
In this post, I create a stress-free AWS invoice PDF administration workflow with Microsoft Power Automate.
Table of Contents
- Introduction
- Manual Solution
- Microsoft Power Automate
- Creating A Power Automate Flow
- Testing
- Summary
Introduction
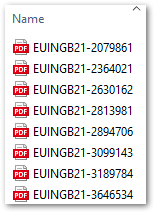
Each month, AWS sends me VAT invoices for all of my AWS accounts. Their filenames aren’t descriptive, with names like EUINGB21-2079861, EUINGB22-3276756 and EUINGB23-2216483. As a result, I rename them to make the contents clearer.
Now while I have the best intentions in the world, life happens and the PDFs usually end up in a to-do folder. As a result, I now have a folder like this:
I don’t want to sort through that. No one wants to sort through that. There must be another way! After successfully automating my application management with Winget, I’m keen to see what options I have here.
Firstly, let’s examine what currently happens with my new AWS invoice PDFs.
Manual Solution
This section examines my manual AWS invoice PDF workflow.
Here are several sample AWS invoices for reference. Although they’re from 2018, the 2023 bills are mostly the same. Let’s focus on a document header:
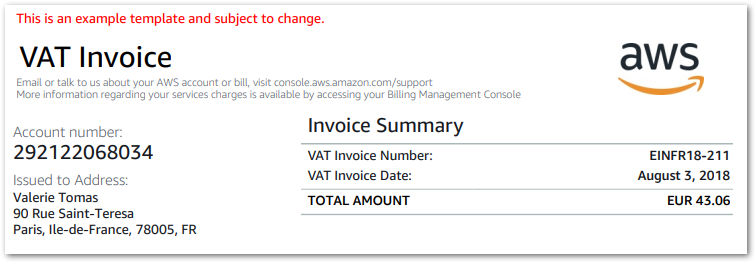
I copy the account number and VAT invoice date from a bill and combine them with some extra strings to produce a filename schema of:
AWS-{VAT Invoice Date}-{Account Number}-VATInvoice
In this example, that would produce:
AWS-2018-08-03-292122068034-VATInvoice
There are several pain points here:
- The PDF must be opened to view the data.
- The invoice date needs converting to ISO 8601 standard.
- An open file can’t be renamed, so the new filename must be created in Notepad and then copy/pasted over.
- Everything is manual and needs my full attention.
Wouldn’t it be nice if all this could be automated?
Microsoft Power Automate
This section examines Microsoft Power Automate and how it works.
What Is Power Automate?
Microsoft Power Automate is an automation tool. It uses triggers and actions to create workflows that complete manual, repetitive, and time-consuming tasks without human involvement. Power Automate is part of the Microsoft Power Platform.
Benefits of Power Automate include:
- A no-code GUI with drag-and-drop functionality.
- An extensive library of pre-defined templates.
- Onboard testing and deployment features.
- A free plan for work or school accounts.
- Integration with the other Power Platform applications, Office 365 and other Microsoft and third-party services.
Power Automate Versions
Power Automate has two versions:
- Power Automate Service focuses on cloud flows like webhooks, event busses and social media activity.
- Power Automate Desktop focuses on desktop flows like file & folder manipulation, user input and script triggering. I’ll be using Power Automate Desktop in this post.
It’s worth pointing out that there are several visual differences between the two versions. This confused me when researching this post, as most screenshots I found were from the cloud service!
Power Automate Flows
Central to Power Automate is the concept of Flows. A Power Automate flow is a sequence of actions that are triggered by an event, performing a series of operations to achieve the desired results.
Flows are created through a visual interface that defines triggers, actions, and conditions using a drag-and-drop approach. Code can be written, but is optional. Completed flows can then be saved, published and run as needed.
Creating A Power Automate Flow
In this section, I create my AWS invoice Power Automate flow.
Getting All Files In The Folder
Firstly, I capture the AWS invoice PDFs using the Get Files In Folder action:

Here, I specify the folder containing the invoices. I tell Power Automate to only get PDF files, to stop any other file types causing errors.
Power Automate stores a list of these files in a %Files% variable. I want to work on each file separately, so I pass the %Files% variable to a For Each action:

This creates a loop that lets Power Automate capture each file in the %Files% variable. Each time the For Each action triggers, Power Automate stores a file from %Files% in a new %CurrentItem% variable.
Each subsequent action within the loop will then be applied to the %CurrentItem% file. At the end of the loop, Power Automate captures the next file from %Files% and overwrites the %CurrentItem% variable with it. This continues until all %Files% files are processed and the loop ends.
Getting The PDF Text
Secondly, I need to get the text from each %CurrentItem% PDF. There’s a great Extract Text From PDF action that can do this:

The PDF text is stored in an %ExtractedPDFText% variable that is going to be very useful for the rest of this flow!
So far, the flow looks like this:
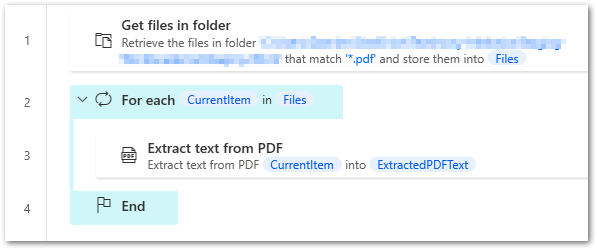
With the PDF text captured, the rest of the automation can begin!
Getting The Account Number
Next, let’s examine the PDF text more closely. This is part of %ExtractedPDFText% for an AWS invoice:
VAT Invoice
Email or talk to us about your AWS account or bill, visit console.aws.amazon.com/support
More information regarding your service charges is available by accessing your Billing Management Console
Account number:
[REDACTED]
Address:
[REDACTED]
Invoice Summary
VAT Invoice Number: EUINGB22-3617620
VAT Invoice Date: September 2, 2022
TOTAL AMOUNT GBP 0.34
On AWS invoices, the account number is always between ‘Account number:’ and ‘Address:’. Knowing this, I can use Crop Text to get the text between these strings:

This action produces two new variables:
%CroppedText%%IsFlagFound%
Usually, these names would be fine. This isn’t the only text I’m going to be cropping though, so I change these to %AWSAccNoCroppedText% and %AWSAccNoIsFlagFound% respectively.
Before continuing, I’d like to check that %AWSAccNoCroppedText% contains the expected value. A good way to test this is to use the Display Message action:
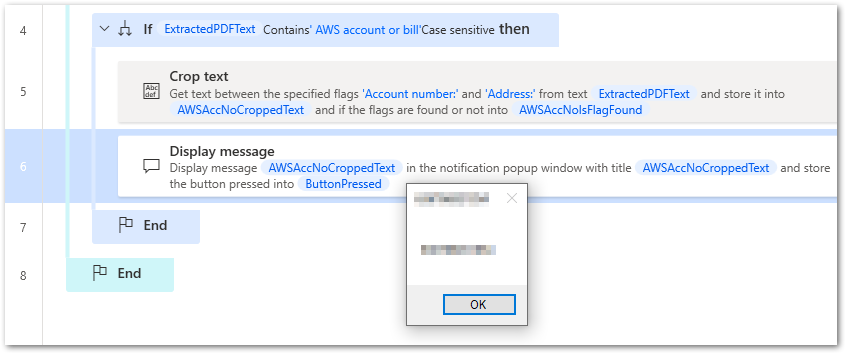
(The account number is obfuscated here, but it was correct!)
Getting The Invoice Date
Now to get the invoice date! This is similar to getting the account number, using Crop Text to capture the date between ‘VAT Invoice Date:’ and ‘TOTAL AMOUNT’:

This produces variables %CroppedText% and %IsFlagFound% again, which I then change to %AWSBillDateCroppedText% and %AWSBillDateIsFlagFound%.
This isn’t enough this time though. Currently, the %AWSBillDateCroppedText% value is a date formatted as August 3, 2018. This won’t produce the filename I want, as I need the date to be in the ISO format of 2018-08-03.
To do this, I use the Convert Text To Datetime action. This converts a text representation of a date value to a datetime value:

I supply %AWSBillDateCroppedText% to convert. A datetime value of 03/08/2018 00:00:00 is returned, which I then assign to a %AWSBillDateTextAsDateTime% variable.
This is still unacceptable though! The date format doesn’t match the requirement and the slashes and colons are not legal filename characters.
To get the required date format, I use the Convert Datetime to Text action to convert 03/08/2018 00:00:00 to the custom format yyyy-MM-dd, in which:
yyyyis the year as a four-digit number.MMis the month as a two-digit number, from 01 through 12.ddis the day of the month as a two-digit number, from 01 through 31.-is…a hyphen.

There is a table describing the custom date and time format specifiers in the Microsoft documentation.
This action produces a %AWSBillDateFormattedDateTime% variable with a value of 2018-08-03. Success!
Creating The New Filename
Now I can start thinking about the filename! To recap, I currently have:
- A
%AWSAccNoCroppedText%variable with a value of (for example) 1234123412341234. - A
%AWSBillDateFormattedDateTime%variable with a value of 2018-08-03.
To create the filename, I need to combine my variables with some additional strings. For this, I use the Set Variable action to create a %AWSFilename% variable with the following value:
AWS-%AWSBillDateFormattedDateTime%-%AWSAccNoCroppedText%-VATInvoiceThis breaks down to:
AWS-string- The
%AWSBillDateFormattedDateTime%variable - A hyphen:
- - The
%AWSAccNoCroppedText%variable -VATInvoicestring
This should produce a string like AWS-2018-08-03-123456781234-VATInvoice. However, this was %AWSFilename%‘s initial output:
AWS-2018-08-03-
123456781234
-VATInvoice
This is unacceptable as a filename, but why is it happening?
It turns out that the Crop Text action capturing the account number is also capturing the line breaks on either side of it. I remove these with the Trim Text action:
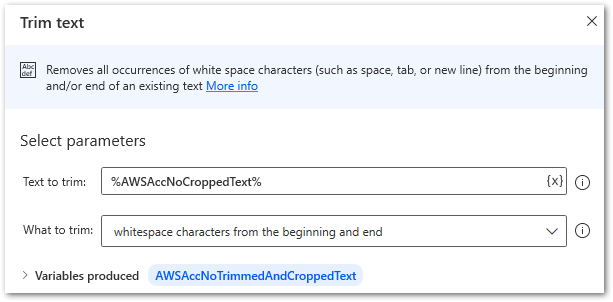
This creates a new %AWSAccNoTrimmedAndCroppedText% variable. Replacing %AWSAccNoCroppedText% with this new variable when setting the %AWSFilename% variable produces the required output:
AWS-2018-08-03-123456781234-VATInvoiceThe %AWSFilename% variable can then be used by the Rename File(s) action to rename the file assigned to %CurrentItem% by the earlier For Each action:

The updated file is assigned to a %AWSRenamedFiles% variable, which I use in the final part of the loop.
Moving The File
I usually move renamed invoices to a different path manually. I might as well add this process to my Power Automate flow since it will save me even more time!
Here, I move the file assigned to the %AWSRenamedFiles% variable to my destination folder using the Move File(s) action:

This is the last action in the loop. Or at least it was, until I reviewed the flow and identified a few improvements.
Enhancements
Originally, this AWS invoice Power Automate flow was just for AWS invoices. However, with some additional Power Automate actions the flow could easily extend to other kinds of invoices. This would allow one flow to administrate multiple invoice types instead of each type needing its own flow.
To begin, I limit the scope of the flow’s actions by adding an If action inside the For Each loop. It will now only apply the AWS invoice flow actions if %ExtractedPDFText% contains the string ‘AWS account or bill’:
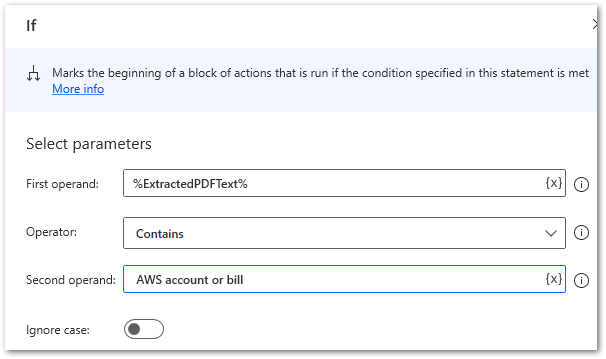
Non-AWS invoices will not meet this condition, and will not be mislabeled by the flow or cause the flow to fail.
So what will happen to non-AWS invoices then? Currently, they’ll just be left in the source folder. Ideally, something should happen to them too, so let’s add a dead letter queue to the flow.
I add two new actions to the very end of the flow, positioned after the For Each loop has processed each file in the source folder:

Both actions have already been used in this flow, but this time their focus has changed. By the time Power Automate reaches these actions, all files in the source folder will have gone through the For Each loop.
At this point, one of two sequences has happened:
- The file did meet the AWS invoice condition, is renamed and then moved to the destination folder.
- The file didn’t meet the AWS invoice condition and is still in the source folder.
So the only files now in the source folder are not AWS invoices.
The Get File In Folder action will get these files and store them in a %DLQFiles% variable. This is then passed to the Move File(s) action, which moves the unprocessed files to a PowerAutomateDLQ folder.
The end result is that:
- The source folder is empty.
- AWS invoices are renamed and then moved to the destination folder.
- Any other files are moved to the PowerAutomateDLQ folder.
So, does it all work?
Testing
This section tests my AWS invoice Power Automate flow.
I put three files into the source folder and then ran the Power Automate flow:
- A DALL-E
PNG. - An AWS invoice
PDF. - A utility bill
PDF.
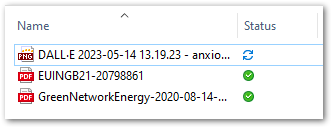
The AWS invoice is renamed and then moved to the destination folder:

The remaining files are unaltered and moved to the DLQ folder.
The flow also works far faster than my manual workflow. The old process – from opening the PDF to moving the renamed folder – took about 2 minutes each on average. Conversely, the flow processed 12 files in 2 seconds – this would have taken me 24 minutes!
Summary
In this post, I created a stress-free AWS invoice PDF administration workflow with Microsoft Power Automate.
I’m very impressed by Power Automate! It can certainly save me a ton of time with tasks I currently do, and with other actions like the ability to run Powershell and Python scripts, execute SQL statements and emulate the terminal, I feel like I haven’t even scratched the surface yet!
If this post has been useful, please feel free to follow me on the following platforms for future updates:
Thanks for reading ~~^~~