AWS Billing and Cost Management is a web service that provides features that helps you pay your bills and optimize your costs. Amazon Web Services bills your account for usage, which ensures that you pay only for what you use.
The data_wordpressapi_raw function gets data from the WordPress API and stores it as CSV objects in Amazon S3. The data_wordpressapi_bronze function transforms these objects to Parquet and stores them in a separate bucket. If either function fails, AWS SNS publishes an alert.
While this process works fine, the extracted data is not currently utilized. To derive value from this data, I need to consider transforming it. Several options are available, such as:
Here, I’ve chosen to use AWS Glue. As a fully managed ETL service, Glue automates various data processes in a low-code environment. I’ve not written much about it, so it’s time that changed!
Firstly, I’ll examine AWS Glue and some of its concepts. Next, I’ll create some Glue resources that interact with my WordPress S3 objects. Finally, I’ll integrate those resources into my existing Step Function workflow and examine their costs.
Let’s begin with some information about AWS Glue.
AWS Glue Concepts
This section explores AWS Glue and some of its data discovering features.
AWS Glue
From the AWS Glue User Guide:
AWS Glue is a serverless data integration service that makes it easy for analytics users to discover, prepare, move, and integrate data from multiple sources. You can use it for analytics, machine learning, and application development. It also includes additional productivity and data ops tooling for authoring, running jobs, and implementing business workflows.
An AWS Glue Data Catalog is a managed repository serving as a central hub for storing metadata about data assets. It includes table and job definitions, and other control information for managing an AWS Glue environment. Each AWS account has a dedicated AWS Glue Data Catalog for each region.
The Data Catalog stores information as metadata tables, with each table representing a specific data store and its schema. Glue tables can serve as sources or targets in job definitions. Tables are organized into databases, which are logically grouped collections of related table definitions.
Each table contains column names, data type definitions, partition information, and other metadata about a base dataset. Data Catalog tables can be populated either manually or using Glue Crawlers.
Glue Crawler
A Glue Crawler connects to a data store, analyzes and determines its schema, and then creates metadata tables in the AWS Glue Data Catalog. They can run on-demand, be automated by services like Amazon EventBridge Scheduler and AWS Step Functions, and be started by AWS Glue Triggers.
An activated Glue Crawler performs the following processes on the chosen data store:
Firstly, data within the store is classified to determine its format, schema and properties.
Secondly, data is grouped into tables or partitions.
Finally, the Glue Data Catalog is updated. Glue creates, updates and deletes tables and partitions, and then writes the metadata to the Data Catalog accordingly.
Now let’s create a Glue Crawler!
Creating A Glue Crawler
In this section, I use the AWS Glue console to create and run a Glue Crawler for discovering my WordPress data.
Crawler Properties & Sources
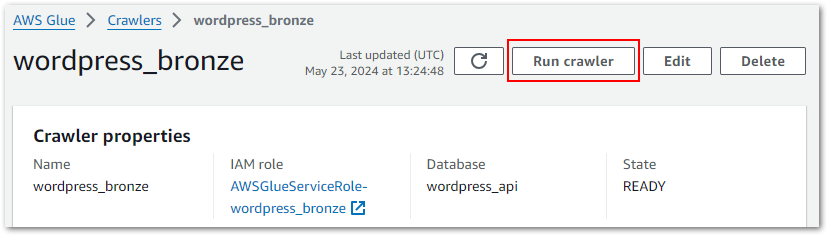
There are four steps to creating a Glue Crawler. Step One involves setting the crawler’s properties. Each crawler needs a name and can have optional descriptions and tags. This crawler’s name is wordpress_bronze.
Step Two sets the crawler’s data sources, which is greatly influenced by whether the data is already mapped in Glue. If it is then the desired Glue Data Catalog tables must be selected. Since my WordPress data isn’t mapped yet, I need to add the data sources instead.
My Step Function workflow puts the data in S3, so I select S3 as my data source and supply the path of my bronze S3 bucket’s wordpress_api folder. The crawler will process all folders and files contained in this S3 path.
Finally, I need to configure the crawler’s behaviour for subsequent runs. I keep the default setting, which re-crawls all folders with each run. Other options include crawling only folders added since the last crawl or using S3 Events to control which folders to crawl.
Classifiers are also set here but are out of scope for this post.
Crawler Security & Targets
Step Three configures security settings. While most of these are optional, the crawler needs an IAM role to interact with other AWS services. This role consists of two IAM policies:
A customer-managed policy with s3:GetObject and s3:PutObject actions allowed on the S3 path given in Step Two.
This role can be chosen from existing roles or created with the crawler.
Step Four begins with setting the crawler’s output. The Crawler creates new tables, requiring the selection of a target database for these tables. This database can be pre-existing or created with the crawler.
An optional table name prefix can also be set, which enables easy table identification. I create a wordpress_api database in the Glue Data Catalog, and set a bronze- prefix for the new tables.
The Crawler’s schedule is also set here. The default is On Demand, which I keep as my Step Function workflow will start this crawler. Besides this, there are choices for Hourly, Daily, Weekly, Monthly or Custom cron expressions.
Advanced options including how the crawler should handle detected schema changes and deleted objects in the data store are also available in Step Four, although I’m not using those here.
And with that, my crawler is ready to try out!
Running The Crawler
My crawler can be tested by accessing it in the Glue console and selecting Run Crawler:
The crawler’s properties include run history. Each row corresponds to a crawler execution, recording data including:
AWS stores the logs in an aws-glue/crawlersCloudWatch Log Group, in which each crawler has a dedicated log stream. Logs include messages like the crawler’s configuration settings at execution:
Crawler configured with Configuration
{
    "Version": 1,
    "CreatePartitionIndex": true
}
 and SchemaChangePolicy
{
    "UpdateBehavior": "UPDATE_IN_DATABASE",
    "DeleteBehavior": "DEPRECATE_IN_DATABASE"
}
And details of what was changed and where:
Table bronze-statistics_pages in database wordpress_api has been updated with new schema
Checking The Data Catalog
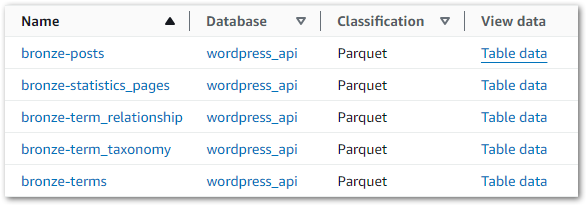
So what impact has this had on the Data Catalog? Accessing it and selecting the wordpress_api database now shows five tables, each matching S3 objects created by the Step Functions workflow:
Data can be viewed by selecting Table Data on the desired row. This action executes an Athena query, triggering a message about the cost implications:
You will be taken to Athena to preview data, and you will be charged separately for Athena queries.
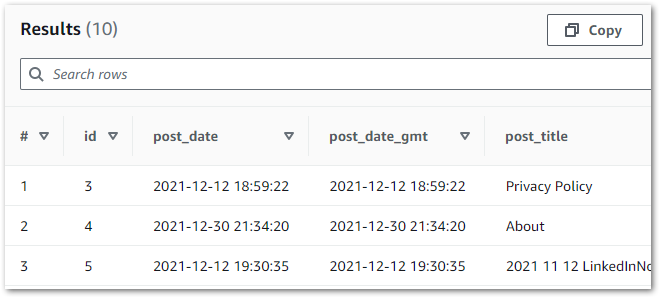
If accepted, Athena generates and executes a SQL query in a new tab. In this example, the first ten rows have been selected from the wordpress_api database’s bronze-posts table:
When this query is executed, Athena checks the Glue Data Catalog for the bronze-posts table in the wordpress_api database. The Data Catalog provides the S3 location for the data, which Athena reads and displays successfully:
Now that the crawler works, I’ll integrate it into my Step Function workflow.
Crawler Integration & Costs
In this section, I integrate my Glue Crawler into my existing Step Function workflow and examine its costs.
Architectural Diagrams
Let’s start with some diagrams. This is how the crawler will behave:
While updating the crawler’s wordpress_bronze CloudWatch Log Stream throughout:
The wordpress_bronze Glue Crawler crawls the bronze S3 bucket’s wordpress-api folder.
The crawler updates the Glue Data Catalog’s wordpress-api database.
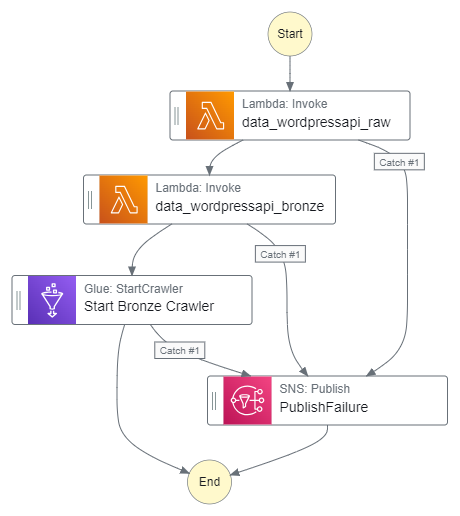
This is how the Crawler will fit into my existing Step Functions workflow:
While updating the workflow’s CloudWatch Log Group throughout:
An EventBridge Schedule executes the Step Functions workflow.
Run Succeeds: Update Glue Data Catalog. Workflow ends.
An SNS message is published if the Step Functions workflow fails.
Step Function Integration
Time to build! Let’s begin with the crawler’s requirements:
The crawler must only run after both Lambda functions.
It must also only run if both functions invoke successfully first.
If the crawler fails it must alert via the existing PublishFailure SNS topic.
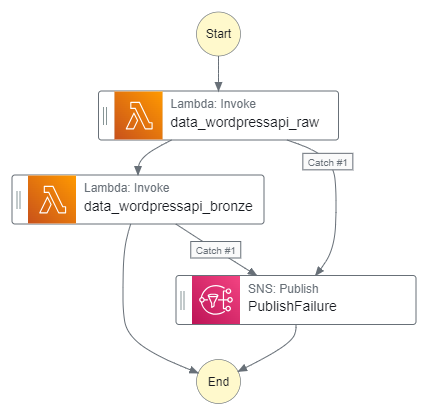
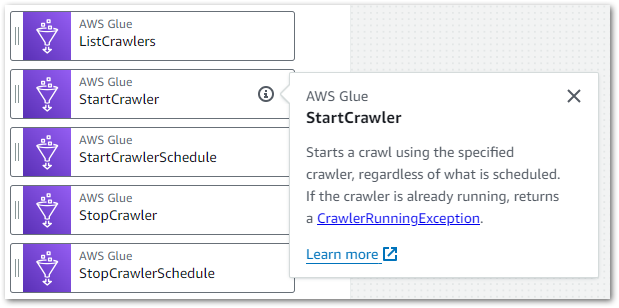
This requires adding an AWS Glue: StartCrawler action to the workflow after the second AWS Lambda: Invoke action:
This action differs from the ones I’ve used so far. The existing actions all use optimized integrations that provide special Step Functions workflow functionality.
Conversely, StartCrawler uses an SDK service integration. These integrations behave like a standard AWS SDK API call, enabling more fine-grained control and flexibility than optimised integrations at the cost of needing more configuration and management.
Here, the Step Functions StartCrawler action calls the Glue API StartCrawler action. After adding it to my workflow, I update the action’s API parameters with the desired crawler’s name:
JSON
{"Name": "wordpress_bronze"}
Next, I update the action’s error handling to catch all errors and pass them to the PublishFailure task. These actions produce these additions to the workflow’s ASL code:
Additionally, the fully updated Step Functions workflow ASL script can be viewed on my GitHub.
Finally, I need to update the Step Function workflow IAM role’s policy so that it can start the crawler. This involves allowing the glue:StartCrawler action on the crawler’s ARN:
My Step Functions workflow is now orchestrating the Glue Crawler, which will only run once both Lambda functions are successfully invoked. If either function fails, the SNS topic is published and the crawler does not run. If the crawler fails, the SNS topic is published. Otherwise, if everything runs successfully, the crawler updates the Data Catalog as needed.
So how much does discovering data with AWS Glue cost?
Glue Costs
This is from AWS Glue’s pricing page for crawlers:
There is an hourly rate for AWS Glue crawler runtime to discover data and populate the AWS Glue Data Catalog. You are charged an hourly rate based on the number of Data Processing Units (or DPUs) used to run your crawler. A single DPU provides 4 vCPU and 16 GB of memory. You are billed in increments of 1 second, rounded up to the nearest second, with a 10-minute minimum duration for each crawl.
$0.44 per DPU-Hour, billed per second, with a 10-minute minimum per crawler run
With the AWS Glue Data Catalog, you can store up to a million objects for free. If you store more than a million objects, you will be charged $1.00 per 100,000 objects over a million, per month. An object in the Data Catalog is a table, table version, partition, partition indexes, statistics or database.
The first million access requests to the Data Catalog per month are free. If you exceed a million requests in a month, you will be charged $1.00 per million requests over the first million. Some of the common requests are CreateTable, CreatePartition, GetTable , GetPartitions, and GetColumnStatisticsForTable.
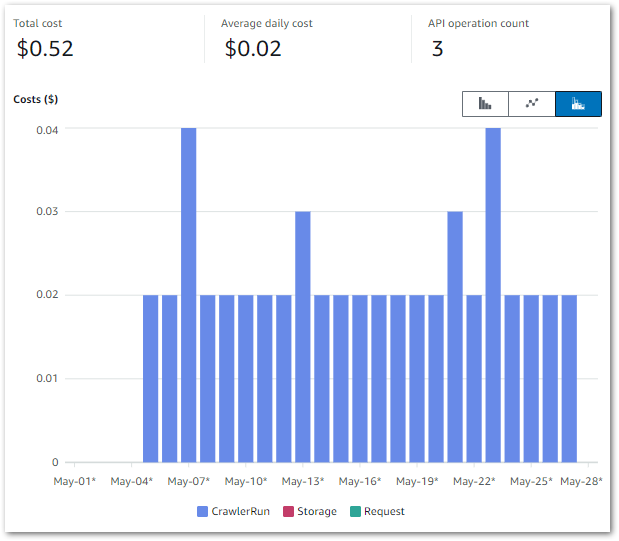
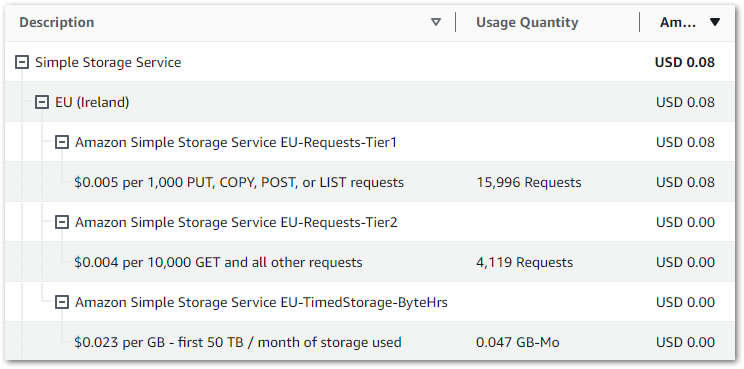
So how does this relate to my workflow? The below Cost Explorer chart shows my AWS Glue API costs from 01 May to 28 May. Only the CrawlerRun API operation has generated charges, with a daily average of $0.02:
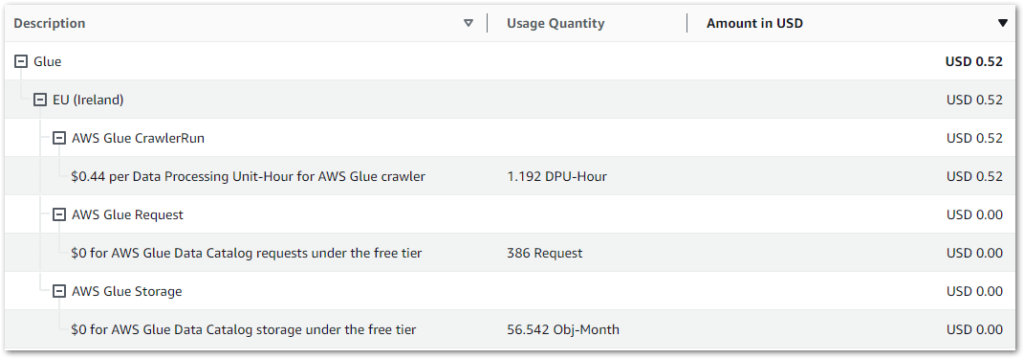
My May 2024 AWS bill shows further details on the requests and storage items. The Glue Data Catalog’s free tier covers my usage:
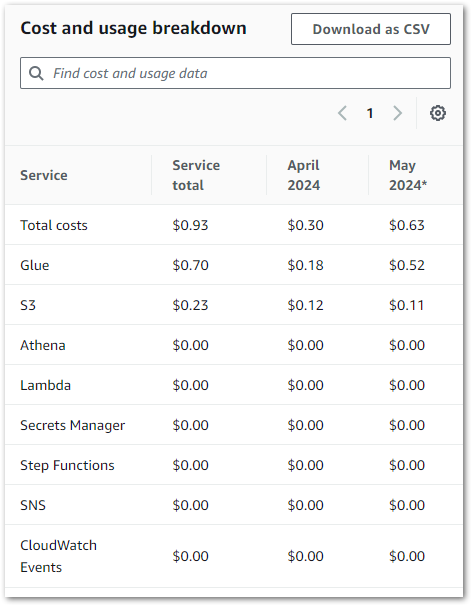
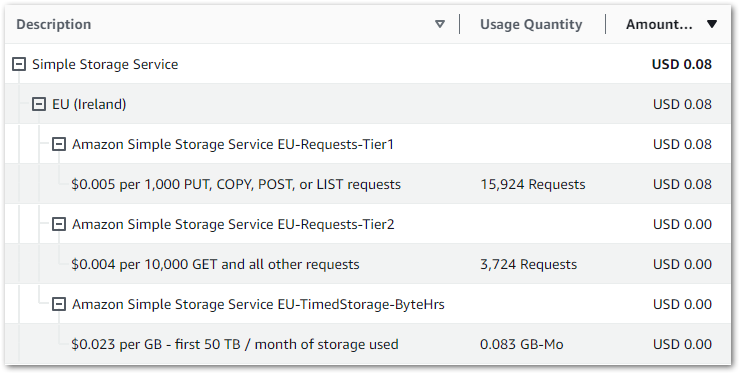
Finally, let’s review the entire pipeline’s costs for April and May. Besides Glue, my only other cost remains S3:
Summary
In this post, I used the data discovering features of AWS Glue to crawl and catalogue my WordPress API pipeline data.
Glue’s native features and integration with other AWS services make it a great fit for my WordPress pipeline’s pending processes. I’ll be using additional Glue features in future posts, and wanted to spotlight the Data Catalog early on as it’ll become increasingly helpful as my use of AWS Glue increases.
If this post has been useful then the button below has links for contact, socials, projects and sessions:
Now, I want to transform the data from semi-structured raw JSON into a more structured and query-friendly ‘bronze’ format to prepare it for downstream partitioning, cleansing and filtration.
Firstly, I’ll cover the additions and changes to my pipeline architecture. Next, I’ll examine both my new bronze Python function and the changes made to the existing raw function.
Finally, I’ll deploy the bronze script to AWS Lambda and create my WordPress pipeline orchestration process with AWS Step Functions. This process will ensure both Lambdas run in a set order each day.
Let’s start by examining my latest architectural decisions.
Architectural Decisions
In this section, I examine my architectural decisions for the bronze AWS Lambda function and the WordPress pipeline orchestration. Note that these decisions are in addition to my previous ones here and here.
AWS SDK For pandas used to be called awswrangler until AWS renamed it for clarity. It now exists as AWS SDK For pandasin documentation and awswranglerin code.
AWS Lambda Layers
A Lambda layer is an archive containing code like libraries, dependencies, or custom runtimes. Layers can be both created manually and provided by AWS and third parties. Each Lambda function can include up to five layers.
Layers can be shared between functions, reducing code duplication and package sizes. This reduces storage costs and lets the smaller packages deploy markedly faster. Layers also separate dependencies from function code, supporting decoupling and separation of concerns.
AWS Step Functions
AWS Step Functions is a serverless orchestration service that integrates with other AWS services to build application workflows as a series of event-driven steps. For example, chaining Athena queries and ML model training.
Central to the Step Functions service are the concepts of States and State Machines:
States represent single steps or tasks in a workflow, and can be one of several types. The Step Functions Developer Guide has a full list of states.
Onto the data architecture! Let’s start by choosing a structured file type for the bronze data:
Apache Parquet is an open source, column-oriented data file format designed for efficient data storage and retrieval. It provides efficient data compression and encoding schemes with enhanced performance to handle complex data in bulk.
There’s a more detailed explanation in the Parquet documentation too. So why choose Parquet over something like CSV? Well:
Size: Parquet supports highly efficient compression, so files take up less space and are cheaper to store than CSVs.
Performance: Parquet files store metadata about the data they hold. Query engines can use this metadata to find only the data needed, whereas with CSVs the whole file must be read first. This reduces the amount of processed data and enhances query performance.
Compatibility: Parquet is an open standard supported by various data processing frameworks including Apache Spark, Apache Hive and Presto. This means that data stored in Parquet format can be read and processed across many platforms and services.
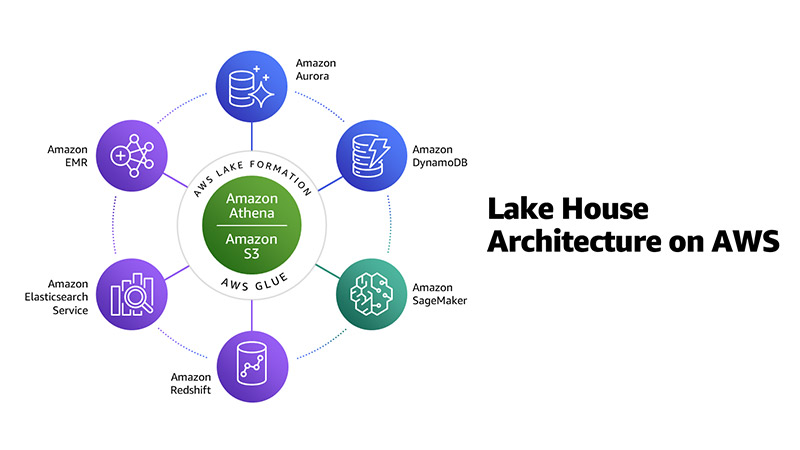
Data Lakehouse
A Data Lakehouse is an emerging data architecture combining the centralized storage of raw data synonymous with Data Lakes with the transactional and analytical processing associated with Data Warehouses.
The result is a unified platform for efficient data management, analytics, and insights. Lakehouses have gained popularity as cloud services increasingly support them, with AWS, Azure and GCP all providing Lakehouse services.
This segues neatly into…
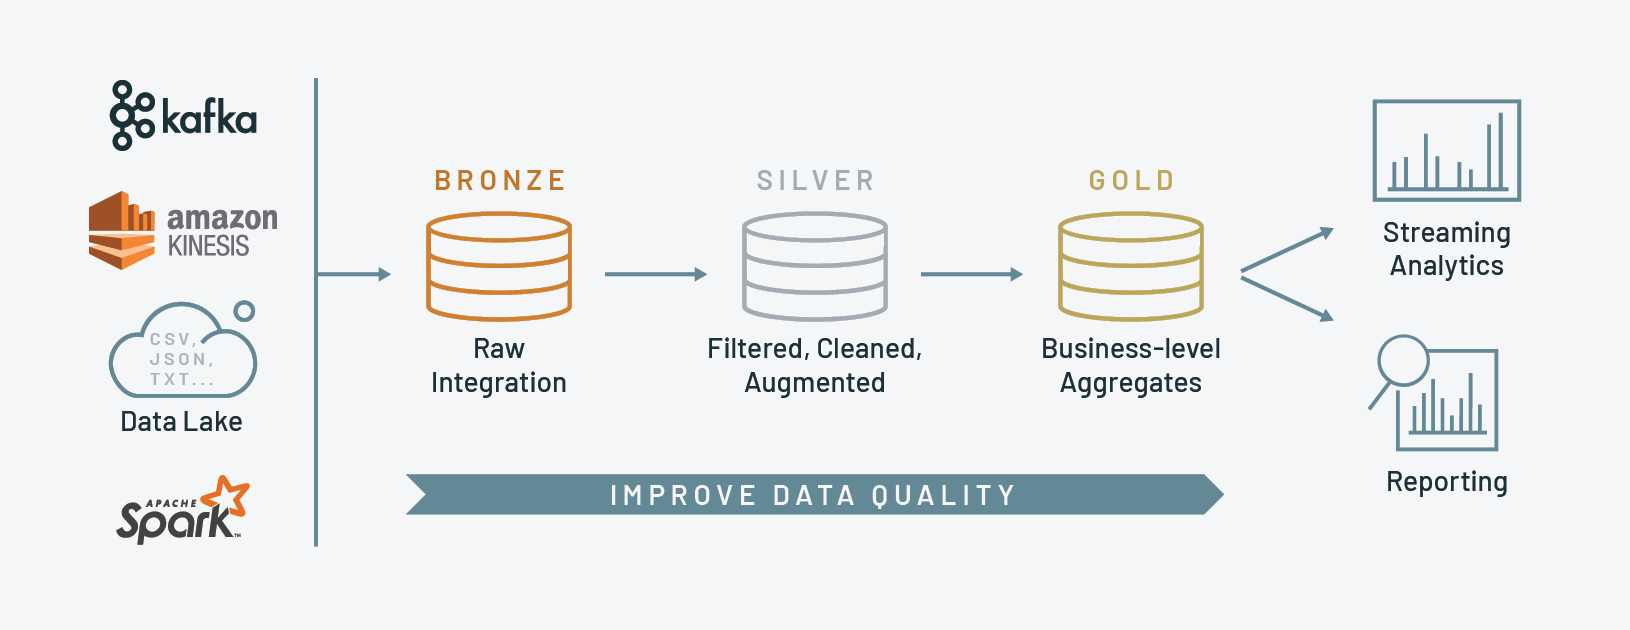
Medallion Architecture
A Medallion Architecture is a data design pattern for logically organizing data in a Lakehouse. It aims to improve data quality as it flows through various layers incrementally. Names for these layers vary, tending to be Bronze, Silver, and Gold.
Implementations of the Medallion Architecture also vary. I like this Advancing Analytics video, which maps the Medallion Architecture to their approach. Despite the title it’s not a negative video, instead outlining how the three layers don’t necessarily fit every use case.
I’m using Raw and Bronze layers here because they best fit what I’m doing with my data.
Architectural Updates
In this section, I examine the changes made to my existing architecture.
Amazon S3
I’ve created a new data-lakehouse-bronze s3 bucket in the same region as the data-lakehouse-raw bucket to separate the two data layers.
Why use two buckets instead of one bucket with two prefixes? Well, after much research I’ve not found a right or wrong answer for this. There’s no difference in cost, performance or availability as long as all objects are stored in the same AWS region.
I chose two buckets because I find it easier to manage multiple buckets with flat structures and small bucket policies, as opposed to single buckets with deep structures and large bucket policies.
The truest answer is ‘it depends’, as other factors can come into play like:
Data Sovereignty: S3 bucket prefixes exist in the same region as the parent bucket. Regulations like GDPR and CCPA may require using separate buckets in order to isolate data within designated locations.
Firstly, there’s now an additional failure-stepfunction topic for any state machine failures.
Secondly, I’ve replaced my wordpress-api-raw topic with a data-lakehouse-raw topic to simplify my alerting channels and allow resource reuse. I’ve also created a new data-lakehouse-bronze topic for bronze process alerts.
Why two data topics? Well, different teams and services care about different things. A bronze-level failure may only concern the Data Engineering team as no other teams consume the data. Conversely, a gold-level failure will concern the AI and MI teams as it impacts their models and reports. Having separate SNS topics for each layer type enables granular monitoring controls.
AWS Parameter Store
Finally, Parameter Store needs the new S3 bucket name and SNS ARNs. I’ve replaced the /sns/pipeline/wordpressapi/raw parameter with /sns/data/lakehouse/raw to preserve the name schema.
I’m now storing five parameters:
2x S3 Bucket names (Raw and Bronze)
2x SNS Topic ARNs (Raw and Bronze notifications)
WordPress API Endpoints (unchanged)
Architectural Diagram
There are two diagrams this time! Firstly, here is the data_wordpressapi_bronze AWS Lambda function:
Where:
AWS Lambda calls Parameter Store for S3 and SNS parameters. Parameter Store returns these to AWS Lambda.
Lambda function gets raw WordPress JSON data from S3 Raw Bucket.
Lambda function transforms the raw WordPress JSON data to bronze WordPress Parquet data and puts the new object in the S3 Bronze Bucket.
Meanwhile, Lambda is writing to a CloudWatch Log Group throughout its invocation. If there’s a failure, the Lambda function publishes a message to an SNS topic. SNS then delivers this message to the user’s subscribed email address.
Next, this is the AWS Step Functions WordPress bronze orchestration process:
The State Machine also has its own logging and alerting channels.
Python
In this section, I work on my raw and bronze Python scripts for the WordPress pipeline orchestration process.
Raw Script Updates
I try to update my existing resources when I find something pertinent online. My latest find was this Indently video that covers, amongst other things, type annotations:
So how are type annotations different from type hints? Type annotations were released in 2006 and aimed to standardize function parameters and return value annotation. Type hints (released in 2014) then added updated definitions and conventions to enrich type annotations further.
The type hints PEP shows this difference between the two:
When used in a type hint, the expression None is considered equivalent to type(None)
name: str is an example of type annotation because the parameter name is of type string.
-> None is an example of a type hint because although None isn’t a type, it confirms that the function has no output.
So what’s changed in my raw script?
Updated Import & Functions
Let’s open with a new import:
Python
from botocore.client import BaseClient
BaseClient serves as a foundational base class for AWS service clients within botocore – a low-level library providing the core functionality of boto3 (the AWS Python SDK) and the AWS CLI.
I’m using it here to add type annotations to my boto3 clients. For example, send_sns_message already had these annotations:
I’ve now annotated sns_client with BaseClient to indicate its boto3 relation. I’ve also added a -> None type hint to confirm the function has no output:
put_s3_object also has new prefix and suffix parameters. Before this, it was hard-coded to create JSON objects in a wordpress-api S3 prefix:
Python
try: logging.info(f"Attempting to put {name} data in {bucket} bucket...") s3_client.put_object(Body= json_data,Bucket= bucket,Key=f"wordpress-api/{name}.json" )
Not any more! The S3 prefix and object suffix can now be changed dynamically:
Python
try: logging.info(f"Attempting to put {name} data in {bucket} bucket's {prefix}/{name} prefix...") s3_client.put_object(Body= json_data,Bucket= bucket,Key=f"{prefix}/{name}/{name}.{suffix}" )
This improves put_s3_object‘s reusability as I can now pass any prefix and suffix to it during a function call. For example, this call creates a JSON object:
Python
ok = put_s3_object(client_s3, s3_bucket, data_source, object_name, api_json_string, 'json')
While this creates a CSV object:
Python
ok = put_s3_object(client_s3, s3_bucket, data_source, object_name, api_json_string, 'csv')
Likewise, this creates a TXT object:
Python
ok = put_s3_object(client_s3, s3_bucket, data_source, object_name, api_json_string, 'txt')
I can also set data_source (which I’ll cover shortly) to any S3 prefix, giving total control over where the object is stored.
Updated Variables
Next, some of my variables need to change. My SNS parameter name needs updating from:
Python
# AWS Parameter Store Namesparametername_s3bucket ='/s3/lakehouse/name/raw'parametername_snstopic ='/sns/pipeline/wordpressapi/raw'parametername_wordpressapi ='/wordpress/amazonwebshark/api/mysqlendpoints'
To:
Python
# AWS Parameter Store Namesparametername_s3bucket ='/s3/lakehouse/name/raw'parametername_snstopic ='/sns/data/lakehouse/raw'parametername_wordpressapi ='/wordpress/amazonwebshark/api/mysqlendpoints'
I also need to lay the groundwork for put_s3_object‘s new prefix parameter. I used to have a lambdaname variable that was used in the logs:
Python
# Lambda name for messageslambdaname ='data_wordpressapi_raw'
I’ve replaced this with two new variables. data_source records the data’s origin, which matches my S3 prefix naming schema. function_name then adds context to data_source to match my Lambda function naming schema:
Python
# Lambda name for messagesdata_source ='wordpress_api'function_name =f'data_{data_source}_raw'
data_source is then passed to the put_s3_object function call when creating raw objects:
Python
ok = put_s3_object(client_s3, s3_bucket, data_source, object_name, api_json_string)
While function_name is used in the logs when referring to the Lambda function:
Python
# Check an S3 bucket has been returned.ifnot s3_bucket_raw: message =f"{function_name}: No S3 Raw bucket returned." subject =f"{function_name}: Failed"
Updated Script Body
My variables all now have type annotations. They’ve gone from:
Python
# AWS Parameter Store Names parametername_s3bucket ='/s3/lakehouse/name/raw' parametername_snstopic ='/sns/data/lakehouse/raw' parametername_wordpressapi ='/wordpress/amazonwebshark/api/mysqlendpoints'# Lambda name for messages data_source ='wordpress_api' function_name =f'data_{data_source}_raw'# Counters api_call_timeout =30 endpoint_count_all =0 endpoint_count_failure =0 endpoint_count_success =0
To:
Python
# AWS Parameter Store Names parametername_s3bucket: str='/s3/lakehouse/name/raw' parametername_snstopic: str='/sns/data/lakehouse/raw' parametername_wordpressapi: str='/wordpress/amazonwebshark/api/mysqlendpoints'# Lambda name for messages data_source: str='wordpress_api' function_name: str=f'data_{data_source}_raw'# Counters api_call_timeout: int=30 endpoint_count_all: int=0 endpoint_count_failure: int=0 endpoint_count_success: int=0
This is helpful when the variables are passed in from settings files or external services and are not immediately apparent. So a good habit to get into!
Bronze Script
Now let’s talk about the new script, which transforms raw S3 JSON objects into bronze S3 Parquet objects. Both raw and bronze WordPress scripts will then feed into an AWS orchestration workflow.
Reused Raw Functions
The following functions are re-used from the Raw script with no changes:
Here, I want to get each S3 path’s object name. The object name has some important uses:
Using it instead of the full S3 path makes the logs easier to read and cheaper to store.
Using it during bronze S3 object creation ensures consistent naming.
A typical S3 path has the schema s3://bucket/prefix/object.suffix, from which I want object.
This function is a remake of the raw script’s Get Filename function. This time, the source string is an S3 path instead of an API endpoint:
I define a get_objectname_from_s3_path function, which expects a path argument with a string type hint and returns a new string.
Firstly, my name_full variable uses the rsplit method to capture the substring I need, using forward slashes as separators. This converts s3://bucket/prefix/object.suffix to object.suffix.
Next, my name_full_last_period_index variable uses the rfind method to find the last occurrence of the period character in the name_full string.
Finally, my name_partial variable uses slicing to extract a substring from the beginning of the name_full string up to (but not including) the index specified by name_full_last_period_index. This converts object.suffix to object.
If the function cannot return a string, an exception is logged and a blank string is returned instead.
Get Data Function
Next, I want to read data from an S3 JSON object in my Raw bucket and store it in a pandas DataFrame.
Here, I define a get_data_from_s3_object function that returns a pandas DataFrame and expects three arguments:
boto3_session: the authenticated session to use with a BaseClient type hint.
s3_object: the S3 object path with a string type hint.
name: the S3 object name with a string type hint (used for logging).
This function uses AWS SDK For pandass3.read_json to read the data from the S3 object path using the existing boto3_session authentication.
If data is found then get_data_from_s3_object returns a populated DataFrame. Otherwise, an empty DataFrame is returned instead.
Put Data Function
Finally, I want to convert the DataFrame to Parquet and store it in my bronze S3 bucket.
I define a put_s3_parquet_object function that expects four arguments:
df: the pandas DataFrame containing the raw data.
name: the S3 object name.
s3_object_bronze: the S3 path for the new bronze object
session: the authenticated boto3 session to use.
I give string type hints to the name and s3_object_bronze parameters. session gets the same BaseClient hint as before, and df is identified as a pandas DataFrame.
I open a try except block that uses s3.to_parquet with the existing boto3_session to upload the DataFrame data to S3 as a Parquet object. If this operation succeeds, the function returns True. If it fails, a botocore exception is logged and the function returns False.
Imports & Variables
The bronze script has two new imports to examine: awswrangler and pandas:
Python
import loggingimport boto3import botocoreimport awswrangler as wrimport pandas as pdfrom botocore.client import BaseClient
I’ve used both before. Here, pandas handles my in-memory data storage and awswrangler handles my S3 interactions.
There are also parameter changes. I’ve added Parameter Store names for both the bronze S3 bucket and the SNS topic. I’ve kept the raw S3 bucket parameter as awswrangler needs it for the get_data_from_s3_object function.
I’ve also swapped out _rawfor _bronze in function_name, and renamed the counters from endpoint_count to object_count to reflect their new function:
Python
# Lambda name for messages data_source: str='wordpress_api' function_name: str=f'data_{data_source}_bronze'# Counters object_count_all: int=0 object_count_failure: int=0 object_count_success: int=0
Script Body
Most of the bronze script is reused from the raw script. Tasks like logging config, name parsing and validation checks only needed the updated parameters! There are some changes though, as S3 is now my data source and I’m also doing additional tasks.
Firstly, I need to get the raw S3 objects. The AWS SDK For pandas S3 class has a list_objects function which is purpose-built for this:
path is the S3 location to list – in this case the raw S3 bucket’s wordpress_api prefix.
suffix filters the list by the specified suffix.
boto3_session specifies my existing boto3_session to prevent unnecessary re-authentication.
During the loop, my script checks if the pandas DataFrame returned from get_data_from_s3_object contains data. If it’s empty then the loop ends, otherwise the column and row counts are logged:
Python
if df.empty: logging.warning(f"{object_name} DataFrame is empty!") endpoint_count_failure +=1continuelogging.info(f'{object_name} DataFrame has {len(df.columns)} columns and {len(df)} rows.')
Assuming all checks succeed, I want to put a new Parquet object into my bronze S3 bucket. AWS SDK For pandas has an s3.to_parquet function that does this using a pandas DataFrame and an S3 path.
I already have the DataFrame so let’s make the path. This is done by the s3_object_bronze parameter, which joins existing parameters with additional characters. This is then passed to put_s3_parquet_object:
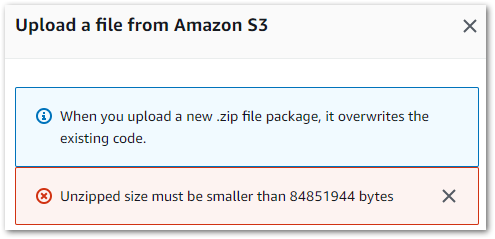
While my zipped raw function is 19.1 MB, my zipped bronze function is over five times bigger at 101.6 MB! My poorly optimised package wouldn’t cut it this time, so I prepared for some pruning. Until I discovered something…
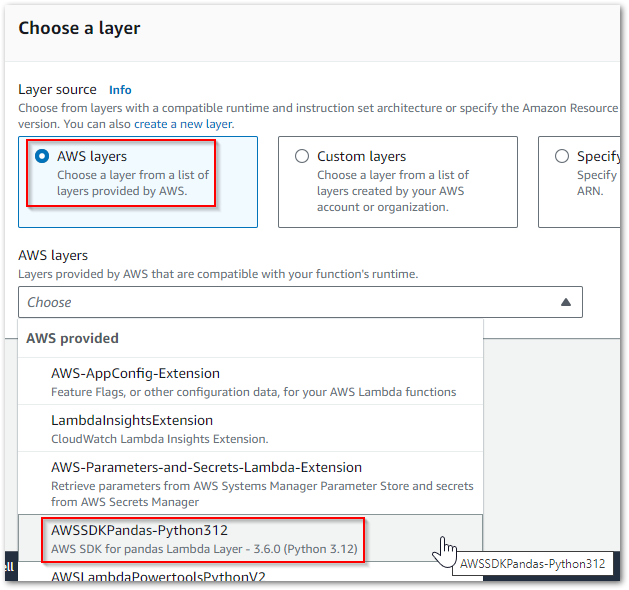
Using A Layer
There’s a managed AWS SDK for pandas Lambda layer!
Additionally, the Lambda Python 3.12 runtime includes boto3 and botocore. So by using this runtime and the managed layer, I’ve gone from a large deployment package to no deployment package! And because my function is now basically just code, I can view and edit that code in the Lambda console directly.
Lambda Config
My Bronze Lambda function borrows several config settings from the raw one, including:
Where it differs is the IAM setup. I needed additional permissions anyway because this function is reading from two S3 buckets now, but by the time I was done the policy was hard to read, maintain and troubleshoot:
Much better! This policy is now far easier to read and update.
There’s also a clear distinction between the bucket-level s3:ListBucket operation and the object-level s3:PutObject and s3:GetObject operations now. Getting these wrong can have big consequences, so the clearer the better!
One deployment and test later, and I have some new S3 objects!
[INFO]: WordPress API Bronze process complete: 5 Successful | 0 Failed.

REPORT RequestId: 899d1658-f7de-4e74-8d64-b4f029fe2bec	Duration: 7108.50 ms	Billed Duration: 7109 ms	Memory Size: 250 MB	Max Memory Used: 250 MB	Init Duration: 4747.38 ms
So now I have two Lambda functions with some requirements around them:
They need to run sequentially.
The Raw Lambda must finish before the Bronze Lambda starts.
If the Raw Lambda fails then the Bronze Lambda shouldn’t run at all.
Now that AWS Lambda is creating WordPress raw and bronze objects, it’s time to start thinking about orchestration!
Step Functions & EventBridge
In this section, I create both an AWS Step Functions State Machine and an Amazon EventBridge Schedule for my WordPress bronze orchestration process.
State Machine Requirements
Before writing any code, let’s outline the steps I need the state machine to perform:
data_wordpressapi_raw Lambda function is invoked. If it succeeds then move to the next step. If it fails then send a notification and end the workflow reporting failure.
data_wordpressapi_bronze Lambda function is invoked. If it succeeds then end the workflow reporting success. If it fails then send a notification and end the workflow reporting failure.
With the states defined, it’s time to create the state machine.
State Machine Creation
The following state machine was created using Step Functions Workflow Studio – a low-code visual designer released in 2021, with drag-and-drop functionality that auto-generates code in real-time:
Workflow Studio produced this section’s code and diagrams.
Firstly I create a data_wordpressapi_rawtask state to invoke my Raw Lambda. This task uses the lambda:invoke action to invoke my data_wordpressapi_raw function. I set the next state as data_wordpressapi_bronze and add a Catch block that sends all errors to a PublishFailure state (which I’ll define later):
Note the TimeoutSeconds parameter. All my task states will have 120-second timeouts. These stop the state machine from waiting indefinitely if the task becomes unresponsive, and are recommended best practice. Also note that state machines wait for Lambda invocations to finish by default, so no additional config is needed for this.
Next, I create a data_wordpressapi_bronze task state to invoke my Bronze Lambda. This task uses the lambda:invoke action to invoke my data_wordpressapi_bronze function. I then add a Catch block that sends all errors to a PublishFailure state.
Finally, "End": true designates this state as a terminal state which ends the execution if the task is successful:
Finally, I create a PublishFailure task state that publishes failure notifications. This task uses the sns:Publish action to publish a simple message to the failure-stepfunction SNS Topic ARN. "End": true marks this task as the other potential way the state machine execution can end:
JSON
"PublishFailure": {"Type": "Task","Resource": "arn:aws:states:::sns:publish","Parameters": {"TopicArn": "arn:aws:sns:eu-west-1:REDACTED:failure-stepfunction","Message": "An error occurred in the state machine: { \"error\": \"$.Error\" }" },"End": true,"TimeoutSeconds": 120 }
While both Lambdas already have SNS alerting, the state machine itself may also fail so the added observability is justified. This Marcia Villalba video was very helpful here:
And that’s everything I need! At this point Wordflow Studio gives me two things – firstly the state machine’s code, which I’ve committed to GitHub. And secondly this handy downloadable diagram:
State Machine Config
It’s now time to think about security and monitoring.
When new state machines are created in the AWS Step Functions console, an IAM Role is created with policies based on the state machine’s resources. The nuances and templates are covered in the Step Functions Developer Guide, so let’s examine my WordPress_Raw_To_Bronze state machine’s auto-generated IAM Role consisting of two policies:
Firstly, a Lambda IAM policy allowing the lambda:InvokeFunction action on all Lambdas listed in the state machine.
This supports the AWS X-Ray integration with AWS Step Functions. If X-Ray trancing is never enabled then this policy is unused.
Besides X-Ray tracing, there is also an option to log a state machine’s execution history to CloudWatch Logs. There are three log levels available plus a fourth default choice: OFF. Each state machine retains recent execution history and I’ve got no need to keep that history long-term, so I leave the log retention disabled. Remember – CloudWatch Logs is only free for the first 5GB!
State Machine Testing
There are various ways to test a state machine. There’s a testing and debugging section in the developer guide that goes into further details, the three main options being:
Both individual states and the entire state machine can be tested in the console. Each state can be tested in isolation (using the TestState API under the hood) with customisable inputs and IAM roles. This is great for checking the state outputs are correct, and that the attached IAM role is sufficient.
The state machine itself can also be tested via on-demand execution. The Execution Details page shows the state machine’s statistics and events, and has great coverage in the developer guide.
During testing, my WordPress_Raw_To_Bronze state machine returned this error:
States.Runtime in step: data_wordpressapi_bronze.

An error occurred while executing the state 'data_wordpressapi_bronze' (entered at the event id #7). Unable to apply Path transformation to null or empty input.
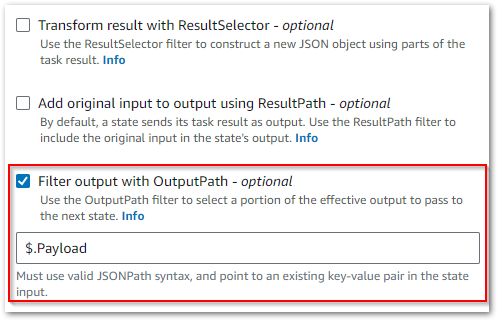
This turned out to be a problem with the OutputPath parameter, which Wordflow Studio enables by default:
I’m not using this setting for anything, so I disabled it to solve this problem.
Eventbridge Schedule
Finally, I want to automate the execution of my state machine. This calls for an EventBridge Schedule!
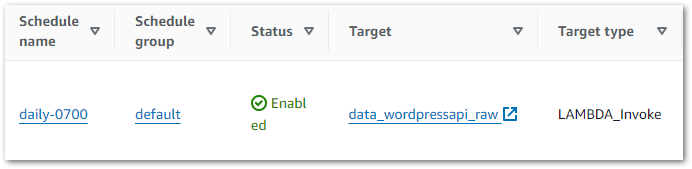
EventBridge makes this quite simple, using mostly the same process as last time. The Step Functions StartExecution operation is a templated target like Lambda’s Invoke operation, so it’s a case of selecting the WordPress_Raw_To_Bronze state machine from the list and updating the schedule’s IAM role accordingly.
And that’s it! EventBridge now executes the state machine at 07:00 each morning. The state machine then sequentially invokes both Lambda functions and catches any errors.
Costs
In this section, I’ll examine my recent AWS WordPress bronze orchestration process costs.
Let’s start with Step Functions. There are two kinds of Step Function workflow:
Standard workflows are charged based on the number of state transitions. These are countedeach time a workflow step is executed. The first 4000 transitions each month are free. After that, every 1000 transitions cost $0.025.
Express workflows are priced by the number of executions, duration, and memory consumption. The specifics of these criteria, coupled with full details of all charges are on the Step Functions pricing page.
I’m using standard workflows, and as of 26 March I’ve used 118 state transitions. In other words, free! Elsewhere, my costs are broadly on par with previous months. These are my S3 costs from 2024-02-01 to 2024-03-26:
S3 Actions
Month
Usage
Cost
PUT, COPY, POST, or LIST requests
2024-02
64,196
0.32
PUT, COPY, POST, or LIST requests
2024-03
17,566
0.09
GET and all other requests
2024-02
101,462
0.04
GET and all other requests
2024-03
8,656
0.00
GB month of storage used
2024-02
0.109
0.00
GB month of storage used
2024-03
0.161
0.00
And this is my recent free tier usage from 2024-02-01 to 2024-03-26:
Service
Month
Usage
EventBridge
2024-02
31 Invocations
EventBridge
2024-03
25 Invocations
Lambda
2024-02
122.563 Second Compute
Lambda
2024-02
84 Requests
Lambda
2024-03
82.376 Second Compute
Lambda
2024-03
58 Requests
Parameter Store
2024-02
34 API Requests
Parameter Store
2024-03
25 API Requests
SNS
2024-02
8 Email-JSON Notifications
SNS
2024-02
438 API Requests
SNS
2024-03
3 Email-JSON Notifications
SNS
2024-03
205 API Requests
So my only costs are still for storage.
Resources
The following items have been checked into the amazonwebshark GitHub repo for the AWS WordPress bronze orchestration process, available via the button below:
New data_wordpressapi_bronze Python script & requirements.txt file.
WordPress_Raw_To_Bronze state machine JSON.
Summary
In this post, I created my WordPress pipeline’s bronze data orchestration process using AWS Lambda layers and AWS Step Functions.
I’ve wanted to try Step Functions out for a while, and all things considered they’re great! Workflow Studio is easy to use, and the templates and tutorials undoubtedly highlight the value that Step Functions can bring.
Additionally, the integration with both EventBridge Scheduler and other AWS services makes Step Functions a compelling orchestration service for both my ongoing WordPress bronze work and the future projects in my pipeline. This combined with some extra Lambda layers will reduce my future dev and test time.
If this post has been useful then the button below has links for contact, socials, projects and sessions:
In my previous post, I wrote a Python script for extracting WordPress API data. While it works fine, it relies on me logging in and pressing buttons. This isn’t convenient, and would be completely out of the question in a commercial use case. Wouldn’t it be great if something could run the script for me?
Enter some AWS managed serverless services that are very adept at automation! In this post, I’ll integrate these services into my existing architecture, test that everything works and see what my AWS costs are to date.
A gentle reminder: this is my first time setting up some of these services from scratch. This post doesn’t represent best practices, may be poorly optimised or include unexpected bugs, and may become obsolete. I expect to find better ways of doing these processes in the coming months and will link updates where appropriate.
Architectural Decisions
In this section, I examine my architectural decisions before starting work. Which AWS services will perform my WordPress data extraction automation? Note that these decisions are in addition to my previous ones.
AWS Lambda
Probably no surprises here. Whenever AWS and serverless come up, Lambda is usually the first service that comes to mind.
And with good reason! AWS Lambda deploys quickly and scales on demand. It supports several programming languages and practically every AWS service. It also has a generous free tier and requires no infrastructure management.
Lambda will provide my compute resources. This includes the runtime, execution environment and network connectivity for my Python script.
Amazon Cloudwatch
Amazon CloudWatch is a monitoring service that can collect and track performance data, generate insights and respond to resource state changes. It provides features such as metrics, alarms, and logs, letting users monitor and troubleshoot their applications and infrastructure in real time.
CloudWatch will record and store my Lambda function’s logs. I can see when my function is invoked, how long it takes to run and any errors that may occur.
So if something does go wrong, how will I know?
Amazon SNS
Amazon Simple Notification Service (SNS) is a messaging service that delivers notifications to a set of recipients or endpoints. It supports various messaging protocols like SMS, email and HTTP, making it helpful for building scalable and decoupled applications.
SNS will be the link between AWS and my email inbox. It will deliver messages from AWS about my Lambda function.
So that’s my alerting sorted. How does the function get invoked?
Amazon EventBridge
Amazon EventBridge is an event bus service that enables communication between different services using events. It offers a serverless and scalable platform with advanced event routing, integration capabilities and, crucially, scheduling and time expression functionality.
EventBridge is here to handle my automation requirements. Using a CRON expression, it’ll invoke my Lambda function regularly with no user input required.
Architectural Diagram
This is an architectural diagram of the AWS automation of my WordPress data extraction process:
EventBridge invokes AWS Lambda function.
AWS Lambda calls Parameter Store for WordPress, S3 and SNS parameters. Parameter Store returns these to AWS Lambda.
Lambda Function calls WordPress API. WordPress API returns data.
API data is written to S3 bucket.
If there’s a failure, the Lambda function publishes a message to an SNS topic. SNS then delivers this message to the user’s subscribed email address.
Meanwhile, Lambda is writing to a CloudWatch Log Group throughout its invocation.
SNS & Parameter Store
In this section, I configure Amazon SNS and update AWS Parameter Store to enable my WordPress data extraction automation alerting. This won’t take long!
SNS Configuration
SNS has two fundamental concepts:
Topics: communication channels for publishing messages.
Subscriptions: endpoints to send messages to.
Firstly, I create a new wordpress-api-raw standard SNS Topic. This topic doesn’t need encryption or delivery policies, so all the defaults are fine. An Amazon Resource Name (ARN) is assigned to the new SNS Topic, which I’ll put into Parameter Store.
Next, I create a new SNS Subscription for my SNS Topic that emails me when invoked.
There’s not much else to add here! That said, SNS can do far more than this. Check out SNS’s features and capabilities in the Developer Guide.
Parameter Store Configuration
Next, I need to add the new SNS Topic ARN to AWS Parameter Store.
I create a new string parameter, and assign the SNS Topic’s ARN as the value. That’s….it! With some changes, my Python script can now get the SNS parameter in the same way as the S3 and WordPress parameters.
Everything bar sns_client has string type hints. No return value is needed.
I create a try except block that attempts to send a message using the sns_client’s publish method and the supplied values. The log is updated with publish‘s success or failure.
Separately, I’ve also added a ParamValidationError exception to my get_parameter_from_ssm function. Previously the exceptions were:
Python
except ssm_client.exceptions.ParameterNotFound: logging.warning(f"Parameter {parameter_name} not found.")return""except botocore.exceptions.ClientError as e: logging.error(f"Error getting parameter {parameter_name}: {e}")return""
They are now:
Python
except ssm_client.exceptions.ParameterNotFound as pnf: logging.warning(f"Parameter {parameter_name} not found: {pnf}")return""except botocore.exceptions.ParamValidationError as epv: logging.error(f"Error getting parameter {parameter_name}: {epv}")return""except botocore.exceptions.ClientError as ec: logging.error(f"Error getting parameter {parameter_name}: {ec}")return""
Variable Updates
My send_sns_message function needs some new variables. Firstly, I create an SNS Client using my existing boto3 session and assign it to client_sns:
Finally, I create a new lambdaname object which I’ll use for SNS notifications in my Python script’s body.
Python
# Lambda name for messages lambdaname ='wordpress_api_raw.py'
Script Body Updates
These changes integrate SNS failure messages into my script. There are no success messages…because I get enough emails as it is.
SNS Parameter Retrieval & Check
There’s now a third use of get_parameter_from_ssm, using parametername_snstopic to get the SNS topic ARN from AWS Parameter Store:
Python
    # Get SNS topic from Parameter Store
    logging.info("Getting SNS parameter...")
    sns_topic = get_parameter_from_ssm(client_ssm, parametername_snstopic)
I’ve also added an SNS parameter check. It behaves differently to the other checks, as it’ll raise a ValueError if nothing is found:
Python
# Check an SNS topic has been returned.ifnot sns_topic: message ="No SNS topic returned." logging.warning(message)raiseValueError(message)
I want to cause an invocation failure in this situation, as not having the SNS topic ARN is a critical and unrecoverable problem which the automation process will have no way to alert me about.
However, the AWS Lambda service can warn me about invocation failures. This is something I’ll set up later on.
Failure Getting Other Parameters
The get_parameter_from_ssm response checks have changed. Previously, if a parameter request (the API endpoints in this case) returns a blank string then a warning is logged and the invocation ends:
Python
# Check the API list isn't emptyifnotany(api_endpoints_list): logging.warning("No API endpoints returned.")return
Now, new subject and message objects are created with details about the error. The message string is added to the log, and both objects are passed to send_sns_message along with the SNS client and SNS topic ARN:
Python
# Check the API list isn't emptyifnotany(api_endpoints_list): message ="No API endpoints returned." subject =f"{lambdaname}: Failed" logging.warning(message) send_sns_message(client_sns, sns_topic, subject, message)return
The S3 check now works similarly:
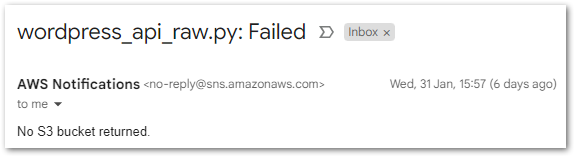
Python
# Check an S3 bucket has been returned.ifnot s3_bucket: message ="No S3 bucket returned." subject =f"{lambdaname}: Failed" logging.warning(message) send_sns_message(client_sns, sns_topic, subject, message)return
If either of these checks fail, no WordPress API calls are made and the invocation stops.
Failure During For Loop
Previously, the script’s final output was a log entry showing the endpoint_count_success and endpoint_count_failure values:
Python
logging.info("WordPress API Raw process complete: " \f"{endpoint_count_success} Successful | {endpoint_count_failure} Failed.")
This section has now been expanded. If endpoint_count_failure is greater than zero, a message object is created including the number of failures.
message is then written to the log, and is passed to send_sns_message with a subject and the SNS client and SNS topic ARN:
Python
logging.info("WordPress API Raw process complete: " \f"{endpoint_count_success} Successful | {endpoint_count_failure} Failed.")# Send SNS notification if any failures foundif endpoint_count_failure >0: message =f"{lambdaname} ran with {endpoint_count_failure} errors. Please check logs." subject =f"{lambdaname}: Ran With Failures" logging.warning(message) send_sns_message(client_sns, sns_topic, subject, message)
If a loop iteration fails, the script ends it and starts the next. One or more loop iterations can fail while the others succeed.
That completes the script changes. Next, I’ll test the failure responses.
SNS Notification Testing
SNS should now send me one of two emails depending on which failure occurs. I can test these locally by inverting the logic of some if conditions.
Firstly, I set the S3 bucket check to fail if a bucket name is returned:
Python
# Check an S3 bucket has been returned.if s3_bucket: message ="No S3 bucket returned." subject =f"{lambdaname}: Failed" logging.warning(message) send_sns_message(client_sns, sns_topic, subject, message)return
Upon invocation, an email arrives with details of the failure:
Secondly, I change the loop’s data check condition to fail if data is returned:
Python
# If no data returned, record failure & end current iterationif api_json: logging.warning("Skipping attempt due to API call failure.") endpoint_count_failure +=1continue
This ends the current loop iteration and increments the endpoint_count_failure value. Then, in a check after the loop, an SNS message is triggered when endpoint_count_failure is greater than 0:
Python
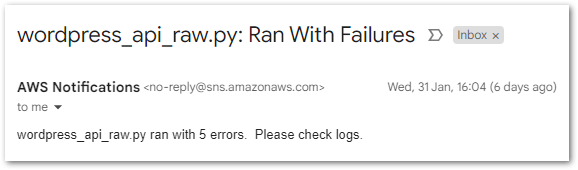
# Send SNS notification if any failures foundif endpoint_count_failure >0: message =f"{lambdaname} ran with {endpoint_count_failure} errors. Please check logs." subject =f"{lambdaname}: Ran With Failures" logging.warning(message) send_sns_message(client_sns, sns_topic, subject, message)
Now, a different email arrives with the number of failures:
Success! Now the Python script is working as intended, it’s time to deploy it to AWS.
Lambda & CloudWatch
In this section, I start creating the automation of my WordPress data extraction process by creating and configuring a new AWS Lambda function. Then I deploy my Python script, set some error handling and test everything works.
I made extensive use of Martyn Kilbryde‘s AWS Lambda Deep DiveA Cloud Guru course while completing this section. It was exactly the kind of course I needed – a bridge between theoretical certification content and hands-on experience in my own account.
This section is the result of my first pass through the course. There are better ways of doing what I’ve done here, but ultimately I have to start somewhere. I have several course sections to revisit, so watch this space!
Let’s begin with creating a new Lambda function.
Function Creation
Lambda function creation steps vary depending on whether the function is being written from scratch, or if it uses a blueprint or container image. I’m writing from scratch, so after choosing a name I must choose the function’s runtime. Runtimes consist of the programming language and the specific version. In my case, this is Python 3.12.
Next are the permissions. By design, AWS services need permissive IAM roles to interact with other services. A Lambda function with no IAM role cannot complete actions like S3 reads or CloudWatch writes.
Thankfully, AWS are one step ahead. By default, Lambda creates a basic execution role for each new function with some essential Amazon CloudWatch actions. With this role, the function can record invocations, resource utilization and billing details in a log stream. Additional IAM actions can be assigned to the role as needed.
Script Deployment
Now I have a function, I need to upload my Python script. There are many ways of doing this! I followed the virtual environment process, as I already had one from developing the script in VSCode. This environment’s contents are in the requirements.txt file listed in the Resources section.
While this was successful, the resulting deployment package is probably far bigger than it needs to be. Additionally, I didn’t make use of any of the toolkits, frameworks or pipelines with Lambda functionality. I expect my future deployments to improve!
Lambda Destination
There’s one more Lambda feature I want to use: a Lambda Destination.
With Destinations, you can route asynchronous function results as an execution record to a destination resource without writing additional code. An execution record contains details about the request and response in JSON format including version, timestamp, request context, request payload, response context, and response payload.
Here, I want a destination that will email me if my Lambda function fails to run. This helps with visibility, and will be vital if the SNS parameter isn’t returned!
With no Destination, the failure would only appear in the function’s log and I might not know about it for days. With a Destination enabled, I’ll know about the failure as soon as the email comes through.
My destination uses the following config:
Invocation Type: Asynchronous
Condition: On Failure
Destination Type: SNS topic
The SNS topic is a general Failed Lambda one that I already have. The Lambda service can use this SNS topic regardless of any script problems.
Lambda & CloudWatch Testing
With the function created and deployed, it’s testing time! Does my function work and log as intended?
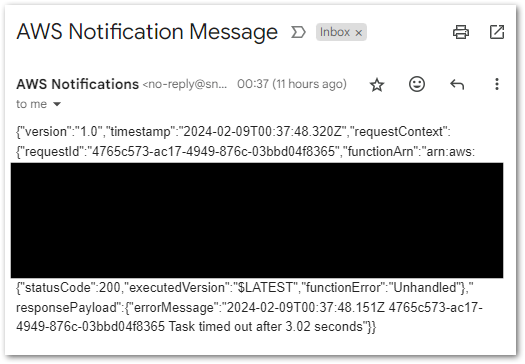
Error: Timeout Exceeded
It doesn’t take long to hit my first problem:
Task timed out after 3.02 seconds
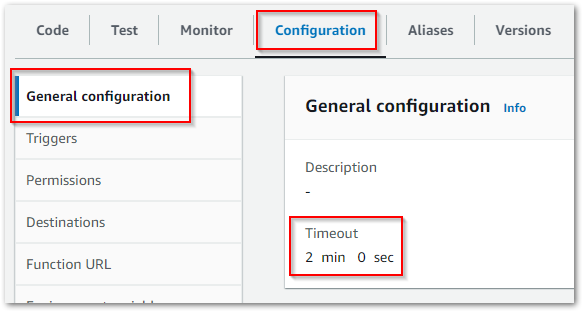
All Lambdas created in the console start with a three-second timeout. This is great at preventing runaway invocations, but I clearly need longer than three seconds.
After some local testing, I increased the timeout to two minutes in the function’s config:
Error: Access Denied
Next, I start hitting permission errors:
An error occurred (AccessDeniedException) when calling the GetParameter operation: User is not authorized to perform: ssm:GetParameter on resource because no identity-based policy allows the ssm:GetParameter action.
My Lambda’s basic execution role can interact with CloudWatch, but nothing else. This is by design in the interests of security. However, this IAM role is currently too restrictive for my needs.
The role’s policy needs to allow additional actions:
To follow IAM best practise, I should also apply least-privilege permissions. Instead of a wildcard character, I should restrict the policy to the specific ARNs of my AWS resources.
For example, this IAM policy is too permissive as it allows access to all parameters in Parameter Store:
My Lambda function can now write to my bucket, but only to the wordpress-api prefix. A good way to understand the distinction is to look at an AWS example:
In this example, line 1 covers the entire my_corporate_bucket S3 bucket. Line 2 is more focused, only covering all objects in the Development prefix of the my_corporate_bucket bucket.
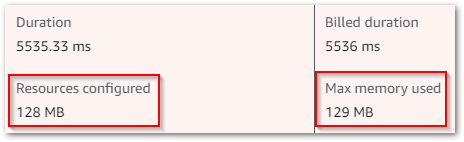
Error: Memory Exceeded
With the new policy, my function runs smoothly. Until:
Runtime exited with error: signal: killed Runtime.ExitError
This one was weird because the function kept suddenly stopping at different points! I then checked further down the test summary:
It’s running out of memory! Lambda assigns a default 128MB RAM to each function, and here my function was hitting 129MB. RAM can be changed in the function’s general configuration. But changed to what?
When a Lambda function runs successfully, it logs memory metrics:
Memory Size: 500 MB Max Memory Used: 197 MB
After some trial and error, I set the function’s RAM to 250MB and have had no problems since.
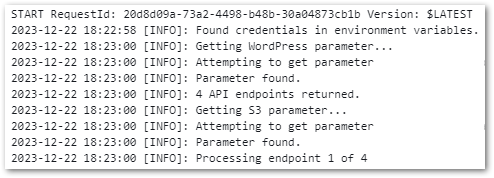
Incomplete CloudWatch Logs
The last issue wasn’t an error so much as a bug. CloudWatch was showing my Lambda invocation start and end, but none of the function’s logs:
The solution was found in Python’s basicConfig‘s docstring:
This function does nothing if the root logger already has handlers configured, unless the keyword argument force is set to True.
And my CloudWatch Log Stream is now far more descriptive!
In the long run I plan to investigate Lamba’s logging abilities, but for now this does what I need.
SNS Destination Email
Finally, I want to make sure my Lambda Destination is working as expected. My function works now, so I need to force a failure. There are many ways of doing this. In this case, I used three steps:
Temporarily alter the function’s timeout to 3 seconds.
Reconfigure the function’s Asynchronous Invocation retry attempts to zero.
Invoke the function with a one-time EventBridge Schedule.
The low timeout guarantees a function invocation failure. Setting zero retries prevents unnecessary retries (because I want the failure to happen!) Finally, the one-time schedule will asynchronously invoke my function, which is what the Destination is looking for.
And…(redacted) success!
I could clean this email up with an EventBridge Input Path (which I’ve done before), but that’s mostly cosmetic in this case.
EventBridge
In this section I configure EventBridge – the AWS service that schedules the automation of my WordPress data extraction process. While I’ve used EventBridge Rules before, this is my first time using EventBridge Scheduler. So what’s the difference?
EventBridge Scheduler 101
From the AWS EventBridge product page:
Amazon EventBridge Scheduler is a serverless scheduler that enables you to schedule tasks and events at scale. With EventBridge Scheduler you have the flexibility to configure scheduling patterns, set a delivery window, and define retry policies to ensure your critical tasks and events are reliably triggered right when you need them.
EventBridge Scheduler is a fully managed service that integrates with over 200 AWS services. It supports one-time schedules and start and end dates, and can account for daylight saving time.
Cost-wise, EventBridge Schedules are changed per invocation. EventBridge’s free tier covers the first 14 million(!) invocations each month, after which each further million currently costs $1.00. These invocations can be staggered using Flexible Time Windows to avoid throttling.
AWS has published a table showing the main differences between EventBridge Scheduler and Eventbridge Rules. Essentially, Eventbridge Rules are best suited for event-based activity, while EventBridge Scheduler is best suited for time-based activity.
Schedule Setup
Let’s create a new EventBridge Schedule. After choosing a name, I need a schedule pattern. Here, I want a recurring CRON-based schedule that runs at a specific time.
EventBridge Cron expressions have six required fields which are separated by white space. My cron expression is 0 7 * * ? * which translates to:
The 0th minute
Of the seventh hour
On every dayof the month
Every month,
Day of the week,
And year
In response, EventBridge shows some of the future trigger dates so I can check my expression is correct:
Sat, 02 Feb 2024 07:00:00 (UTC+00:00)
Sun, 03 Feb 2024 07:00:00 (UTC+00:00)
Mon, 04 Feb 2024 07:00:00 (UTC+00:00)
Tue, 05 Feb 2024 07:00:00 (UTC+00:00)
Wed, 06 Feb 2024 07:00:00 (UTC+00:00)
I then need to choose a flexible time window setting. This setting distributes AWS service API calls to help prevent throttling, but that’s not a problem here so I select Off.
Next, I choose the target. I have two choices: templated targets or universal targets. Templated targets are a set of popular AWS service operations, needing only the relevant ARN during setup. Universal targets can target any AWS service but require more configuration details. Lambda’s Invoke operation is a targeted template, so I use that.
Next are some optional encryption, retry and state settings. EventBridge Scheduler IAM roles are handled here too, allowing EventBridge to send events to the targeted AWS services. Finally, a summary screen shows the full schedule before creation.
The schedule then appears on the EventBridge console:
EventBridge Testing
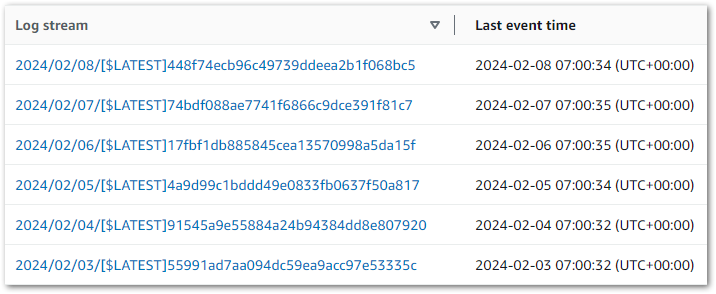
Testing time! Does CloudWatch show Lambda function invocations at 07:00?
It does!
While I’m in CloudWatch, I’ll change the log group’s retention setting. It defaults to Never Expire, but I don’t need an indefinite history for this function! Three months is fine – long enough to troubleshoot any errors, but not so long that I’m storing and potentially paying for logs I’ll never need.
Costs
In this section, I examine the current AWS costs for my WordPress data extraction and automation processes using the Billing & Cost Management console.
I began creating pipeline resources in December 2023 using various workshops and tutorials. This table shows my AWS service costs (excluding tax) accrued over December 2023 and January 2024 (the months I currently have full billing periods for):
I’ll examine these costs in two parts:
S3 Costs: my AWS costs are all storage-based. I’ll examine my S3 API calls and how each S3 API contributes to my bill.
Free Tier Usage: everything else has zero cost. I’ll examine what I used and how it compares to the free tier allowances.
I’ll also take a quick look at February’s costs to date. I’ve not tagged any of the pipeline resources, so these figures are for all activity in this AWS account.
S3 Costs
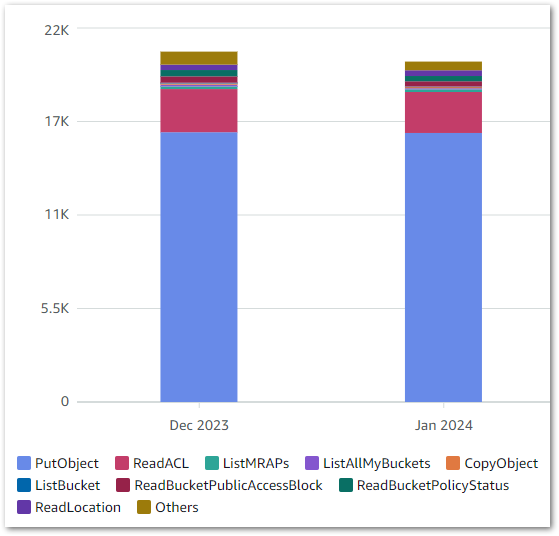
S3 is the only AWS service in my WordPress data extraction and automation processes that is generating a cost. This Cost Explorer chart shows my S3 API usage over the last two full months:
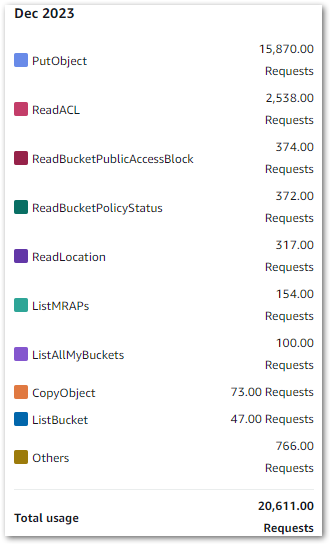
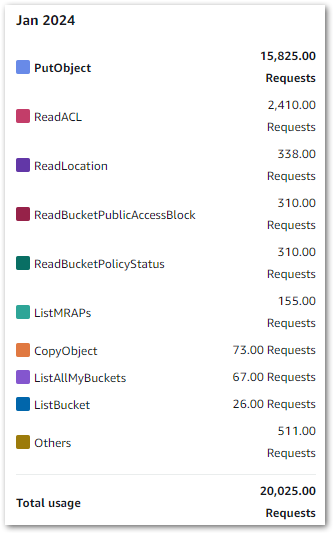
PutObject is clearly the most used S3 API, which isn’t surprising given S3’s storage nature. Cost Explorer can also show API request totals, as shown below:
The following services had no cost because my usage fell within their free tier allowances. For each zero cost on the bill, I’ll show the service and, where appropriate, the respective free tier allowance.
CloudTrail:
2023-12: 7970 Events recorded.
2024-01: 6605 Events recorded.
CloudWatch was the same for both months:
Sub 1GB-Mo log storage used of 5GB-mo log storage free tier
Sub 1GB log data ingested of 5GB log data ingestion free tier
Lambda 2023-12:
36.976 GB-Seconds used of 400,000 GB-seconds Compute free tier
47 Requests used of 1,000,000 Request free tier
Lambda 2024-01:
9.572 GB-Seconds used of 400,000 GB-seconds Compute free tier
8 Requests used of 1,000,000 Request free tier
Parameter Store (billed as Secrets Manager):
2023-12: 31 API Requests used of 10,000 API Request free tier
2024-01: 41 API Requests used of 10,000 API Request free tier
February 2024 Costs
At this time I don’t have full billing data for February, but I wanted to show the EventBridge and SNS usage to date:
EventBridge (billed as CloudWatch Events):
16 Invocations used of 14 million free tier
SNS:
3 Notifications used of 1,000 Email-JSON Notification free tier
227 API Requests used of 1,000,000 API Request free tier
As of Feb 15, Lambda is on 71.742 GB-Seconds and 34 Requests while S3 is on 8,821PCPL requests, 3,764GET+ requests and 0.0052 GB-Mo storage.
Resources
The full Python script has been checked into the amazonwebshark GitHub repo, available via the button below. Included is a requirements.txt file for the Python libraries used to extract the WordPress API data. This file is unchanged from last time but is included for completeness.
Summary
In this post, I set up the automation of my WordPress API data extraction script with AWS managed serverless services.
On the one hand, there’s plenty more to do here. I have lots to learn about Lambda, like deployment improvement and resource optimisation. This will improve with time and experience.
However, my function’s logging and alerting are in place, my IAM policies meet AWS standards and I’m using the optimal services for my compute and scheduling. And, most importantly, my automation pipeline works!
My attention now turns to the data itself. My next WordPress Data Pipeline post will look at transforming and loading the data so I can put it to use! If this post has been useful, the button below has links for contact, socials, projects and sessions: