In this post I unbox and configure my new Raspberry Pi 4, and then register it with my AWS account as an AWS IoT device.
Table of Contents
- Introduction
- What’s In The Box?
- Getting To Know My Pi With FutureLearn
- Connecting My Pi To AWS
- Next Steps
- Summary
Introduction
After earning my AWS Certified Developer – Associate certification last month, my attention turned to the Raspberry Pi my partner got me as a birthday present. I’ve had it for a while and done nothing with it because of a lack of time and ideas. I promised myself that I’d open it up after finishing my exam, so let’s go!
What’s In The Box?
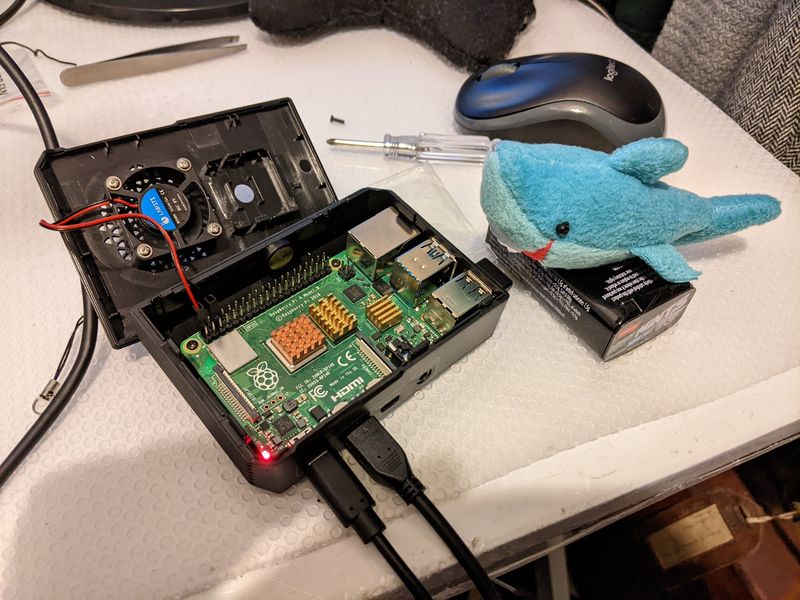
My birthday gift came in the form of the Labists Raspberry Pi 4 4GB Complete Starter Kit. Having seen the price, I must have been good that year!

The set includes:
- Raspberry Pi 4 Model B 4GB RAM with 1.5GHz 64-bit Quad-core CPU
- 32GB Class 10 MicroSD Card Preloaded with NOOBS
- Premium Black Case (High Gloss) for Pi 4B
- Mini Silent Fan
- Two Micro HDMI to HDMI Cables
Labists have a great video for assembling the Raspberry Pi. Fiddling with exposed circuitry is anxiety-inducing for a heavy-handed data professional like myself, so the video was very welcome!
The steps basically boil down to:
- Attach Heat Sinks To Pi
- Screw Fan To Case
- Screw Pi To Case
- Connect Fan Pins To Pi
- Close Case

My Raspberry Pi is now out of the box and fully assembled, so let’s get some advice on how it works.
Getting To Know My Pi With FutureLearn
FutureLearn is a global learning platform with a mission to transform access to education by offering online courses from the world’s leading universities and brands. They offer a range of all-online, on-demand courses and offer free and paid content.
The Educators
The Getting Started with Your Raspberry Pi course is one of a number of free courses by the Raspberry Pi Foundation. The Foundation is a UK charity seeking to increase the availability of computing and digital making skills by providing low-cost, high-performance single-board computers, highly available training and free software.
The Course
The course is split into three weeks, although the lessons can be completed at the pace of the user. The first week of the course “Setting Up Your Raspberry Pi” introduces the facilitation team, walks through the hardware and software and gives a basic introduction to Raspberry Pi OS.
Week Two “Using Your Raspberry Pi” offers insight into what the Raspberry Pi can do. This includes the compute resources, the ability to connect peripherals and the built-in software such as the visual programming language Scratch and the introductory Python editor Thonny.
Finally, Week Three “Taking More Control Of Your Raspberry Pi” goes full SysAdmin and introduces security measures, the command line and remote access. Instructions are given on how to control the Pi via VNC Viewer and SSH, and commands like mkdir, cp and mv are covered.
Most significantly, the APT Package Manager is introduced along with commands including:
sudo apt updateapt list --upgradablesudo apt autoclean.
A beginners course that introduces the ideas of keeping devices updated, tidy and secure is a welcome sight as it encourages good user behaviour early on and ultimately prolongs the life of the Raspberry Pi.
My Raspberry Pi is now accessible, updated and ready to take on jobs, so let’s give it something to do!
Connecting My Pi To AWS
AWS offer several IoT services that are summarised as Device Software, Control Services and Analytics. To simplify the process of connecting a new IoT device, AWS has added a wizard to the Build A Solution widget on the newest version of the AWS Management Console:
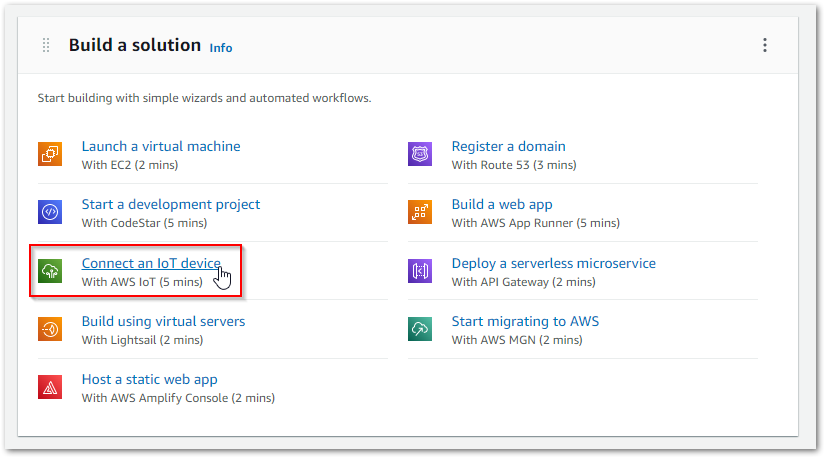
This loads the AWS IoT wizard used by AWS IoT Core, consisting of a three-step process:

A word of advice – check the region the wizard is running in! I mainly use eu-west-1 but the IoT wizard changed this to us-west-2 and would have created my resources in the wrong place!
Before starting, AWS need to know which operating system my IoT device uses and which SDK I want to use. I tell AWS that my Raspberry Pi is running Linux and that I intend to use the Python SDK, and in response AWS offers some advice before starting the wizard:
Some prerequisites to consider: the device should have Python and Git installed and a TCP connection to the public internet on port 8883.
This has already been taken care of so let’s continue.
AWS IoT Configuration
Step 1 involves creating an IoT Thing with a matching Thing Record. A Thing Record is how AWS represents and records a physical device in the cloud, and is used for recording properties of the IoT Thing including certificates, jobs and the ARN.
I name my Raspberry Pi dj-raspberrypi4-labists. AWS then attach a Device Shadow to the Thing Record. These make a device’s state available to apps and other services. whether the device is connected to AWS IoT or not. For example, my Pi’s state could be Online or Offline.
In Step 2 AWS confirm that a new thing was created. A new AWS IoT Core policy is also created to enable sending and receiving messages. AWS IoT Core policies are basically IAM for AWS IoT devices. They control access to operations including:
- Connecting to the AWS IoT Core message broker.
- Sending and Receiving MQTT messages.
- Getting or Updating an IoT Thing’s Device Shadow.
AWS also supply a downloadable connection kit. This contains certificates and keys for authentication and an SSH script for device configuration and message processing. This is provided as a ZIP archive, which I put on my Raspberry Pi in a new folder specifically for AWS objects.
Device Configuration
Finally, the wizard gives a list of commands to send to the IoT device to test the AWS connection. The first command unzips the connection kit:
unzip connect_device_package.zipThe second command adds execution permissions to the start.sh script in the connection kit:
chmod +x start.shI’m never keen on running unfamiliar code off the Internet without knowing what it does first, so I did some searching – it turns out that chmod +x makes a file executable.
Now start.sh is runnable, it can be executed using the command ./start.sh. This is a short script that performs the following actions:
- Downloads an AWS IoT Root CA certificate from the Amazon Trust Repository if one doesn’t exist.
- Downloads the AWS Device SDK for Python if it doesn’t exist.
- Installs the AWS Device SDK for Python if it is not found.
- Runs a sample pub/sub Python application.
The result is an infinite stream of Hello Worlds:
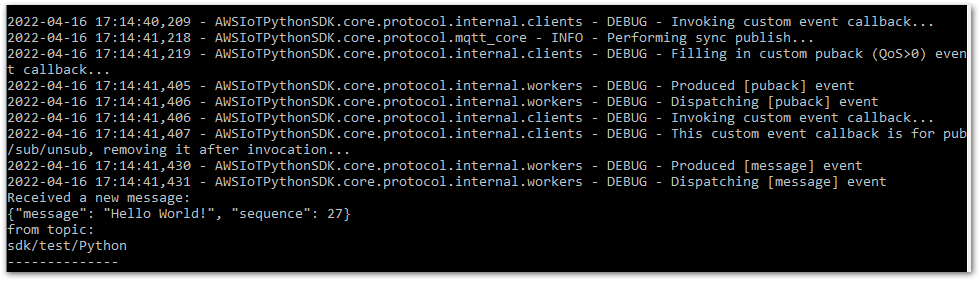
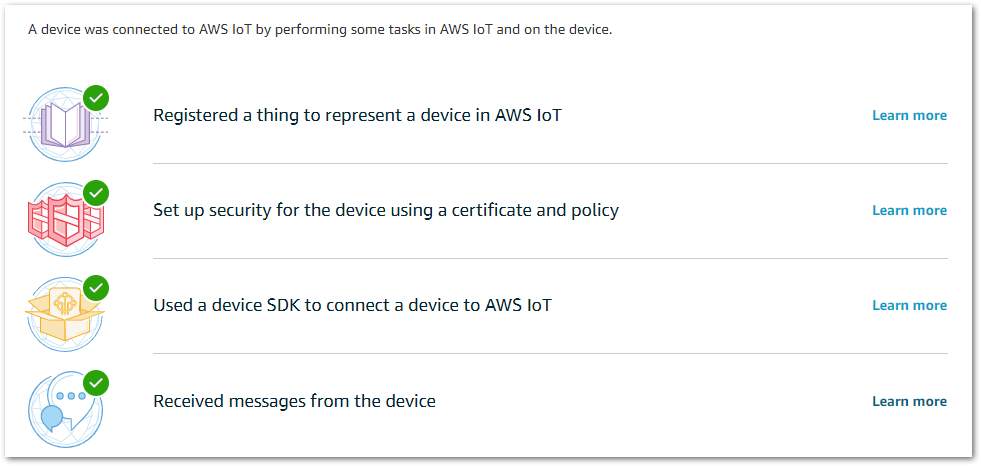
Finally, AWS give a summary of the steps completed:
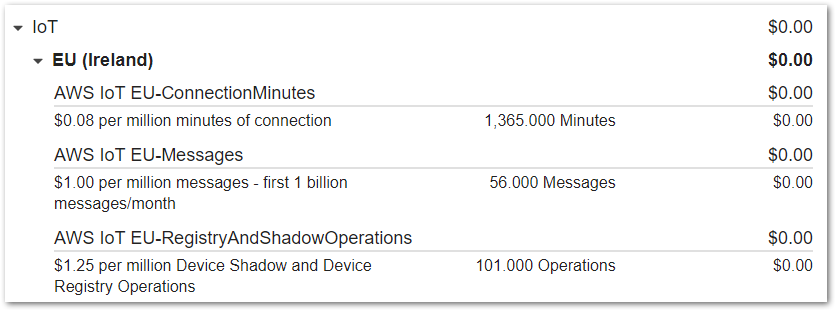
Cost Analysis
AWS IoT Core hasn’t cost me any money so far. This might be because I’m only running test loads on it currently, but looking at the new lines on my bill it’s going to be a while before I start making AWS any money here:
Next Steps
Having set up my Raspberry Pi, I have found some upgrades that I need to take care of:
Operating System Upgrade
Firstly, my Raspberry Pi’s operating system has an update available. It is currently running Rasbian 10, known as Buster:

In November 2021 Raspberry Pi released Bullseye. This is a major upgrade so the recommended process is to download a new image, reinstall any applications, and move data across from the current image. This makes sense to do while there isn’t much data on my Pi.
This leads me on to…
Raspberry Pi Imager
A common task with a Raspberry Pi is installing an operating system onto an SD card. In 2013 Raspberry Pi released NOOBS, or New Out Of the Box Software to give it its full name. Someone at Raspberry Pi HQ clearly has a sense of humour.
NOOBS was designed to simplify the process of setting up a new Pi for first time users, and the Labists kit included an SD card with NOOBS preinstalled. However Raspberry Pi no longer support it, and now recommend the Raspberry Pi Imager for installing Raspberry Pi OS instead.
So plenty to be getting on with!
Summary
In this post I’ve unboxed and configured my Raspberry Pi and linked it to my AWS account as an IoT Thing. I’ve described the basic concepts of AWS IoT Core and have identified some important upgrades that my Pi needs before I consider using it for anything serious.
If this post has been useful, please feel free to follow me on the following platforms for future updates:
Thanks for reading ~~^~~