Please be as specific as possible with your examples and include your reasoning.
Good question!
In each section, I’ll use a different language. Firstly I’ll create a script, and then show a problem the script could encounter in production. Finally, I’ll show how a different approach can prevent that problem from occurring.
I’m limiting myself to three production code qualities to keep the post at a reasonable length, and so I can show some good examples.
Precision
In this section, I use T-SQL to show how precise code in production can save a data pipeline from unintended failure.
Setting The Scene
Consider the following SQL table:
USE [amazonwebshark]
GO

CREATE TABLE [2022].[sharkspecies](
	[shark_id] [int] IDENTITY(1,1) NOT NULL,
	[name_english] [varchar](100) NOT NULL,
	[name_scientific] [varchar](100) NOT NULL,
	[length_max_cm] [int] NULL,
	[url_source] [varchar](1000) NULL
)
GO
Now, let’s say that I have a data pipeline that uses data in amazonwebshark.2022.sharkspecies for transformations further down the pipeline.
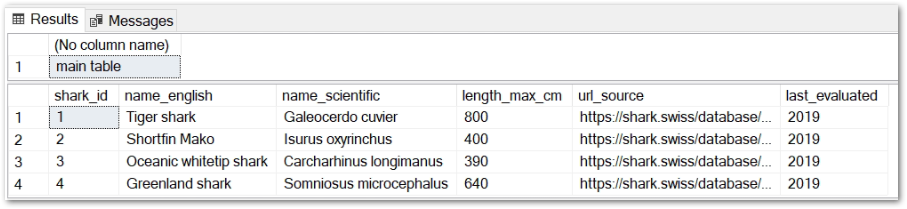
No problem – I create a #tempsharkstemp table and insert everything from amazonwebshark.2022.sharkspecies using SELECT *:
When this script runs in production, I get two tables with the same data:
What’s The Problem?
One day a new last_evaluated column is needed in the amazonwebshark.2022.sharkspecies table. I add the new column and backfill it with 2019:
ALTER TABLE [2022].sharkspecies
ADD last_evaluated INT DEFAULT 2019 WITH VALUES
GO
However, my script now fails when trying to insert data into #tempsharks:
(1 row affected)

(4 rows affected)

Msg 213, Level 16, State 1, Line 17
Column name or number of supplied values does not match table definition.

Completion time: 2022-11-02T18:00:43.5997476+00:00
#tempsharks has five columns but amazonwebshark.2022.sharkspecies now has six. My script is now trying to insert all six sharkspecies columns into the temp table, causing the msg 213 error.
Doing Things Differently
The solution here is to replace row 21’s SELECT * with the precise columns to insert from amazonwebshark.2022.sharkspecies:
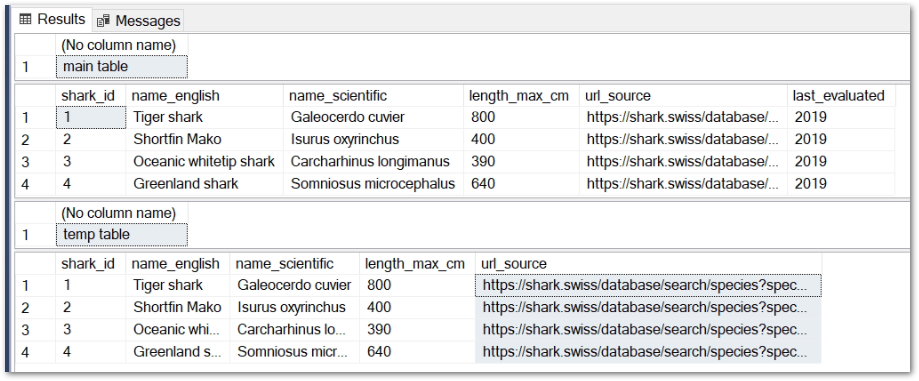
While amazonwebshark.2022.sharkspecies now has six columns, my script is only inserting five of them into the temp table:
I can add the last_evaluated column into #tempsharks in future, but its absence in the temp table isn’t causing any immediate problems.
Works The Same In Other Environments
In this section, I use Python to show the value of production code that works the same in non-production.
Setting The Scene
Here I have a Python script that reads data from an Amazon S3 bucket using a boto3 session. I pass my AWS_ACCESSKEY and AWS_SECRET credentials in from a secrets manager, and create an s3bucket variable for the S3 bucket path:
When I deploy this script to my dev environment it works fine.
What’s The Problem?
When I deploy this script to production, s3bucket will still be s3://dev-bucket. The potential impact of this depends on the AWS environment setup:
Different AWS account for each environment:
dev-bucket doesn’t exist in Production. The script fails.
Same AWS account for all environments:
Production IAM roles might not have any permissions for dev-bucket. The script fails.
Production processes might start using a dev resource. The script succeeds but now data has unintentionally crossed environment boundaries.
Doing Things Differently
A solution here is to dynamically set the s3bucket variable based on the ID of the AWS account the script is running in.
I can get the AccountID using AWS STS. I’m already using boto3, so can use it to initiate an STS client with my AWS credentials.
STS then has a GetCallerIdentity action that returns the AWS AccountID linked to the AWS credentials. I capture this AccountID in an account_id variable, then use that to set s3bucket‘s value:
For bonus points, I can terminate the script if the AWS AccountID isn’t defined. This prevents undesirable states if the script is run in an unexpected account.
Speaking of which…
Prevents Undesirable States
In this section, I use PowerShell to demonstrate how to stop production code from doing unintended things.
Setting The Scene
In June I started writing a PowerShell script to upload lossless music files from my laptop to one of my S3 buckets.
I worked on it in stages. This made it easier to script and test the features I wanted. By the end of Version 1, I had a script that dot-sourced its variables and wrote everything in my local folder $ExternalLocalSource to my S3 bucket $ExternalS3BucketName:
#Load Variables Via Dot Sourcing
. .\EDMTracksLosslessS3Upload-Variables.ps1


#Upload File To S3
Write-S3Object -BucketName $ExternalS3BucketName -Folder $ExternalLocalSource -KeyPrefix $ExternalS3KeyPrefix -StorageClass $ExternalS3StorageClass
What’s The Problem?
NOTE: There were several problems with Version 1, all of which were fixed in Version 2. In the interests of simplicity, I’ll focus on a single one here.
In this script, Write-S3Object will upload everything in the local folder $ExternalLocalSource to the S3 bucket $ExternalS3BucketName.
Problem is, the $ExternalS3BucketName S3 bucket isn’t for everything! It should only contain lossless music files!
At best, Write-S3Object will upload everything in the local folder to S3 whether it’s music or not.
At worst, if the script is pointing at a different folder it will start uploading everything there instead! PowerShell commonly defaults to C:\Windows, so this could cause all kinds of problems.
Doing Things Differently
I decided to limit the extensions that the PowerShell script could upload.
So now, if I attempt to upload an unacceptable .log file, PowerShell raises an exception and terminates the script:
**********************
Transcript started, output file is C:\Files\EDMTracksLosslessS3Upload.log

Checking extensions are valid for each local file.
Unacceptable .log file found.  Exiting.
**********************
While an acceptable .flac file will produce this message:
**********************
Transcript started, output file is C:\Files\EDMTracksLosslessS3Upload.log

Checking extensions are valid for each local file.
Acceptable .flac file.
**********************
In this post, I responded to November 2022’s T-SQL Tuesday #156 Invitation and gave my thoughts on some production code qualities. I gave examples of each quality and showed how they could save time and prevent unintended problems in a production environment.
Read the Docs is an open source tool for creating documentation. It uses the Sphinx documentation generator and is free for public repos. It offers the following features:
Free hosting for all documentation.
Documentation available in online and offline formats.
Automatic builds in response to Git commits.
Document versioning in response to Git branches and version control settings.
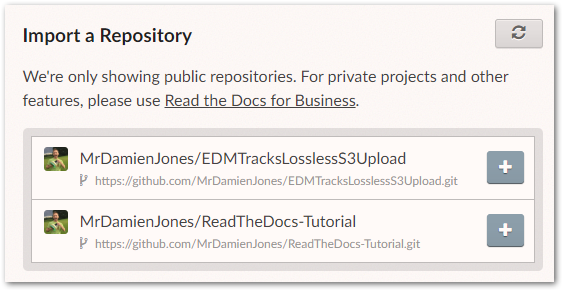
I begin by accessing the Read The Docs tutorial GitHub template and use this to create a repo on my GitHub account. I then sign up for a Read The Docs account and authorise it to interact with my GitHub account:
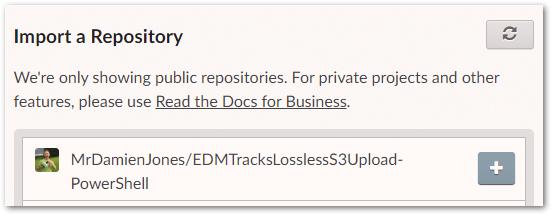
This allows Read The Docs to view the public repos in my GitHub account. They are then displayed in my Read The Docs console:
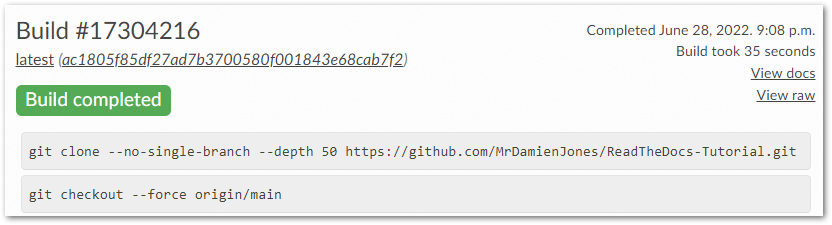
I select my ReadTheDocs-Tutorial repo and Read The Docs immediately starts building the documentation for it. Builds usually take around 30 to 40 seconds and Read The Docs gives updates throughout the process:
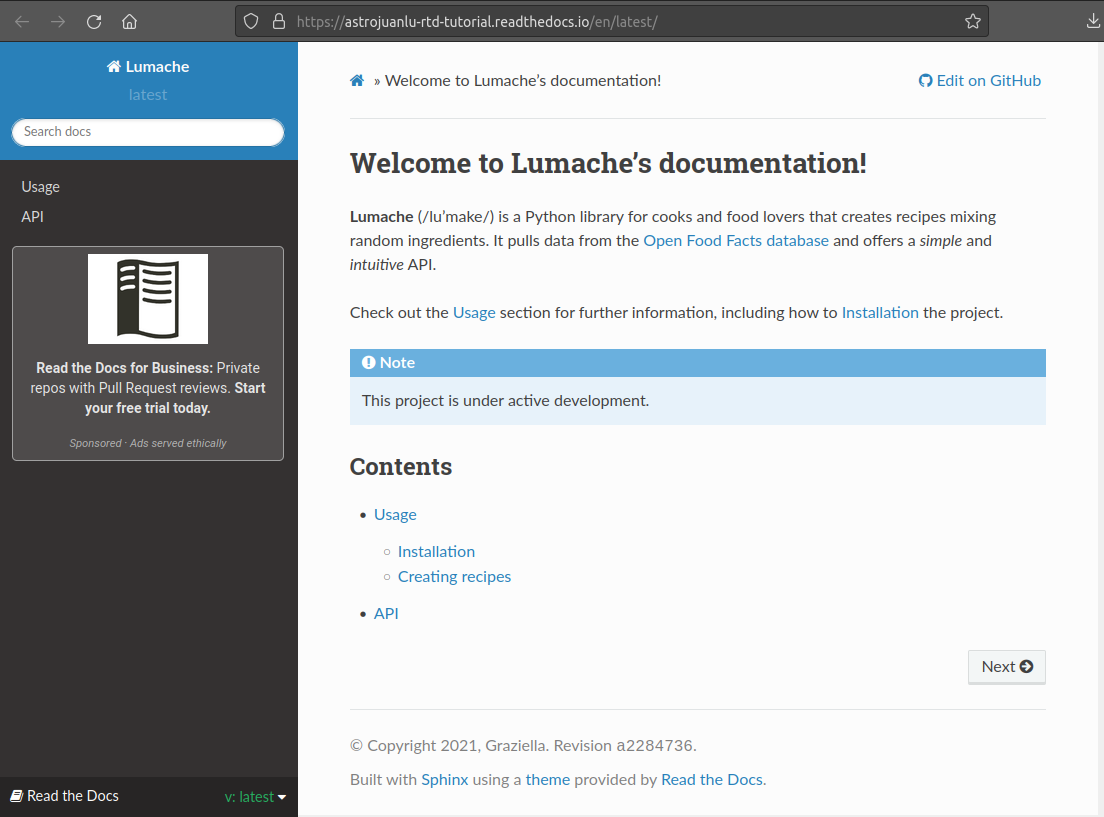
The end result is a site like the one below:
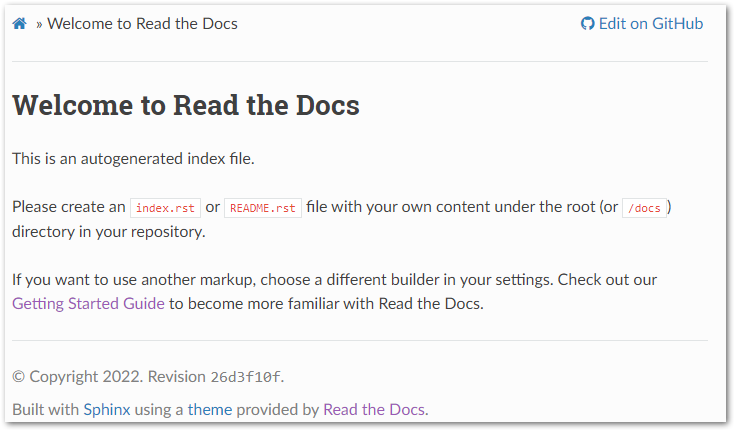
So far everything has been going well. What will happen when I try it out with the GitHub repository I made last time?
As before, the build takes around 30 seconds and gives me a link to my documentation. This time the site shows an autogenerated template instead:
This is because there is an important difference between the repos. The ReadMe in my repo is an .md (Markdown) file, whereas the Read The Docs tutorial documentation uses.rst(reStructuredText) files.
I’m currently getting to know Read The Docs and .rst, so I’ll use my tutorial repo for the remainder of this post and let my experiences guide my next steps.
Discovering .rst
Now that I’m more clued up on how Read The Docs works behind the scenes, let’s examine what .rst files look like and how they can be changed.
Included within the Read The Docs tutorials repo is a docs folder, which contains a source folder with four files:
api.rst
conf.py
index.rst
usage.rst
These files mirror the site generated by Read The Docs. For example, index.rst:
Welcome to Lumache's documentation!
===================================

**Lumache** (/lu'make/) is a Python library for cooks and food lovers
that creates recipes mixing random ingredients.
It pulls data from the `Open Food Facts database <https://world.openfoodfacts.org/>`_
and offers a *simple* and *intuitive* API.

Check out the :doc:`usage` section for further information, including
how to :ref:`installation` the project.

.. note::

   This project is under active development.

   Lumache has its documentation hosted on Read the Docs.

Contents
--------

.. toctree::

   usage
   api
Mirrors the page at readthedocs.io/en/latest/index.html:
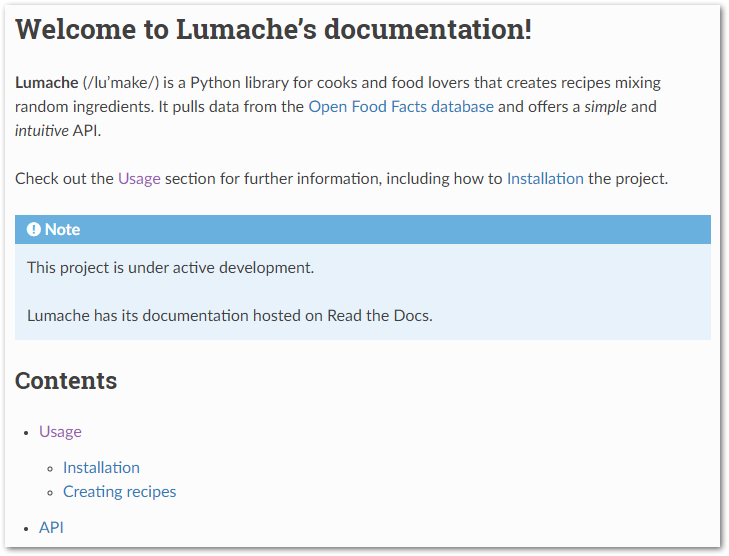
Let’s make some changes. I update index.rst to include new code on lines 18, 20 and 29:
Welcome to Lumache's documentation!
===================================

**Lumache** (/lu'make/) is a Python library for cooks and food lovers
that creates recipes mixing random ingredients.
It pulls data from the `Open Food Facts database <https://world.openfoodfacts.org/>`_
and offers a *simple* and *intuitive* API.

Check out the :doc:`usage` section for further information, including
how to :ref:`installation` the project.

.. note::

   This project is under active development.

   Lumache has its documentation hosted on Read the Docs.

.. note::

   This page also now holds test content for `EDMTracksLosslessS3Upload-PowerShell <https://github.com/MrDamienJones/EDMTracksLosslessS3Upload-PowerShell>`_.

Contents
--------

.. toctree::

   usage
   api
   instructions
Instructions
=====
.. _instructions:
Installation
------------
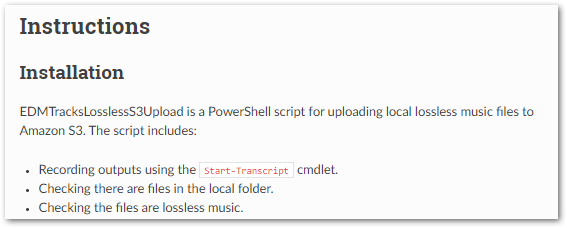
EDMTracksLosslessS3Upload is a PowerShell script for uploading local lossless music files to Amazon S3. The script includes:
- Recording outputs using the ``Start-Transcript`` cmdlet.
- Checking there are files in the local folder.
**(Some text removed to avoid unnecessary scrolling)**
Please use the most recent version. Previous versions are included for completeness.
.. _usage:
Usage
------------
When everything is in place, run the PowerShell script. PowerShell will then move through the script, producing outputs as work is completed. A typical example of a successful transcript is as follows:
.. code-block:: console
**********************
Transcript started, output file is C:\Users\Files\EDMTracksLosslessS3Upload.log
**(Some text removed to avoid unnecessary scrolling)**
All files processed. Exiting.
**********************
Windows PowerShell transcript end
End time: 20220617153926
**********************
instructions.rst on GitHub
The GitHub commit triggers a new Read The Docs build:
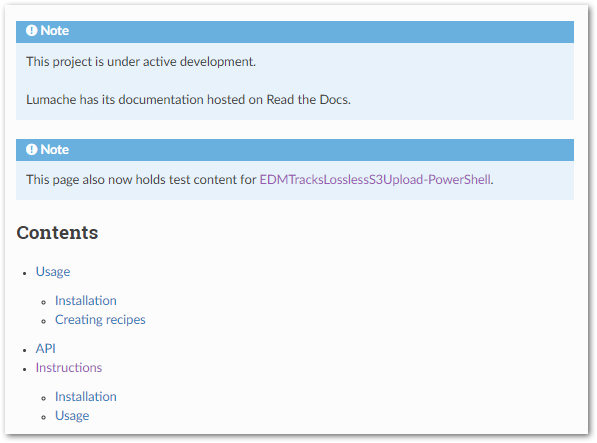
The new build updates the Index page with a new note and additional links in the Contents menu:
On paper, the reStructureText format is compelling. It avoids having a single ReadMe file that can easily get large and unwelcoming. The documentation produced by .rst is comparable to a wiki and GitHub supports it in preview and display modes.
That said, Markdown has embedded itself in more places and has found more buy-in as a result. Applications like Trello, Azure DevOps and, crucially, Visual Studio Code support it out of the box. This gives more opportunities to practise and use Markdown, essentially making it the de facto winner of this unofficial format war.
Although, while Markdown is designed for writing for the web, .rst is specifically designed for writing technical documentation. Support is out there – Sphinx has an .rst tutorial and some .rst previewers exist. The versatility of .rst and its ability to auto-generate documentation and navigation is also of interest.
I’m likely to give it a go when I have some beefier documentation to write and see how it works out. There are still parts of the tutorial I haven’t touched on, and the documentation is, perhaps unsurprisingly, very good. So it looks like Read The Docs would be a good tool to use for the right project.
Summary
In this post, I tried out the open source documentation tool Read The Docs. I made some sample documentation and experienced the reStructureText format for the first time. Then I committed some changes to work with the .rst format and get a feel for how it works.
If this post has been useful, please feel free to follow me on the following platforms for future updates:
For several months I’ve been going through some music from an old hard drive. These music files are currently on my laptop, and exist mainly as lossless .flac files.
For each file I’m doing the following:
Creating an .mp3 copy of each lossless file.
Storing the .mp3 file on my laptop.
Uploading a copy of the lossless file to S3 Glacier.
Transferring the original lossless file from my laptop to my desktop PC.
I usually do the uploads using the S3 console, and have been meaning to automate the process for some time. So I decided to write some code to upload files to S3 for me, in this case using PowerShell.
Prerequisites
Before starting to write my PowerShell script, I have done the following on my laptop:
Version 0 gets the basic functionality in place. No bells and whistles here – I just want to upload a file to an S3 bucket prefix, stored using the Glacier Flexible Retrieval storage class.
V0: Writing To S3
I am using the PowerShell Write-S3Object cmdlet to upload my files to S3. This cmdlet needs a couple of parameters to do what’s required:
-BucketName: The S3 bucket receiving the files.
-Folder: The folder on my laptop containing the files.
-KeyPrefix: The S3 bucket key prefix to assign to the uploaded objects.
-StorageClass: The S3 storage class to assign to the uploaded objects.
I create a variable for each of these so that my script is easier to read as I continue its development. I couldn’t find the inputs that the -StorageClass parameter uses in the Write-S3Object documentation. In the end, I found them in the S3 PutObject API Reference.
I don’t have to log onto the S3 console for uploads anymore.
Forgetting to specify Glacier Flexible Retrieval as the S3 storage class is no longer a problem. The script does this for me.
Starting an upload to S3 is now as simple as right-clicking the script and selecting Run With PowerShell from the Windows Context Menu.
Version 0 works great, but I’ll give away one of my S3 bucket names if I start sharing a non-redacted version. This has been known to cause security issues in severe cases. Ideally, I’d like to separate the variables from the Powershell commands, so let’s work on that next.
Version 1: Security
Version 1 enhances the security of my script by separating my variables from my PowerShell commands. To make this work without breaking things, I’m using the following features:
To take advantage of these features, I’ve made two new files in my repo:
Variables.ps1 for my variables.
V1Security.ps1 for my Write-S3Object command.
So let’s now talk about how this all works.
V1: Isolating Variables With Dot Sourcing
At the moment, my script is broken. Running Variables.ps1 will create the variables but do nothing with them. Running V1Security.ps1 will fail as the variables aren’t in that script anymore.
This is where Dot Sourcing comes in. Using Dot Sourcing lets PowerShell look for code in other places. Here, when I run V1Security.ps1 I want PowerShell to look for variables in Variables.ps1.
To dot source a script, type a dot (.) and a space before the script path. As both of my files are in the same folder, PowerShell doesn’t even need the full path:
. .\EDMTracksLosslessS3Upload-Variables.ps1
Now my script works again! But I still have the same problem – if Variables.ps1 is committed to GitHub at any point then my variables are still visible. How can I stop that?
This time it’s Git to the rescue. I need a .gitignore file.
V1: Selective Tracking With .gitignore
.gitignore is a way of telling Git what not to include in commits. Entering a file, folder or pattern into a repo’s .gitignore file tells Git not to track it.
When Visual Studio Code finds a .gitignore file, it helps out by making visual changes in response to the file’s contents. When I create a .gitignore file and add the following lines to it:
#Set Variables


#The local file path for objects to upload to S3
#E.g. "C:\Users\Files\"
$LocalSource =

#The S3 bucket to upload the objects to
#E.g. "my-s3-bucket"
$S3BucketName =

#The S3 bucket prefix / folder to upload the objects to (if applicable)
#E.g. "Folder\SubFolder\"
$S3KeyPrefix =

#The S3 Storage Class to upload to
#E.g. "GLACIER"
$S3StorageClass =
Version 1 VariablesBlank.ps1 On GitHub
V1: Evaluation
Version 1 now gives me the benefits of Version 0 with the following additions:
My variables and commands have now been separated.
I can now call Variables.ps1 from other scripts in the same folder, knowing the variables will be the same each time for each script.
I can use .gitignore to make sure Variables.ps1 is never uploaded to my GitHub repo.
The next problem is one of visibility. I have no way to know if my uploads have been successful. Or if they were duplicated. Nor do I have any auditing.
The S3 console gives me a summary at the end of each upload:
It would be great to have something similar with my script! In addition, some error handling and quality control checks would increase my confidence levels.
Let’s get to work!
Version 2: Visibility
Version 2 enhances the visibility of my script. The length of the script grows a lot here, so let’s run through the changes and I’ll explain what’s going on.
As a starting point, I copied V1Security.ps1 and renamed it to V2Visibility.ps1.
V2: Variables.ps1 And .gitignore Changes
Additions are being made to these files as a result of the Version 2 changes. I’ll mention them as they come up, but it makes sense to cover a few things up-front:
I added External to all variable names in Variables.ps1 to keep track of them in the script. For example, $S3BucketName is now $ExternalS3BucketName.
There are some additional local file paths in Variables.ps1 that I’m using for transcripts and some post-upload checks.
The first change is perhaps the simplest. PowerShell has built-in cmdlets for creating transcripts:
Start-Transcript creates a record of all or part of a PowerShell session in a separate file.
Stop-Transcript stops a transcript that was started by the Start-Transcript cmdlet.
These go at the start and end of V2Visibility.ps1, along with a local file path for the EDMTracksLosslessS3Upload.log file I’m using to record everything.
This new path is stored in Variables.ps1. In addition, EDMTracksLosslessS3Upload.log has been added to .gitignore.
V2: Check If There Are Any Files
Now the error handing begins. I want the script to fail gracefully, and I start by checking that there are files in the correct folder. First I count the files using Get-ChildItem and Measure-Object:
And then stop the script running if no files are found:
If ($LocalSourceCount -lt 1)
{
Write-Output "No Local Files Found.  Exiting."
Start-Sleep -Seconds 10
Stop-Transcript
Exit
}
There are a couple of cmdlets here that make several appearances in Version 2:
Start-Sleep suspends PowerShell activity for the time stated. This gives me time to read the output when I’m running the script using the context menu.
Exit causes PowerShell to completely stop everything it’s doing. In this case, there’s no point continuing as there’s nothing in the folder.
If files are found, PowerShell displays the count and carries on:
Else
{
Write-Output "$LocalSourceCount Local Files Found"
}
V2: Check If The Files Are Lossless
Next, I want to stop any file uploads that don’t belong in the S3 bucket. The bucket should only contain lossless music – anything else should be rejected.
So now, if I attempt to upload an unacceptable .log file, the transcript will say:
**********************
Transcript started, output file is C:\Files\EDMTracksLosslessS3Upload.log
Checking extensions are valid for each local file.
Unacceptable .log file found. Exiting.
**********************
Whereas an acceptable .flac file will produce:
**********************
Transcript started, output file is C:\Files\EDMTracksLosslessS3Upload.log
Checking extensions are valid for each local file.
Acceptable .flac file.
**********************
And when uploading multiple files:
**********************
Transcript started, output file is C:\Files\EDMTracksLosslessS3Upload.log
Checking extensions are valid for each local file.
Acceptable .flac file.
Acceptable .wav file.
Acceptable .flac file.
**********************
V2: Check If The Files Are Already In S3
The next step checks if the files are already in S3. This might not seem like a problem, as S3 usually overwrites an object if it already exists.
Thing is, this bucket is replicated. This means it’s also versioned. As a result, S3 will keep both copies in this scenario. In the world of Glacier this doesn’t cost much, but it will distort the bucket’s S3 Inventory. This could lead to confusion when I check them with Athena. And if I can stop this situation with some automation then I might as well.
I’m going to use the Get-S3Object cmdlet to query my bucket for each file. For this to work, I need two things:
-BucketName: This is in Variables.ps1.
-Key
-Key is the object’s S3 file path. For example, Folder\SubFolder\Music.flac. As the files shouldn’t be in S3 yet, these keys shouldn’t exist. So I’ll have to make them using PowerShell.
Get-S3Object should return null as the object shouldn’t exist.
If this doesn’t happen then the object is already in the bucket. In this situation, PowerShell identifies the file causing the problem and then exits the script:
If the file isn’t found then PowerShell continues to run:
Else
{
Write-Output "$LocalSourceObjectFileName does not currently exist in S3 bucket."
}
Assuming no files are found at this point, the log will read as follows:
Checking if local files already exist in S3 bucket.
Checking S3 bucket for Artist-Track-ExtendedMix.flac
Artist-Track-ExtendedMix.flac does not currently exist in S3 bucket.
Checking S3 bucket for Artist-Track-OriginalMix.flac
Artist-Track-OriginalMix.flac does not currently exist in S3 bucket.
V2: Uploading Files Instead Of Folders
Now to start uploading to S3!
In Version 2 I’ve altered how this is done. Previously my script’s purpose was to upload a folder to S3 using the PowerShell cmdlet Write-S3Object.
Version 2 now uploads individual files instead. There is a reason for this that I’ll go into shortly.
This means I have to change things around as Write-S3Object now needs different parameters:
Instead of telling the -Folder parameter where the local folder is, I now need to tell the -File parameter where each file is located.
Instead of telling the -KeyPrefix parameter where to store the uploaded objects in S3, I now need to tell the -Key parameter the full S3 path for each object.
I’ll do -Key first. I start by opening another ForEach loop, and create an S3 key for each file in the same way I did earlier:
The main benefit of this approach is that, if something goes wrong mid-upload, the transcript will tell me which uploads were successful. Version 1’s script would only tell me that uploads had started, so in the event of failure I’d need to check the S3 bucket’s contents.
Speaking of failure, wouldn’t it be good to check that the uploads worked?
V2: Were The Uploads Successful?
For this, I’m still working in the ForEach loop I started for the uploads. After an upload finishes, PowerShell checks if the object is in S3 using the Get-S3Object command I wrote earlier:
This time I want the object to be found, so null is a bad result.
Next, I get PowerShell to do some heavy lifting for me. I’ve created a pair of new local folders called S3WriteSuccess and S3WriteFail. The paths for these are stored in Variables.ps1.
If my S3 upload check doesn’t find anything and returns null, PowerShell moves the file from the source folder to S3WriteFail using Move-Item:
If ($null -eq $LocalSourceObjectFileNameS3Check)
{
Write-Output "S3 Upload Check FAIL: $LocalSourceObjectFileName. Moving to local Fail folder"
Move-Item -Path $LocalSourceObjectFilepath -Destination $ExternalLocalDestinationFail
}
If the object is found, PowerShell moves the file to S3WriteSuccess:
Else
{
Write-Output "S3 Upload Check Success: $LocalSourceObjectFileName. Moving to local Success folder"
Move-Item -Path $LocalSourceObjectFilepath -Destination $ExternalLocalDestinationSuccess
}
The ForEach loop then repeats with the next file until all are processed.
So now, a failed upload produces the following log:
**********************
Beginning S3 Upload Checks On Following Objects: StephenJKroos-Micrsh-OriginalMix
S3 Upload Check: StephenJKroos-Micrsh-OriginalMix.flac
S3 Upload Check FAIL: StephenJKroos-Micrsh-OriginalMix. Moving to local Fail folder
**********************
Windows PowerShell transcript end
**********************
While a successful S3 upload produces this one:
**********************
Beginning S3 Upload Checks On Following Objects: StephenJKroos-Micrsh-OriginalMix
S3 Upload Check: StephenJKroos-Micrsh-OriginalMix.flac
S3 Upload Check Success: StephenJKroos-Micrsh-OriginalMix. Moving to local Success folder
**********************
Windows PowerShell transcript end
**********************
PowerShell then shows a final message before ending the transcript:
Write-Output "All files processed. Exiting."
Start-Sleep -Seconds 10
Stop-Transcript
##################################
####### EXTERNAL VARIABLES #######
##################################
#Load External Variables Via Dot Sourcing
. .\EDMTracksLosslessS3Upload-Variables.ps1
#Start Transcript
Start-Transcript -Path $ExternalTranscriptPath -IncludeInvocationHeader
###############################
####### LOCAL VARIABLES #######
###############################
#Get count of items in $ExternalLocalSource
#Get list of filenames in $ExternalLocalSource
$LocalSourceCount = (Get-ChildItem -Path $ExternalLocalSource | Measure-Object).Count
#Get list of extensions in $ExternalLocalSource
$LocalSourceObjectFileExtensions = Get-ChildItem -Path $ExternalLocalSource | ForEach-Object -Process { [System.IO.Path]::GetExtension($_) }
#Get list of filenames in $ExternalLocalSource
$LocalSourceObjectFileNames = Get-ChildItem -Path $ExternalLocalSource | ForEach-Object -Process { [System.IO.Path]::GetFileName($_) }
##########################
####### OPERATIONS #######
##########################
#Check there are files in local folder.
Write-Output "Counting files in local folder."
#If local folder less than 1, output this and stop the script.
If ($LocalSourceCount -lt 1)
{
Write-Output "No Local Files Found. Exiting."
Start-Sleep -Seconds 10
Stop-Transcript
Exit
}
#If files are found, output the count and continue.
Else
{
Write-Output "$LocalSourceCount Local Files Found"
}
#Check extensions are valid for each file.
Write-Output " "
Write-Output "Checking extensions are valid for each local file."
ForEach ($LocalSourceObjectFileExtension In $LocalSourceObjectFileExtensions)
{
#If any extension is unacceptable, output this and stop the script.
If ($LocalSourceObjectFileExtension -NotIn ".flac", ".wav", ".aif", ".aiff")
{
Write-Output "Unacceptable $LocalSourceObjectFileExtension file found. Exiting."
Start-Sleep -Seconds 10
Stop-Transcript
Exit
}
#If extension is fine, output the extension for each file and continue.
Else
{
Write-Output "Acceptable $LocalSourceObjectFileExtension file."
}
}
#Check if local files already exist in S3 bucket.
Write-Output " "
Write-Output "Checking if local files already exist in S3 bucket."
#Do following actions for each file in local folder
ForEach ($LocalSourceObjectFileName In $LocalSourceObjectFileNames)
{
#Create S3 object key using $ExternalS3KeyPrefix and current object's filename
$LocalSourceObjectFileNameS3Key = $ExternalS3KeyPrefix + $LocalSourceObjectFileName
#Create local filepath for each object for the file move
$LocalSourceObjectFilepath = $ExternalLocalSource + "\" + $LocalSourceObjectFileName
#Output that S3 upload check is starting
Write-Output "Checking S3 bucket for $LocalSourceObjectFileName"
#Attempt to get S3 object data using $LocalSourceObjectFileNameS3Key
$LocalSourceObjectFileNameS3Check = Get-S3Object -BucketName $ExternalS3BucketName -Key $LocalSourceObjectFileNameS3Key
#If local file found in S3, output this and stop the script.
If ($null -ne $LocalSourceObjectFileNameS3Check)
{
Write-Output "File already exists in S3 bucket: $LocalSourceObjectFileName.  Please review.  Exiting."
Start-Sleep -Seconds 10
Stop-Transcript
Exit
}
#If local file not found in S3, report this and continue.
Else
{
Write-Output "$LocalSourceObjectFileName does not currently exist in S3 bucket."
}
}
#Output that S3 uploads are starting - count and file names
Write-Output " "
Write-Output "Starting S3 Upload Of $LocalSourceCount Local Files."
Write-Output "These files are as follows: $LocalSourceObjectFileNames"
Write-Output " "
#Do following actions for each file in local folder
ForEach ($LocalSourceObjectFileName In $LocalSourceObjectFileNames)
{
#Create S3 object key using $ExternalS3KeyPrefix and current object's filename
$LocalSourceObjectFileNameS3Key = $ExternalS3KeyPrefix + $LocalSourceObjectFileName
#Create local filepath for each object for the file move
$LocalSourceObjectFilepath = $ExternalLocalSource + "\" + $LocalSourceObjectFileName
#Output that S3 upload is starting
Write-Output "Starting S3 Upload Of $LocalSourceObjectFileName"
#Write object to S3 bucket
Write-S3Object -BucketName $ExternalS3BucketName -File $LocalSourceObjectFilepath -Key $LocalSourceObjectFileNameS3Key -StorageClass $ExternalS3StorageClass
#Output that S3 upload check is starting
Write-Output "Starting S3 Upload Check Of $LocalSourceObjectFileName"
#Attempt to get S3 object data using $LocalSourceObjectFileNameS3Key
$LocalSourceObjectFileNameS3Check = Get-S3Object -BucketName $ExternalS3BucketName -Key $LocalSourceObjectFileNameS3Key
#If $LocalSourceObjectFileNameS3Key doesn't exist in S3, move to local Fail folder.
If ($null -eq $LocalSourceObjectFileNameS3Check)

{
Write-Output "S3 Upload Check FAIL: $LocalSourceObjectFileName.  Moving to local Fail folder"
Move-Item -Path $LocalSourceObjectFilepath -Destination $ExternalLocalDestinationFail
}
#If $LocalSourceObjectFileNameS3Key does exist in S3, move to local Success folder.
Else

{
Write-Output "S3 Upload Check Success: $LocalSourceObjectFileName.  Moving to local Success folder"
Move-Item -Path $LocalSourceObjectFilepath -Destination $ExternalLocalDestinationSuccess
}
}
#Stop Transcript
Write-Output " "
Write-Output "All files processed.  Exiting."
Start-Sleep -Seconds 10
Stop-Transcript
V2Visibility.ps1 On GitHub
VariablesBlank.ps1 Version 2
##################################
####### EXTERNAL VARIABLES #######
##################################

#The local file path for the transcript file
#E.g. "C:\Users\Files\"
$ExternalTranscriptPath =

#The local file path for objects to upload to S3
#E.g. "C:\Users\Files\"
$ExternalLocalSource =

#The S3 bucket to upload objects to
#E.g. "my-s3-bucket"
$ExternalS3BucketName =

#The S3 bucket prefix / folder to upload  objects to (if applicable)
#E.g. "Folder\SubFolder\"
$ExternalS3KeyPrefix =

#The S3 Storage Class to upload to
#E.g. "GLACIER"
$ExternalS3StorageClass =

#The local file path for moving successful S3 uploads to
#E.g. "C:\Users\Files\"
$ExternalLocalDestinationSuccess =

#The local file path for moving failed S3 uploads to
#E.g. "C:\Users\Files\"
$ExternalLocalDestinationFail =
Version 2 VariablesBlank.ps1 On GitHub
V2: Evaluation
Overall I’m very happy with how this all turned out! Version 2 took a script that worked with some supervision, and turned it into something I can set and forget.
The various checks now have my back if I select the wrong files or if my connection breaks. And, while the Get-S3Object checks mean that I’m making more S3 API calls, the increase won’t cause any bill spikes.
The following is a typical transcript that my script produces following a successful upload of two .flac files:
**********************
Transcript started, output file is C:\Users\Files\EDMTracksLosslessS3Upload.log
Counting files in local folder.
2 Local Files Found

Checking extensions are valid for each local file.
Acceptable .flac file.
Acceptable .flac file.

Checking if local files already exist in S3 bucket.
Checking S3 bucket for MarkOtten-Tranquility-OriginalMix.flac
MarkOtten-Tranquility-OriginalMix.flac does not currently exist in S3 bucket.
Checking S3 bucket for StephenJKroos-Micrsh-OriginalMix.flac
StephenJKroos-Micrsh-OriginalMix.flac does not currently exist in S3 bucket.

Starting S3 Upload Of 2 Local Files.
These files are as follows: MarkOtten-Tranquility-OriginalMix StephenJKroos-Micrsh-OriginalMix.flac

Starting S3 Upload Of MarkOtten-Tranquility-OriginalMix.flac
Starting S3 Upload Check Of MarkOtten-Tranquility-OriginalMix.flac
S3 Upload Check Success: MarkOtten-Tranquility-OriginalMix.flac.  Moving to local Success folder
Starting S3 Upload Of StephenJKroos-Micrsh-OriginalMix.flac
Starting S3 Upload Check Of StephenJKroos-Micrsh-OriginalMix.flac
S3 Upload Check Success: StephenJKroos-Micrsh-OriginalMix.flac.  Moving to local Success folder

All files processed.  Exiting.
**********************
Windows PowerShell transcript end
End time: 20220617153926
**********************
In this post, I created a script to upload lossless music files from my laptop to one of my Amazon S3 buckets using PowerShell.
I introduced automation to perform checks before and after each upload, and logged the outputs to a transcript. I then produced a repo for the scripts, accompanied by a ReadMe document.
If this post has been useful, please feel free to follow me on the following platforms for future updates: