In this post I will use Python and AWS Data Wrangler to create a basic iTunes ETL that extracts data from an iTunes export file into a Pandas DataFrame.
Table of Contents
- Introduction
- iTunes Export Files
- Setup
- Advisory
- Creating Secure Variables
- Making The ETL
- Scripts
- Summary
Introduction
For many years I have enjoyed various forms of dance music. Starting with my first compilation CDs in 2000, I’ve since amassed a large collection of records, CDs and virtual media ranging from the late 80s to modern times.
I started using iTunes as my main media player in 2010. Since then I have built up a large database of iTunes metadata that includes various counts, ratings and timestamps.
Currently I use this data for a series of iTunes Smart Playlists. To derive further meaning from the data and to practise my Python skills, I want to extract this data from iTunes and analyse it using the various data tools at my disposal.
To get the ball rolling I’m going to build a basic iTunes ETL, which I will continue to develop over the coming months.
Let’s start by looking at the iTunes export process.
iTunes Export Files
I use iTunes 12.6.4.3. This isn’t by choice – iTunes 12.6.4.3 is the last version with a built-in App Store, allowing my battered old iPhone 3GS to live on in its second life as an iPod Touch:

I mention this as newer versions of iTunes may be different, or may not offer an export feature at all. Why do I persist with this ageing setup? That…is a post for another time.
Every week I sync my Not-iPhone via iTunes, and then create an export of my master playlist:
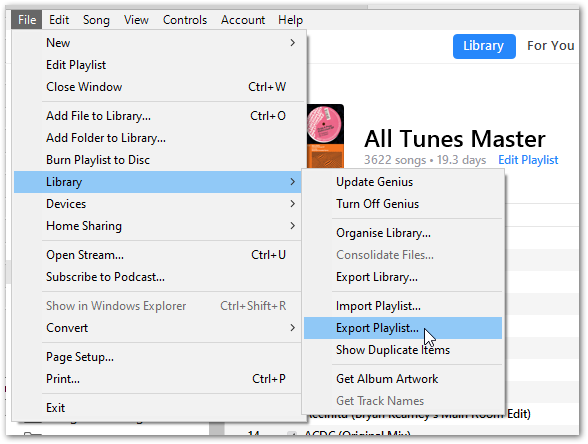
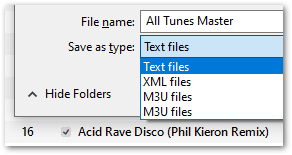
iTunes doesn’t have many export options, and exports playlists as tab-delimited txt files by default:
To give myself an easier time for this post, I manually made the following changes to a recent iTunes export file:
- Imported the
txtfile into Microsoft Excel. - Removed columns I didn’t want.
- Saved the altered file as a
csv. - Uploaded the
csvto Amazon S3.
This Franken-File will be what I use to build my basic iTunes ETL. I understand there are ways of dealing with txt files in Python – I’ll be exploring this in future posts.
Setup
Before starting to write any code, I have done the following:
- Checked my Python version – currently 3.9.
- Built a Python development environment with WSL.
- Created a virtual environment.
- Created an AWS IAM user with programmatic access.
Advisory
During this post, I will make several decisions that will be revisited in the coming months as my skills improve. I have taken steps to protect my AWS credentials (more on that shortly) but at this stage my basic iTunes ETL Python script is a work in progress and should not be used in a Production environment.
Creating Secure Variables
My first job is to create the variables I’m going to need. As these variables can compromise my AWS account in the wrong hands, I want to create them as securely as possible.
The topic of security is something I will be returning to in future posts. For now, I’m using a similar method to PowerShell’s Dot Sourcing in last month’s post.
Python’s import statement can import other Python scripts in the same way as modules. With this in mind, I create a new ETL_ITU_Play_Variables.py file for my variables.
Importing ETL_ITU_Play_Variables into my main script will allow Python to locate the variables and call them successfully:
import ETL_ITU_Play_Variables

aws_accesskey = ETL_ITU_Play_Variables.AWS_ACCESSKEY
aws_secret = ETL_ITU_Play_Variables.AWS_SECRET
Next I create a gitignore file and add ETL_ITU_Play_Variables.py to it. I can now use these variables in my local environment, safe in the knowledge that Git will not track ETL_ITU_Play_Variables and will not include it in any commits.
With that taken care of, I need two sets of variables.
Creating Authentication Variables
AWS authenticates every request before completing it. As none of my AWS resources are public, I need to provide credentials that have the necessary IAM permissions.
There are various ways to provide these credentials – in this case I’m using an AWS Access Key / Secret Key combination with a variable for each string:
aws_accesskey = 'accesskey123456789'
aws_secretkey = 'secretkey123456789'
As additional security, these keys belong to a new IAM user that only has permission to read S3 objects in the appropriate bucket.
I now need a way to pass these keys to AWS. I use the AWS SDK for Python (Boto3) for this, creating a session variable using boto3.session.Session
session = boto3.session.Session
(
aws_access_key_id = aws_accesskey,
aws_secret_access_key = aws_secret
)
Creating S3 Variables
Next I create the S3 variables I need. I use s3_bucket for the bucket name and s3_prefix for the iTunes export csv‘s bucket prefix.
s3_bucket = 'example-my-bucket'
s3_prefix = 'Example/MyPath/'
I then use these variables to create s3_path for AWS Data Wrangler to use:
s3_path = f"s3://{s3_bucket}/{s3_prefix}"
Making The ETL
With my variables in place, I can start working on my basic iTunes ETL! AWS is now accepting my requests, so let’s start configuring AWS Data Wrangler.
Creating The DataFrame
AWS Data Wrangler is essentially Pandas on AWS, and the two tools share many commands. This DataEng Uncomplicated AWS Data Wrangler Overview does a great job of explaining the fundamentals:
I read the iTunes Export csv‘s contents by using awswrangler.s3.read_csv with the following parameters:
path: Mys3_pathvariable.path_suffix: The files I want to read, in this case.csv.boto3_session: Mysessionvariable.
This reads all the csv files in the S3 path, which is fine for now.
df = wr.s3.read_csv(path = s3_path,
                    path_suffix = ".csv",
                    boto3_session = session
                    )
I can then print the columns in a DataFrame:
print (f'Dataframe columns are {df.columns}')
Dataframe columns are Index(['Name', 'Artist', 'Album', 'Genre', 'Time', 'Track Number', 'Year', 'Date Modified', 'Date Added', 'Bit Rate', 'Plays', 'Last Played', 'Skips', 'Last Skipped', 'My Rating', 'Location'], dtype='object')
Deleting Unnecessary Columns
Having seen the list of columns, there are some I don’t need. I can get rid of them using pandas.DataFrame.drop:
df = df.drop(columns=
    [
        'Time',
        'Bit Rate',
        'Skips',
        'Last Skipped',
        'Location'
    ]
)
Now, when I print the list of columns, the removed columns are no longer included:
print (f'Dataframe columns are now {df.columns}')
Dataframe columns are now Index(['Name', 'Artist', 'Album', 'Genre', 'Track Number', 'Year', 'Date Modified', 'Date Added', 'Plays', 'Last Played', 'My Rating'], dtype='object')
Renaming Columns
Next, I want to rename the columns. I use pandas.DataFrame.rename to map the current column names to the new ones:
df = df.rename(columns=
    {
        'Name' : 'name',
        'Artist' : 'artist',
        'Album' : 'album',
        'Genre' : 'genre',
        'Track Number' : 'tracknumber',
        'Year' : 'year',
        'Date Modified' : 'datemodified',
        'Date Added' : 'dateadded',
        'Plays' : 'plays',
        'Last Played' : 'lastplayed',
        'My Rating' : 'myrating'
    }
)
The columns are now changed to:
print (f'Dataframe columns are now named {df.columns}')
Dataframe columns are now named Index(['name', 'artist', 'album', 'genre', 'tracknumber', 'year', 'datemodified', 'dateadded', 'plays', 'lastplayed', 'myrating'], dtype='object')
Reformatting DateTime Columns
I now want to make sure that the dates in my DataFrame are stored in ISO 8601 format, as this will make them earlier to work with and report against.
When I print the dateadded column as an example, the dates are not currently in this format:
print (f'Dataframe Date Added column is {df.dateadded}')
1       05/04/2021 13:29
2       26/01/2019 18:25
3       30/12/2016 17:34
4       12/12/2015 00:43
I can resolve this using the dayfirst and yearfirst arguments of pandas.to_datetime:
df['dateadded'] = pd.to_datetime(df['dateadded'],yearfirst=False,dayfirst=True)
This tells Pandas how to interpret the dates. In the case of 05/04/2021, dayfirst=True tells Pandas this is 5th April 2021, as opposed to 4th May 2021.
Pandas then parses the rest of my dates in the same way, giving me the formatting I want:
1      2021-04-05 13:29:00
2      2019-01-26 18:25:00
3      2016-12-30 17:34:00
4      2015-12-12 00:43:00
I repeat this for the datemodified and lastplayed columns.
Creating Date Columns From DateTime Columns
I now want to create some new columns in my DataFrame.
The first of these new columns will mirror the values in the existing date columns. However, these columns will not contain the full timestamp – they will only contain the date instead. This will make it easier to aggregate my data.
To do this, I use pandas.Series.dt.date to create three new columns in the DataFrame:
df['datemodifieddate'] = df['datemodified'].dt.date
df['dateaddeddate'] = df['dateadded'].dt.date
df['lastplayeddate'] = df['lastplayed'].dt.date
The new columns retain the original date values and remove the unneeded time values:
print (f'Dataframe Date Added Date column is {df.dateaddeddate}')
1       2021-04-05
2       2019-01-26
3       2016-12-30
4       2015-12-12
Creating Simplified Rating Columns
I now want to add another column to the DataFrame to simplify reporting against a track’s rating. Ratings in iTunes export files appear in multiples of twenty:
- 1 star = 20
- 2 stars = 40
- 3 stars = 60
- 4 stars = 80
- 5 stars = 100
In my current DataFrame, printing myrating produces this:
print (f'Dataframe My Rating is {df.myrating}')
1        40.0
2        40.0
3        60.0
4        80.0
This produces a disconnect between the data in the DataFrame and the data in the iTunes GUI. I would prefer to keep things simple by having a column where the rating value mirrors the iTunes GUI.
This can be added to my DataFrame by using a function. I define an itunes_rating function that will return an integer based on the value that is passed to it:
def itunes_rating(r):
    """Converts ratings in export file to familiar format"""
    if r == 20:
        return 1
    elif r == 40:
        return 2
    elif r == 60:
        return 3
    elif r == 80:
        return 4
    elif r == 100:
        return 5
    else:
        return 0
I then create a new myratingdigit column in my DataFrame by passing each value in the myrating column to the itunes_rating function and capturing the result:
df['myratingdigit'] = df['myrating'].apply(itunes_rating)
And when I print the new column, the results are as expected:
print (f'Dataframe My Rating Digit is {df.myratingdigit}')
1       2
2       2
3       3
4       4
Setting Data Types
Finally, I want to make sure the DataFrame is using the correct data types for each column. Pandas will usually infer data types correctly but doesn’t always get it right.
I can use pandas.DataFrame.dtypes to see the current data types in my DataFrame. At the moment they are:
name                        object
artist                      object
album                       object
genre                       object
tracknumber                  int64
year                         int64
datemodified        datetime64[ns]
dateadded           datetime64[ns]
plays                      float64
lastplayed          datetime64[ns]
myrating                   float64
datemodifieddate            object
dateaddeddate               object
lastplayeddate              object
myratingdigit                int64
Most of these are correct but some need changing. For example, plays will never have decimal places so should be int, and columns like datemodifieddate should be datetime64.
Pandas has several options for this, which are laid out in this helpful Stack Overflow thread. Here, I use astype to assign data types to my dataframe:
df = df.astype(
    {
        'name' : str,
        'artist' : str,
        'album' : str,
        'genre' : str,
        'tracknumber' : int,
        'year' : int,
        'datemodified' : datetime64,
        'dateadded' : datetime64,
        'plays' : int,
        'lastplayed' : datetime64,
        'myrating' : int,
        'datemodifieddate' : datetime64,
        'dateaddeddate' : datetime64,
        'lastplayeddate' : datetime64,
        'myratingint' : int
    }
)
Pandas uses NumPy datetime64 dtypes for working with time series data, so I import it at the top of my script:
from numpy import datetime64
Fixing A Casting Exception
Unfortunately, while testing the newly assigned dtypes I started getting an error:
Exception has occurred: IntCastingNaNError
Cannot convert non-finite values (NA or inf) to integer
This error means that at least one of the columns I’m trying to cast as int contains an empty value. An infinite value is possible, but unlikely due to the various integrity checks iTunes performs on its library.
To find the empty values, I create a second DataFrame using the data in the first, using pandas.DataFrame.isna and pandas.DataFrame.any to find any NA values:
df1 = df[df.isna().any(axis=1)]
Included within the resulting DataFrame were the following tracks:
3571	7 Hours (Original Mix)	Dan Stone	07A-Dm	...	2019-01-26	NaT	1

3575	8th Wonder (Espen & Stian Remix)	8 Wonders	04A-Fm	...	2019-01-26	NaT	1
Checking iTunes shows that these tracks have no plays:
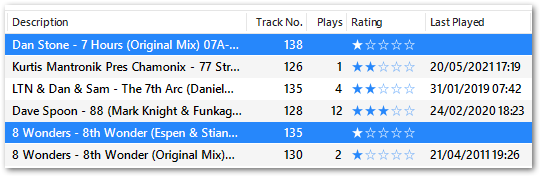
iTunes represents no plays as an empty string as opposed to a zero. This is then extracted into the DataFrame as NA, causing the IntCastingNaN error.
To fix this, I use pandas.DataFrame.fillna to replace the empty fields with zero. Although only the plays column is generating the error, I apply fillna to all the columns being cast as int to prevent any future problems for the ETL:
df['tracknumber'] = df['tracknumber'].fillna(0)
df['year'] = df['year'].fillna(0)
df['plays'] = df['plays'].fillna(0)
df['myrating'] = df['myrating'].fillna(0)
The myratingint column doesn’t need this approach, since my itunes_rating function always returns zero if no conditions are met.
This time, printing the data types shows an acceptable list:
name                        object
artist                      object
album                       object
genre                       object
tracknumber                  int64
year                         int64
datemodified        datetime64[ns]
dateadded           datetime64[ns]
plays                        int64
lastplayed          datetime64[ns]
myrating                     int64
datemodifieddate    datetime64[ns]
dateaddeddate       datetime64[ns]
lastplayeddate      datetime64[ns]
myratingdigit                int64
Exporting The DataFrame As A CSV
This is as far as I’m going to take the DataFrame in this post. As a final check, I want to extract the DataFrame in some form to confirm its suitability for future work I have planned.
The quickest way to do this is with pandas.DataFrame.to_csv. This writes the entire DataFrame to a csv file. When I run:
df.to_csv('ETL-ITU.csv')
A ETL-ITU.csv file is created in the terminal’s working directory that can be viewed and sandboxed as needed.
Scripts
My gitignore file commit from 2022-07-17 can be viewed here:

My ETL_ITU_Play.py file commit from 2022-07-17 can be viewed here:
A requirements.txt file has also been created to aid installation. The file commit from 2022-07-20 can be viewed here:
Summary
In this post I used Python and AWS Data Wrangler to create a basic iTunes ETL that extracts data from an iTunes export file into a Pandas DataFrame. I have used various Python modules to extract and transform the data, and the data is now ready to be loaded to a staging area of my choosing.
Expect to see further posts on this in the coming months. This basic iTunes ETL probably won’t stay basic for long!
If this post has been useful, please feel free to follow me on the following platforms for future updates:
Thanks for reading ~~^~~