In this post I talk about my recent experience with the AWS Certified Developer – Associate certification, discuss why and how I studied for the exam and explain why part of the process was like an early 90s puzzle game.
Table of Contents
- Introduction
- Motivation For Earning The AWS Developer Associate
- Resources For The AWS Developer Associate
- Approach To Studying The AWS Developer Associate
- Next Steps
Introduction
On 25 March 2022 I earned the AWS Certified Developer – Associate certification. This is my fourth AWS certification and I now hold all the associate AWS certifications. People wanting to know more are welcome to view my Credly badges.

Motivation For Earning The AWS Developer Associate
Firstly I’ll explain why I took the exam. I like to use certifications as evidence of my current knowledge and skillset, and as mechanisms to introduce me to new topics that I wouldn’t otherwise have interacted with.
There’s a gap of around 18 months between my last AWS certification and this one. There are a few reasons for that:
- I wanted to give the knowledge from the Solutions Architect and SysOps Administrator certifications time to bed in.
- I wanted to use my new skills for the AWS data migration project at work.
- My role at the time didn’t involve many of the services covered in the Developer Associate exam.
After the AWS migration was completed and I became a Data Engineer, I felt that the time was right for the Developer Associate. My new role brought with it new responsibilities, and the AWS migration made new tooling available to the business. I incorporated the Developer Associate into the upskilling for my new role over a four month period.
The benefits of the various sections and modules of the Developer Associate can be split across:
- Projects the Data Engineering team is currently working on.
- Future projects the Data Engineering team is likely to receive.
- Projects I can undertake in my own time to augment my skillset.
Current Work Projects
- Our ETLs are built using Python on AWS Lambda. The various components of Lambda were a big part of the exam and helped me out when writing new ETLs and modernising legacy components.
- Git repos are a big part of the Data Engineering workstream. I am a relative newcomer to Git, and the sections on CodeCommit helped me better understand the fundamentals.
- Build tests and deployments are managed by the Data Engineering CICD pipelines. The CodeBuild, CodeDeploy and CodePipeline sections have shown me what these pipelines are capable of and how they function.
- Some Data Engineering pipelines use Docker. The ECS and Fargate sections helped me understand containers conceptually and the benefits they offer.
Future Work Projects
- Sections about CloudWatch and SNS will be useful for setting up new monitoring and alerting as the Data Engineering team’s use of AWS services increases.
- The DynamoDB module will be helpful when new data sources are introduced that either don’t need a relational database or are prone to schema changes.
- Sections about Kinesis will help me design streams for real-time data processing and analytics.
Future Personal Projects
- The CloudFormation and SAM modules will help me build and deploy applications in my AWS account for developing my Python knowledge.
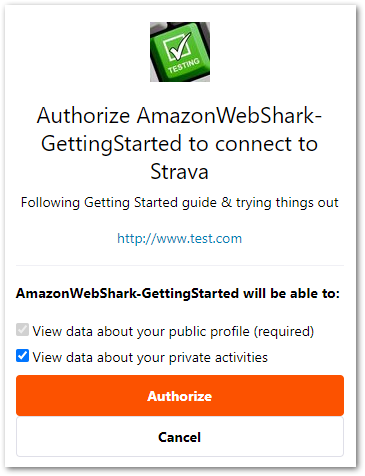
- Sections on Cognito will help me secure these applications against unauthorized and malicious activity.
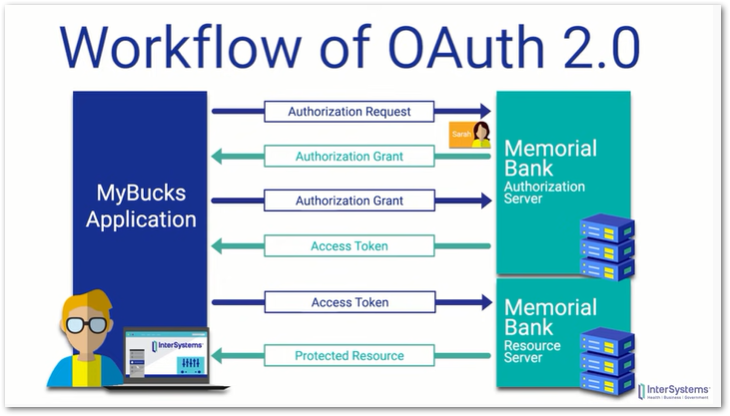
- The API Gateway module will let me define how my applications can be interacted with and how incoming requests should be handled.
- Sections on KMS will help me secure my data and resources when releasing homemade applications.
Resources For The AWS Developer Associate
Because AWS certifications are very popular, there are many resources to choose from. I used the following resources for my AWS Developer Associate preparation.
Stéphane Maarek Udemy Course
I’ve been a fan of Stéphane Maarek for some time, having used his courses for all of my AWS associate exams. His Ultimate AWS Certified Developer Associate is exceptional, with 32 hours of well presented and informative videos covering all exam topics. In addition, his code and slides are also included.
Stéphane is big on passing on real-world skills as opposed to just teaching enough to pass exams, and his dedication to keeping his content updated is clearly visible in the course.
À votre santé Stéphane!
Tutorials Dojo Learning Portal
Tutorials Dojo, headed by Jon Bonso, is a site with plentiful resources for AWS, Microsoft Azure and Google Cloud. Their practice exams are known for being hard but fair and are comparable to the AWS exams. All questions include detailed explanations of both the correct and incorrect answers. These practice exams were an essential part of my preparation.
Their Certified Developer Associate practise exam package offers a number of learning choices:
- Want to mimic the exam? Timed Mode poses 65 questions against the clock.
- Prefer immediate feedback? Review Mode shows answers and explanations after every question.
- Practising a weak area? Section-Based Mode limits questions to specific topics.
Tutorials Dojo also offers a variety of Cheat Sheets and Study Guides. These are free, comprehensive and regularly updated.
AWS Documentation & FAQs
AWS documentation is the origin of most questions in the exam and Stéphane and Jon both reference it in their content. I refer to it in situations where a topic isn’t making sense, or if a topic is a regular stumbling block in the practice exams.
For example, I didn’t understand API Gateway integration types until I read the API Gateway Developer Guide page. I am a visual learner, but sometimes there’s no substitute for reading the instruction manual! The KMS FAQs cleared up a few problem areas for me as well.
AWS also have their own learning services, including the AWS Skill Builder. While I didn’t use it here, some of my AWS certifications will expire in 2023 so I’ll definitely be looking to test out Skill Builder then.
Anki
Anki is a free and open-source flashcard program. It has a great user guide that includes an explanation of how it aids learning. I find Anki works best for short pieces of information that I want regular exposure to via their mobile app.
For example, one of my Anki cards was:
CodeCommit: Migrate Git = CLONE Git; PUSH Git
PULL = NULL
This was explaining the process of migrating a Git repo to CodeCommit. PULL = NULL was a way for me to remember that pulling objects from the Git repo was incorrect in that scenario.
If an Anki card goes over two lines I use pen and paper for it instead. Previous experience has taught me that I can visualise small notes better on Anki and large notes better on paper.
Blogging
My best exam performance is with the AWS services I am most familiar with. Towards the end of my exam preparation, I wanted to fill some knowledge gaps by getting my hands dirty!
My posts about creating security alerts and enhanced S3 notifications let me get to grips with CloudTrail, CloudWatch, EventBridge and SNS. These all made an appearance in my exam so this was time well spent!
I also ran through an AWS guide about Building A Serverless Web Application to get some quick experience using API Gateway, CodeCommit and Cognito. This has given me some ideas for future blog projects, so stay tuned!
Approach To Studying The AWS Developer Associate
This section goes into detail about how I approached my studies. I didn’t realise it at the time but, on review, the whole process is basically a long ETL. With sword fighting.
Extract
I started by watching Stéphane’s course in its entirety, ‘extracting’ notes as I went. Since Stéphane provided his slides and since I already knew some topics from previous experience, the notes were mostly on topics that I either didn’t know or was out of practice with.

Transform
Having finished Stéphane’s course, I started the Tutorials Dojo practice exams. The aim here is to ‘transform’ my knowledge from notes and slides to answers to exam questions.
I have a spreadsheet template in Google Sheets for this process:

As I work through a practice exam, I record how I feel about my answers:

I can choose from:
- Confident: I’m totally confident with my answer
- 5050: I’m torn between two answers but have eliminated some
- Guess: I have no idea what the answer is
When I get the results of the practice exam, I add the outcomes:
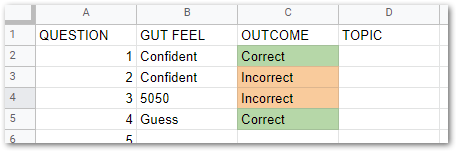
The Gut Feel and Outcome columns then populate tables elsewhere on the spreadsheet:

I use these tables for planning my next moves:
- The top table quantifies overall confidence, and can answer questions like “Is my confidence improving between practise exams?”, “How often am I having to guess answers?” and “How confident am I about taking the real exam?”
- I can get the middle table from Tutorials Dojo, but have it on the sheet for convenience.
- The bottom table shows me an analysis of
Gut FeelandOutcome. This shows me how many of my correct answers were down to knowledge, and in addition how many were down to luck.
I then update the Question column of the spreadsheet depending on the results in the bottom table:
- I assume that anything listed as
ConfidentandCorrectis well known. Nothing is changed. - All
5050sandCorrect Guessesare coloured orange. Here some knowledge is apparent, but more revision is needed. - All
Incorrect Guessesare coloured red, because there are clear knowledge gaps here. - Anything listed as
ConfidentandIncorrectis also coloured red. These are the biggest red flags of all, as here knowledge has either been misread or misunderstood.
Load
As the knowledge gaps and development areas become clear, I began to ‘load’ the topics that still didn’t make sense or were proving hard to remember.
Based on the Tutorials Dojo practise exam outcomes, I made a second set of notes that were more concise than the first. So where the first set was mostly “Things I Don’t Know” the second set was mostly “Things I Can’t Remember”.
As you might imagine, this uses a fair amount of paper. I recycle this afterwards because I’m an environmentally-conscious shark.
Insult Sword Fighting
I’ve come to know part of the ‘load’ as Insult Sword Fighting. Some people will know exactly what I’m talking about here, while others will quite rightly need some explanation.
Insult Sword Fighting is part of the 1990 point and click adventure game The Secret of Monkey Island. In this section of the game, the player wins fights by knowing the correct responses to an opponent’s insults.
For example, during a fight the opponent might say:
“You fight like a dairy farmer.”
To which the player’s response should be:
“How appropriate. You fight like a cow!”
The player starts out with two insult-response pairs, and learns more during subsequent fights.
The aim of the section is to learn enough to defeat the Sword Master. However, her insults are different to the ones the player has previously seen. For the final challenge, the player must match their existing knowledge to the new insults.
So if the Sword Master says:
“I will milk every drop of blood from your body!”
The player should pick up on the word “milk” and respond with:
“How appropriate. You fight like a cow!”
OK But What Does This Have To Do With The Exam?
So let me explain. The first time with a practice exam is like the player’s first Insult Sword Fight. Most responses are unknown or unfamiliar, so things usually don’t go well.
The player gets better at Insult Sword Fighting by challenging new opponents. This time the player will know some responses, but will also encounter new insults to learn.
In the same way, the subsequent practice exams will pose some questions that are similar to those in the previous exam. Of course there will also be entirely new questions that need further investigation.


The player will decide they are ready to face the Sword Master when they are able to win the majority of their Insult Sword Fights because they know the logic behind the correct responses.
Like the insults, the logic behind the practice exam questions can also be learned. Knowing the logic well enough to regularly answer these questions correctly is a good indicator that the real exam is a good idea.
The Sword Master’s insults are different to the ones the player has trained with. To win, the player must look for key words and phrases in the new insults and match them to their existing responses during battle.

The real exam will use unfamiliar questions. However the key words and phrases in the questions will match the knowledge built up during the practice exams, revealing the logic to arrive at the correct answers!
For those wondering how I made these images, I direct you to this awesome tool.
Next Steps
Now that the Developer Associate exam is over, I have a number of ideas for blog posts and projects to try out:
- Building an ETL for my own data
- Creating an API to query that data
- Deploying the solution using Git and CICD
Plus I have a bookmarks folder and Trello board full of ideas to consider. So plenty to keep me busy!
If this post has been useful, please feel free to follow me on the following platforms for future updates:
Thanks for reading ~~^~~