I first found O’Reilly books a few years back in a Data Engineering-themed Humble Bundle. Since then, I’ve built an extensive library of both e-books and physical books, with many more on my Amazon wish list. At the start of 2025, I decided to actually start reading them…
So far, I’ve finished three. Now, I don’t feel compelled to review them all. But having finished Practical Lakehouse Architecture I decided to start the Shark Shelf. This will be an occasional series of review posts about books that I really like, or that deserve some fanfare. And yes – How To Solve Itbelongs on the Shark Shelf.
Now let’s talk about Practical Lakehouse Architecture.
The Author
Gaurav Ashok Thalpati hails from Pune, India, where he’s worked as an independent cloud data consultant for decades. He’s a blogger and YouTuber, holds multiple data certifications and is an AWS Community Builder.
In July 2024, O’Reilly published his first book, Practical Lakehouse Architecture.
The Book
From the Practical Lakehouse Architecture blurb:
This guide explains how to adopt a data lakehouse architecture to implement modern data platforms. It reviews the design considerations, challenges, and best practices for implementing a lakehouse and provides key insights into the ways that using a lakehouse can impact your data platform, from managing structured and unstructured data and supporting BI and AI/ML use cases to enabling more rigorous data governance and security measures.
Practical Lakehouse Architecture was released in July 2024. It is available in both physical and eBook forms from O’Reilly, Amazon US, Amazon UK and eBooks.
Motivations
Reading a book?! In 2025?! I know, right? This section examines my motivations for buying and reading Practical Lakehouse Architecture.
Project Wolfie
I recently wrote about the beginning of Project Wolfie. I kinda expected to have started coding by now. Instead, most of my work is currently on paper and whiteboards. But there’s a good reason for this.
Project Wolfie is greenfield. I don’t have any existing code or resources, and I can use modern tools freely. However, with this freedom comes responsibility. Every choice I make now affects the architecture and involves tradeoffs. As much as I want to start working on the deliverables, I also want to make sensible decisions that can withstand scrutiny.
My hope with Practical Lakehouse Architecture was that it would help me with critical areas like observability, CI/CD, and security. Because it’s not that there isn’t advice online…
Advice Spread Thin
Lakehouse architectures are relatively recent in the data landscape. As a result, their understanding is not as established as that of data warehouses and data lakes, and some aspects of Lakehouse architecture are still evolving.
Many Lakehouse resources are either brief overviews, opinionated deep dives into specific use cases or marketing posts acting as best practices. This makes it hard to find balanced advice. My hope with Practical Lakehouse Architecture was that it would offer clear, unbiased views.
Professional Curiosity
As of 2025, I’ve spent nearly a decade in technical data roles. And in that time I’ve seen massive changes in data management, ranging from a server cupboard in Stockport to huge, multi‑region distributed data platforms.
Over the years, I’ve cultivated a passion for data technology, evolving from writing blog posts and speaking at meetups to working as an AWS consultant. As an AWS Community Builder in the Data category, I can access early previews and best practices from AWS experts. Additionally, as an AWS User Group Leader, I help attendees and guest speakers discuss data patterns.
With this in mind, I was curious about what new insights Practical Lakehouse Architecture could offer me.
Book Review
Onto the review! In this section, I’ll summarise the chapters and examine what stood out in each.
Chapters 1 – 3
The first set of chapters introduces the foundations of Lakehouse architecture, comparing it with traditional models and exploring the importance of storage in modern data platforms.
Chapter 1: Introduction to Lakehouse Architecture lays the groundwork for the book, putting all readers on equal footing for the chapters ahead. Gaurav starts by defining and exploring the ideas and concepts of various data architectures. He then examines the characteristics, evolution and benefits of the Lakehouse architecture.
Chapter 2: Traditional Architectures and Modern Platforms contrasts the Lakehouse architecture with traditional data lakes and data warehouses, outlining the benefits and limitations of each. Gaurav then shifts his focus to how modern cloud platforms have transformed these traditional architectures.
I like how Gaurav hasn’t dismissed lakes and warehouses here. Both are proven and well-understood options, and they are still the better choice in certain situations over Lakehouses.
Chapter 3: Storage: The Heart Of The Lakehouse examines the various factors surrounding data storage. Gaurav looks at row-based and column-based storage formats. He then explains the features and uses of Parquet, ORC, and Avro. He also compares newer open table formats, like Iceberg, Hudi, and Delta Lake, highlighting their similarities, differences, and use cases.
This is one area where the book really shines. Having topics like this explained clearly in one place, without having to go online, is incredibly useful!
Chapters 4 – 6
Next, these chapters focus on the operational and organisational elements of Lakehouse architectures. Topics include metadata management, compute engines, and governance. These elements are essential for effectively scaling and securing a modern data platform.
Chapter 4: Data Catalogs explores the purpose of data catalogs and the different types of metadata they can contain. It explains how catalogs support essential processes such as classification, governance, and lineage. Gaurav also compares data catalog implementations across AWS, Azure, and GCP.
Including multi-cloud examples both broadens the chapter’s scope and reinforces the cloud-agnostic nature of Lakehouse architecture – an important theme of the book.
Chapter 5: Compute Engines for Lakehouse Architectures examines compute options for batch and real-time data processing. Gaurav covers open-source tools such as Spark, Flink, and Presto, as well as cloud-native services like AWS Glue, Google BigQuery, and Databricks. He offers practical advice for selecting a compute engine, considering factors such as provisioning complexity, open-source support and AI/ML capabilities.
Chapter 6: Data and AI Governance and Security in Lakehouse Architecture explores governance and security, crucial areas for any production-ready data platform. Gaurav discusses core topics such as data quality, ownership, sensitivity and compliance. He also explores how governance responsibilities span both business and technical domains, emphasising the importance of organisational roles in maintaining control and oversight.
Chapters 7 – 9
Finally, these chapters focus on the practical realities of Lakehouse implementation – moving between theory and practice, and looking ahead to the architecture’s potential future.
Chapter 7: The Big Picture: Designing and Implementing a Lakehouse Platform examines considerations ranging from requirements gathering to defining business goals. Recommended Lakehouse zones are analysed and explained, and the expectations for each zone are defined. Finally, CICD is considered, and a sample design questionnaire is provided to help guide implementation planning.
Zones, or layers, are currently one of the most contentious areas of Lakehouse architectures. I like Gaurav’s stance on this – it’s somewhat similar to Simon Whiteley‘s. Yup – this video again.
Chapter 8: Lakehouse in the Real World does something I don’t see often – contrasting ideal scenarios with real-world events. It covers key stages in a Lakehouse’s development like analysis, testing and maintenance, examining what could go wrong and offering mitigation strategies.
This section is definitely accurate, as I’ve encountered some of these factors! It includes comparing greenfield and brownfield implementations, examining how business constraints affect technology choices, and considering if the desired RPO and RTO targets are financially and logistically possible.
Finally, Chapter 9: Lakehouse Of The Future looks ahead, exploring how Lakehouses might evolve in the years to come. Gaurav discusses potential intersections with trends like Data Mesh, Zero ETL and AI model integration. He also introduces emerging technologies like Delta UniForm and Apache XTable, which aim to improve interoperability across data processing systems and query engines. Finally, he touches on future innovations such as Apache Puffin and Ververica Streamhause that could further transform the data landscape.
(Sidenote: this Dremio post explores UniFrom and XTable very well.)
Thoughts
Having finished the book (in two weeks no less!), here are my thoughts:
Firstly, it’s not an intimidating read. At 283 pages, Practical Lakehouse Architecture is authoritative and content-rich without being overly complex or wordy. It also uses familiar O’Reilly conventions and style. When placed next to similar books I own, like The Data Warehouse Toolkit (600 pages) and Designing Data-Intensive Applications (614 pages), it’s easier to pick up and get into. And with some books, that’s a battle in itself!
Also, Practical Lakehouse Architecture‘s flow is very natural and the chapters make their points very well. I find some technical books, including some O’Reilly ones, hard to follow because they feel disjointed and jargon-heavy. That wasn’t the case here. The book held my attention very well throughout, and will serve me well as a future reference point.
Practical Lakehouse Architecture also feels like it will be relevant for a while. Some of my technical books have sections that are now outdated due to rapid technological changes. Here, ideas such as decoupled storage and compute, unified governance, and data personas will continue to matter for years to come.
Overall, an excellent book that I enjoyed reading.
Summary
In this post, I reviewed Gaurav Ashok Thalpati’s 2024 book ‘Practical Lakehouse Architecture‘ published by O’Reilly Media.
Ultimately, Practical Lakehouse Architecture is a well-written and informative book that caters to a wide range of skills. It’s a strong addition to the O’Reilly catalogue and complements titles like Rukmani Gopalan‘s 2022 book, The Cloud Data Lake, which I’m currently reading. It’s a great knowledge source for this constantly evolving modern data architecture.
If this post has been useful then the button below has links for contact, socials, projects and sessions:
On 24 January 2025, our German Shepherd Wolfie sadly passed away.
Wolfie was a long, fluffy boi with a big presence and a big mane. He enjoyed sniffing things, tilting his head and barking at foxes. He was loud, proud and bushy-browed.
Wolfie was also psychic. No one could leave the house without his knowledge, and no one could enter it without having a snout-first search.
Wolfie struggled with various health issues throughout his life, including eating difficulties, muscle problems and genetic defects. Despite this, Wolfie was a cherished family member for four years before he sadly lost his battle with kidney failure and suspected cancer.
Our walks often involved music, and I regularly exposed Wolfie to my music library. He grew so accustomed to iPods during walks that he would bark whenever I picked one up!
After he was gone, I found myself revisiting the songs we shared. Music became a way to cherish those memories, so I wanted to create something meaningful in his memory…
Project Wolfie
This section explores what Project Wolfie is, the music data it utilises and its goals.
Definition
This project has been on my mind for some time now, and I suppose this was the push it needed to take shape. Project Wolfie is a data-driven initiative that explores the patterns hidden in my music collection. It analyses track metadata, listening habits and technical attributes to find insights, trends and recommendations.
Here, Wolfie is short for:
Waveform Observations Library For Intelligence Engineering
Let’s break this down:
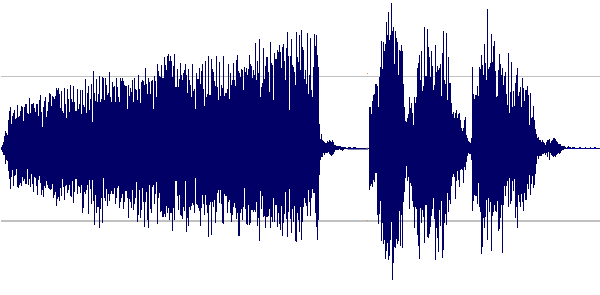
Waveform: A visual illustrating a track’s traits like timbre, pitch and dynamics. Time is represented on the horizontal axis, while the vertical axis reflects amplitude.
Here is a sample waveform:
Observations Library: A consolidated data repository containing information about my music’s properties and my listening habits. The data consists of various types, structures and formats, and will be stored, cleaned and enriched for further use.
For Intelligence Engineering: The AI and BI use cases for the observations library. Here, interactive data visualisation and machine learning services will use the data to uncover patterns, predict trends and generate personalised recommendations.
Data
Music files contain more than just sound – they hold layers of metadata that are crucial to Project Wolfie.
This section explores the different types of metadata related to my music collection, highlighting their functions and purposes. I have assigned these categories using my understanding and intended use of the data.
Technical Metadata
Technical Metadata refers to the measurable and technical attributes of a music file. It tends to include numerical values and audio properties, and is commonly found by analysing the track using applications like Audacity, foobar2000 and MixedInKey, as well as Python libraries like Librosa.
Descriptive Metadata refers to the contextual and identifying information about a music track. It tends to include text-based details and is commonly found both within the track’s properties and on websites like Beatport and Discogs.
Examples include:
Who produced the track, and what is it called?
What is the track’s genre?
Which label published the track, and when?
Interaction MetaData
Interaction Metadata refers to engagement and listening behaviours. It typically includes dates, integers and timestamps, and is commonly generated by digital music services like iTunes and Spotify.
Examples include:
When was the last time a track was played or skipped?
How many times has a track been played?
What rating has a track been assigned?
Deliverables
Here are the objectives I’m pursuing in Project Wolfie. Given their complexity, they will be divided into multiple epics and spread out over an extended period.
Data Lakehouse
So far, I have discussed the importance, types, and applications of data. To this end, I need to fulfil a few requirements:
Ingesting and storing data from multiple sources.
Transforming and cleaning data at scale.
Enriching and aggregating data for analytics and consumption.
In short, I need a Data Lakehouse. I’ve written about them before and have followed the Medallion Architecture through bronze, silver and gold layers. For Project Wolfie and moving forward, I’ll be using the well-documented and supported AWS reference architecture:
I find this clearer and more regimented than the Medallion Architecture. It also aligns with the points made in Simon Whiteley‘s Advancing Analytics video, which I agree with.
Of course, a good Data Lakehouse isn’t possible without good data…
Quality & Observability
A Data Lakehouse’s effectiveness depends on data quality and observability. Project Wolfie must address factors like:
Veracity & Validation Checks: Verify data accuracy. Checks such as schema validation, null checks and data quality rules can identify issues early, stopping incorrect data from propagating downstream.
Anomaly Detection: Identify patterns often missed by validation like volume spikes and missing periods. Timely anomaly detection shields downstream resources from requiring remedial measures and lowers unforeseen cloud and developer expenses.
Lineage Tracking: Track the data’s journey from ingestion to consumption, documenting all transformations and processes. Vital for debugging, auditing and validation.
Governance & Security
A Data Lakehouse must balance accessibility and control. Governance and security protocols protect data while encouraging responsible usage.
I own all Project Wolfie data, so I have permission to process it. Additionally, there is no sensitive information or PII. However, there are other factors to consider:
Access Controls: Establish guidelines for who and what can access Project Wolfie resources. This safeguards data and services from unauthorised access, misuse and malicious activities.
Data Controls: Establish criteria for availability, backups, and structure. This aids in managing costs, ensuring disaster recovery, and maintaining schema consistency.
Monitoring & Logging: Track access patterns and record changes to data and infrastructure. This improves visibility into both potential threats and cost-related opportunities and vulnerabilities.
AI & BI Use Cases
Finally, I want to extract value and insights from Project Wolfie using Artificial Intelligence (AI) and Business Intelligence (BI). I have data from 2021 onwards from a music collection I started in the early 2000s, so I have lots to work with!
BI Use Cases (Dashboards, Analytics, Insights)
Listening Trends: Identify traits of my collection’s most frequently played and best-represented music. Analyse listening patterns over time to find trends.
Library Optimisation: Find rarely played tracks to add to playlists. Recognise songs that are often played and recommend alternatives for variety.
Distribution Analysis: Analyse my collection’s main genres, publishers and record labels, and investigate the connections between different elements (e.g., “The most popular tracks are typically in the 120-130 BPM range”). Create reports that show diversity and spread (e.g., “90% of house tracks are in five minor keys”).
AI Use Cases (Machine Learning, Automation, Predictions)
AI-Powered Personalised Playlists: Create playlists using the existing library based on properties like BPMs, keys and previous listening patterns, similar to Spotify Wrapped.
Smart Music Recommendations: Use collaborative filtering to suggest search criteria for new music based on my existing collection and listening habits (e.g., “Try G minor tracks at 128 BPM from the early 2010s”).
Predictive Analysis: Use Technical and Descriptive Metadata from new tracks to predict how they will be rated based on my existing library’s metadata (e.g., “This track has harmonic similarities to 70% of your highly rated tracks.“).
Summary
In this post, I discussed our late German Shepherd Wolfie and outlined a project that utilises music data in his memory.
Wolfie enjoyed scent games and retrieving toys, making Project Wolfie’s mission to find and return data and insights a fitting tribute. As the project evolves, I will strengthen its capabilities using new architectures and technologies, honouring Wolfie’s spirit – one track at a time.
Wolfie was more than just a pet; he was a companion and a guardian each day. I miss you big man. Take care out there.
If this post has been useful then the button below has links for contact, socials, projects and sessions:
In the Medallion Lakehouse Architecture, this covers both the Bronze and Silver layers that handle raw and processed data respectively. Now I’ll start aggregating my WordPress data for reporting and analytics. For this, I’ll use AWS Glue Studio.
Firstly, I’ll explore Glue Studio and its features. Next, I’ll architect and build an ETL job using Glue Studio’s visual editor while examining some of Glue’s behaviours. Finally, I’ll update my WordPress Data Pipeline Step Functions workflow and examine costs.
Let’s begin with Glue Studio.
AWS Glue Studio
This section introduces Glue Studio and examines Apache Spark.
AWS Glue Studio
AWS Glue Studio is a serverless tool designed for data-centric tasks like automating data preparation, orchestrating data quality checks and creating ETL jobs. It integrates with other AWS services, and also interacts with data from sources like RDS, Redshift and S3. It is ideal for simplifying data transformation and integration processes. The AWS documentation contains full details of Glue Studio’s features.
Under the hood, Glue Studio uses PySpark, the Python API for Apache Spark. Workflows can be created both as code and via Glue Studio’s visual interface. Glue Studio supports Git version control systems for change management, and integrates several observability tools including AWS IAM for security and Amazon CloudWatch for logging. Additionally, Glue also has its own monitoring and orchestration tools.
But wait – Spark? PySpark? What?!
Apache Spark
Apache Spark is an open-source framework designed to process large-scale data quickly. Spark enables distributed computing, allowing tasks to be performed across multiple machines for faster and more efficient data processing. It has existed since 2014.
Known for its speed, Spark processes data in memory, significantly reducing the need for slower disk operations associated with older systems. Spark is commonly used for big data analytics, machine learning and real-time data processing in industries that handle massive datasets.
PySpark
PySpark is a Python interface for Apache Spark. It allows operations to be distributed across clusters of machines while maintaining the accessibility and ease of Python. PySpark’s combination of Python’s simplicity and Spark’s power makes it a practical, accessible solution for handling extensive datasets in a fast and scalable way.
Glue Studio’s visual interface automatically writes PySpark code in real time. For example, this boilerplate Python script is created with each new Glue PySpark job:
For those curious, this DataEng video provides a technical explanation of each import:
So that’s the basics of AWS Glue Studio. Now let’s see what the solution looks like.
Architecture
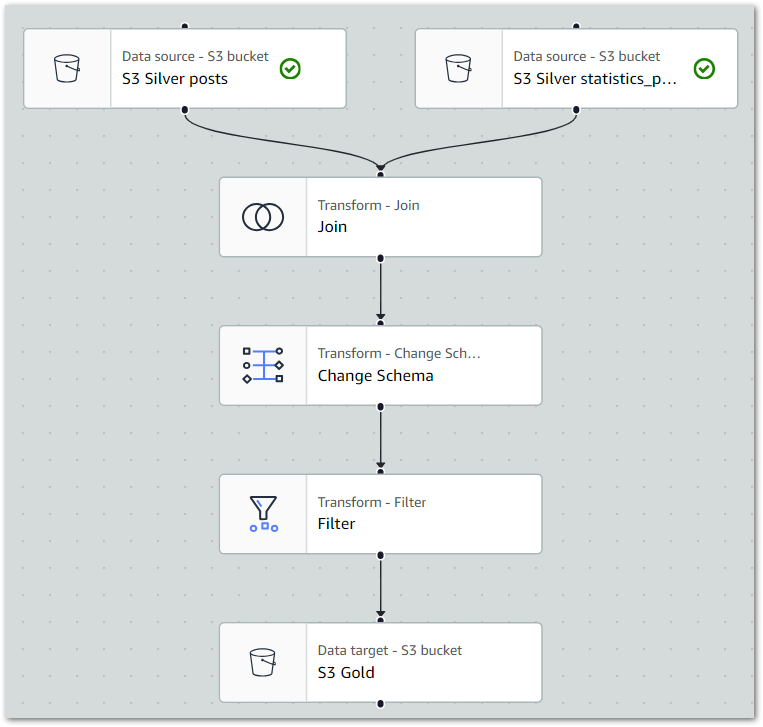
This section examines my proposed solution’s architecture. Much of this architecture is similar to both the Bronze and Silver layers. I’ll examine the new Gold Glue PySpark ELT job first, followed by the updated WordPress data pipeline Step Function workflow.
Glue Gold ETL Job
Firstly, this is the Gold Glue PySpark ETL job:
While updating CloudWatch Logs throughout:
Gold Glue ETL job extracts data from wordpress-api Silver S3 objects and then performs PySpark transformations.
Gold Glue PySpark ETL job loads the transformed data into Gold S3 bucket as Parquet objects.
Step Function Workflow
Next, the updated Step Function workflow:
While updating the workflow’s CloudWatch Log Group throughout:
An EventBridge Schedule executes the Step Functions workflow. Lambda Raw function is invoked.
Invocation Fails: Publish SNS message. Workflow then ends.
Invocation Fails: Publish SNS message. Workflow then ends.
Invocation Succeeds: Run Glue Bronze Crawler.
Glue Bronze Crawler runs.
Run Fails: Publish SNS message. Workflow then ends.
Run Succeeds: Update Glue Data Catalog. Run Glue Silver ETL job.
Glue Silver ETL job runs.
Run Fails: Publish SNS message. Workflow then ends.
Run Succeeds: Run Glue Silver Data Quality Checks.
Glue Silver Data Quality Checks run.
Run Fails: Publish SNS message. Workflow then ends.
Run Succeeds: Run Glue Silver Crawler.
Glue Silver Crawler runs.
Run Fails: Publish SNS message. Workflow then ends.
Run Succeeds: Update Glue Data Catalog. Run Glue Gold ETL job.
Glue Gold PySpark ETL job runs.
Run Fails: Publish SNS message. Workflow then ends.
Run Succeeds: Run Glue Gold Crawler.
Glue Gold Crawler runs.
Run Fails: Publish SNS message. Workflow then ends.
Run Succeeds: Update Glue Data Catalog. Workflow then ends.
Additionally, an SNS message is published if the Step Functions workflow fails.
Gold ETL Job
In this section, I create my Gold Glue PySpark ETL job. Firstly, I’ll define the job’s requirements. Next, I’ll build the job in Glue Studio, and finally I’ll examine Glue’s inbuilt monitoring.
Requirements
Let’s begin by understanding the Gold Layer. Databricks defines it as curated, business-level data:
Data in the Gold layer of the lakehouse is typically organised in consumption-ready “project-specific” databases. The Gold layer is for reporting and uses more de-normalised and read-optimised data models with fewer joins. The final layer of data transformations and data quality rules are applied here.
The concept of a gold layer is nothing new. Other names include aggregated, enriched and consumption layers. The idea is the same in all cases – producing refined and aggregated datasets that are easily consumable by analytics tools, machine learning models and production applications.
This Gold ETL job will produce an aggregation of both the posts and statistics_pages Silver datasets. The Gold dataset will contain view statistics and post creation data, limited to blog posts.
This will involve:
Joining the Silver datasets.
Removing unneeded columns to reduce the Gold dataset’s size.
Renaming columns to improve the Gold dataset’s legibility.
Filtering the Gold dataset to remove unneeded data.
So let’s get started!
Job Creation
This section splits the Gold Glue PySpark ETL job creation process into separate steps for each part.
Sources
Firstly, let’s define the data sources. There are two sources, both of which are folders in the data-lakehouse-silver S3 bucket:
wordpress_api/posts/
wordpress_api/statistics_pages/
Each source needs a separate node specifying the S3 path and data format. This example shows the Silver posts dataset, where the wordpress_api/posts/ S3 path is selected:
Finally, this is the Source node’s PySpark code for both posts and statistics_pages:
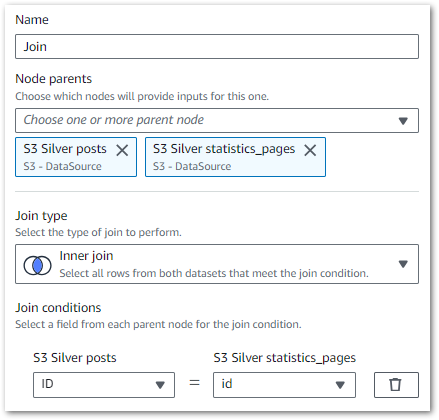
This node essentially creates a SQL join using columns from the selected sources. Here, I’ve inner joined posts.ID to statistics_pages.ID:
Rows from the Silver datasets that match the join condition are merged into a new row in an output DynamicFrame that will ultimately become the Gold dataset. This frame includes all columns from both Silver datasets.
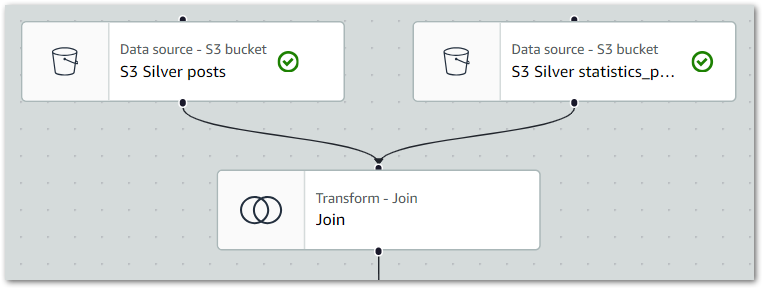
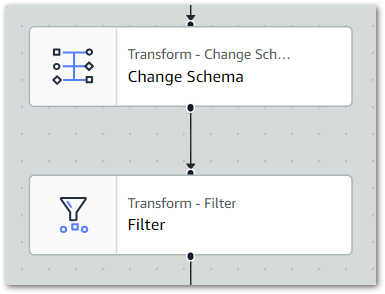
The ETL visual now shows two source nodes linked to the Join node:
Finally, this is the Join node’s PySpark code:
Python
# Script generated for node JoinJoin_node1724059035756 = Join.apply(frame1=S3Silverposts_node1724058915313,frame2=S3Silverstatistics_pages_node1724058965930,keys1=["ID"],keys2=["id"],transformation_ctx="Join_node1724059035756" )
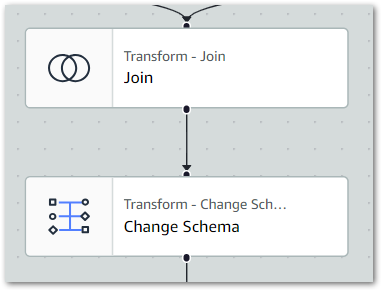
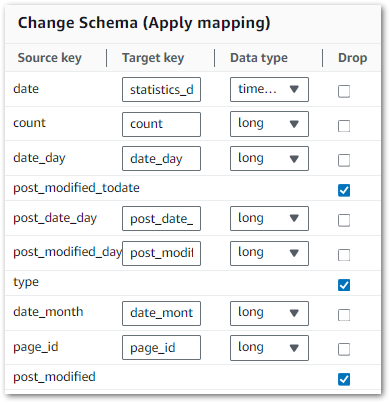
Change Schema Transformation
Now it’s time to do some cleaning!
From AWS:
A Change Schema transform remaps the source data property keys into the desired configured for the target data. In a Change Schema transform node, you can:
Change the name of multiple data property keys.
Change the data type of the data property keys, if the new data type is supported and there is a transformation path between the two data types.
Choose a subset of data property keys by indicating which data property keys you want to drop.
The joined, cleaned dataset contains data about all amazonwebshark content. I only want the posts data, so next I’ll filter everything else out.
From AWS:
Use the Filter transform to create a new dataset by filtering records from the input dataset based on a regular expression. Rows that don’t satisfy the filter condition are removed from the output.
Finally, I must choose a target location for my Gold dataset.
Target uses the same interface as the Source node. This time, a Gold S3 bucket folder path wordpress_api/statistics_postname/ is specified. Everything else is the same as Source. The Target node offers significant versatility, detailed in the AWS target node documentation.
In summary, this is the Target node’s PySpark code:
Next, I’ll examine some of my Glue job’s properties. This section only covers some key properties as there are loads. For a fuller view, please review the AWS Job Property documentation.
Glue Version 4.0: This determines the Apache Spark and Python versions available to the job. I usually go with the most recent. AWS has documented each version’s features.
2x G 1X Workers: This determines the resources available to the job, and therefore how much money the job costs to run. Each G.1X worker maps to 1 DPU (4 vCPUs, 16 GB of memory) with 84GB disk space. This is plenty for what I need. AWS has documented each worker’s specifications and suggested use cases.
Job Insights: This creates additional CloudWatch log streams to simplify both job debugging and optimisation. I usually switch this on for testing. AWS has documented this feature’s benefits and requirements.
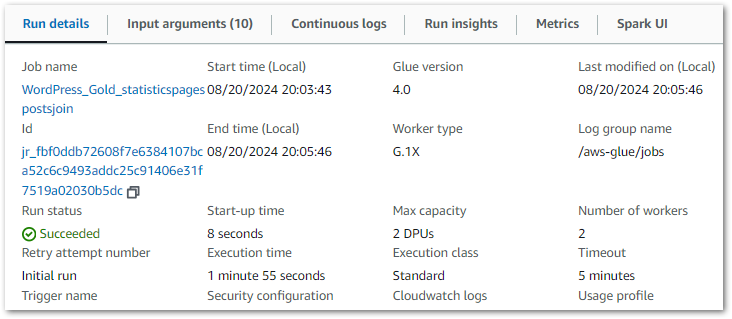
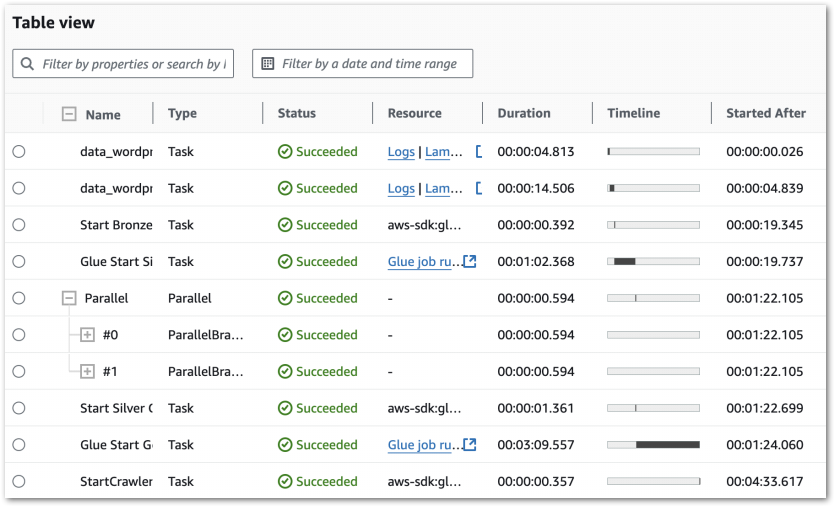
Each PySpark Glue job has several logging sources that are aggregated into the job’s Run tab. The summary shows properties including job status, durations and DPU capacity:
Each job can then be viewed in further detail, with insights including:
These resources are increasingly useful as Glue jobs scale. They show resource utilisation, query plans and node configuration which is essential when optimising and troubleshooting big data processes.
Ok, so my job is configured and running successfully. Now let’s review the outputs.
Glue Outputs & Behaviours
This section examines the outputs of my Gold Glue PySpark ETL job and the behaviours influencing them.
For clarity, this is not a case of finding and fixing errors. Rather, this is an exploration of how a Glue PySpark job’s output can differ from expectations. Coming in, I was more familiar with using pandas for ETL and initially found these behaviours confusing. So I wrote this section with that in mind, as it may help others in similar positions down the road.
Firstly I’ll demonstrate a behaviour. Next, I’ll explain why it happens. Finally, I’ll examine if it can be changed. Although, just because something can be done doesn’t mean that it should be.
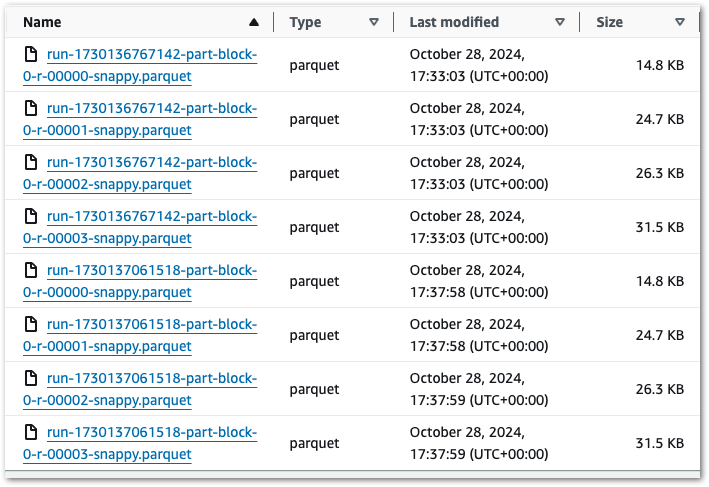
Run 1: Multiple Objects
Previously, the Bronze and Silver layers ultimately produced single objects for each dataset. Conversely, my Gold PySpark job creates four objects with the same RunID:
Ok – that’s unexpected. What’s more, if I run the job again then I get another four files with a new RunID. So that’s eight in total:
There’s two behaviours here that differ from the previous layers:
Each run produces multiple objects instead of one.
Each run creates new objects instead of replacing existing ones.
Let’s examine the multiple objects first.
What’s Happening?
This occurs due to data partitioning.
As mentioned earlier, AWS Glue uses Apache Spark. Spark enables distributed computing by breaking down data into smaller parts. The presence of multiple objects is a direct outcome of this partitioning approach, offering benefits such as:
Parallel Processing: With data spread across multiple files, Spark workers can access different parts of the dataset simultaneously instead of fighting for a single object. This approach balances the workload and accelerates both read and write operations.
Fault Tolerance: If a write operation fails, only the impacted object needs reprocessing rather than the entire dataset. This design enhances resilience and reduces the risk of complete data loss.
Memory Management: Each Spark worker processes only its assigned data partition rather than the full dataset. This improves data loading efficiency and helps prevent memory exhaustion.
Can I Change It?
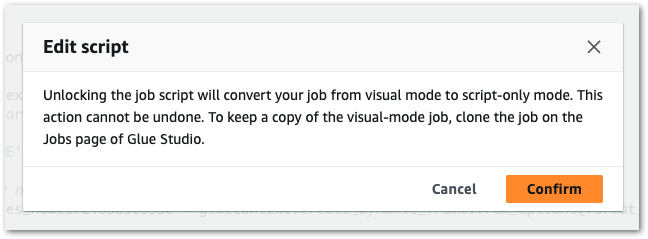
I couldn’t find a way to change this behaviour within Glue Studio. Glue is very capable of deriving partitions, so this isn’t surprising.
While it can be done, this involves manually changing the autogenerated PySpark script. Glue allows this at the cost of disabling the job’s visual design features:
The Glue job now produces a single Parquet object.
This should be used with care. Too many partitions can reduce response times by requiring more reads than necessary. Too few can hinder Spark’s workload distribution abilities. Here, having one object cripples it completely thus removing a key Spark benefit.
Run 2: Objects Not Replaced
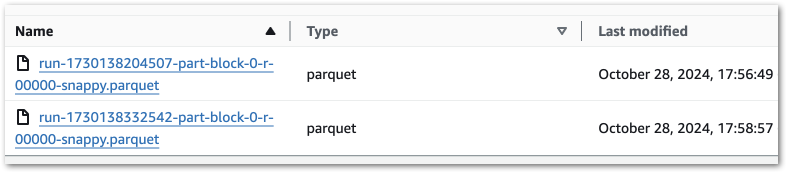
Ok, let’s keep coalesce(1) in place because it makes this example easier. Running this job variant creates a single object:
Running it again produces a second object with a new RunID:
Why isn’t the first object being replaced?
What’s Happening?
There are good reasons for this. Here’s why a replace function isn’t built in:
Spark Architecture: Spark processes data in parallel, with each task running separately. With this setup, replacing a single piece of data in an object is challenging. So instead, Spark jobs either create entirely new objects or replace data partitions.
S3 Architecture: S3 stores data as objects rather than files, so it doesn’t have folder-level replacements like a typical file system. When S3 ‘replaces’ an object, it actually creates a new version of the object with the same name and removes the old one.
Data Management Features: Writing new objects for each job run enables features like versioning, time travel and incremental processing with formats like Apache Iceberg and Delta Lake. It also avoids issues like access conflicts and deadlocks, since existing data remains unchanged while new data is written.
Can I Change It?
So…yes. Creating a boto3 S3 client and running a conditional delete during the job would achieve the desired effect:
Python
# Define S3 bucket and prefix for output pathoutput_bucket ="data-lakehouse-gold"output_prefix ="wordpress_api/statistics_postname/"# Initialize S3 client and clear existing objects in the output paths3 = boto3.client('s3')response = s3.list_objects_v2(Bucket=output_bucket, Prefix=output_prefix)# Check if there are any files and delete themif'Contents'in response:for obj in response['Contents']: s3.delete_object(Bucket=output_bucket, Key=obj['Key'])
But, at this point, is this really a Spark use case anymore? For an ETL job requiring object replacement, I would initially lean towards using a Glue Python Shell job or the AWS SDK for pandas Lambda layer because:
Fewer cloud resources would be used, making the job cheaper than a PySpark job.
Fewer Python imports would be needed, reducing the script size and dependencies.
With appropriate settings, Lambda may run the script faster than Glue.
Suitability should always be a key consideration with cloud architectures. Taking time to choose the right service saves a lot of headaches later on.
Step Functions Update
This section integrates the Gold resources into my existing WordPress Data Pipeline Step Function workflow.
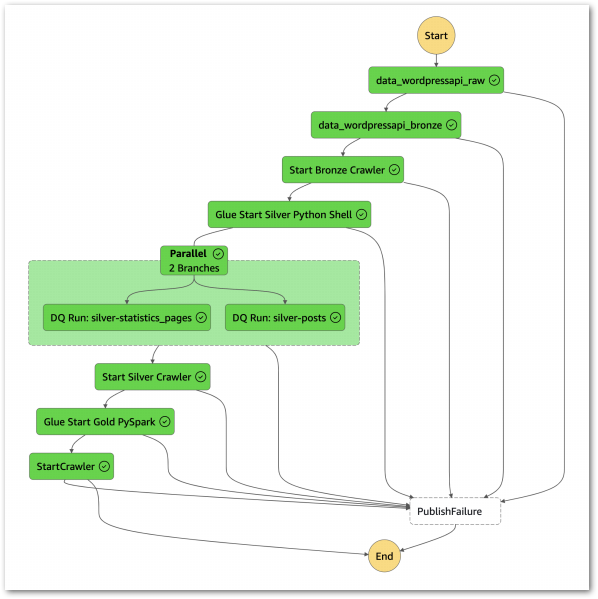
The Gold workflow update is similar to the Silver one. Firstly, I need a new Glue: StartJobRun action running the Gold Glue PySpark ETL job:
Also, a new Glue: StartCrawler action running the Gold crawler:
JSON
{"Name": "wordpress-gold"}
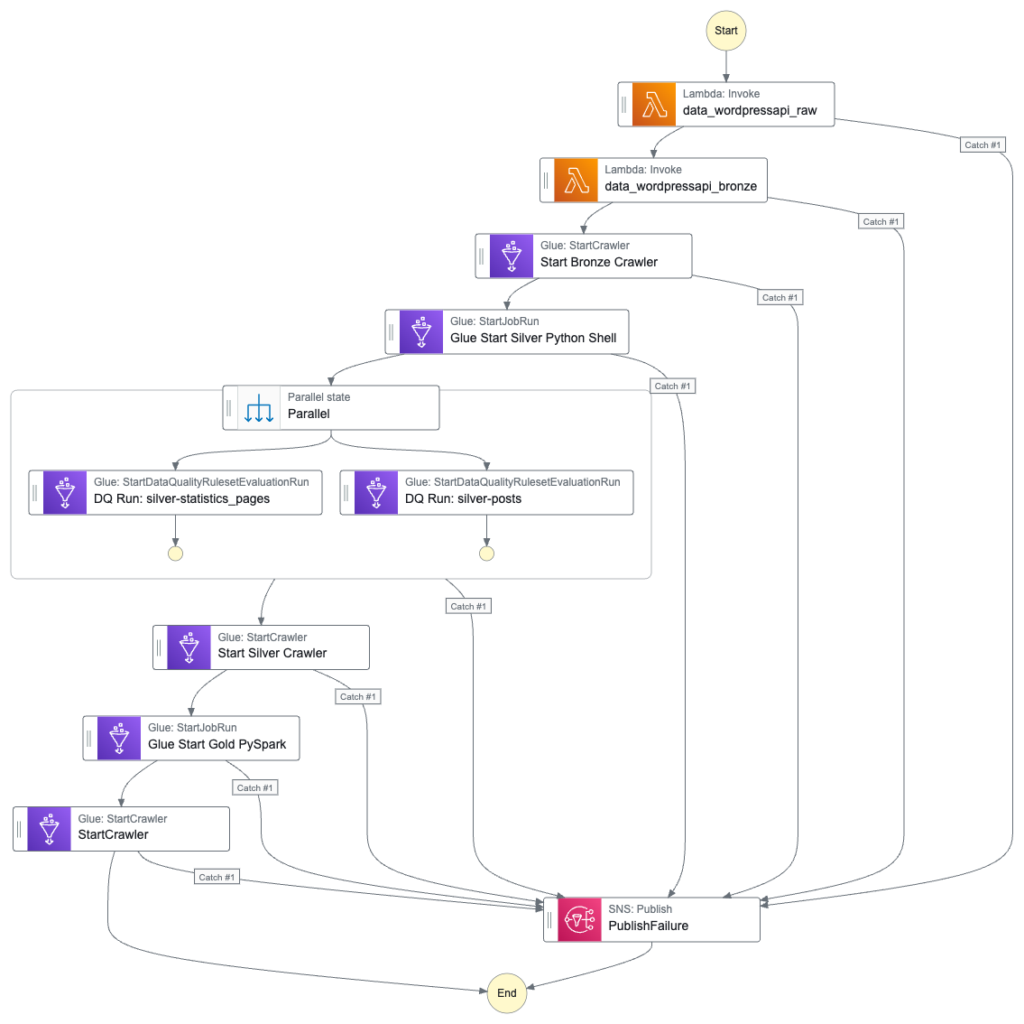
Here is how my Step Function workflow looks with these changes:
The workflow’s IAM role needs new allow permissions too. Firstly, glue:StartJobRun and glue:GetJobRun on the WordPress_Gold_statisticspagespostsjoin Glue job:
This section examines my costs for the updated Step Function workflow.
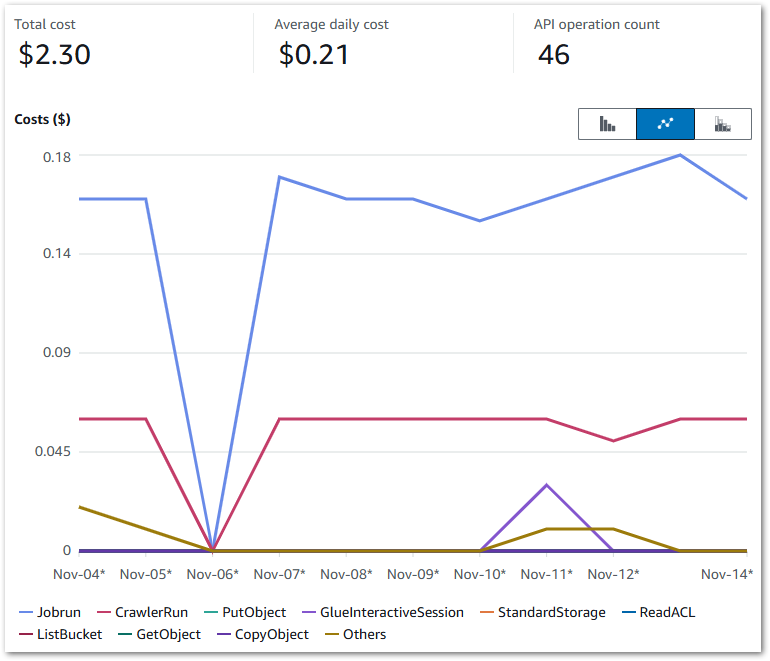
Here, my Cost Explorer chart runs from 04 November to 14 November. It is grouped by API Operation and excludes tax.
My main costs are from Glue’s Jobrun and CrawlerRun operations. Each ruleset now costs around $0.17 a day to run. This has increased from last time’s $0.09, but that’s to be expected as I’m running two Glue jobs now.
My crawlers now cost $0.06 a day, averaging $0.02 for each of the Bronze, Silver and Gold crawlers. The purple blip is for Glue Interactive Sessions – I have something coming up on those. Beyond that, I’m paying for some S3 PutObject calls and everything else is within the free tier.
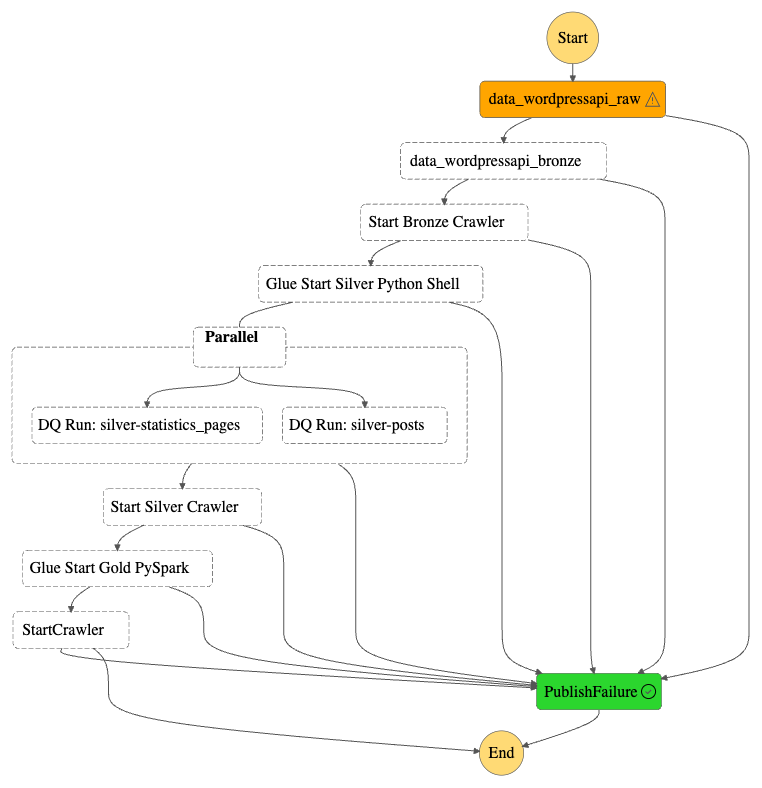
Note that on Nov 06, it….broke. A failed call to the WordPress API brought the whole workflow down:
This proves my error handling works though! A forced stop and graceful failure is preferable to having data in an unknown state, especially in a production environment!
Summary
In this post, I created my WordPress data pipeline’s Gold ETL process using PySpark and the AWS Glue Studio visual interface.
I found Glue Studio to be highly user-friendly. It enhances job observability with comprehensive monitoring tools, and makes PySpark script creation significantly easier through its visual editor. Additionally, it integrates smoothly with other Glue features and the broader AWS ecosystem, offering extensive and intuitive customisation options.
This wraps up the WordPress AWS Data Pipeline project. This series aimed to demonstrate how different AWS services can work together to build efficient and cost-effective data pipelines. Through it, I’ve gained new insights and have several fresh ideas to explore!
If this post has been useful then the button below has links for contact, socials, projects and sessions: