In this post, I use the Pydantic Python library to create data validation and observability processes for my Project Wolfie iTunes data.
Table of Contents
- Introduction
- Introducing Pydantic
- Preparation
- Pydantic Data Models
- Pydantic Built-In Validation
- Pydantic Custom Validation
- Pydantic Observability
- Testing Pydantic
- GitHub Repo
- Summery
Introduction
Data validation is a crucial component of any data project. It ensures that data is accurate, consistent and reliable. It verifies that data meets set criteria and rules to maintain its quality, and stops erroneous or unreliable information from entering downstream systems. I’ve written about it, scripted it and talked about it.
Validation will be a crucial aspect of Project Wolfie. It is an ongoing process that should occur from data ingestion to exposure, and should be automated wherever possible. Thankfully, most data processes within Project Wolfie are (and will be) built using Python, which provides several libraries to simplify data validation. These include Pandera, Great Expectations and the focus of this post – Pydantic (specifically, version 2).
Firstly, I’ll explore the purpose and benefits of Pydantic. Next, I’ll import some iTunes data and use it to explore key Pydantic validation concepts. Finally, I’ll explore how Pydantic handles observability and test its findings. The complete code will be in a GitHub repo.
Let’s begin!
Introducing Pydantic
This section introduces Pydantic and examines some of its benefits.
About Pydantic
Pydantic is an open-source data validation Python library. It uses established Python notation and constructs to define data structures, types and constraints. These can then validate the provided data, generating clear error messages when issues occur.
Pydantic is a widely used tool for managing application settings, validating API requests and responses, and streamlining data transfer between Python objects and formats like JSON. By integrating both existing and custom elements, it offers a powerful and Pythonic method for ensuring data quality and consistency within projects. This makes data handling in Python more reliable and reduces the likelihood of errors through its intuitive definition and validation processes.
Pydantic Benefits
Pydantic’s benefits are thoroughly documented, and the ones I want to highlight here are:
Intuitive: Pydantic’s use of type hints, functions and classes fits well with my current Python skill level, so I can focus on learning Pydantic without also having to explore unfamiliar Python concepts.
Fast: Pydantic’s core validation logic is written in Rust, which enables rapid development, testing, and validation. This speed has contributed towards…
Well-Supported: Pydantic has extensive community use and support from organisations like Anthropic, Netflix and OpenAI, as well as popular Python libraries like Airflow, FastAPI and LangChain. It also has extensive AWS Lambda support via user-configurable artefacts and the community-managed Powertools for AWS Lambda (Python)‘s Parser utility.
Preparation
Before I can start using Pydantic, I need some data. This section examines the data I am using and how I prepare it for Pydantic.
iTunes Data
Firstly, let’s extract some data from iTunes. I create iTunes Export files using the iTunes > Export Playlist command. Apple has documented this, but WikiHow’s documentation is more illustrative. The export file type choices are…interesting. The one closest to matching my needs is the txt format, although the files are technically tab-separated files (TSVs).
iTunes Exports contain many metadata columns. I’m not including them all here (after all, this is a Pydantic post not an iTunes one), but I will be using the following subset (using my existing metadata definitions):
| Metadata Type | Column Name | Data Type | Purpose |
| Technical | Album | String | Track key as Camelot Notation* |
| Technical | Location | String | Track file path |
| Technical | Track Number | Integer | Track BPM* |
| Descriptive | Artist | String | Track artist(s) |
| Descriptive | Genre | String | Track genre |
| Descriptive | Name | String | Track name and mix |
| Descriptive | Work | String | Publishing record label |
| Descriptive | Year | Integer | Track release year |
| Interaction | My Rating | Integer | Track personal rating |
Note that the starred Album and Track Number columns have purposes that differ from the column names. The reasons for this are…not ideal.
Track Numbercontains BPM data as, although iTunes does have a BPM column, it isn’t included in the exports. And the exports can’t be customised! To include BPMs in an export, I had to repurpose an existing column.
Great. But that’s not as bad as…
Albumcontains musical keys, as iTunes doesn’t even have a key column, despite MP3s having a native Initial Key metadata field! Approaches to dealing with this vary – I chose to use another donor column. I’ll explain Camelot Notations later on.
That’s enough about the iTunes data for now – I’ll go into more detail in future Project Wolfie posts. Now let’s focus on getting this data into memory for Python.
Data Capture
Next, let’s get the iTunes data into memory. Starting with a familiar library…
pandas
I’ll be using pandas to ingest the iTunes data. This is a well-established and widely supported module. It also has its own data validation functions and will assist with issues like handling spaces in column names.
While iTunes files aren’t CSVs, the pandas read_csv function can still read their data into a DataFrame. It needs some help though – the delimiter parameter must be \t to identify the tabs’ delimiting status.
So let’s read the iTunes metadata into memory and…
df = pd.read_csv(csv_path, delimiter='\t')

>> UnicodeDecodeError: 'utf-8' codec can't decode byte 0xff in position 0: invalid start byte
Oh. pandas can’t read the file. The error says it’s trying the utf-8 codec, so the export must be using something else. Fortunately, there’s another Python library that can help!
charset_normalizer
charset_normalizer is an open-source encoding detector. It determines the encoding of a file or text and records the result. It’s related to the older chardet library but is faster, has a more permissive MIT license and supports more encodings.
Here, I’m using charset_normalizer.detect in a detect_file_encoding function to detect the export’s codec:
def detect_file_encoding(file_path: Path) -> str:
    with open(file_path, 'rb') as file:
        raw_data = file.read()

    detection_result = charset_normalizer.detect(raw_data)
    return detection_result['encoding'] or 'utf-8'
In which:
- I define a
detect_file_encodingfunction that expects a filepath and returns a string. detect_file_encodingopens the file, reads the data and stores it asraw_data.charset_normalizerdetectsraw_data‘s codec and stores this asdetection_result.detect_file_encodingreturns either the successfully detected codec, or the commonutf-8codec if the attempt fails.
I can then pass the export’s filepath to the detect_file_encoding function, capture the results as encoding and pass this as a parameter to pandas.read_csv:
encoding = detect_file_encoding(csv_path)

df = pd.read_csv(csv_path, encoding=encoding, delimiter='\t')

>> Loaded 4407 rows
There’s one more action to take before moving on. Some columns contain spaces. This will become a problem as spaces are not allowed in Python identifiers!
As the data is now in a pandas DataFrame, I can use pandas.DataFrame.rename to remove these spaces:
df = df.rename(columns={
        'Track Number': 'TrackNumber',
        'My Rating': 'MyRating'
    })
The metadata is now ready for Pydantic.
Installing Pydantic
Finally, let’s install Pydantic. This process is fully documented. My preferred method is via pip install in a local virtual environment:
pip install pydanticAnd then importing Pydantic into my script:
import pydanticNow I can start using Pydantic.
Pydantic Data Models
In this section, I tell Pydantic about my data model and the types of data it should expect for validation.
Introducing BaseModel
At the core of Pydantic is the BaseModel class – used for defining data models. Every Pydantic model inherits from it, and by doing so gains features like type enforcement, automatic data parsing and built-in validation.
By subclassing BaseModel, a schema for the data is defined using standard Python type hints. Pydantic uses these hints to validate and convert input data automatically.
Let’s explore BaseModel by creating a new Track class.
Creating A Track Class
Pydantic supports standard library types like string and integer. This reduces Pydantic’s learning curve and simplifies integration into existing Python processes.
Here are the very beginnings of my Track data model. I have a new Track class inheriting from Pydantic’s BaseModel, and a Name field with string data type:
class Track(BaseModel):
    Name: str
Next, I add a Year field with integer data type:
class Track(BaseModel):
    Name: str
    Year: int
And so on for each field I want to validate with Pydantic:
class Track(BaseModel):
    Name: str
    Artist: str
    Album: str
    Work: str
    Genre: str
    TrackNumber: int
    Year: int
    MyRating: int
    Location: str
Now, if any field is missing or has the wrong type, Pydantic will raise a ValidationError. But there’s far more to Pydantic data types than this…
Defining Special Data Types
Where no standards exist or where validation rules are more complex to determine, Pydantic offers further type coverage. These include:
- Secret types for log obfuscation.
- Payment Card Number types for common card issuers.
- File types for local storage validation.
One of my Track fields will immediately benefit from this:
class Track(BaseModel):
    Location: str
Currently, my Location field validation is highly permissive. It will accept any string. I can improve this using Pydantic’s FilePath data type:
class Track(BaseModel):
    Location: FilePath
Now, Pydantic will check that the given location is a path that exists and links to a valid file. No custom code; no for loops – the FilePath type handles everything for me.
So I now have data type validation in my Pydantic data model. What else can I have?
Pydantic Built-In Validation
This section explores the native data validation features of Pydantic, including field annotation and constraints.
Introducing Field
In Pydantic models, data attributes are typically defined using Python type hints. The Field function enables further customisation like constraints, schema metadata and default values.
While type hints define what kind of data is allowed, Field defines how that data should behave, what happens if it’s missing and how it should be documented. It adds clarity to models and helps Pydantic enforce stricter rules.
Let’s run through some examples.
Custom Schema Metadata
One of the challenges in creating data pipelines is that the data fields can sometimes be unclear or difficult to explain. This can cause confusion and delay when building ETLs, examining repos and interacting with code.
Field helps here by adding custom fields to annotate data within Pydantic classes. Examples include description:
class Track(BaseModel):
    Name: str = Field(
        description="Track's name and mix.")
And examples:
class Track(BaseModel):
    Name: str = Field(
        description="Track's name and mix.",
        examples=["Track Title (Original Mix)", "Track Title (Extended Mix)"])
Using these throughout my Track class simplifies the code and reduces context switching:
class Track(BaseModel):
    Name: str = Field(
        description="Track's name and mix.",
        examples=["Track Title (Original Mix)", "Track Title (Extended Mix)"])

    Artist: str = Field(
        description="The artist(s) of the track.",
        examples=["Above & Beyond", "Armin van Buuren"])

    Album: str = Field(
        description="Track's Camelot Notation indicating the key.",
        examples=["01A-Abm", "02B-GbM"])

    Work: str = Field(
        description="The record label that published the track.",
        examples=["Armada Music", "Anjunabeats"])

    Genre: str = Field(
        description="Track's musical genre.",
        examples=["Trance", "Progressive House"])

    TrackNumber: int = Field(
        description="Track's BPM (Beats Per Minute).",
        examples=[130, 140])

    Year: int = Field(
        description="Track's release year.",
        examples=[1998, 2004])

    MyRating: int = Field(
        description="Personal Rating.  Stars expressed as 0, 20, 40, 60, 80, or 100",
        examples=[60, 80])

    Location: FilePath = Field(
        description="Track's Location on the filesystem.",
        examples=[r"C:\Users\User\Music\iTunes\TranquilityBase-GettingAway-OriginalMix.mp3"])
This is especially useful for Album and TrackNumber given their unique properties.
Field Constraints
Field can also constrain the data that a class accepts. This includes string constraints:
max_length: Maximum length of the string.min_length: Minimum length of the string.pattern: A regular expression that the string must match.
and numeric constraints:
ge&le– greater than or equal to/less than or equal togt<– greater/less thanmultiple_of– multiple of a given number
Constraints can also be combined as needed. For example, iTunes exports record MyRating values in increments of 20, where 1 star is 20 and 2 stars are 40, rising to the maximum 5 stars being 100.
I can express this within the Track class as:
class Track(BaseModel):
    MyRating: int = Field(
        description="Personal Rating.  Stars expressed as 0, 20, 40, 60, 80, or 100",
        examples=[60, 80],
        ge=20,
        le=100,
        multiple_of=20)
Here, MyRating must be greater than or equal to 20 (ge=20), less than or equal to 100 (le=100), and must be a multiple of 20 (multiple_of=20).
I can also parameterise these constraints using variables instead of hard-coded values:
ITUNES_RATING_RAW_LOWEST = 20
ITUNES_RATING_RAW_HIGHEST = 100

class Track(BaseModel):
    MyRating: int = Field(
        description="Personal Rating.  Stars expressed as 0, 20, 40, 60, 80, or 100",
        examples=[60, 80],
        ge=ITUNES_RATING_RAW_LOWEST,
        le=ITUNES_RATING_RAW_HIGHEST,
        multiple_of=20)
This property lets me use Pydantic with other Python libraries. Here, my Year validation checks for years greater than or equal to 1970 and less than or equal to the current year (using the datetime library):
YEAR_EARLIEST = 1970
YEAR_CURRENT = datetime.datetime.now().year

class Track(BaseModel):
    Year: int = Field(
        description="Track's release year.",
        examples=[1998, 2004],
        ge=YEAR_EARLIEST,
        le=YEAR_CURRENT)
No track in the collection should exist beyond the current year – this constraint will now update itself as time passes.
Having applied other constraints, my Track class looks like this:
class Track(BaseModel):
    """Pydantic model for validating iTunes track metadata."""

    Name: str = Field(
        description="Track's name and mix type.",
        examples=["Track Title (Original Mix)", "Track Title (Extended Mix)"])

    Artist: str = Field(
        description="The artist(s) of the track.",
        examples=["Above & Beyond", "Armin van Buuren"])

    Album: str = Field(
        description="Track's Camelot Notation indicating the key.",
        examples=["01A-Abm", "02B-GbM"])

    Work: str = Field(
        description="The record label that published the track.",
        examples=["Armada Music", "Anjunabeats"])

    Genre: str = Field(
        description="Track's musical genre.",
        examples=["Trance", "Progressive House"])

    TrackNumber: int = Field(
        description="Track's BPM (Beats Per Minute).",
        examples=[130, 140],
        ge=BPM_LOWEST,
        le=BPM_HIGHEST)

    Year: int = Field(
        description="Track's release year.",
        examples=[1998, 2004],
        ge=YEAR_EARLIEST,
        le=YEAR_CURRENT)

    MyRating: int = Field(
        description="Personal Rating. Stars expressed as 0, 20, 40, 60, 80, or 100",
        examples=[60, 80],
        ge=ITUNES_RATING_RAW_LOWEST,
        le=ITUNES_RATING_RAW_HIGHEST,
        multiple_of=20)

    Location: FilePath = Field(
        description="Track's Location on the filesystem.",
        examples=[r"C:\Users\User\Music\iTunes\AboveAndBeyond-AloneTonight-OriginalMix.mp3"])
This is already very helpful. Next, let’s examine my custom requirements.
Pydantic Custom Validation
This section discusses how to create custom data validation using Pydantic. I will outline what the requirements are, and then examine how these validations are defined and implemented.
Introducing Decorators
In Python, decorators modify or enhance the behaviour of functions or methods without changing their actual code. Decorators are usually written using the @ symbol followed by the decorator name, just above the function definition:
@my_decorator
def my_function():
    ...
For example, consider this logger_decorator function:
def logger_decorator(func):
    def wrapper():
        print(f"Running {func.__name__}...")
        func()  # Execute the supplied function
        print("Done!")
    return wrapper
This function takes another function (func) as an argument, printing a message before and after execution. If the logger_decorator function is then used as a decorator when running this greet function:
@logger_decorator
def greet():
    print("Hello, world!")

greet()
Python will add the logging behaviour of logger_decorator without modifying greet:
Running greet...
Hello, world!
Done!
Introducing Field Validators
In addition to the built-in data validation capabilities of Pydantic, custom validators with more specific rules can be defined for individual fields using Field Validators. These use the field_validator() decorator, and are declared as class methods within a class inheriting from Pydantic’s BaseModel.
Here’s a basic example using my Track model:
class Track(BaseModel):
    Name: str = Field(
        description="Track's name and mix.",
        examples=["Track Title (Original Mix)", "Track Title (Extended Mix)"]
    )

    @field_validator("Name")
    @classmethod
    def validate_name(cls, value):
        # custom validation logic here
        return value
Where:
@field_validator("Name")tells Pydantic to use the function to validate theNamefield.@classmethodlets the validator access theTrackclass (cls).- The validator executes the
validate_namefunction with the fieldvalue(in this caseName) as input, performs the checks and must either:- return the validated value, or
- raise a
ValueErrororTypeErrorif validation fails.
Let’s see this in action.
Null Checks
Firstly, let’s perform a common data validation check by identifying empty fields. I have two variants of this – one for strings and another for numbers.
The first – validate_non_empty_string – uses pandas.isna to catch missing values and strip() to catch empty strings. This field validator applies to the Artist, Work and Genre columns:
    @field_validator("Artist", "Work", "Genre")
    @classmethod
    def validate_non_empty_string(cls, value, info):
        """Validate that a string field is not empty."""
        if pd.isna(value) or str(value).strip() == "":
            raise ValueError(f"{info.field_name} must not be null or empty")
        return value
The second – validate_non_null_numeric – checks the TrackNumber, Year and MyRating numeric columns for empty values using pandas.isna:
    @field_validator("TrackNumber", "Year", "MyRating", mode="before")
    @classmethod
    def validate_non_null_numeric(cls, value, info):
        """Validate that a numeric field is not null."""
        if pd.isna(value):
            raise ValueError(f"{info.field_name} must not be null")
        return value
Also, it uses Pydantic’s before validator (mode="before"), ensuring the data validation happens before Pydantic coerces types. This catches edge cases like "" or "NaN" before they become None or float("nan") values.
Character Check
Now let’s create a validator for something a little more challenging to define. All tracks in my collection follow a Track Name (Mix) schema. This can take many forms:
- Original track: Getting Away (Original Mix)
- Remixed track: Shapes (Oliver Smith Remix)
- Updated remixed track: Distant Planet (Menno de Jong Interpretation) (2020 Remaster)
- …and many more variants.
But generally, there should be at least one instance of text enclosed by parentheses. However, some tracks have no remixer and are released with just a title:
- Getting Away
- Shapes
- Distant Planet
This not only looks untidy (eww!), but also breaks some of my downstream automation that expects the Track Name (Mix) schema. So any track without a remixer gets (Original Mix) added to the Name field upon download:
- Getting Away (Original Mix)
- Shapes (Original Mix)
- Distant Planet (Original Mix)
Expressing this is possible with RegEx, but I can make a more straightforward and more understandable check with a field validator:
    @field_validator("Name")
    @classmethod
    def validate_name(cls, value):
        if pd.isna(value) or str(value).strip() == "":
            raise ValueError("Name must not be null or empty")

        value_str = str(value)
        if '(' not in value_str:
            raise ValueError("Name must contain an opening parenthesis '('")
        if ')' not in value_str:
            raise ValueError("Name must contain a closing parenthesis ')'")
        return value
This validator checks that the value isn’t empty and then performs additional checks for parentheses. This could be one check, but having it as two checks improves log readability (insert foreshadowing – Ed). I could also have added Name to the validate_non_empty_string validation, but this way I have all my Name checks in the same place.
Parameterised Checks
Like constraints, field validators can also be parameterised. Let’s examine Album.
As iTunes exports can’t be customised, I use Album for a track’s Camelot Notation. These are based on the Camelot Wheel – MixedInKey‘s representation of the Circle Of Fifths. DJs generally favour Camelot Notation as it is simpler than traditional music notation for human understanding and application sorting.
Importantly, there are only twenty-four possible notations:
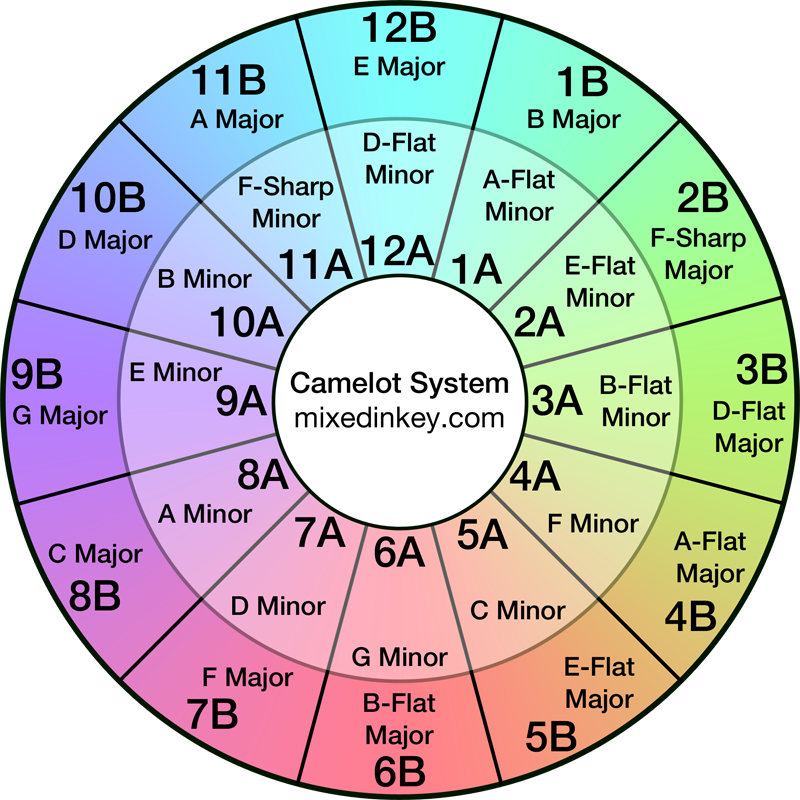
For example:
- 1A (A-Flat Minor)
- 6A (G Minor)
- 6B (B-Flat Major)
- 10A (B Minor)
So let’s capture these values in a CAMELOT_NOTATIONS list:
CAMELOT_NOTATIONS = {
    '01A-Abm', '01B-BM', '02A-Ebm', '02B-GbM', '03A-Bbm', '03B-DbM',
    '04A-Fm', '04B-AbM', '05A-Cm', '05B-EbM', '06A-Gm', '06B-BbM',
    '07A-Dm', '07B-FM', '08A-Am', '08B-CM', '09A-Em', '09B-GM',
    '10A-Bm', '10B-DM', '11A-Gbm', '11B-AM', '12A-Dbm', '12B-EM'
}
(Note the leading zeros. Without them, iTunes sorts the Album column as (10, 11, 12, 1, 2, 3…) – you can imagine how I felt about that – Ed)
Next, I pass the CAMELOT_NOTATIONS list to an Album field validator that checks if the given value is in the list:
    @field_validator("Album")
    @classmethod
    def validate_album(cls, value):
        if pd.isna(value) or str(value).strip() == "":
            raise ValueError("Album must not be null or empty")

        if str(value) not in CAMELOT_NOTATIONS:
            raise ValueError(f"Album must be a valid Camelot notation: {value} is not in the valid list")
        return value
Pydantic now fails any value not found in the CAMELOT_NOTATIONS list.
Now I have my validation needs fully covered. What observability does Pydantic give me over these data validation checks?
Pydantic Observability
In this section, I assess and adjust the default Pydantic observability abilities to ensure my data validation is accurately recorded.
Default Output
Pydantic automatically generates data validation error messages if validation fails. These detailed messages provide a structured overview of the issues encountered, including:
- The index of the failing input (e.g., a DataFrame row number).
- The model class where the error occurred.
- The field name that failed validation.
- A human-readable explanation of the issue.
- The offending input value and its type.
- A direct link to relevant documentation for further guidance.
Here’s an example of Pydantic’s output when a string field receives a NaN value:
Row 2353: 1 validation error for Track
Work
  Input should be a valid string [type=string_type, input_value=nan, input_type=float]
    For further information visit https://errors.pydantic.dev/2.11/v/string_type
In this example:
- Row
2353indicates the problematic input row. Trackis the Pydantic model where validation failed.Workis the failing field.- Pydantic detects that the input is
nan(a float) and not a valid string. - Pydantic provides a URL to the
string_typedocumentation.
Here’s another example, this time for a MyRating error:
Row 3040: 1 validation error for Track
MyRating
  Value error, MyRating must not be null [type=value_error, input_value=nan, input_type=float]
    For further information visit https://errors.pydantic.dev/2.11/v/value_error
In this case, a field validator raised a ValueError because MyRating must not be null.
Pydantic’s error reporting is clear and actionable, making it suitable for debugging and systemic data validation tasks. However, for larger datasets or more user-friendly outputs (such as reports or UI feedback), further customisation is helpful, such as…
Terminal Output Customisation
As good as Pydantic’s default output is, it’s not that human-readable. For example, in this Terminal output I have no idea which tracks are on rows 2353, 2495 and 3040:
Row 2353: 1 validation error for Track
Work
  Input should be a valid string [type=string_type, input_value=nan, input_type=float]
    For further information visit https://errors.pydantic.dev/2.11/v/string_type

Row 2495: 1 validation error for Track
Work
  Input should be a valid string [type=string_type, input_value=nan, input_type=float]
    For further information visit https://errors.pydantic.dev/2.11/v/string_type

Row 3040: 1 validation error for Track
MyRating
  Value error, MyRating must not be null [type=value_error, input_value=nan, input_type=float]
    For further information visit https://errors.pydantic.dev/2.11/v/value_error
While I can find this out, it would be better to know at a glance. Fortunately, I can improve this when capturing the errors by appending the artist and name to each row of the errors object:
except (ValidationError, ValueError) as e:
            artist = row['Artist'] if not pd.isna(row['Artist']) else "Unknown Artist"
            name = row['Name'] if not pd.isna(row['Name']) else "Unknown Name"
            errors.append((index, artist, name, str(e)))
Now, Artist and Name are added to each row:
Row 2353: Ben Stone - Mercure (Extended Mix): 1 validation error for Track
Work
  Input should be a valid string [type=string_type, input_value=nan, input_type=float]
    For further information visit https://errors.pydantic.dev/2.11/v/string_type

Row 2495: DJ Hell - My Definition Of House Music (Resistance D Remix): 1 validation error for Track
Work
  Input should be a valid string [type=string_type, input_value=nan, input_type=float]
    For further information visit https://errors.pydantic.dev/2.11/v/string_type

Row 3040: York - Reachers Of Civilisation (In Search Of Sunrise Mix): 1 validation error for Track
MyRating
  Value error, MyRating must not be null [type=value_error, input_value=nan, input_type=float]
    For further information visit https://errors.pydantic.dev/2.11/v/value_error
This makes it far easier to find the problematic files in my collection. As long as there aren’t many findings…
Creating An Error File
There are three main problems with Pydantic printing all data validation errors in the Terminal:
- They don’t persist outside of the Terminal session.
- The Terminal isn’t that easy to read when it’s full of text.
- The Terminal may run out of space if there are a large number of errors.
So let’s capture the errors in a file instead. This write_error_report function generates a text-based error report from validation failures, saving it in a logs subfolder adjacent to the input file:
def write_error_report(
    csv_path: Path,
    field_error_details: Dict[str, List[str]],
    sorted_fields: List[str]
) -> Path:

    timestamp = datetime.now().strftime("%Y%m%d-%H%M%S")
    logs_dir = csv_path.parent / "logs"
    logs_dir.mkdir(exist_ok=True)

    error_output_path = logs_dir / f"{timestamp}-PydanticErrors-{csv_path.stem}.txt"

    with open(error_output_path, 'w', encoding='utf-8') as f:
        f.write(f"Validation Error Report - {timestamp}\n")
        f.write("=" * 80 + "\n")

        for field in sorted_fields:
            messages = field_error_details.get(field, [])
            if messages:
                f.write(f"\n{field} Errors ({len(messages)}):\n")
                f.write("-" * 80 + "\n")
                for message in messages:
                    f.write(message + "\n\n")

    return error_output_path
Firstly, it constructs a timestamped filename using the original file’s stem (e.g., 20250529-142304-PydanticErrors-data.txt) and the logs subfolder, creating the latter if it doesn’t exist:
    timestamp = datetime.now().strftime("%Y%m%d-%H%M%S")
    logs_dir = csv_path.parent / "logs"
    logs_dir.mkdir(exist_ok=True)

    error_output_path = logs_dir / f"{timestamp}-PydanticErrors-{csv_path.stem}.txt"
Next, Python orders the errors by the sorted_fields input, displays error counts per field and formats each error message with clear section dividers. A structured report listing all validation errors by field is saved in the logs subfolder:
    with open(error_output_path, 'w', encoding='utf-8') as f:
        f.write(f"Validation Error Report - {timestamp}\n")
        f.write("=" * 80 + "\n")

        for field in sorted_fields:
            messages = field_error_details.get(field, [])
            if messages:
                f.write(f"\n{field} Errors ({len(messages)}):\n")
                f.write("-" * 80 + "\n")
                for message in messages:
                    f.write(message + "\n\n")
Finally, the filesystem path of the generated report is returned:
return error_output_pathWhen executed, the Terminal tells me the error file path:
Detailed error log written to: 20250513-133743-PydanticErrors-iTunes-Elec-Dance-Club-Main.txtAnd stores the findings in a local txt file, grouped by error type for simpler readability:
Validation Error Report - 20250513-133743
================================================================================

MyRating Errors (5):
--------------------------------------------------------------------------------
Row 3040: York - Reachers Of Civilisation (In Search Of Sunrise Mix): 1 validation error for Track
MyRating
  Value error, MyRating must not be null [type=value_error, input_value=nan, input_type=float]
    For further information visit https://errors.pydantic.dev/2.11/v/value_error

Work Errors (22):
--------------------------------------------------------------------------------
Row 223: Dave Angel - Artech (Original Mix): 1 validation error for Track
Work
  Input should be a valid string [type=string_type, input_value=nan, input_type=float]
    For further information visit https://errors.pydantic.dev/2.11/v/string_type
Adding A Terminal Summary
Finally, I created a Terminal summary of Pydantic’s findings:
print("\nValidation Summary:\n")
sorted_fields = sorted(Track.model_fields.keys())

for field in sorted_fields:
  count = error_analysis['counts'].get(field, 0)
  print(f"{field} findings: {count}")
This shows feedback after each execution:
Validation Summary:

Album findings: 0
Artist findings: 0
Genre findings: 0
Location findings: 0
MyRating findings: 5
Name findings: 1
TrackNumber findings: 0
Work findings: 22
Year findings: 0
Now, let’s ensure everything works properly!
Testing Pydantic
In this section, I test that my Pydantic data validation and observability processes are working correctly using iTunes export files and pytest unit tests.
Recent File Test
The first test used a recent export from the end of April 2025. Here is the Terminal output:
Processing file: iTunes-Elec-Dance-Club-Main-2025-04-28.txt
Reading iTunes-Elec-Dance-Club-Main-2025-04-28.txt with detected encoding UTF-16
Loaded 4407 rows
Validated 4379 rows
Found 28 errors!

Validation Summary for iTunes-Elec-Dance-Club-Main-2025-04-28.txt:
Album errors: 0
Artist errors: 0
Genre errors: 0
Location errors: 0
MyRating errors: 5
Name errors: 1
TrackNumber errors: 0
Work errors: 22
Year errors: 0

Detailed error log written to: 20250521-164324-PydanticErrors-iTunes-Elec-Dance-Club-Main-2025-04-28.txt
Good first impressions – the 4407 row count matches the export file, the summary is shown in the Terminal and an error log is created. So what’s in the log?
Firstly, five tracks have no MyRating values. For example:
MyRating Errors (5):
--------------------------------------------------------------------------------
Row 558: Reel People Feat Angela Johnson - Can't Stop (Michael Gray Instrumental Remix): 1 validation error for Track
MyRating
  Value error, MyRating must not be null [type=value_error, input_value=nan, input_type=float]
    For further information visit https://errors.pydantic.dev/2.11/v/value_error
This is correct, as this export was created when I added some new tracks to my collection.
Next, one track has a Name issue:
Name Errors (1):
--------------------------------------------------------------------------------
Row 1292: The Prodigy - Firestarter (Original Mix}: 1 validation error for Track
Name
  Value error, Name must contain a closing parenthesis ')' [type=value_error, input_value='Firestarter (Original Mix}', input_type=str]
    For further information visit https://errors.pydantic.dev/2.11/v/value_error
This one confused me at first, until I looked at the error more closely and realised the closing parenthesis is wrong! } is used instead of )! This is why my validate_name field validator has separate checks for each character – it makes it easier to understand the results!
Finally, twenty-two tracks are missing record label metadata in Work:
Work Errors (22):
--------------------------------------------------------------------------------
Row 223: Dave Angel - Artech (Original Mix): 1 validation error for Track
Work
  Input should be a valid string [type=string_type, input_value=nan, input_type=float]
    For further information visit https://errors.pydantic.dev/2.11/v/string_type
This means some tracks are missing full metadata. This won’t break any downstream processes as I have no reliance on this field. That said, it’s good to know about this in case my future needs change.
Older File Test
The next test uses an older file from March 2025. Let’s see what the Terminal says this time…
Processing file: iTunes-AllTunesMaster-2025-03-01.txt
Reading iTunes-AllTunesMaster-2025-03-01.txt with detected encoding UTF-16
Loaded 4381 rows
Validated 0 rows
Found 4381 errors!

Validation Summary for iTunes-AllTunesMaster-2025-03-01.txt:

Album errors: 0
Artist errors: 0
Genre errors: 0
Location errors: 4381
MyRating errors: 0
Name errors: 1
TrackNumber errors: 2
Work errors: 17
Year errors: 0
Detailed error log written to: 20250521-164322-PydanticErrors-iTunes-AllTunesMaster-2025-03-01.txt
There are fewer rows here – 4381 vs 4407. This is correct, as my collection was smaller in March. But no rows were validated successfully!
I don’t have to go far to find out why:
Location Errors (4381):
--------------------------------------------------------------------------------
Row 0: Ariel - A9 (Original Mix): 1 validation error for Track
Location
  Path does not point to a file [type=path_not_file, input_value='C:\\Users\\User\\Folder...riel-A9-OriginalMix.mp3', input_type=str]
All the location checks failed. But this is actually a successful test!
In the time between these two exports, I reorganised my music collection. As a result, the file paths in this export no longer exist. Remember – the Location field uses the FilePath data type, which checks that the given paths exist and link to valid files. And these don’t!
The Name results are the same as the first test. This has been around for a while apparently…
Name Errors (1):
--------------------------------------------------------------------------------
Row 1292: The Prodigy - Firestarter (Original Mix}: 1 validation error for Track
Name
  Value error, Name must contain a closing parenthesis ')' [type=value_error, input_value='Firestarter (Original Mix}', input_type=str]
    For further information visit https://errors.pydantic.dev/2.11/v/value_error
There are also TrackNumber errors in this export:
TrackNumber Errors (2):
--------------------------------------------------------------------------------
Row 485: Andrew Bayer Feat Alison May - Brick (Original Mix): 2 validation errors for Track
TrackNumber
  Input should be greater than or equal to 100 [type=greater_than_equal, input_value=90, input_type=int]
    For further information visit https://errors.pydantic.dev/2.11/v/greater_than_equal
Two tracks have BPM values lower than the set range. Both files were moved during my reorganisation, but were included in this export at the time and therefore fail this validation check.
Finally, the Work errors are the same as the first test (although more have crept in since!):
Work Errors (17):
--------------------------------------------------------------------------------
Row 223: Dave Angel - Artech (Original Mix): 1 validation error for Track
Work
  Input should be a valid string [type=string_type, input_value=nan, input_type=float]
    For further information visit https://errors.pydantic.dev/2.11/v/string_type
Ultimately, both tests match expectations!
Unit Tests With Amazon Q
Finally, I wanted to include some unit tests for this project. Unit testing is always a good idea, especially in this context where I can verify function outputs and error generation without needing to create numerous test files.
I figured this was a good opportunity to test Amazon Q Developer and see what it came up with. I gave it a fairly basic prompt, using the @workspace context to allow Q access to my project’s entire workspace as context for its responses:
@workspace write unit tests for this script using pytestI tend to use pytest for my Python testing, as I find it simpler and more flexible than Python’s standard unittest library.
Q promptly provided several reasonable tests in response. This initiated a half-hour exchange between us focused on calibrating the existing tests and creating new ones. To be fair to Q, my initial prompt was quite basic and could have been much more detailed.
Amongst Q’s tests was this one testing an empty Artist field:
    @patch('pathlib.Path.exists')
    def test_empty_artist(self, mock_exists):
        """Test that an empty artist fails validation."""
        # Mock file existence check
        mock_exists.return_value = True

        invalid_track_data = {
            "Name": "Test Track (Original Mix)",
            "Artist": "",  # Empty artist
            "Album": "01A-Abm",
            "Work": "Test Label",
            "Genre": "Trance",
            "TrackNumber": 130,
            "Year": 2020,
            "MyRating": 80,
            "Location": "C:\\Music\\test_track.mp3"
        }
This one, checking an invalid Camelot Notation:
@patch('pathlib.Path.exists')
    def test_invalid_album_not_camelot(self, mock_exists):
        """Test that an invalid Camelot notation fails validation."""
        # Mock file existence check
        mock_exists.return_value = True

        invalid_track_data = {
            "Name": "Test Track (Original Mix)",
            "Artist": "Test Artist",
            "Album": "Invalid Key",  # Not a valid Camelot notation
            "Work": "Test Label",
            "Genre": "Trance",
            "TrackNumber": 130,
            "Year": 2020,
            "MyRating": 80,
            "Location": "C:\\Music\\test_track.mp3"
        }

        with pytest.raises(ValueError, match="Album must be a valid Camelot notation"):
            Track(**invalid_track_data)
And this one, checking what happens with an incomplete DataFrame:
    @patch('wolfie_exportvalidator_itunes.detect_file_encoding')
    @patch('pandas.read_csv')
    def test_load_itunes_data_missing_columns(self, mock_read_csv, mock_detect_encoding):
        """Test loading iTunes data with missing columns."""
        # Setup mocks
        mock_detect_encoding.return_value = 'utf-8'
        mock_df = pd.DataFrame({
            'Name': ['Test Track (Original Mix)'],
            'Artist': ['Test Artist'],
            # Missing required columns
        })
        mock_read_csv.return_value = mock_df

        # Call function and verify it raises an error
        with pytest.raises(ValueError, match="Missing expected columns"):
            load_itunes_data(Path('dummy_path.txt'))
I’ll include the whole test suite in my GitHub repo. Let’s conclude with pytest‘s output:
collected 41 items

tests/test_wolfie_exportvalidator_itunes.py::TestTrackModel::test_valid_track PASSED                                                                [  2%]
tests/test_wolfie_exportvalidator_itunes.py::TestTrackModel::test_valid_track_boundary_values PASSED                                                [  4%]
tests/test_wolfie_exportvalidator_itunes.py::TestTrackModel::test_invalid_name_no_parentheses PASSED                                                [  7%]
tests/test_wolfie_exportvalidator_itunes.py::TestTrackModel::test_empty_name PASSED                                                                 [  9%]
tests/test_wolfie_exportvalidator_itunes.py::TestTrackModel::test_empty_artist PASSED                                                               [ 12%]
tests/test_wolfie_exportvalidator_itunes.py::TestTrackModel::test_empty_work PASSED                                                                 [ 14%]
tests/test_wolfie_exportvalidator_itunes.py::TestTrackModel::test_empty_genre PASSED                                                                [ 17%]
tests/test_wolfie_exportvalidator_itunes.py::TestTrackModel::test_invalid_album_not_camelot PASSED                                                  [ 19%]
tests/test_wolfie_exportvalidator_itunes.py::TestTrackModel::test_valid_camelot_notations PASSED                                                    [ 21%]
tests/test_wolfie_exportvalidator_itunes.py::TestTrackModel::test_invalid_bpm_range_high PASSED                                                     [ 24%]
tests/test_wolfie_exportvalidator_itunes.py::TestTrackModel::test_invalid_bpm_range_low PASSED                                                      [ 26%]
tests/test_wolfie_exportvalidator_itunes.py::TestTrackModel::test_invalid_year_range_early PASSED                                                   [ 29%]
tests/test_wolfie_exportvalidator_itunes.py::TestTrackModel::test_invalid_year_range_future PASSED                                                  [ 31%]
tests/test_wolfie_exportvalidator_itunes.py::TestTrackModel::test_invalid_rating_not_multiple PASSED                                                [ 34%]
tests/test_wolfie_exportvalidator_itunes.py::TestTrackModel::test_invalid_rating_too_low PASSED                                                     [ 36%]
tests/test_wolfie_exportvalidator_itunes.py::TestTrackModel::test_invalid_rating_too_high PASSED                                                    [ 39%]
tests/test_wolfie_exportvalidator_itunes.py::TestTrackModel::test_null_track_number PASSED                                                          [ 41%]
tests/test_wolfie_exportvalidator_itunes.py::TestTrackModel::test_null_year PASSED                                                                  [ 43%]
tests/test_wolfie_exportvalidator_itunes.py::TestTrackModel::test_null_rating PASSED                                                                [ 46%]
tests/test_wolfie_exportvalidator_itunes.py::TestFileOperations::test_detect_file_encoding PASSED                                                   [ 48%]
tests/test_wolfie_exportvalidator_itunes.py::TestFileOperations::test_detect_file_encoding_latin1 PASSED                                            [ 51%]
tests/test_wolfie_exportvalidator_itunes.py::TestFileOperations::test_detect_file_encoding_no_result PASSED                                         [ 53%]
tests/test_wolfie_exportvalidator_itunes.py::TestFileOperations::test_load_itunes_data_success PASSED                                               [ 56%]
tests/test_wolfie_exportvalidator_itunes.py::TestFileOperations::test_load_itunes_data_missing_columns PASSED                                       [ 58%]
tests/test_wolfie_exportvalidator_itunes.py::TestFileOperations::test_load_itunes_data_empty_dataframe PASSED                                       [ 60%]
tests/test_wolfie_exportvalidator_itunes.py::TestValidation::test_validate_tracks_all_valid PASSED                                                  [ 63%]
tests/test_wolfie_exportvalidator_itunes.py::TestValidation::test_validate_tracks_with_errors PASSED                                                [ 65%]
tests/test_wolfie_exportvalidator_itunes.py::TestValidation::test_duplicate_location PASSED                                                         [ 68%]
tests/test_wolfie_exportvalidator_itunes.py::TestValidation::test_analyze_errors PASSED                                                             [ 70%]
tests/test_wolfie_exportvalidator_itunes.py::TestValidation::test_analyze_errors_with_general_error PASSED                                          [ 73%]
tests/test_wolfie_exportvalidator_itunes.py::TestValidation::test_write_error_report PASSED                                                         [ 75%]
tests/test_wolfie_exportvalidator_itunes.py::TestValidation::test_process_file_with_errors PASSED                                                   [ 78%]
tests/test_wolfie_exportvalidator_itunes.py::TestValidation::test_process_file_no_errors PASSED                                                     [ 80%]
tests/test_wolfie_exportvalidator_itunes.py::TestParamsData::test_bpm_range_valid PASSED                                                            [ 82%]
tests/test_wolfie_exportvalidator_itunes.py::TestParamsData::test_year_range_valid PASSED                                                           [ 85%]
tests/test_wolfie_exportvalidator_itunes.py::TestParamsData::test_rating_range_valid PASSED                                                         [ 87%]
tests/test_wolfie_exportvalidator_itunes.py::TestParamsData::test_camelot_notations_valid PASSED                                                    [ 90%]
tests/test_wolfie_exportvalidator_itunes.py::TestMain::test_main_with_files PASSED                                                                  [ 92%]
tests/test_wolfie_exportvalidator_itunes.py::TestMain::test_main_no_files PASSED                                                                    [ 95%]
tests/test_wolfie_exportvalidator_itunes.py::TestMain::test_main_with_exception PASSED                                                              [ 97%]
tests/test_wolfie_exportvalidator_itunes.py::TestMain::test_main_with_critical_exception PASSED                                                     [100%]

=================================================================== 41 passed in 0.20s ===================================================================
I had a very positive experience overall! Working with Amazon Q allowed me to write the tests more quickly than I could have done on my own. We would have been even faster if I had put more thought into my initial prompt. Additionally, since Q Developer offers a generous free tier, it didn’t cost me anything.
GitHub Repo
I have committed my Pydantic data validation script, test suite and documentation in the repo below:

Note that the parameters are decoupled from the Pydantic script. This will allow me to reuse some parameters across future validation scripts and has enabled me to exclude the system parameters from the repository.
Summery
In this post, I used the Pydantic Python library to create data validation and observability processes for my Project Wolfie iTunes data.
I found Pydantic very impressive! Its simplicity, functionality and interoperability make it an attractive addition to Python data pipelines, and its strong community support keeps Pydantic relevant and current. Additionally, Pydantic’s presence in FastAPI, PydanticAI and a managed AWS Lambda layer enables rapid integration and seamless deployment. I see many applications for it within Project Wolfie.
There’s lots more to Pydantic – this Pixegami video is a great walkthrough of Pydantic in action:
If this post has been useful then the button below has links for contact, socials, projects and sessions:

Thanks for reading ~~^~~