Categories
Developing & Application Integration

Stress-Free AWS Invoice PDF Administration With Power Automate

In this post, I create a stress-free AWS invoice PDF administration workflow with Microsoft Power Automate.

Table of Contents

Introduction

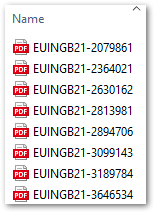
Each month, AWS sends me VAT invoices for all of my AWS accounts. Their filenames aren’t descriptive, with names like EUINGB21-2079861, EUINGB22-3276756 and EUINGB23-2216483. As a result, I rename them to make the contents clearer.

Now while I have the best intentions in the world, life happens and the PDFs usually end up in a to-do folder. As a result, I now have a folder like this:

2023 05 08 LakeFolder

I don’t want to sort through that. No one wants to sort through that. There must be another way! After successfully automating my application management with Winget, I’m keen to see what options I have here.

Firstly, let’s examine what currently happens with my new AWS invoice PDFs.

Manual Solution

This section examines my manual AWS invoice PDF workflow.

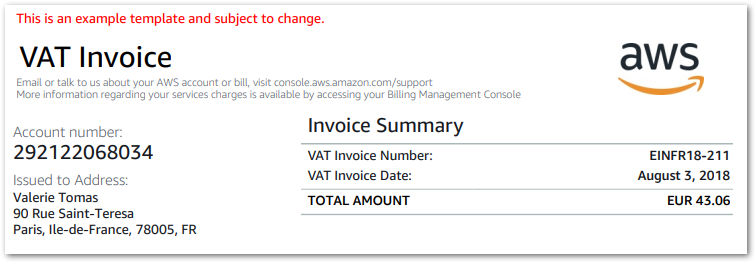
Here are several sample AWS invoices for reference. Although they’re from 2018, the 2023 bills are mostly the same. Let’s focus on a document header:

2023 05 08 AWSSampleInvoice

I copy the account number and VAT invoice date from a bill and combine them with some extra strings to produce a filename schema of:

AWS-{VAT Invoice Date}-{Account Number}-VATInvoice

In this example, that would produce:

AWS-2018-08-03-292122068034-VATInvoice

There are several pain points here:

  • The PDF must be opened to view the data.
  • The invoice date needs converting to ISO 8601 standard.
  • An open file can’t be renamed, so the new filename must be created in Notepad and then copy/pasted over.
  • Everything is manual and needs my full attention.

Wouldn’t it be nice if all this could be automated?

Microsoft Power Automate

This section examines Microsoft Power Automate and how it works.

What Is Power Automate?

Microsoft Power Automate is an automation tool. It uses triggers and actions to create workflows that complete manual, repetitive, and time-consuming tasks without human involvement. Power Automate is part of the Microsoft Power Platform.

Benefits of Power Automate include:

  • A no-code GUI with drag-and-drop functionality.
  • An extensive library of pre-defined templates.
  • Onboard testing and deployment features.
  • A free plan for work or school accounts.
  • Integration with the other Power Platform applications, Office 365 and other Microsoft and third-party services.

Power Automate Versions

Power Automate has two versions:

  • Power Automate Desktop focuses on desktop flows like file & folder manipulation, user input and script triggering. I’ll be using Power Automate Desktop in this post.

It’s worth pointing out that there are several visual differences between the two versions. This confused me when researching this post, as most screenshots I found were from the cloud service!

Power Automate Flows

Central to Power Automate is the concept of Flows. A Power Automate flow is a sequence of actions that are triggered by an event, performing a series of operations to achieve the desired results.

Flows are created through a visual interface that defines triggers, actions, and conditions using a drag-and-drop approach. Code can be written, but is optional. Completed flows can then be saved, published and run as needed.

Creating A Power Automate Flow

In this section, I create my AWS invoice Power Automate flow.

Getting All Files In The Folder

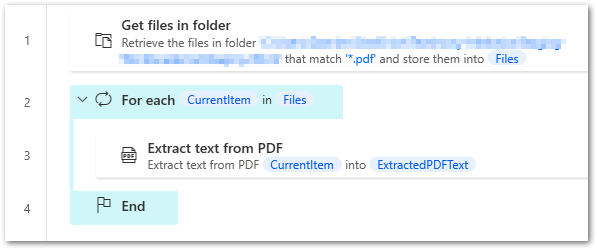
Firstly, I capture the AWS invoice PDFs using the Get Files In Folder action:

2023 05 11 PAGetFilesInFolder

Here, I specify the folder containing the invoices. I tell Power Automate to only get PDF files, to stop any other file types causing errors.

Power Automate stores a list of these files in a %Files% variable. I want to work on each file separately, so I pass the %Files% variable to a For Each action:

2023 05 11 PAForEach

This creates a loop that lets Power Automate capture each file in the %Files% variable. Each time the For Each action triggers, Power Automate stores a file from %Files% in a new %CurrentItem% variable.

Each subsequent action within the loop will then be applied to the %CurrentItem% file. At the end of the loop, Power Automate captures the next file from %Files% and overwrites the %CurrentItem% variable with it. This continues until all %Files% files are processed and the loop ends.

Getting The PDF Text

Secondly, I need to get the text from each %CurrentItem% PDF. There’s a great Extract Text From PDF action that can do this:

2023 05 11 PAExtractTextPDF

The PDF text is stored in an %ExtractedPDFText% variable that is going to be very useful for the rest of this flow!

So far, the flow looks like this:

2023 05 11 PAFlowFolderAndFiles

With the PDF text captured, the rest of the automation can begin!

Getting The Account Number

Next, let’s examine the PDF text more closely. This is part of %ExtractedPDFText% for an AWS invoice:

VAT Invoice
Email or talk to us about your AWS account or bill, visit console.aws.amazon.com/support
More information regarding your service charges is available by accessing your Billing Management Console
Account number:
[REDACTED]
Address:
[REDACTED]
Invoice Summary
VAT Invoice Number: EUINGB22-3617620
VAT Invoice Date: September 2, 2022
TOTAL AMOUNT GBP 0.34

On AWS invoices, the account number is always between ‘Account number:’ and ‘Address:’. Knowing this, I can use Crop Text to get the text between these strings:

2023 05 11 PACropTextAWSAccNo

This action produces two new variables:

  • %CroppedText%
  • %IsFlagFound%

Usually, these names would be fine. This isn’t the only text I’m going to be cropping though, so I change these to %AWSAccNoCroppedText% and %AWSAccNoIsFlagFound% respectively.

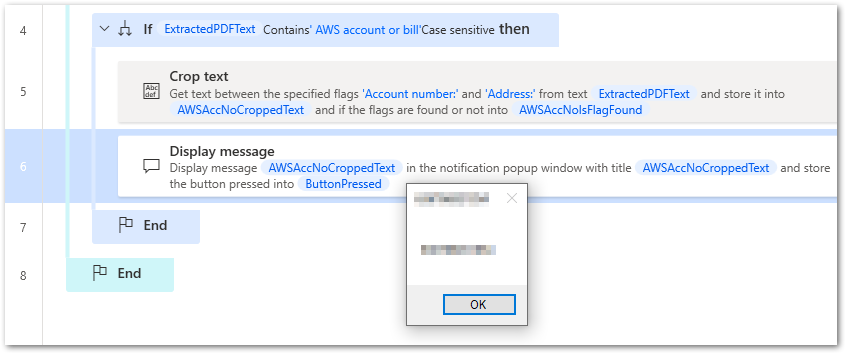
Before continuing, I’d like to check that %AWSAccNoCroppedText% contains the expected value. A good way to test this is to use the Display Message action:

2023 05 11 PAFlowCropAcctNo

(The account number is obfuscated here, but it was correct!)

Getting The Invoice Date

Now to get the invoice date! This is similar to getting the account number, using Crop Text to capture the date between ‘VAT Invoice Date:’ and ‘TOTAL AMOUNT’:

2023 05 11 PAAWSBillCropText

This produces variables %CroppedText% and %IsFlagFound% again, which I then change to %AWSBillDateCroppedText% and %AWSBillDateIsFlagFound%.

This isn’t enough this time though. Currently, the %AWSBillDateCroppedText% value is a date formatted as August 3, 2018. This won’t produce the filename I want, as I need the date to be in the ISO format of 2018-08-03.

To do this, I use the Convert Text To Datetime action. This converts a text representation of a date value to a datetime value:

2023 05 11 PAAWSBillTextoDatetime

I supply %AWSBillDateCroppedText% to convert. A datetime value of 03/08/2018 00:00:00 is returned, which I then assign to a %AWSBillDateTextAsDateTime% variable.

This is still unacceptable though! The date format doesn’t match the requirement and the slashes and colons are not legal filename characters.

To get the required date format, I use the Convert Datetime to Text action to convert 03/08/2018 00:00:00 to the custom format yyyy-MM-dd, in which:

  • yyyy is the year as a four-digit number.
  • MM is the month as a two-digit number, from 01 through 12.
  • dd is the day of the month as a two-digit number, from 01 through 31.
  • - is…a hyphen.
2023 05 11 AWSBillDateDatetimeToText

There is a table describing the custom date and time format specifiers in the Microsoft documentation.

This action produces a %AWSBillDateFormattedDateTime% variable with a value of 2018-08-03. Success!

Creating The New Filename

Now I can start thinking about the filename! To recap, I currently have:

  • A %AWSAccNoCroppedText% variable with a value of (for example) 1234123412341234.
  • A %AWSBillDateFormattedDateTime% variable with a value of 2018-08-03.

To create the filename, I need to combine my variables with some additional strings. For this, I use the Set Variable action to create a %AWSFilename% variable with the following value:

AWS-%AWSBillDateFormattedDateTime%-%AWSAccNoCroppedText%-VATInvoice

This breaks down to:

  • AWS- string
  • The %AWSBillDateFormattedDateTime% variable
  • A hyphen: -
  • The %AWSAccNoCroppedText% variable
  • -VATInvoice string

This should produce a string like AWS-2018-08-03-123456781234-VATInvoice. However, this was %AWSFilename%‘s initial output:

AWS-2018-08-03-
123456781234
-VATInvoice

This is unacceptable as a filename, but why is it happening?

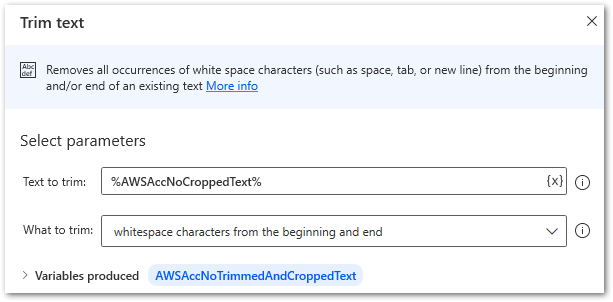
It turns out that the Crop Text action capturing the account number is also capturing the line breaks on either side of it. I remove these with the Trim Text action:

2023 05 13 PATrimText

This creates a new %AWSAccNoTrimmedAndCroppedText% variable. Replacing %AWSAccNoCroppedText% with this new variable when setting the %AWSFilename% variable produces the required output:

AWS-2018-08-03-123456781234-VATInvoice

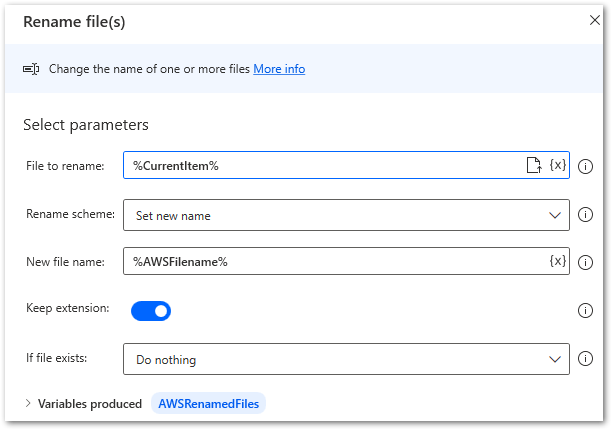
The %AWSFilename% variable can then be used by the Rename File(s) action to rename the file assigned to %CurrentItem% by the earlier For Each action:

2023 05 14 PARenameFiles

The updated file is assigned to a %AWSRenamedFiles% variable, which I use in the final part of the loop.

Moving The File

I usually move renamed invoices to a different path manually. I might as well add this process to my Power Automate flow since it will save me even more time!

Here, I move the file assigned to the %AWSRenamedFiles% variable to my destination folder using the Move File(s) action:

2023 05 14 PAMoveFIles

This is the last action in the loop. Or at least it was, until I reviewed the flow and identified a few improvements.

Enhancements

Originally, this AWS invoice Power Automate flow was just for AWS invoices. However, with some additional Power Automate actions the flow could easily extend to other kinds of invoices. This would allow one flow to administrate multiple invoice types instead of each type needing its own flow.

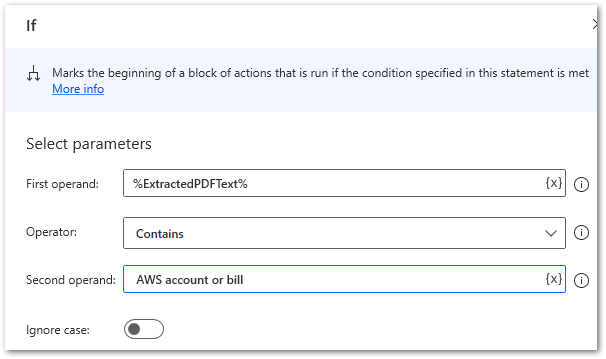
To begin, I limit the scope of the flow’s actions by adding an If action inside the For Each loop. It will now only apply the AWS invoice flow actions if %ExtractedPDFText% contains the string ‘AWS account or bill’:

2023 05 11 PAIf

Non-AWS invoices will not meet this condition, and will not be mislabeled by the flow or cause the flow to fail.

So what will happen to non-AWS invoices then? Currently, they’ll just be left in the source folder. Ideally, something should happen to them too, so let’s add a dead letter queue to the flow.

I add two new actions to the very end of the flow, positioned after the For Each loop has processed each file in the source folder:

2023 05 14 PAFlowDLQ

Both actions have already been used in this flow, but this time their focus has changed. By the time Power Automate reaches these actions, all files in the source folder will have gone through the For Each loop.

At this point, one of two sequences has happened:

  • The file did meet the AWS invoice condition, is renamed and then moved to the destination folder.
  • The file didn’t meet the AWS invoice condition and is still in the source folder.

So the only files now in the source folder are not AWS invoices.

The Get File In Folder action will get these files and store them in a %DLQFiles% variable. This is then passed to the Move File(s) action, which moves the unprocessed files to a PowerAutomateDLQ folder.

The end result is that:

  • The source folder is empty.
  • AWS invoices are renamed and then moved to the destination folder.
  • Any other files are moved to the PowerAutomateDLQ folder.

So, does it all work?

Testing

This section tests my AWS invoice Power Automate flow.

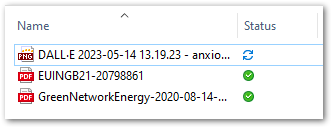
I put three files into the source folder and then ran the Power Automate flow:

  • A DALL-E PNG.
  • An AWS invoice PDF.
  • A utility bill PDF.
2023 05 14 TestFiles

The AWS invoice is renamed and then moved to the destination folder:

2023 05 13 TestAfter

The remaining files are unaltered and moved to the DLQ folder.

The flow also works far faster than my manual workflow. The old process – from opening the PDF to moving the renamed folder – took about 2 minutes each on average. Conversely, the flow processed 12 files in 2 seconds – this would have taken me 24 minutes!

Summary

In this post, I created a stress-free AWS invoice PDF administration workflow with Microsoft Power Automate.

I’m very impressed by Power Automate! It can certainly save me a ton of time with tasks I currently do, and with other actions like the ability to run Powershell and Python scripts, execute SQL statements and emulate the terminal, I feel like I haven’t even scratched the surface yet!

If this post has been useful, please feel free to follow me on the following platforms for future updates:

Thanks for reading ~~^~~

Categories
Data & Analytics

WordPress MySQL Database Tables Deep Dive

In this post, I do a deep dive into some of the amazonwebshark WordPress MySQL database tables following the journey of a recent post.

Table of Contents

Introduction

In January I used Python and Matplotlib to create some visualisations using the WordPress amazonwebshark MySQL database.

Since then I’ve been doing a lot with Power BI at work, so I’ve created a Power BI connection to the amazonwebshark database to reacquaint myself with some features and experiment with a familiar dataset.

I talked about doing a views analysis in January’s post. While some of the 2022 data is missing, I can still accurately analyse 2023 data. I plan to measure:

  • Total views for each post.
  • Total views for each category.

I’ll use this post to examine some of the MySQL tables, and link back to it in future analysis posts.

Let’s begin with a brief WordPress database overview.

WordPress Database 101

In this section, I take a high-level view of a typical WordPress database and identify the tables I’ll need.

There’s plenty of great documentation online about typical WordPress installations. I’m particularly keen on The Ultimate Developer’s Guide to the WordPress Database by DeliciousBrains, which includes an in-depth tour of the various tables.

As for table relationships, this WordPress ERD shows object names, primary keys and relationship types:

I’ll be concentrating on these WordPress tables:

And the wp_statistics_pages table used by WPStatistics.

I’ll examine each table in the context of a recent post: DBeaver OpenAI ChatGPT Integration.

wp_posts

In this section of my WordPress database deep dive, I examine the most important WordPress database table: wp_posts.

Table Purpose

WordPress uses wp_posts to manage a site’s content. Each row in the table is an event relating to a piece of content, like a post, page or attachment. Examples of these events in the context of a blog post are:

  • Creating A New Draft: A new row is created with a post_status of draft. This row is the parent of all future activity for the blog post.
  • Updating A Draft: A new row is created with details of the update. The new row’s post_parent is set to the initial post’s ID.
  • Publishing A Draft: The initial row’s post_status is changed to publish, and the post_date is changed to the publication date. WordPress finds revisions to the post by filtering rows with a post_parent matching the initial row’s ID.

Post Journey

Let’s start by finding DBeaver OpenAI ChatGPT Integration‘s parent row, which is its earliest record. The following query finds rows where the post_title is DBeaver OpenAI ChatGPT Integration, then orders by ID and returns the first result.

SELECT 
  id, 
  post_date, 
  post_title, 
  post_status, 
  post_name, 
  post_parent, 
  post_type 
FROM 
  `wp_posts` 
WHERE 
  post_title = 'DBeaver OpenAI ChatGPT Integration' 
ORDER BY 
  id 
LIMIT 
  1

Note that I order by ID, not post_date. The publication process changes the parent post’s post_date, so I must use ID to find the earliest post.

This record is returned:

Name Value
ID 1902
post_date 2023-02-19 20:28:22
post_title DBeaver OpenAI ChatGPT Integration
post_status publish
post_name dbeaver-openai-chatgpt-integration
post_parent 0
post_type post

So the DBeaver OpenAI ChatGPT Integration parent row is ID 1902. I can use this to count the number of changes to this post by searching for wp_posts rows with a post_parent of 1902:

SELECT 
  COUNT(*) 
FROM 
  `wp_posts`
WHERE 
  post_parent = 1902

81 rows are returned:

Name    |Value|
--------+-----+
COUNT(*)|81   |

Now let’s examine these results more closely.

In the following query, I get all rows relating to DBeaver OpenAI ChatGPT Integration and then group the results by:

  • Date the post was made (using the MySQL DATE function to remove the time values for more meaningful aggregation).
  • Status of the post.
  • Post’s parent post.
  • Type of post.

I also count the rows that match each group and order the results by ID to preserve the event order:

SELECT 
  COUNT(*) AS ID_count, 
  DATE(post_date) AS post_date, 
  post_status, 
  post_parent, 
  post_type 
FROM 
  `wp_posts`
WHERE 
  ID = 1902 
  OR post_parent = 1902 
GROUP BY 
  DATE(post_date), 
  post_status, 
  post_parent, 
  post_type 
ORDER BY 
  ID

The query results are below. A couple of things to note:

  • The first two columns show what happens when a post is published. Row 1 is ID 1902 as it has no post_parent, and it has a post_status of publish and a post_date of 2023-02-19.
  • Row 2 is the first revision of ID 1902, and it has a post_status of inherit and a post_date of 2023-02-15. This is why I order by ID instead of post_date – ordering by post_date would show the revisions before the parent post in the results.
  • There are various post_type valves – revisions are text updates and attachments are image updates.
ID_count post_date post_status post_parent post_type
1 2023-02-19 publish 0 post
1 2023-02-15 inherit 1902 revision
19 2023-02-16 inherit 1902 revision
7 2023-02-16 inherit 1902 attachment
24 2023-02-17 inherit 1902 revision
1 2023-02-17 inherit 1902 attachment
7 2023-02-18 inherit 1902 revision
21 2023-02-19 inherit 1902 revision
1 2023-02-26 inherit 1902 revision

Spotlighting some of these results for context:

  • On 2023-02-16 there were 19 text revisions and 7 images attached. I save a lot!
  • On 2023-02-19 there were 21 text revisions and then the post was published.
  • There was a further text revision on 2023-02-26 in response to a DBeaver software update.

That’s enough about wp_posts for now. Next, let’s start examining how WordPress groups content.

wp_term_relationships

In this section, I examine the first of the WordPress taxonomy tables: wp_term_relationships.

Table Purpose

wp_term_relationships stores information about the relationship between posts and their associated taxonomy terms (More on taxonomies in the next section). WordPress uses it as a bridge table between wp_posts and the various taxonomy tables.

Post Journey

In this query, I join wp_term_relationships to wp_posts on object_id (this is ID in wp_posts), then find the rows where either wp_posts.id or wp_posts.post_parent is 1902:

SELECT 
  yjp.ID, 
  DATE(yjp.post_date) AS post_date, 
  yjp.post_type, 
  yjp.post_status,
  yjtr.object_id, 
  yjtr.term_taxonomy_id 
FROM 
  `wp_posts` AS yjp 
  INNER JOIN `wp_term_relationships` AS yjtr 
    ON yjtr.object_id = yjp.ID 
WHERE 
  yjp.ID = 1902 
  OR yjp.post_parent = 1902

wp_term_relationships only contains published posts, so the only rows returned concern the parent ID 1902:

ID post_date post_type post_status object_id term_taxonomy_id
1902 2023-02-19 post publish 1902 2
1902 2023-02-19 post publish 1902 69
1902 2023-02-19 post publish 1902 71
1902 2023-02-19 post publish 1902 74
1902 2023-02-19 post publish 1902 76
1902 2023-02-19 post publish 1902 77

The query returned six distinct wp_term_relationships.term_taxonomy_id values. My next step is to establish what these IDs relate to.

wp_term_taxonomy

In this section, I examine the table that groups term_taxonomy_id values into taxonomy types: wp_term_taxonomy.

Table Purpose

WordPress uses the wp_term_taxonomy table to store the taxonomy data for terms. Taxonomies in WordPress are used to group posts and custom post types together. Examples of WordPress taxonomies are category, post_tag and nav_menu.

Post Journey

In this query, I add a new join to the previous query, joining wp_term_taxonomy to wp_term_relationships on term_taxonomy_id. Some of the wp_posts columns have been removed from the query to save space.

SELECT 
  yjp.ID,  
  yjtr.term_taxonomy_id, 
  yjtt.taxonomy
FROM 
  `wp_posts` AS yjp 
  INNER JOIN `wp_term_relationships` AS yjtr 
    ON yjtr.object_id = yjp.ID 
  INNER JOIN `wp_term_taxonomy` AS yjtt 
    ON yjtr.term_taxonomy_id = yjtt.term_taxonomy_id 
WHERE 
  yjp.ID = 1902 
  OR yjp.post_parent = 1902

These results give some content to the previous results. I can now see that wp_posts.id 1902 has one category and five tags.

ID term_taxonomy_id taxonomy
1902 2 category
1902 69 post_tag
1902 71 post_tag
1902 74 post_tag
1902 76 post_tag
1902 77 post_tag

To get the names of the categories and tags, I must bring one more table into play…

wp_terms

In this section of my WordPress database deep dive, I examine the table that holds the names and details of the taxonomy terms used on amazonwebshark: wp_terms.

Table Purpose

The wp_terms table stores all of the terms that are used across all taxonomies on a WordPress site. Each row represents a single term, and the columns in the table contain information about that term, including name and ID.

Post Journey

In this query, I add another join to the previous query, joining wp_terms to wp_term_taxonomy on term_id.

SELECT 
  yjp.ID, 
  yjtr.term_taxonomy_id, 
  yjtt.taxonomy,
  yjt.name 
FROM 
  `wp_posts` AS yjp 
  INNER JOIN `wp_term_relationships` AS yjtr 
    ON yjtr.object_id = yjp.ID 
  INNER JOIN `wp_term_taxonomy` AS yjtt 
    ON yjtr.term_taxonomy_id = yjtt.term_taxonomy_id 
  INNER JOIN `wp_terms` AS yjt 
    ON yjtt.term_id = yjt.term_id 
WHERE 
  yjp.ID = 1902 
  OR yjp.post_parent = 1902

The results now identify the category and each of the five tags by name:

ID term_taxonomy_id taxonomy name
1902 2 category AI & Machine Learning
1902 69 post_tag WordPress
1902 71 post_tag DBeaver
1902 74 post_tag MySQL
1902 76 post_tag OpenAI
1902 77 post_tag ChatGPT

This is a perfect match for the post’s taxonomy in the WordPress portal:

2023 03 10 WordPressPanelChatGPT

So that’s the categories. What about the views?

wp_statistics_pages

In this final section, I examine the WPStatistics table that holds view counts: wp_statistics_pages.

Table Purpose

WPStatistics uses wp_statistics_pages to store data about page views. Each row shows a URI’s total views on the date specified.

WPStatistics documentation isn’t as in-depth as WordPress, so here are the table’s DDL and column descriptions:

CREATE TABLE `1yJ_statistics_pages` (
  `page_id` bigint(20) NOT NULL AUTO_INCREMENT,
  `uri` varchar(190) NOT NULL,
  `type` varchar(180) NOT NULL,
  `date` date NOT NULL,
  `count` int(11) NOT NULL,
  `id` int(11) NOT NULL,
  PRIMARY KEY (`page_id`),
  UNIQUE KEY `date_2` (`date`,`uri`),
  KEY `url` (`uri`),
  KEY `date` (`date`),
  KEY `id` (`id`),
  KEY `uri` (`uri`,`count`,`id`)
)
Table NameDescription
page_idPrimary key. Unique identifier for the table.
uriUniform Resource Identifier used to access a page.
typeuri type: home / page / post
dateDate the uri was viewed
counturi total views on the specified date
iduri ID in wp_posts.ID

Post Journey

As wp_statistics_pages.id is the same as wp_posts.id, I can use id 1902 in a query knowing it will still refer to DBeaver OpenAI ChatGPT Integration.

For example, this query counts the number of rows in wp_statistics_pages relating to id 1902:

SELECT 
  COUNT(*) 
FROM 
  `wp_statistics_pages` 
WHERE 
  id = 1902
COUNT(*)|
--------+
      14|

I can also calculate how many visits DBeaver OpenAI ChatGPT Integration has received by using SUM on all wp_statistics_pages.count values for id 1902:

SELECT 
  SUM(yjsp.count) 
FROM 
  `wp_statistics_pages` AS yjsp
WHERE 
  yjsp.id = 1902
SUM(count)|
----------+
        40|

So the page currently has 40 views. I can see how these views are made up by selecting and ordering by wp_statistics_pages.date:

SELECT 
  yjsp.date, 
  yjsp.count 
FROM 
  `wp_statistics_pages` AS yjsp
WHERE 
  yjsp.id = 1902 
ORDER BY 
  yjsp.date

date count
2023-02-19 1
2023-02-20 5
2023-02-21 1
2023-02-22 4
2023-03-07 6
2023-03-08 3
2023-03-09 2
2023-03-10 1

I can also join wp_posts to wp_statistics_pages on their id columns, bridging the gap between the WPStatistics table and the standard WordPress tables:

SELECT 
  yjsp.date, 
  yjsp.count, 
  yjp.post_title 
FROM 
  `wp_statistics_pages` AS yjsp 
  INNER JOIN `wp_posts` AS yjp 
    ON yjsp.id = yjp.id 
WHERE 
  yjsp.id = 1902 
ORDER BY 
  yjsp.date
date count post_title
2023-02-19 1 DBeaver OpenAI ChatGPT Integration
2023-02-20 5 DBeaver OpenAI ChatGPT Integration
2023-02-21 1 DBeaver OpenAI ChatGPT Integration
2023-02-22 4 DBeaver OpenAI ChatGPT Integration
2023-03-07 6 DBeaver OpenAI ChatGPT Integration
2023-03-08 3 DBeaver OpenAI ChatGPT Integration
2023-03-09 2 DBeaver OpenAI ChatGPT Integration
2023-03-10 1 DBeaver OpenAI ChatGPT Integration

Summary

In this post, I did a deep dive into some of the amazonwebshark WordPress MySQL database tables following the journey of a recent post.

I’ve used this post to present the journey a typical post goes through in the WordPress database. Future posts will use this knowledge and the WordPress database as a data source for various dashboards, scripting and processes. Watch this space!

If this post has been useful, please feel free to follow me on the following platforms for future updates:

Thanks for reading ~~^~~

Categories
Architecture & Resilience

Automating Application Management With Winget

In this post, I try automating my laptop’s application management with the Windows Package Manager tool Winget.

Table of Contents

Introduction

After much frustration with my laptop’s performance, I finally booked it in for upgrades to an SSD hard drive and 16GB RAM. It’s now very responsive and far faster!

The shop originally planned to clone my existing HDD drive onto the new SSD. Unfortunately, the clone kept failing due to some bad sectors. Fortunately, this didn’t present a risk of data loss – most of my files are in OneDrive, and everything else is either in Amazon S3 or on external drives.

The failing clone meant that none of my previously installed programs and packages were on the new drive. I wasn’t flying blind here though, as I regularly use the free Belarc Advisor tool to create a list of installed programs.

But this is a heavily manual process, and the Belarc Advisor files contain a lot of unnecessary data that isn’t easy to use. So I found myself looking for an alternative!

User Story

In this section, I outline the problem I want to solve.

I want to capture a list of all applications installed on a given Windows device so that I can audit my device and have a better disaster recovery strategy.

ACCEPTANCE CRITERIA:

The process must be fully automated. I don’t want another job to do – I want the device to own this process.

The process must be efficient. Belarc Advisor gets the job done, but it takes time to load and does a bunch of other stuff that I don’t need.

There is no budget. Belarc Advisor isn’t ideal, but it’s free. I don’t want to start spending money on this problem now.

Introducing Winget

This section explains what Winget is and examines some of the features and benefits it offers.

What Is Winget?

Winget is a Windows Package Manager that helps install, upgrade, configure and delete applications on Windows 10 and Windows 11.

Package Managers look through configured repositories like the Windows Package Manager Community Repository for applications. If the application is available, it will be downloaded from the repository and installed onto the device.

Microsoft has open-sourced Winget, and has committed it to their GitHub account. After installation, Winget is accessible via the Windows Terminal, PowerShell, and the Command Prompt.

Package Manager Benefits

Package Managers like Winget offer several benefits over traditional methods:

  • Applications are installed as CLI commands, so there is no need to navigate to different websites or go through multiple installation steps.
  • Their repositories enforce a strict submission policy and use standardized package formats, so applications are installed consistently and reliably.
  • They manage application dependencies. If a desired application needs another application to work, the package manager will automatically install that application as well.
  • They lend themselves well to CI/CD pipelines, IAC and disaster recovery, as package manager commands can be used in scripts and automated processes.
  • Community tools like winstall exist that can create batch-installation Winget commands and scripts using a web GUI.

Winget Commands

Winget regularly receives new commands, a list of which is maintained by Microsoft. These commands can be loosely grouped into:

For this post, I will be focusing on the last group.

winget list displays a list of installed applications. The list includes the current version and the package’s source, and has several filtration options.

The winget list syntax is:

winget list [[-q] \<query>] [\<options>]

winget export creates and exports a JSON file of apps to a specified path.

This JSON file can combine with the winget import command to allow the batch-installing of applications and the creation of build environments.

winget export‘s JSON files do not include applications that are unavailable in the Windows Package Manager Community Repository. In these cases, the export command will show a warning.

The winget export syntax is:

winget export [-o] <output> [<options>]

Winget Scripting With VSCode

In this section, I write a script that will run the Winget commands.

I’m writing the script using Visual Studio Code, as this allows me to write the Winget script in the same way as other PowerShell scripts I’ve written.

Unique Filename

Firstly, I want to give each file a unique filename to make sure nothing is overwritten. A good way to do that here is by capturing Get-Date‘s output formatted as the ISO 8601 standard:

$RunDate = Get-Date -Format 'yyyy-MM-dd-HHmm'

This returns a string with an appropriate level of granularity, as I’m not going to be running this script multiple times a minute:

2023-04-26-1345

Winget Export Code

Next, I’ll script my export command.

I need to tell Winget where to create the file, and what to call it. I create a new folder for the exports and capture its path in a $ExportsFilePath variable.

Then I create a $ExportsFileName variable for the first part of the export file’s name. It uses a WingetExport string and the device’s name, which PowerShell can access using $env:computername:

$ExportsFileName = 'WingetExport' + '-' + $env:computername + '-'

Including the computer’s name means I can run this script on different devices and know which export files belong to which device:

WingetExport-LAPTOP-IFIJ32T-

My third $ExportsOutput variable joins everything together to produce an acceptable string for winget export‘s output argument:

$ExportsOutput = $ExportsFilePath + '\' + $ExportsFileName  + $RunDate + '.json'

An example of which is:

C:\{PATH}\WingetExport-LAPTOP-IFIJ32T-2023-04-26-1345.json

Finally, I can script the full command. This command creates an export file at the desired location and includes application version numbers for accuracy and auditing:

winget export --output $ExportsOutput --include-versions

Here are some sample exports:

{
  "$schema": "https://aka.ms/winget-packages.schema.2.0.json",
  "CreationDate": "2023-04-27T11:02:04.321-00:00",
  "Sources": [
    {
      "Packages": [
        {
          "PackageIdentifier": "Git.Git",
          "Version": "2.40.0"
        },
        {
          "PackageIdentifier": "Anki.Anki",
          "Version": "2.1.61"
        },
        {
          "PackageIdentifier": "Microsoft.PowerToys",
          "Version": "0.69.1"
        }
      ],
      "SourceDetails": {
        "Argument": "https://cdn.winget.microsoft.com/cache",
        "Identifier": "Microsoft.Winget.Source_8wekyb3d8bbwe",
        "Name": "winget",
        "Type": "Microsoft.PreIndexed.Package"
      }
    }
  ],
  "WinGetVersion": "1.4.10173"
}

As a reminder, these exports don’t include applications that are unavailable in Winget. This means winget export alone doesn’t meet the user story requirements, so there is still work to do!

Winget List Code

Finally, I’ll script my list command. This is mostly similar to the export command and I create the file path in the same way:

$ListsOutput = $ListsFilePath + '\' + $ListsFileName + $RunDate + '.txt'

The filename is changed for accuracy, and the suffix is now TXT as no JSON is produced:

WingetList-LAPTOP-IFIJ32T-2023-04-25-2230.txt

Now, while winget list shows all applications on the device, it has no argument to save this list anywhere. For that, I need to pipe the winget list output to a PowerShell command that does create files – Out-File:

winget list | Out-File -FilePath $ListsOutput

Out-File writes the list to the $ListsOutput path, producing rows like these:

Name Id Version Available Source
Anki Anki.Anki 2.1.61 winget
Audacity 2.4.2 Audacity.Audacity 2.4.2 3.2.4 winget
DBeaver 23.0.2 dbeaver.dbeaver 23.0.2 winget
S3 Browser version 10.8.1 S3 Browser_is1 10.8.1

The entire script takes around 10 seconds to run in an open PowerShell session and produces no CPU spikes or memory load. The script is on my GitHub with redacted file paths.

Automation With Task Scheduler

In this section, I put Task Scheduler in charge of automating my application management Winget script.

What Is The Task Scheduler?

Task Scheduler began life on Windows 95 and is still used today by applications including Dropbox, Edge and OneDrive. Parts of it aren’t great. The Send Email and Display Message features are deprecated, and monitoring and error handling relies on creating additional tasks that are triggered by failure events.

However, it’s handy for running local scripts and has no dependencies as it’s built into Windows. It supports a variety of use cases which can be scripted or created in the GUI. Existing tasks are exportable as XML.

Creating A New Task

There is plentiful documentation for the Task Scheduler. The Microsoft Learn developer resources cover every inch of it, and these Windows Central and Windows Reports guides are great resources with extensive coverage.

In my case, I create a new ApplicationInventory task, set to trigger every time I log on to Windows:

2023 04 25 TaskSchedulerTrigger

The task starts powershell.exe, passing an argument of -file "C:\{PATH}\ApplicationInventory.ps1".

This works, but will force a PowerShell window to open every time the schedule runs. This can be stopped by configuring the task to Run whether user is logged on or not. Yup – it feels a bit hacky. But it works!

I now have a new scheduled task:

2023 04 25 TaskSchedulerNewTask

Testing

An important part of automating my application management with Winget is making sure everything works! In this section, I check the script and automation processes are working as expected.

I’ll start with the task automation. Task Scheduler has a History tab, which filters events from Event Viewer. Upon checking this tab, I can see the chain of events marking a successful execution:

2023 04 25 TaskSchedulerHistory

When I check the WingetExport folder, it contains an export file created on 25/04/2023 at 22:30:

2023 04 25 AppInventoryExports

And there are similar findings in the WingetList folder:

2023 04 25 AppInventoryLists

Both files open successfully and contain the expected data. Success!

Summary

In this post, I try automating my laptop’s application management with the Windows Package Manager tool Winget.

If this post has been useful, please feel free to follow me on the following platforms for future updates:

Thanks for reading ~~^~~