Amazon Web Services (AWS) is the world’s most comprehensive and broadly adopted cloud platform, offering over 200 fully-featured services from data centres globally.
It’s time for the customary retrospective post! Previously, I’ve written these in December. From now on, I’ll post them on amazonwebshark’s birthday in January because:
It gives me more time to consider my goals.
If I’m going to write about a year, it makes more sense to write after the year is over.
In previous years, I’ve felt personal pressure to produce both a December YearCompass post and a January birthday post. My YearCompass post can cover both of these instead.
Firstly, I’ll examine YearCompass itself. Next, I’ll discuss how 2024 went. Finally, I’ll examine my 2025 YearCompass goals.
YearCompass is a free booklet that helps you reflect on the year and plan the next one. With a set of carefully selected questions and exercises, YearCompass helps you uncover your own patterns and design the ideal year for yourself.
YearCompass offers a free alternative to New Year’s Resolutions. Available as A4 and A5 PDFs in several languages, the booklet can be completed digitally or by hand.
YearCompass PDFs contain two sections: reflecting on the past year and planning for the next. Each section features prompts to help users assess priorities and prepare for the future.
There are no rigid guidelines for completing YearCompass. Although the book recommends taking breaks between sections, many people choose to complete it in one go. I often focus on specific sections rather than the entire document, as I usually have what I need by a certain point.
2024 Retrospective
In this section, I reflect on my 2024 goals and evaluate my progress with them.
Build Technology Projects
As a cloud enthusiast, I want to complete valuable project builds so that I can develop and validate my knowledge and skills, and have subject matter for future session abstracts.
Exiting 2023, I felt I had done much theory but little practice. I had completed online learning, attended events and recertified my AWS SysOps Administrator certification, yet I still felt lacking in hands-on experience.
Separately, in July, I joined Steamhaus as an AWS Consultant, where I build, scale, and optimise cloud solutions for clients. This role involves unique projects spanning diverse organisations, requiring creative problem-solving and offering many opportunities to learn and grow. And 2025 is already shaping up to be an interesting year!
Recently, I began a series of shorts to boost my spontaneous speaking ability. It appears to be working for me, and there’s still plenty to film!
Finally, in September I met Cat Mawdsley and Dan Knowles at Northern Reach for the first time. Northern Reach focuses on providing technology and innovation-driven business engagement initiatives for partners in both the public and private sectors across Northern England.
I was born and raised in Lancashire, and quickly discovered their ambitious plans for the region. We got chatting, one thing led to another and, well, I’ll have some exciting news to share soon about something I’m part of!
Build A Second Brain
Asjust a normal manI want to build a second brain so that I can organise my resources and work more efficiently.
So this is the goal with the least progress, but only because the first two goals blew up beyond anything I could have envisaged! Having read Building A Second Brain in January, I started putting some of the ideas into practice.
Firstly, I’m a big fan of the CODE information consumption method:
Capture
Organise
Distill
Express
In some ways I was already doing this, but lacked a framework or set of steps to follow. I now use CODE in several areas of my life, and while it’s not yet fully embedded everywhere it is starting to make a difference.
However, I’m no fan of the PARA organisational system:
Project
Area
Resource
Archive
Tiago Forte and I define Project very differently, and I dislike using Archive to describe anything. Archive always feels like a nondescript collection of stuff, which is what a Second Brain should not be. Even Tiago defines Archive as:
Anything from the previous three categories that is no longer active, but you might want to save for future reference.
Ultimately, my Second Brain isn’t where I want it to be right now. But to be fair, a second brain is never really finished as it constantly grows and evolves like a human brain. In 2025, I’ll be examining some Second Brain-related AI and SaaS tools and might make some related content if I think it’ll be helpful.
2025 Goals
In this section, I use YearCompass to decide on my 2025 professional goals. For each goal, I’ll explain my reasoning and then write a user story.
Community Investment
I am deeply grateful for the tech communities that supported me throughout 2024. They offered me opportunities to learn, grow and connect with like-minded peers who share my passion for technology. I was invited to speak at several local and international events, and I strongly believe that my journey to Steamhaus began at AWS community events.
In 2025, I plan to build on these experiences by continuing to contribute through speaking engagements, writing, and social support, as well as giving operational user group support. In this way, I hope to strengthen and grow the communities that played such an integral role in my 2024 successes.
On a personal note, I look forward to continuing the growth journey that the communities have nurtured. This includes enhancing my confidence, refining interpersonal skills, strengthening relationships and expanding my experiences. Just like any solid investment – everyone benefits.
As an active tech community member, I want to support and grow these communities through content, involvement and participation so that both the communities and I thrive.
That said…
Gestalt Cycles
I did a lot in 2024, and looking back I didn’t allow much downtime. Feelings of ‘I should be doing something’ constantly ran into evenings, weekends, and annual leave, and I increasingly noticed disrupted sleep, diminished health and fitness and heightened anxiety as a result.
I’ve burned myself out before so I recognise the signs. And as keen as I am to continue on this unexpected, wild and incredible journey I’m currently on, I also don’t want to end up utterly cooked.
Turning this into a goal was hard as nothing really fit. The closest match I’ve found so far is Gestalt Cycles. This describes the natural rhythm of completing an experience, from identifying a need to achieving closure.
Each cycle involves several stages:
The idea focuses on completing each stage fully to maintain balance and well-being, avoiding lingering stress while creating space for rest and renewal. This aligns closely with what I need. My challenge hasn’t been starting or finishing tasks – it’s been allowing enough recovery time between them.
This aligns with Animas Coaching‘sWithdrawal stage definition:
Finally, after the satisfaction of the need or desire, individuals withdraw, returning to a state of relative equilibrium. This stage offers an opportunity for rest and reflection before the cycle recommences with a new sensation.
…the goal is to find relief and meet needs in a way that they are assimilated, such that the organism is truly integrating what it takes in, and what is taken in is a good fit for the organism.
I have 2025 ambitions around fitness, home improvements and landscaping. To enable these, I’ll need to ease off the accelerator occasionally. So with all this in mind:
As an individual with multiple workstreams, I want to apply Gestalt cycles to recognize when a task is complete and take intentional breaks, so that I can improve my wellbeing and maintain consistent energy and focus.
Be The Change
Definitely the most LinkedIn-sounding of the three. But hear me out. This goal stems from Mahatma Gandhi’s quote:
“Be the change” is about taking personal responsibility to embody the values and actions you want to inspire in others. It emphasises proactivity and self-empowerment over simply waiting for change to happen.
Throughout my career, I’ve had ideas I wanted to share and a strong desire to contribute. However, I have constantly struggled with self-confidence, self-doubt and articulating my thoughts.
This changed in 2024. Through my professional role, speaking engagements and involvement in the AWS community, I gained the confidence and ability to express and implement my insights and ideas. This let me enhance my skills and uncover new opportunities, leading to beneficial outcomes for myself, my colleagues and clients and the wider tech community.
In 2025, I’m committed to embracing this newfound confidence to present and support ideas and changes that matter to me. By doing so, I hope to build stronger relationships, deliver impactful projects and advance initiatives that reflect my values and passions.
As a hard working dog dad, I want to confidently embrace and act on my ideas and opinions so that I can make meaningful contributions and changes to myself, my peers and clients and the wider tech community.
Summary
In this post, I used the free YearCompass booklet to reflect on 2024 and to plan some professional goals for 2025.
Reflecting on 2024 has highlighted key lessons and opportunities for growth, helping me shape an exciting vision for 2025. I’m eager to see where the new year leads and to share progress along the way! I’ll post updates here and via my social, project and session links, which are available via the button below:
Last time, I examined some unexpected AWS Glue costs and designed an event-based cost control process architecture. I also wrote this user story:
As an AWS account owner, I want Glue interactive sessions to stop automatically after a chosen duration so that I don’t accidentally generate unexpected and avoidable costs.
Here, I’m going to build my event-based Glue cost control process using these AWS services:
SNS
CloudTrail
Step Functions
EventBridge
CloudWatch
The order is based on dependencies, which I will explain shortly. Some of these resources already exist, so let’s start by reviewing those.
Existing Resources
I have two existing SNS topics that this process will use. These are general-purpose topics used for all my Step Functions notifications. They are:
failure-stepfunction
success-stepfunction
Both topics are largely alike, with the main difference being the distinct subaddressing in their respective email endpoints.
CloudTrail
Let’s start by examining an AWS Glue CreateSession CloudTrail event record. I haven’t included a full Glue CreateSession CloudTrail event record here because:
This is the Glue Interactive Session’s unique identifier. I’ll be using this in my event-based Glue cost control build shortly. For now, understand that:
The Glue Interactive Session’s ID is found in the event record’s requestParameters object.
The requestParameters object is in turn found in the event record’s details object.
This is represented as:
JSON
detail.requestParameters.id
I’m going to pass this ID to a Step Functions state machine later. Speaking of which…
Step Functions
In this section, I start creating my event-based Glue cost control build automation. This consists of two components:
An event router – built with an EventBridge rule.
A service orchestrator – built with a Step Functions state machine.
Since the state machine will be the EventBridge rule’s target, I must create the state machine first.
State Machine Actions
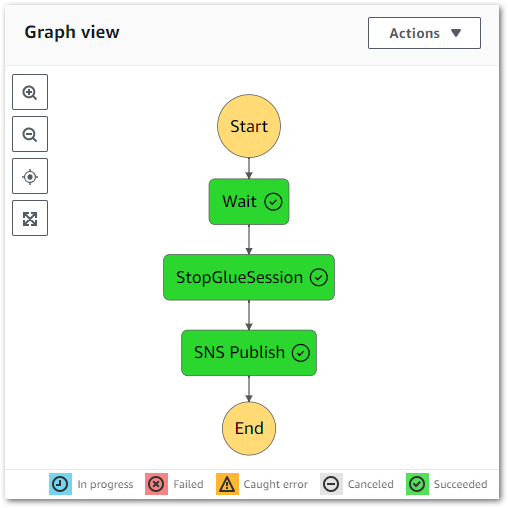
The state machine’s architecture was covered in my previous post. As a reminder, when given a Glue SessionID the state machine must:
Wait for a set period.
Stop the Glue session.
Trigger a confirmation email.
So let’s run through each step, starting with how the Glue SessionID is acquired.
Getting Glue Session ID
When executing a Step Functions state machine, an optional JSON input can be specified. There are several ways to supply this input:
The state machine must then stop the Glue session.
Glue: Stop Session
To understand what’s needed here, let’s review the Glue StopSession API reference. ID is the only required parameter, which comes from the earlier JSON input.
This is represented in ASL as:
JSON
{"Id.$": "$.session_id"}
Now, as discussed previously, this action can fail. In the example below, a Glue StopSession request fails because the session is still being provisioned. Since nothing has started, there is nothing to stop:
JSON
{"cause": "Session is in PROVISIONING status (Service: Glue, Status Code: 400, Request ID: null)","error": "Glue.IllegalSessionStateException","resource": "stopSession","resourceType": "aws-sdk:glue"}
To that end, I’ve added retry parameters. Upon error, StopGlueSession will retry three times, with a ten-second delay between attempts. If the third retry fails, then the state machine’s error handling will be invoked.
"SNS Publish": {"Type": "Task","Resource": "arn:aws:states:::sns:publish","Parameters": {"TopicArn": "arn:aws:sns:eu-west-1:[REDACTED]:success-stepfunction","Message.$": "States.Format('Hi! AWS Step Functions has stopped this Glue session for you: {}', $)" },"End": true }
I customised the Message.$ parameter using the States.Format intrinsic function:
The string starting with 'Hi!... is the message I want SNS to use.
{} is a placeholder for the value I want to insert.
$ is the state machine data to insert into {}
This produces a better email notification for the user:
Hi! AWS Step Functions has stopped this Glue session for you: {Id=glue-studio-datapreview-3f905608-50f1-4b9e-80e2-f4071feb2282}
Finally, "End": true stops the state machine.
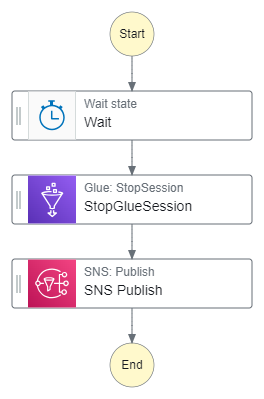
Final Workflow
The state machine is now as follows:
With this auto-generated ASL:
JSON
{"StartAt": "Wait","States": {"Wait": {"Type": "Wait","Seconds": 30,"Next": "StopGlueSession" },"StopGlueSession": {"Type": "Task","Resource": "arn:aws:states:::aws-sdk:glue:stopSession","Parameters": {"Id.$": "$.session_id" },"Next": "SNS Publish","Retry": [ {"ErrorEquals": ["States.ALL" ],"IntervalSeconds": 10,"MaxAttempts": 3 } ] },"SNS Publish": {"Type": "Task","Resource": "arn:aws:states:::sns:publish","Parameters": {"TopicArn": "arn:aws:sns:eu-west-1:[REDACTED]:success-stepfunction","Message.$": "States.Format('Hi! AWS Step Functions has stopped this Glue session for you: {}', $)" },"End": true } },"Comment": "When given a Glue SessionID start a wait, stop the session and send an SNS message."}
There’s one more aspect to sort out. What happens if the state machine fails?
Error Logging
Firstly, let’s examine the state of events if the state machine fails:
A Glue session must have started.
An Eventbridge Rule must have sent the event to Step Functions.
One of the state machine states must have failed.
Unless the failing state is SNS:Publish, then there is an active Glue session still incurring costs. Therefore, triggering an alarm is much more appropriate than a notification. Alarm creation requires sending the state machine logs to CloudWatch.
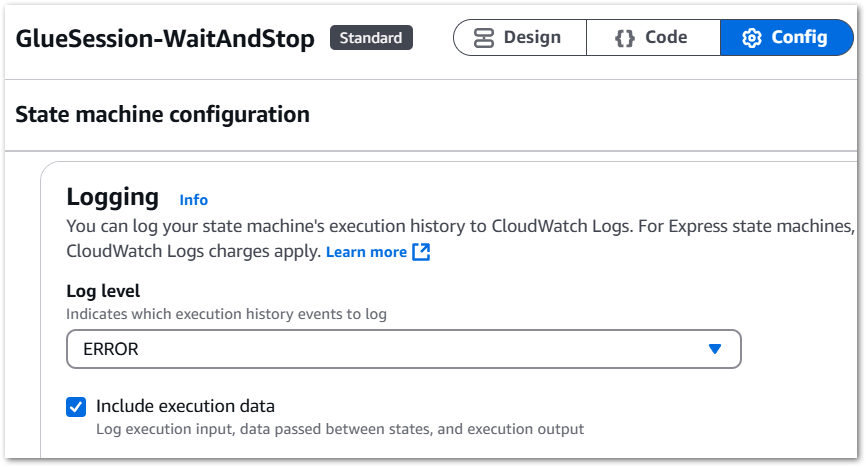
By default, new state machines do not enable logging due to storage expenses. However, in this case, the log storage cost will be significantly lower than that of an unattended Glue Session. So I activate the logging for my state machine.
Step Functions log levels range from ALL to ERROR to FATAL to OFF, which are explained in the AWS documentation. As I’m only interested in failures, I select ERROR and include the execution data. This consists of execution input, data passed between states and execution output:
Next, I create a new CloudWatch log group called /aws/vendedlogs/states/GlueSession-WaitAndStop-Logs. This will form the basis of my failure alerting.
CloudWatch
Here, I configure the CloudWatch resources for my event-based Glue cost control build.
Log Groups & Metrics
The previously configured GlueSession-WaitAndStop-Logs group receives all the Step Functions state machine’s ERROR events. In most cases, these are Glue.IllegalSessionStateException events:
JSON
{"id": "7","type": "TaskFailed","details": {"cause": "Session is in PROVISIONING status (Service: Glue, Status Code: 400, Request ID: b1baaf14-ae89-4106-a286-87cf5445de6c)","error": "Glue.IllegalSessionStateException","resource": "stopSession","resourceType": "aws-sdk:glue" },
Note the TaskFailed event type – it indicates the failure of a single state, not the entire state machine. Thus, I don’t need alerts for those events.
However, there are also ExecutionFailed events like these:
JSON
{"id": "5","type": "ExecutionFailed","details": {"cause": "An error occurred while executing the state 'StopGlueSession' (entered at the event id #4). The JSONPath '$.session_id' specified for the field 'Id.$' could not be found in the input '{\n\"sessionId\": \"\"\n}'","error": "States.Runtime" },
I definitely want to know about these! ExecutionFailed means the entire state machine failed, and there’s probably a Glue Session still running!
These events are captured as ExecutionsFailedCloudWatch metrics. Keep in mind that the AWS Step Functions console automatically publishes various metrics irrespective of logging configurations, including ExecutionFailed. However, in my experience, having both the metrics and failure logs centralised in CloudWatch simplifies troubleshooting.
Next, let’s use these metrics to create an alarm.
Alarm
Creating a CloudWatch alarm begins with selecting the ExecutionsFailed metric from States > Execution Metrics
This alarm will have a static value threshold with a value greater than zero, which is checked every minute. When the alarm’s state is In Alarm, an email notification will be sent to my failure-stepfunction SNS topic.
Finally, CloudWatch creates a new alarm graph:
So that’s everything state machine needs. Next, how do I pass the Glue SessionID to it?
EventBridge
In this section, I create the EventBridge Rule responsible for handling my event-based Glue cost control build’s events.
EventBridge Rule Anatomy
EventBridge Rules specify the criteria for routing events from an event bus to designated targets like Lambda functions, Step Functions and SQS queues. They use event patterns to filter incoming events and identify targets to route to, enabling event-driven and event-based workflows without custom processing logic.
Creating an EventBridge Rule involves three steps:
Define rule detail
Build event pattern
Select target
Define Rule Detail
Besides the name and description, this section is mainly concerned with:
Event Bus: The event bus to monitor for events. Default is fine.
Rule Type: EventBridge’s rule type. This can either match an event pattern or operate on a schedule (this is different from EventBridge Scheduler – Ed).
Next, let’s discuss event patterns!
Build Event Pattern
Firstly, event patterns are a very expansive topic, so please refer to the EventBridge user guide afterwards for definitions and examples.
Event patterns act as filters, defining how EventBridge identifies whether to send an event to a target. The EventBridge console provides options for sample events and testing patterns.
As a reminder, this is part of a typical CreateSession event record from which I want to capture ID:
Pattern Form: Using pre-defined EventBridge templates.
Custom Pattern: Using a manual JSON editor.
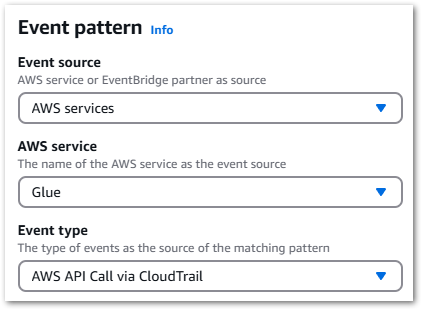
Pattern Form offers a series of dropdowns that quickly construct the desired pattern:
Selecting AWS Services > Glue > AWS API Call via CloudTrail creates this event pattern:
JSON
{"source": ["aws.glue"],"detail-type": ["AWS API Call via CloudTrail"],"detail": {"eventSource": ["glue.amazonaws.com"] }}
This will send all Glue events to the target, so it could use some refinement. An eventName can be added to the pattern either by manual editing or via the Specific Operation(s) setting.
The updated pattern will now only send Glue CreateSession events:
JSON
{"source": ["aws.glue"],"detail-type": ["AWS API Call via CloudTrail"],"detail": {"eventSource": ["glue.amazonaws.com"],"eventName": ["CreateSession"] }}
Select Target
Finally, I must select the EventBridge Rule’s target – my state machine. This is why I created the state machine first; for it to be an EventBridge target it must first exist.
At this point, I could pass the whole event to the state machine. However, the state machine had no way to parse the SessionID from the event. While JSONata could now meet this requirement, it wasn’t a Step Functions feature back in June.
Luckily, EventBridge offers relevant settings here. One of these – an Input Transformer – can customise an event’s text before EventBridge sends it to the rule’s target. Input Transformers consist of an Input Path and Input Template.
An Input Path uses a JSON path and key-value pairs to reference items in events and store them as variables. For instance, capturing ID from this event:
$.detail accesses the detail object of the CloudTrail event record.
$.detail.requestParameters accesses the requestParameters object within detail.
Finally, $.detail.requestParameters.id accesses the id value within requestParameters.
This is passed to an Input Template, mapping the path’s output to a templated key-value pair. This is then passed to the rule target verbatim, replacingplaceholders with the Input Path values.
So this template:
JSON
{"session_id": "<id>"}
Produces a JSON object comprising a "session_id": string and the Input Path’s Glue SessionID value:
This will be passed as the JSON input when executing the state machine.
That’s everything done now. So let’s see if it works!
Testing
This section tests my event-based Glue cost control build.
In the following tests, a Glue Interactive Session was started with the build fully active and was observed in the AWS console. AWS assigned the SessionID glue-studio-datapreview-3f905608-50f1-4b9e-80e2-f4071feb2282.
EventBridge Rule
Expectation: When a Glue CreateSession CloudTrail event record is created:
EventBridge matches the CloudTrail event record to my EventBridge Rule.
The EventBridge Rule triggers and defines a session_id variable.
The EventBridge Rule executes my target state machine with session_id JSON input.
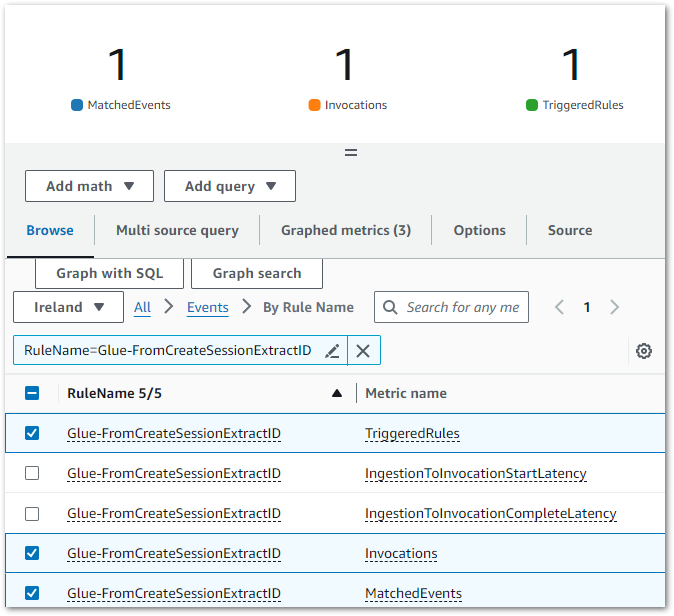
Result: CloudWatch indicates EventBridge matched the CloudTrail Event Record to my EventBridge Rule’s Event Pattern, executing the intended actions:
The EventBridge Rule’s extracts the glue-studio-datapreview-3f905608-50f1-4b9e-80e2-f4071feb2282 SessionID from the CloudTrail Event Record and adds it as a JSON input when executing the targeted GlueSession-WaitAndStop state machine.
Step Functions State Machine
Expectation: When a Glue CreateSession CloudTrail event record is created:
State machine is executed with session_id JSON input.
Glue StopSession API is called after 30 seconds.
If the first StopSession API call fails, a retry occurs after ten seconds.
A confirmation email is sent to the user.
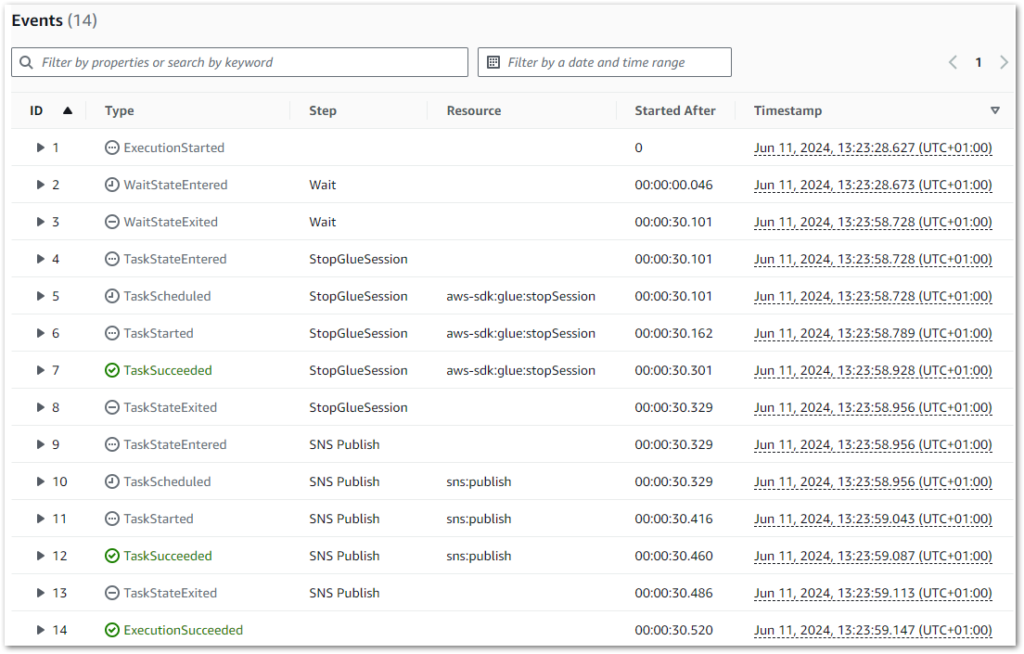
Result: State machine executes successfully:
The state machine logs also correctly show a thirty-second wait between rows 2 and 3 (the start and end of the Wait state):
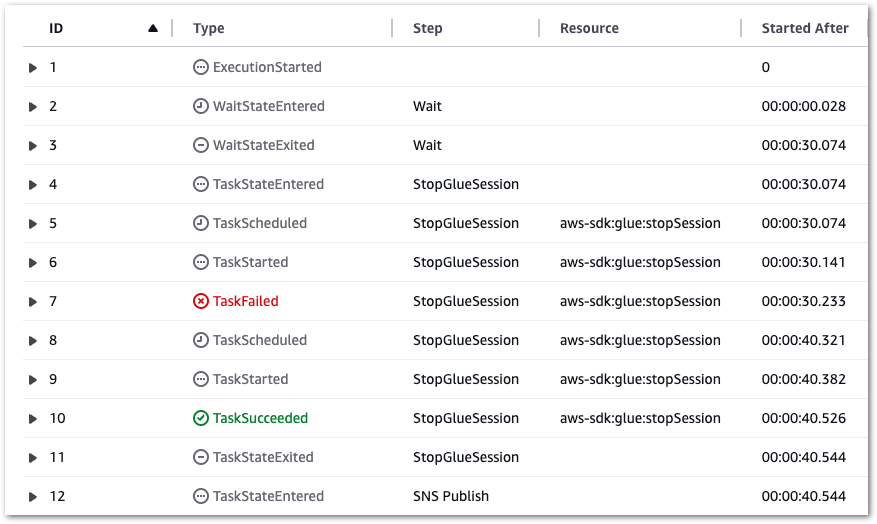
Additionally, if a Glue.IllegalSessionStateException error occurs, a retry occurs after ten seconds (see rows 7 and 8):
Finally, SNS sends the correct email to the user:
The failure alarm is tested later.
Glue Session
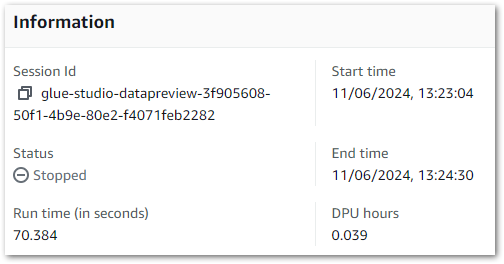
Expectation: When an Interactive Session starts while the EventBridge Rule is enabled, it is automatically stopped thirty seconds after becoming active.
Result: This session runs for seventy seconds. Although this exceeds thirty seconds, keep in mind that the session needs to be provisioned before it can be stopped.
The CloudWatch Alarm was tested by briefly changing the Step Function state machine’s IAM policy to deny the StopSession action and then starting a new Interactive Session, forcing the desired failure without altering the cost control process itself.
Expectation: If the state machine fails, then a CloudWatch Alert is sent to the user.
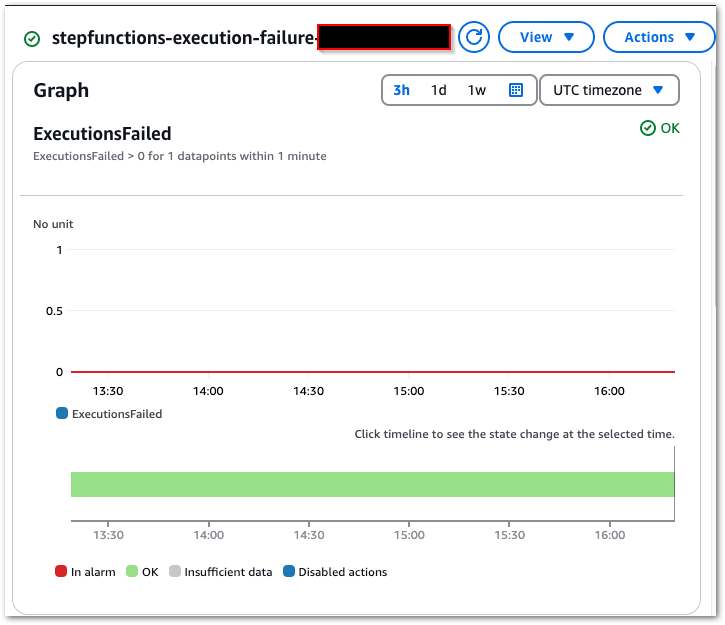
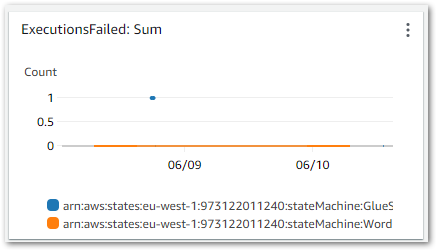
Result: Upon the state machine’s failure, an ExecutionsFailed metric is emitted to CloudWatch, shown in this chart:
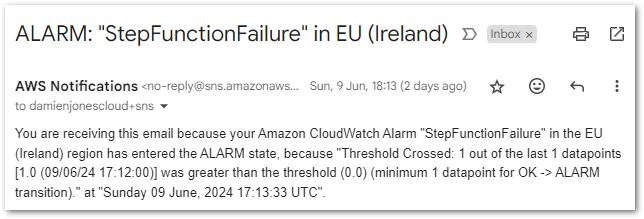
This triggers the CloudWatch Alarm when its Sum > 0 threshold condition is met, changing the alarm’s state to In Alarm and sending an email notification using my failure-stepfunction SNS topic:
And with that, all tests are successful. Now let’s look at the costs.
Cost Analysis
This section analyses the costs of my event-based Glue cost control build. There are two aspects to this:
Cost Expenditure: How much is the cost control process costing me to run?
Cost Savings: How much money am I saving on the stopped Glue Sessions?
Because the biggest test of all is whether this build satisfies the user story. Does it prevent unexpected and avoidable costs?
Cost Expenditure
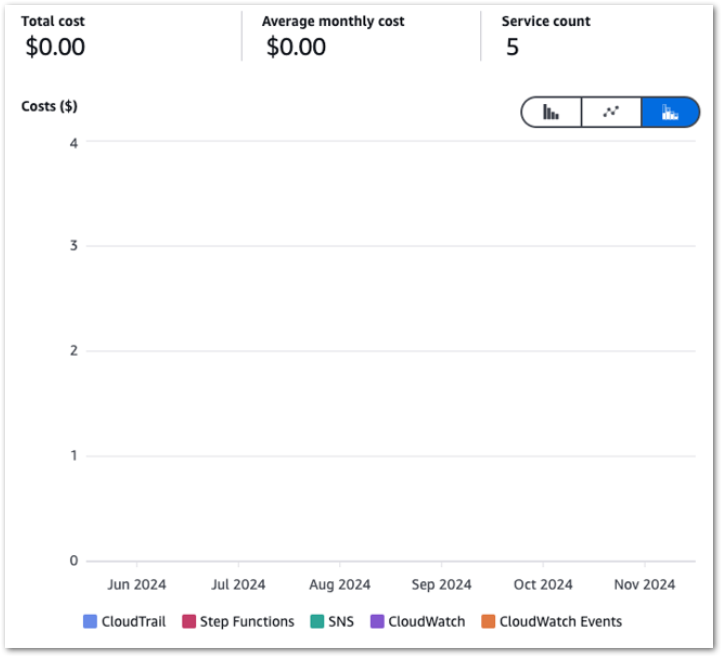
Firstly, let’s examine my event-based Glue cost control build costs between June 2024 and November 2024:
So I guess this kinda makes my point. Zero cost doesn’t mean zero usage though, so let’s check the bills for that period.
Caveat: I didn’t tag any of my resources (yes ok I know), so this usage is for the entire account.
CloudTrail & CloudWatch Usage
CloudTrail FreeEventsRecorded:
Service
Period
Metric
Quantity
CloudTrail
2024-06
FreeEventsRecorded
33,217
CloudTrail
2024-07
FreeEventsRecorded
28,993
CloudTrail
2024-08
FreeEventsRecorded
40,682
CloudTrail
2024-09
FreeEventsRecorded
29,891
CloudTrail
2024-10
FreeEventsRecorded
36,208
CloudTrail
2024-11
FreeEventsRecorded
28,630
CloudWatch Alarms:
Service
Period
Metric
Quantity
CloudWatch
2024-06
Alarms
0.919
CloudWatch
2024-07
Alarms
2
CloudWatch
2024-08
Alarms
2.126
CloudWatch
2024-09
Alarms
2
CloudWatch
2024-10
Alarms
2
CloudWatch
2024-11
Alarms
2
CloudWatch Metrics:
Service
Period
Metric
Quantity
CloudWatch
2024-06
Metrics
5.29
CloudWatch
2024-07
Metrics
0.372
CloudWatch
2024-08
Metrics
4.766
CloudWatch
2024-09
Metrics
0.003
CloudWatch
2024-10
Metrics
4.003
CloudWatch
2024-11
Metrics
4.626
CloudWatch Requests:
Service
Period
Metric
Quantity
CloudWatch
2024-06
Requests
696
CloudWatch
2024-07
Requests
15
CloudWatch
2024-08
Requests
230
CloudWatch
2024-09
Requests
0
CloudWatch
2024-10
Requests
181
CloudWatch
2024-11
Requests
122
EventBridge, SNS & Step Functions Usage
EventBridge EventsInvocation:
Service
Period
Metric
Quantity
EventBridge
2024-06
EventsInvocation
30
EventBridge
2024-07
EventsInvocation
31
EventBridge
2024-08
EventsInvocation
31
EventBridge
2024-09
EventsInvocation
30
EventBridge
2024-10
EventsInvocation
31
EventBridge
2024-11
EventsInvocation
30
SNS NotificationDeliveryAttempts-SMTP:
Service
Period
Metric
Quantity
SNS
2024-06
NotificationDeliveryAttempts-SMTP
52
SNS
2024-07
NotificationDeliveryAttempts-SMTP
29
SNS
2024-08
NotificationDeliveryAttempts-SMTP
85
SNS
2024-09
NotificationDeliveryAttempts-SMTP
2
SNS
2024-10
NotificationDeliveryAttempts-SMTP
58
SNS
2024-11
NotificationDeliveryAttempts-SMTP
11
SNS Requests:
Service
Period
Metric
Quantity
SNS
2024-06
Requests-Tier1
315
SNS
2024-07
Requests-Tier1
542
SNS
2024-08
Requests-Tier1
553
SNS
2024-09
Requests-Tier1
325
SNS
2024-10
Requests-Tier1
366
SNS
2024-11
Requests-Tier1
299
Step Functions StateTransition:
Service
Period
Metric
Quantity
Step Functions
2024-06
StateTransition
388
Step Functions
2024-07
StateTransition
180
Step Functions
2024-08
StateTransition
566
Step Functions
2024-09
StateTransition
300
Step Functions
2024-10
StateTransition
616
Step Functions
2024-11
StateTransition
362
All within free tier. So how did Glue fare?
Cost Savings
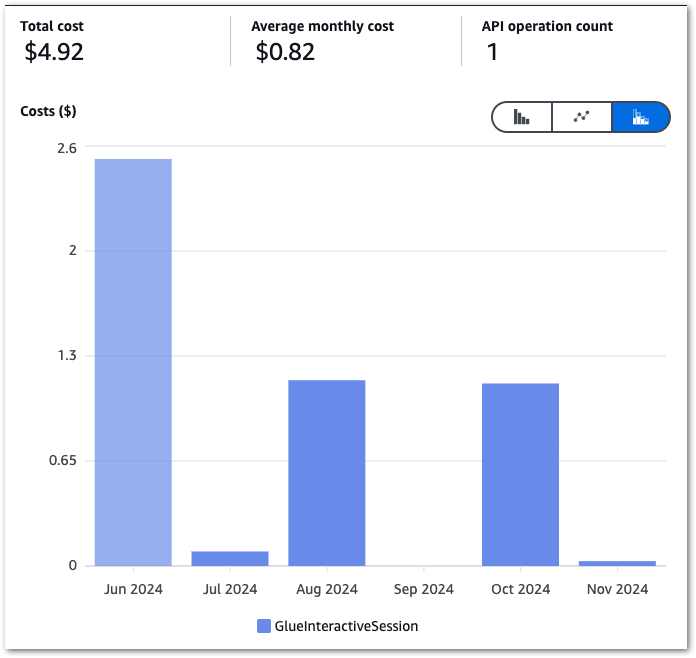
Next, let’s pull my InteractiveSessions costs between June 2024 and November 2024:
The high June costs kickstarted this process, and there’s a massive difference between June and the others! September isn’t a mistake – I was kinda busy.
Glue Costs
Here are the actual costs:
Service
Period
Metric
Quantity
Cost $
Glue
2024-06
InteractiveSessions
5.731 DPU-Hour
2.52
Glue
2024-07
InteractiveSessions
0.197 DPU-Hour
0.09
Glue
2024-08
InteractiveSessions
2.615 DPU-Hour
1.15
Glue
2024-09
InteractiveSessions
0.000 DPU-Hour
0.00
Glue
2024-10
InteractiveSessions
2.567 DPU-Hour
1.13
Glue
2024-11
InteractiveSessions
0.079 DPU-Hour
0.03
TOTAL
4.92
While these aren’t exactly huge sums, there are two items to consider here:
Proactive cost management is always better than reactive cost management. specially when it’s your bill!
Glue Estimated Savings
Finally, what saving does this represent? While I can’t get a value from AWS Billing, I can reasonably estimate one. Firstly, using the AWS Calculator for Glue I calculated the cost of an Interactive Session that times out:
2 DPUs x 0.50 hours x 0.44 USD per DPU-Hour = 0.44 USD
Next, I went back through my records and found how many sessions had been stopped each month:
Period
Stops
2024-06
11
2024-07
5
2024-08
61
2024-09
0
2024-10
53
2024-11
2
Caveat: To be fair to AWS, some sessions were created while I was working on a Glue ETL job with automation enabled. So, while the automation was continually stopping sessions, I was constantly starting new ones. Thus, Glue isn’t the money pit I perhaps make out, and I’m not that careless with leaving them on!
By multiplying the number of stopped sessions by 0.44, I can determine each month’s potential cost, then subtract the actual cost to find the estimated savings:
Period
Stops
Potential Cost $
Actual Cost $
Est. Saving $
2024-06
11
4.84
2.52
2.32
2024-07
5
2.20
0.09
2.11
2024-08
61
26.84
1.15
25.69
2024-09
0
0.00
0.00
0.00
2024-10
53
23.32
1.13
22.19
2024-11
2
0.88
0.03
0.85
TOTAL
132
58.08
4.92
53.16
Almost $55! Even if I reduce that by 50% based on the caveat, that’s still around a $25 saving. And with no setup costs!
Summary
In this post, I built my event-based AWS Glue automated cost control process using serverless managed services.
I’m pleased with the outcome! My generally busy Summer and Autumn inadvertently tested this process for six months, and it’s been fine throughout! I may soon extend the state machine’s waiting duration, which only needs a parameter change for one state.
The great thing about this process is that it isn’t limited to Glue; EventBridge can use nearly all AWS services as event sources. I’m seriously impressed with EventBridge. It’s poked me about Glacier restores, scheduled my ETLs and now is also saving me a few quid!
If this post has been useful then the button below has links for contact, socials, projects and sessions:
Last month, I finished a series of data pipeline posts using, among other services, AWS Glue. During this series I made many discoveries – some more desirable than others. One such undesirable was a cost spike in early June! Not enough to trigger a budget alarm, but still higher than expected at that time.
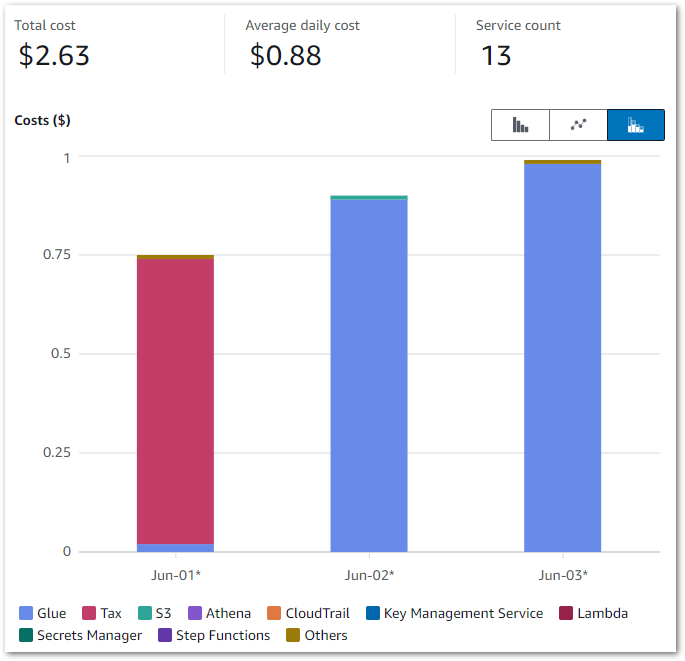
To Cost Explorer! These were the results:
Those Glue costs were…unexpected. While this doesn’t look like much, in contrast my entire May 2024 bill was $1.08. So June saw an almost 150% cost increase over just three days!
This post has two sections. Firstly, the Discovery section examines the costs in closer detail and considers potential solutions. Secondly, the Architecture section examines the decisions made for and the technical implementation of the chosen solution.
Discovery
This section examines the costs in closer detail and considers potential solutions. I’ll structure the cost analysis using three questions:
How are the costs made up?
What specifically is generating the costs?
Why are the costs being generated?
The How
Question 1: How are the costs made up?
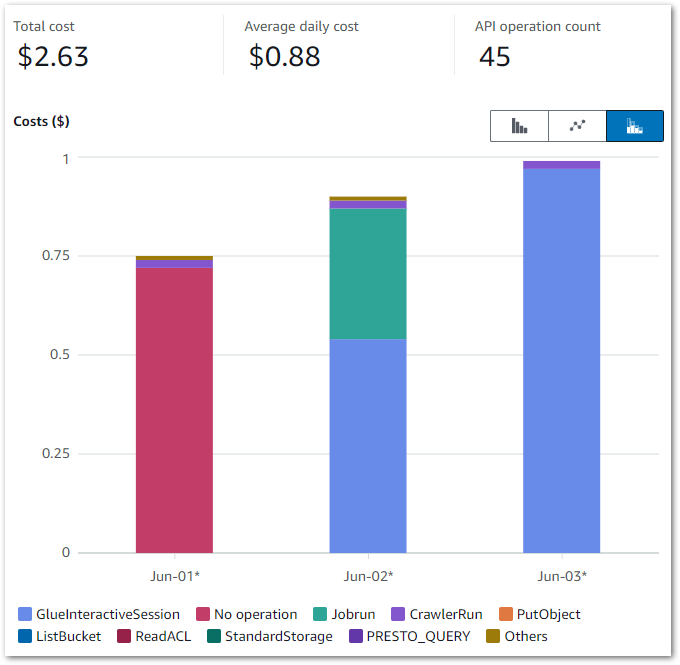
Firstly, let’s break down the costs. The earlier chart shows that Glue is the main cost driver – I now want to drill down into the API-level costs. I can do this by changing the chart’s dimension to API Operation.
This updates it to:
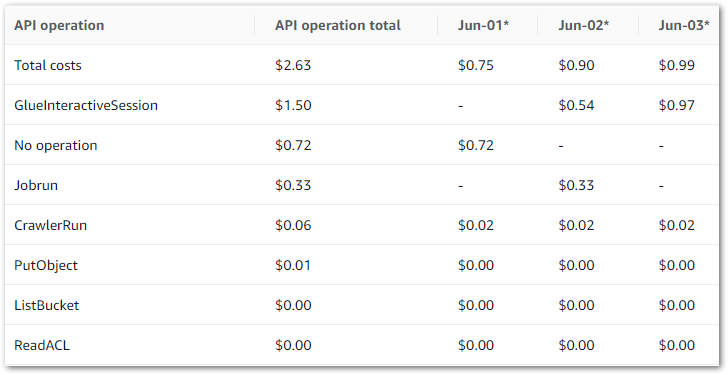
And the raw data to:
The main costs here are all Glue APIs, with the top two being:
GlueInteractiveSession
Jobrun
No operation is tax – Ed
Jobrun was easy to account for, as I was testing some Glue ETL jobs at the time. But I was unfamiliar with GlueInteractiveSession, and as it was the biggest cost driver it became the focus of my ongoing investigation.
The What
Question 2: What specifically is generating the costs?
So what is the GlueInteractiveSession API? What does it do? And how does it accrue costs? Let’s begin with the AWS User Guide definition:
The interactive sessions API describes the AWS Glue API related to using AWS Glue interactive sessions to build and test extract, transform, and load (ETL) scripts for data integration.
AWS Glue Interactive Sessions offer serverless, on-demand Apache Spark environments that work seamlessly with Glue ETL jobs. These sessions allow for the live development, testing, and enhancement of data processing steps and ETL tasks. They can easily connect to data from various AWS services such as S3, DynamoDB, and Redshift.
Interactive Sessions let users preview data without running full ETL jobs. This offers several benefits during development and testing:
Data modifications are only temporary during an Interactive Session, protecting the original data from undesired and unintended changes.
Jobs can be evaluated step by step rather than after each complete run, allowing for quicker development and testing compared to always executing the full job. And because of this…
When testing ETL steps, interactive sessions usually use fewer resources than a Glue job, thus reducing costs.
Speaking of costs, Glue Interactive Sessions billing is similar to Glue ETL Job billing and is based on the following factors:
Duration: How long the session runs, measured in seconds.
Resource Usage: The resources consumed during the session, such as CPU, memory, and storage.
This all sounds good. So why is my bill so high?
The Why
Question 3: Why are the costs being generated?
So I now know that:
The GlueInteractiveSession API is the main cost driver.
My Glue Interactive Sessions are linked to my AWS Glue ETL Jobs.
Let’s now examine why the GlueInteractiveSession API is suddenly generating higher costs.
The How chart shows that GlueInteractiveSession costs can happen irrespective of Jobrun costs. Indeed – on June 03 there were noJobrun costs. So running Glue ETL jobs isn’t causing these charges.
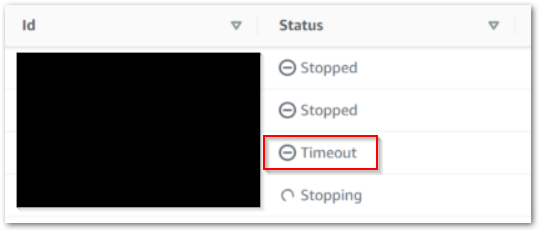
Helpfully, the AWS Glue console has a dedicated Interactive Sessions section that shows session instance histories. Upon inspection, I found lots of this:
So, timeouts. Timeouts are good. They stop Interactive Sessions from running indefinitely, and sessions started from the Glue console automatically get a 30-minute timeout.
What was more concerning was the number of timeouts I found: three on June 02 and six on June 03. That’s nine sessions, each of which timing out after 30 minutes. That’s four and a half hours of unused compute I’m being billed for! How are these timeouts happening?
…About that. I often open multiple browser tabs to compare screens quickly when I’m trying things out. Here, each new Glue ETL Job browser tab starts a new interactive session based on my commands, and I forget to close these sessions afterwards. Oops!
Solutions
So now I know the cost’s root cause is my own ineptitude, how do I fix this? There are several options:
Permission Blocking: I could deny CreateSession requests using IAM and SCPs. This solution works for non-data-facing AWS accounts but creates unreasonable barriers for Glue-based console workstreams elsewhere.
Parameter Adjustment: The CreateSession API has an IdleTimeout parameter that controls the number of minutes when idle before the session times out. Although this can be easily configured through the CLI or SDK, I haven’t found a way to adjust it in the console yet.
Local Sessions: AWS maintains a Glue Labs Docker image intended for local AWS Glue job script development and testing. This would replace the cloud-based Interactive Sessions entirely and is arguably the best solution for data teams and at scale. The main reason I’m not using it here is that I’m the only user of this particular AWS account.
Event-Based Automation: All Interactive Sessions are stopped using the StopSession API regardless of reason. This includes the timeout process. An automated mechanism that invokes this API after a set period would effectively emulate a timeout. Additionally, since I oversee this process, I’m able to swiftly adjust the duration as needed.
And so I finally have a user story:
As an AWS account owner, I want Glue interactive sessions to stop automatically after a chosen duration so that I don’t accidentally generate unexpected and avoidable costs.
Finally, there is one further topic I want to address…
Event-Based Vs Event-Driven
Let’s examine the difference between event-based and event-driven. Mainly because I thought this was an event-driven process for months until I did some digging.
Now, I’m no expert on this. However, James Eastham is. Go watch this. It’s only six minutes – I’ll wait.
Ok good. For those who are time-strapped or want the highlights:
Event-based systems are technical events. Represented in a data context as API calls like ObjectCreated and CrawlerStarted.
Event-driven systems are business events. Represented in a data context as processes like Refresh Started and Sales Data Ingested.
My Glue Cost Control system is event-based because it is governed entirely by AWS events and API calls: StartSession will trigger some AWS automation that ultimately invokes StopSession.
So what does that automation look like? Well…
Architecture
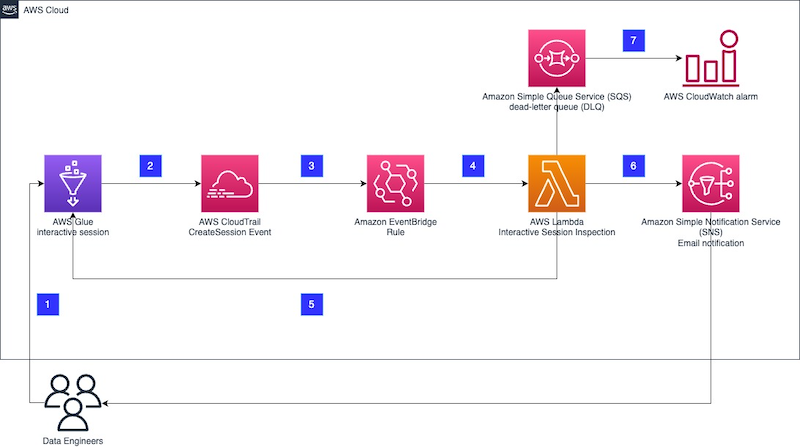
This section examines the decision-making and technical implementation of my AWS Glue event-based cost control architecture. In my investigations, I discovered that AWS is way ahead of me!
An EventBridge Rule captures the event and invokes a Lambda function.
The Lambda function inspects the event and acts depending on set boundaries.
SNS handles user notifications.
SQS and CloudWatch handle errors.
I’m using this architecture as a basis for my event-based Glue cost control process with some changes.
Architectural Decisions
This section outlines my adjustments to the AWS architecture to better align with my event-based Glue cost control process.
Replace Lambda With Step Functions
The AWS solution uses a Lambda function for event inspection and API interaction. This function has lots going on. But my needs are far simpler and fall well within the remit of a Step Functions workflow.
Many AWS heavyweights evangelize Step Functions over Lambda. Most recently, Eric Johnson dedicated a slide of his 2024 re:Invent session to this mantra:
“Step Functions first, Step Functions always.”
For this use case, I’m inclined to agree. Step Functions offers several advantages over Lambda here:
Service Integration: Lambda’s interactivity with other AWS services requires manual code (e.g. a Python boto3 client). Step Functions offer no-code AWS service integrations that interact directly with AWS APIs. So my Step Function will be faster to develop.
Error Handling: Lambda relies on the function code for error handling and retries. In contrast, Step Functions offer configurable built-in no-code error handling and retry mechanisms, making my Step Function more resilient.
Ongoing Maintenance: While AWS manages the Lambda service, the function code still needs runtime maintenance, security patching and general refactoring as it ages. Conversely, Step Functions use static JSON and YAML-based ASL, so my Step Function will require less ongoing maintenance.
API Behaviour: Changing a Glue Interactive Session is not an idempotent action. Requesting a change to a session in an invalid state produces an IllegalSessionState exception. For example, the below error is thrown when trying to stop a Glue job that hasn’t yet been fully provisioned:
JSON
{"cause": "Session is in PROVISIONING status (Service: Glue, Status Code: 400, Request ID: null)","error": "Glue.IllegalSessionStateException","resource": "stopSession","resourceType": "aws-sdk:glue"}
Express Workflows utilize an at-least-once model, meaning an execution might run multiple times. Sending several requests that are very likely to fail will create confusion and waste resources. In contrast, Standard Workflows adhere to an exactly-once model with optional retries, significantly reducing the likelihood of these problems.
And speaking of resource use…
Cost: Express Workflow executions are charged according to how often they run, the duration of each run and the memory consumed during the process. Standard Workflow executions are billed based on the number of state transitions and feature a generous and indefinite free tier.
Standard Workflows are a better option here because my workflow requires waiting. While Express Workflows may not be too costly, I’d still be paying for the wait. And remember – the whole point is to reduce avoidable costs! Conversely, Standard Workflows would stay entirely within the free tier at the expected volumes.
Remove The SQS Queue
I’ve removed the SQS queue simply because I don’t need it here. It was originally intended to record events that triggered a Lambda function failure. However, the Step Function workflow’s inbuilt auditing will now capture this.
This is my event-based Glue Cost Control process architecture diagram:
In this solution:
User interacts with a Glue ETL Job and creates an Interactive Session.
Glue CreateSession event is created.
Glue CreateSession event creates a CloudTrail event record.
EventBridge matches the event record to an event rule.
Eventbridge extracts the event’s SessionID and passes it to the Step Functions workflow, which waits for the set duration.
Workflow passes SessionID to the Glue StopSession API. This action retries twice if it is unsuccessful.
Finally, Workflow triggers an SNS email confirming the session’s stop.
Additionally, several services send logs to CloudWatch and gain permissions using IAM. If the Step Function fails, a CloudWatch alarm triggers a user email.
Summary
In this post, I examined some unexpected AWS Glue costs and designed an event-based cost control process architecture.
Once I understood the problem clearly, I iterated on an existing AWS architecture to build my bespoke event-based process. My architecture diagram shows how the key components work together and provides a clear implementation roadmap. In the next post I’ll start the build!
If you found this post helpful, the button below will take you to my contact details, socials, projects, and sessions.