Categories
Developing & Application Integration

Simplified Data Workflows With AWS Step Functions Variables

In this post, I use AWS Step Functions variables and JSONata to create a simplified API data capture workflow with Lambda and DynamoDB.

Table of Contents

Introduction

I’ve become an AWS Step Functions convert in recent times. Back in 2020 when I first studied it for some AWS certifications, Step Functions defined workflows entirely in JSON, making it less approachable and often overlooked.

How times change! With 2021’s inclusion of a visual editor, Step Functions became far more accessible, helping it become a key tool in serverless application design. And in 2024 two major updates significantly enhanced Step Functions’ flexibility: JSONata support, which I recently explored, and built-in variables, which simplify state transitions and data management. This post focuses on the latter.

To demonstrate the power of Step Functions variables, I’ll walk through a practical example: fetching API data, verifying the response, and inserting it into DynamoDB. Firstly, I’ll examine the services and features I’ll use. Then I’ll create a state machine and examine each state’s use of variables. Finally, I’ll complete some test executions to ensure everything works as expected.

If a ‘simplified’ workflow seems hard to justify as a 20-minute read…that’s fair. But mastering Step Functions variables now can save hours of debugging and development in the long run! – Ed

Also, special thanks to AWS Community Builder Md. Mostafa Al Mahmud for generously providing AWS credits to support this and future posts!

Architecture

This section provides a top-level view of the architecture behind my simplified Step Functions variables workflow, highlighting the main AWS services involved in getting and processing API data. I’ll briefly cover the data being used, the role of Step Functions variables and the integration of DynamoDB within the workflow.

API Data

The data comes from a RESTful API that provides UK car details. The API needs both an authentication key and query parameters. Response data is provided in JSON.

The data used in this post is about my car. As some of it is sensitive, I will only use data that is already publicly available:

JSON
{
    "make": "FORD",
    "yearOfManufacture": 2014,
    "engineCapacity": 1242,
    "co2Emissions": 120,
    "fuelType": "PETROL",
    "markedForExport": false,
    "colour": "GREY",
}

There are several data types here. This will be important when writing to DynamoDB!

AWS Step Functions Variables

In my last post, I talked about JSONata in AWS Step Functions. This time let’s talk about Step Functions variables, which were introduced alongside JSONata in November 2024.

Step Functions variables offer a simple way to store and reuse data within a state machine, enabling dynamic workflows without complex transformations. They work well with both JSONata and JSONPath and are available at no extra cost in all AWS regions that support Step Functions.

Variables are set using Assign. They can be assigned static values for fixed values:

JSON
"Assign": {
    "productName": "product1",
    "count" : 42,
    "available" : true
}

As well as dynamic values for changing values. To dynamically set variables, Step Functions uses JSONata expressions within {% ... %}. The following example extracts productName and available from the state input using the JSONata $states reserved variable:

JSON
"Assign": {
    "product": "{% $states.input.productName %}",
    "available": "{% $states.input.available %}"
}

Variables are then referenced using dollar signs ($), e.g. $productName.

There’s tonnes more to this. For details on name syntax, ASL integration and creating JSONPath variables, check the Step Functions Developer Guide variables section. Additionally, watch AWS Principal Developer Advocate Eric Johnson‘s related video:

With Step Functions variables handling data transformation and persistence, the next step is storing processed data efficiently. This is where Amazon DynamoDB comes in.

Amazon DynamoDB

DynamoDB is a fully managed NoSQL database built for high performance and seamless scalability. Its flexible, schema-less design makes it perfect for storing and retrieving JSON-like data with minimal overhead.

DynamoDB can automatically scale to manage millions of requests per second while maintaining low latency. It integrates seamlessly with AWS services like Lambda and API Gateway, providing built-in security, automated backups, and global replication to ensure reliability at any scale.

Popular use cases include:

  • Serverless backends (paired with AWS Lambda/API Gateway) for API-driven apps.
  • Real-time workloads like user sessions, shopping carts, or live leaderboards.
  • High-velocity data streams from IoT devices or clickstream analytics.

Diagram

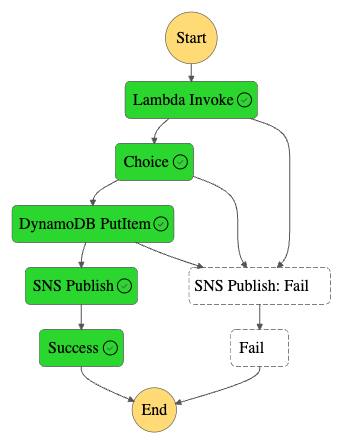
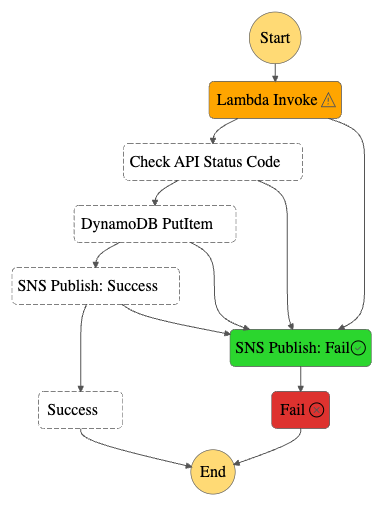
Finally, here is an architectural diagram of my simplified Step Functions variables workflow:
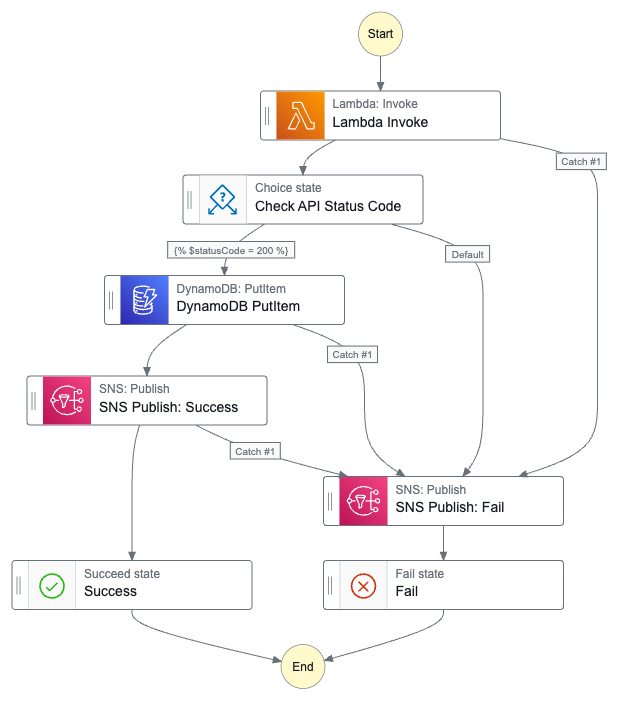
In which:

  1. The user triggers an AWS Step Functions state machine with a JSON key-value pair as input.
  2. A Lambda function is invoked with the input payload.
  3. The Lambda function sends a POST request to a third-party API.
  4. The API server responds with JSON data.
  5. The Lambda function assigns Step Functions variables to store API response values and enters a Choice state that checks the API response code.
  6. If the Choice state condition fails, SNS publishes a failure notification email.
  7. The state machine terminates with an ExecutionFailed status.
  8. If the Choice state condition passes, the processed API response data is written to a DynamoDB table.
  9. SNS publishes a success notification email.
  10. The state machine terminates with an ExecutionSucceeded status.

If an error occurs at any point in execution, SNS publishes a failure notification email and the state machine terminates with an ExecutionFailed status.

Resources

In this section, I create and configure my simplified Step Functions variables workflow resources, which are:

  • AWS Lambda function
  • AWS Step Functions Choice state
  • Amazon DynamoDB table
  • Amazon SNS topic

AWS Lambda

This section details how I created an AWS Lambda function to interact with a REST API. The function makes a secure POST request, manages potential errors and parses the response for use in downstream states. Additionally, I will discuss an issue I encountered while attempting to create variables from the function’s output using JSONata.

Lambda Function

First, I need to write a function. It’s nothing special – I have the API link and security key I need, and I just want to retrieve some data. So I decided to give Amazon Q Developer a try!

I used this prompt:

I have an HTTPS hyperlink for a REST API and an API key. I want to send a POST request to the API using the key. I have a USERID parameter that I will pass as JSON.

Please write a Python function for AWS Lambda with error handling. Please use security best practises and Pythonic standards.

Yes I do say Please in my prompts.

Amazon Q produced a decent script with:

  • API endpoint and key stored as environment variables.
  • Use of the requests module with a timeout to prevent indefinite hangs.
  • Error handling for request failures, validation errors, and unexpected issues.
  • A structured JSON response including the status code and parsed response.
Python
import json
import os
import logging
import requests
from typing import Dict, Any
from botocore.exceptions import ClientError

# Configure logging
logger = logging.getLogger()
logger.setLevel(logging.INFO)

def lambda_handler(event: Dict[str, Any], context: Any) -> Dict[str, Any]:
    """
    AWS Lambda function to make POST request to API endpoint
    Args:
        event: Lambda event object containing request data
        context: Lambda context object
    Returns:
        API response as dictionary
    """
    try:
        # Get API endpoint and key from environment variables
        api_endpoint = os.environ['API_ENDPOINT']
        api_key = os.environ['API_KEY']

        # Extract user ID from event
        user_id = event.get('userId')
        if not user_id:
            raise ValueError("userId is required in the request")

        # Set request headers
        headers = {
            'Content-Type': 'application/json',
            'x-api-key': api_key
        }

        # Prepare request payload
        payload = {
            'userId': user_id
        }

        # Make POST request
        response = requests.post(
            api_endpoint,
            headers=headers,
            json=payload,
            timeout=30  # Set timeout for the request
        )

        # Raise exception for bad status codes
        response.raise_for_status()

        return {
            'statusCode': response.status_code,
            'body': response.json()
        }

    except requests.exceptions.RequestException as e:
        logger.error(f"API request failed: {str(e)}")
        return {
            'statusCode': 500,
            'body': json.dumps({'error': 'Failed to make API request'})
        }

    except ValueError as e:
        logger.error(f"Validation error: {str(e)}")
        return {
            'statusCode': 400,
            'body': json.dumps({'error': str(e)})
        }

    except Exception as e:
        logger.error(f"Unexpected error: {str(e)}")
        return {
            'statusCode': 500,
            'body': json.dumps({'error': 'Internal server error'})
        }

It needed some tweaks for my purposes, but was still faster than typing it all out manually!

Step Functions Config

The Lambda: Invoke action defaults to using the state input as the payload, so "Payload": "{% $states.input %}" is scripted automatically:

JSON
    "Lambda Invoke": {
      "Type": "Task",
      "Resource": "arn:aws:states:::lambda:invoke",
      "Output": "{% $states.result.Payload %}",
      "Arguments": {
        "FunctionName": "[LAMBDA_ARN]:$LATEST",
        "Payload": "{% $states.input %}"
      },
      "Next": "Check API Status Code"
    }

This is going to be helpful in the next section!

Step Functions manages retries and error handling. If my Lambda function fails, it will retry up to three times with exponential backoff before sending a failure notification through SNS:

JSON
    "Lambda Invoke": {
      "Retry": [
        {
          "ErrorEquals": [
            "Lambda.ServiceException",
            "Lambda.AWSLambdaException",
            "Lambda.SdkClientException",
            "Lambda.TooManyRequestsException"
          ],
          "IntervalSeconds": 1,
          "MaxAttempts": 3,
          "BackoffRate": 2,
          "JitterStrategy": "FULL"
        }
      ],
      "Next": "Check API Status Code",
      "Catch": [
        {
          "ErrorEquals": [
            "States.ALL"
          ],
          "Next": "SNS Publish: Fail"
        }
      ]
    }

Next, let’s talk about the function’s outputs.

Outputs & JSONata Variables

The Lambda function returns a nested JSON structure. Here’s a redacted example of it:

JSON
{
  "output": {
    "ExecutedVersion": "$LATEST",
    "Payload": {
      "statusCode": 200,
      "body": {
        "make": "FORD",
        "yearOfManufacture": 2014,
        "engineCapacity": 1242,
        "co2Emissions": 120,
        "fuelType": "PETROL",
        "markedForExport": false,
        "colour": "GREY"
      }
    },
    "SdkHttpMetadata": {
      "AllHttpHeaders": {
        "REDACTED": "REDACTED"
      },
      "HttpHeaders": {
        "REDACTED": "REDACTED"
      },
      "HttpStatusCode": 200
    },
    "SdkResponseMetadata": {
      "REDACTED": "REDACTED"
    },
    "StatusCode": 200
  }
}

I mentioned earlier about Lambda: Invoke‘s default Payload setting. This default creates a {% $states.result.Payload %} JSONata expression output that I can use to assign variables for downstream states.

In this example, {% $states.result.Payload %} returns this:

JSON
{
  "Payload": {
      "statusCode": 200,
      "body": {
        "make": "FORD",
        "yearOfManufacture": 2014,
        "engineCapacity": 1242,
        "co2Emissions": 120,
        "fuelType": "PETROL",
        "markedForExport": false,
        "colour": "GREY"
      }
    }
}

Let’s make a variable for statusCode. In the response, statusCode is a property of Payload:

JSON
{
  "Payload": {
      "statusCode": 200
    }
}

In JSONata this is expressed as {% $states.result.Payload.statusCode %}. Then I can assign the JSONata expression to a statusCode variable via JSON. In the AWS console, I do this via:

JSON
{
  "statusCode": "{% $states.result.Payload.statusCode %}"
}

And in Step Functions ASL via:

JSON
"Assign": {"statusCode": "{% $states.result.Payload.statusCode %}"}

I can then call this variable using $statusCode. Here, this will return 200.

Next, let’s make a make variable. This is slightly more involved as make is a property of body, which is itself a property of Payload:

JSON
{
  "Payload": {
      "body": {
        "make": "FORD"
      }
    }
}

So this time I need:

JSON
CONSOLE:
"make": "{% $states.result.Payload.body.make%}"

ASL:
"Assign": {"make": "{% $states.result.Payload.body.make%}"}

And now $make will return "FORD".

So let’s do the other values:

JSON
"Assign": {
    "statusCode": "{% $states.result.Payload.statusCode %}",
    "make": "{% $states.result.Payload.body.make%}",
    "yearOfManufacture": "{% $string($states.result.Payload.body.yearOfManufacture) %}",
    "engineCapacity": "{% $string($states.result.Payload.body.engineCapacity) %}",
    "co2Emissions": "{% $string($states.result.Payload.body.co2Emissions) %}",
    "fuelType": "{% $states.result.Payload.body.fuelType %}",
    "markedForExport": "{% $states.result.Payload.body.markedForExport%}",
    "colour": "{% $states.result.Payload.body.colour%}"
}

Note that variables returning numbers from the response body like yearOfManufacture have an additional $string JSONata expression. I’ll explain the reason for this in the DynamoDB section.

Lambda Issues

When I first started using Step Functions variables, I used a different Lambda function for the API call and kept getting this error:

An error occurred.

The JSONata expression '$states.input.body.make' specified for the field 'Assign/make' returned nothing (undefined).

After getting myself confused, I checked the function’s return statement and found this:

Python
return {
    'statusCode': response.status_code,
    'body': response.text
}

Here, response.text returns the response body as a JSON-formatted string rather than as a nested dictionary:

Plaintext
{
  "statusCode": 200,
  "body": "{\"make\":\"FORD\",\"yearOfManufacture\":2014,\"engineCapacity\":1242,\"co2Emissions\":120,\"fuelType\":\"PETROL\",\"markedForExport\":false,\"colour\":\"GREY\"}"
}

That string isn’t compatible with dot notation. So while $states.input.body will match the whole body, $states.input.body.make can’t match anything because the string can’t be traversed. So nothing is returned, causing the error.

Using response.json() fixes this, as the response is now correctly structured for JSONata expressions:

Python
return {
    'statusCode': response.status_code,
    'body': response.json()
}

Choice State

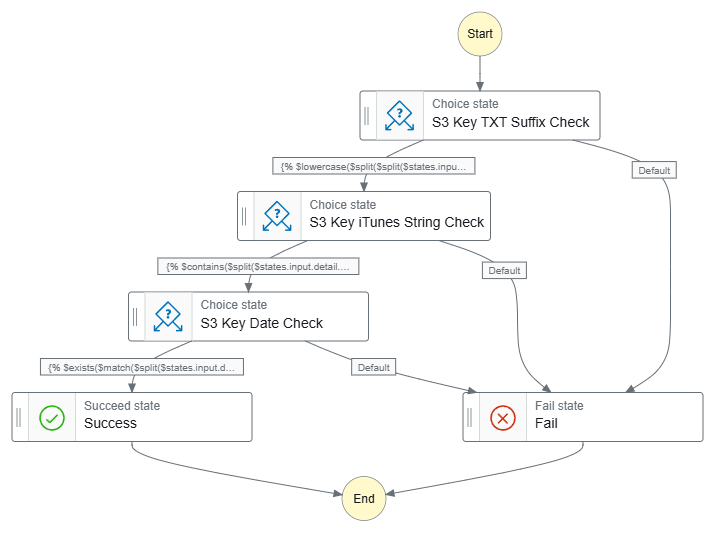
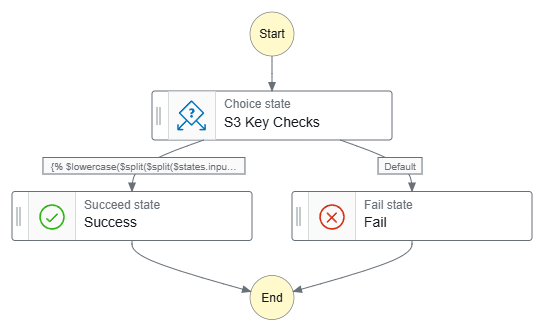
The Choice state here is very similar to a previous one. This Choice state checks the Lambda function’s API response and routes accordingly.

Here, the Choice state uses the JSONata expression {% $statusCode = 200 %} to check the $statusCode variable value. By default, it will transition to the SNS Publish: Fail state. However, if $statusCode equals 200, then the Choice state will transition to the DynamoDB PutItem state instead:

JSON
    "Check API Status Code": {
      "Type": "Choice",
      "Choices": [
        {
          "Next": "DynamoDB PutItem",
          "Condition": "{% $statusCode = 200 %}"
        }
      ],
      "Default": "SNS Publish: Fail"
    }

This step prevents silent failures by ensuring unsuccessful API responses trigger an SNS notification instead of proceeding to DynamoDB. It also helps maintain data integrity by isolating success and failure paths, and ensuring only valid responses are saved in DynamoDB.

So now I’ve captured the data and confirmed its integrity. Next, let’s store it somewhere!

Amazon DynamoDB

It’s time to think about storing the API data. Enter DynamoDB! This section covers creating a table, writing data and integrating DynamoDB with AWS Step Functions and JSONata. I’ll share key lessons learned, especially about handling data types correctly.

Let’s start by creating a table.

Creating A Table

Before inserting data into DynamoDB, I need to create a table. Since DynamoDB is a schemaless database, all that is required to create a new table is a table name and a primary key. Naming the table is straightforward, so let’s focus on the key.

DynamoDB has two types of key:

  • Partition key (required): Part of the table’s primary key. It’s a hash value that is used to retrieve items from the table and allocate data across hosts for scalability and availability.
  • Sort key (optional): The second part of a table’s primary key. The sort key enables sorting or searching among all items sharing the same partition key.

Let’s look at an example using a Login table. In this table, the user ID serves as the partition key, while the login date acts as the sort key. This structure enables efficient lookups and sorting, allowing quick retrieval of a user’s login history while minimizing operational overhead.

To use a physical analogy, consider the DynamoDB table as a filing cabinet, the Partition key as a drawer, and the Sort key as a folder. If I wanted to retrieve User 123‘s logins for 2025, I would:

  • Access the Logins filing cabinet (DynamoDB table).
  • Find User 123’s drawer (Partition Key).
  • Get User 123’s 2025 folder (Sort Key).

DynamoDB provides many features beyond those discussed here. For the latest features, please refer to the Amazon DynamoDB Developer Guide.

Writing Data

So now I have a table, how do I put data in it?

DynamoDB offers several ways to write data, and a common one is PutItem. This lets me insert or replace an item in my table. Here’s a basic example of adding a login event to a UserLogins table:

JSON
{
    "TableName": "UserLogins",
    "Item": {
        "UserID": { "S": "123" },
        "LoginDate": { "S": "2025-02-25T12:00:00Z" },
        "Device": { "S": "Laptop" }
    }
}

Here:

  • TableName specifies the name of the DynamoDB table where the item will be stored.
  • Item represents the data being inserted into the table. It contains key-value pairs, where the attributes (e.g. UserID) are mapped to their corresponding data types (e.g. "S") and values (e.g. "123").
  • UserID is an attribute in the item being inserted.
  • "S" is a data type descriptor, ensuring that DynamoDB knows how to store and index it.
  • "123" is the value assigned to the UserID attribute.

While DynamoDB is NoSQL, it still enforces strict data types and naming rules to ensure consistency. These are detailed in the DynamoDB Developer Guide, but here’s a quick rundown of supported data types as of March 2025:

  • S – String
  • N – Number
  • B – Binary
  • BOOL – Boolean
  • NULL – Null
  • M – Map
  • L – List
  • SS – String Set
  • NS – Number Set
  • BS – Binary Set

Step Functions Config

So how do I apply this to Step Functions? Well, remember when I set variables in the output of the Lambda function? Step Functions lets me reference those variables here.

Here’s how I store a make attribute in DynamoDB, using my $make variable in a JSONata expression:

JSON
{
    "TableName": "REDACTED",
    "Item": {
        "make": { "S": "{% $make %}" }
    }
}

This is equivalent to:

JSON
{
    "TableName": "REDACTED",
    "Item": {
        "make": { "S": "FORD" }
    }
}

Using JSONata, I can dynamically inject values during execution instead of hardcoding them.

Now let’s add a yearOfManufacture attribute:

JSON
{
    "TableName": "REDACTED",
    "Item": {
        "make": { "S": "{% $make %}" },
        "yearOfManufacture": { "N": "{% $yearOfManufacture %}" }
    }
}

This pattern continues for my other attributes:

JSON
{
  "TableName": "REDACTED",
  "Item": {
    "make": {
      "S": "{% $make %}"
    },
    "yearOfManufacture": {
      "N": "{% $yearOfManufacture%}"
    },
    "engineCapacity": {
      "N": "{% $engineCapacity %}"
    },
    "co2Emissions": {
      "N": "{% $co2Emissions%}"
    },
    "fuelType": {
      "S": "{% $fuelType %}"
    },
    "markedForExport": {
      "BOOL": "{% $markedForExport %}"
    },
    "colour": {
      "S": "{% $colour %}"
    }
  }
}

All this is then passed as an Argument to the DynamoDB: PutItem action in the state machine’s ASL:

JSON
    "DynamoDB PutItem": {
      "Type": "Task",
      "Resource": "arn:aws:states:::dynamodb:putItem",
      "Arguments": {
        "TableName": "REDACTED",
        "Item": {
          "make": {
            "S": "{% $make %}"
          },
          "yearOfManufacture": {
            "N": "{% $yearOfManufacture%}"
          },
          "engineCapacity": {
            "N": "{% $engineCapacity %}"
          },
          "co2Emissions": {
            "N": "{% $co2Emissions%}"
          },
          "fuelType": {
            "S": "{% $fuelType %}"
          },
          "markedForExport": {
            "BOOL": "{% $markedForExport %}"
          },
          "colour": {
            "S": "{% $colour %}"
          }
        }
      }

Finally, DynamoDB:PutAction gets the same error handling as Lambda:Invoke.

So I got all this working first time, right? Well…

DynamoDB Issues

During my first attempts, I got this error:

An error occurred while executing the state 'DynamoDB PutItem'.

The Parameters '{"TableName":"REDACTED","Item":{"make":{"S":"FORD"},"yearOfManufacture":{"N":2014}}}' could not be used to start the Task:

[The value for the field 'N' must be a STRING]

Ok. Not the first time I’ve seen data type problems. I’ll just change the yearOfManufacture data type to "S"(string) and try again…

An error occurred while executing the state 'DynamoDB PutItem'.

The Parameters '{"TableName":"REDACTED","Item":{"make":{"S":"FORD"},"yearOfManufacture":{"S":2014}}}' could not be used to start the Task:

[The value for the field 'S' must be a STRING]

DynamoDB rejected both approaches (╯°□°)╯︵ ┻━┻

The issue wasn’t the data type, but how it was formatted. DynamoDB treats numbers as strings in its JSON-like structure, so even when using numbers they must be wrapped in quotes.

In the case of yearOfManufacture, where I was providing 2014:

Plaintext
"yearOfManufacture": {"N": 2014}

DynamoDB needed "2014":

Plaintext
"yearOfManufacture": {"N": "2014"}

Thankfully, JSONata came to the rescue again! Remember the $string function from the Lambda section? Well, $string casts the given argument to a string!

So this:

JSON
"yearOfManufacture": "{% $states.result.Payload.body.yearOfManufacture %}"

> 2014

Becomes this:

JSON
"yearOfManufacture": "{% $string($states.result.Payload.body.yearOfManufacture) %}"

> "2014"

This solved the problem with no Lambda function changes or additional states!

Amazon SNS

After successfully writing data to DynamoDB, I want to include a confirmation step by sending a notification through Amazon SNS.

While this approach is not recommended for high-volume use cases because of potential costs and notification fatigue, it can be helpful for testing, monitoring, and debugging. Additionally, it offers an opportunity to reuse variables from previous states and dynamically format a message using JSONata.

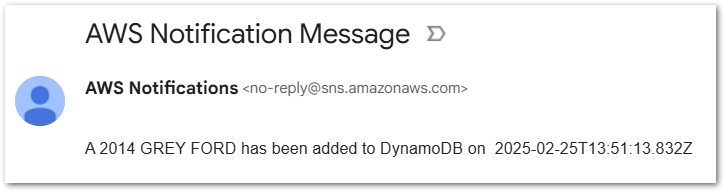
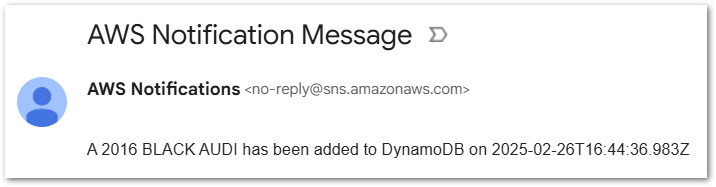
The goal is to send an email notification like this:

A 2014 GREY FORD has been added to DynamoDB on (current date and time)

To do this, I’ll use:

  • $yearOfManufacture for the vehicle’s year (2014)
  • $colour for the vehicle’s colour (GREY)
  • $make for the manufacturer (FORD)

Plus the JSONata $now() function for the current date and time. This generates a UTC timestamp in ISO 8601-compatible format and returns it as a string. E.g. "2025-02-25T19:12:59.152Z"

So the code will look something like:

A $yearOfManufacture $colour $make has been added to DynamoDB on $now()

Which translates to this JSONata expression:

Plaintext
{% 'A ' & $yearOfManufacture & ' ' & $colour & ' ' & $make & ' has been added to DynamoDB on ' & $now() %}

Let’s analyse each part of the JSONata expression to understand how it builds the final message:

Plaintext
{%

  'A '
& 
  $yearOfManufacture 
& 
  ' ' 
& 
  $colour 
& 
  ' ' 
& 
  $make 
& 
  ' has been added to DynamoDB on ' 
& 
  $now() 
  
%}"

Each part of this expression plays a specific role:

  • ‘A ‘ | ‘ has been added to DynamoDB on ‘: Static strings & spaces.
  • $yearOfManufacture | $colour | $make: Dynamic values.
  • $now(): JSONata function.
  • ‘ ‘: Static spaces to separate JSONata variable outputs.

The static spaces are important! Without them, I’d get this:

2014GREYFORD

Instead of the expected:

2014 GREY FORD

This JSONata expression is passed as the Message argument in the SNS:Publish action, ensuring the notification contains the correctly formatted message:

JSON
"Message": "{% 'A ' & $yearOfManufacture & ' ' & $colour & ' ' & $make & ' has been added to DynamoDB on ' & $now() %}"

Finally, to integrate this with Step Functions it is included in the SNS Publish: Success task ASL:

JSON
"SNS Publish: Success": {
    "Type": "Task",
    "Resource": "arn:aws:states:::sns:publish",
    "Arguments": {
      "Message": "{% 'A ' & $yearOfManufacture & ' ' & $colour & ' ' & $make & ' has been added to DynamoDB on ' & $now() %}",
      "TopicArn": "arn:aws:sns:REDACTED:success-stepfunction"
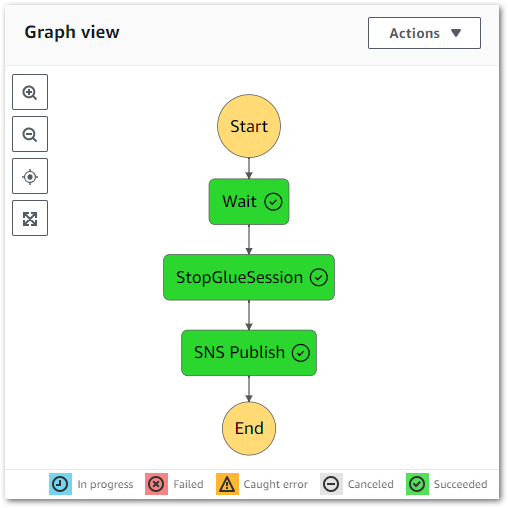
}

Final Workflow

Finally, let’s see what the workflows look like. Here’s the workflow graph:

stepfunctions graph

And here’s the workflow ASL on GitHub.

Testing

In this section, I run some test executions against my simplified Step Functions workflow and check the variables. I’ll test four requests – two valid and two invalid.

Valid Request: Ford

Firstly, what happens when a valid API request is made and everything works as expected?

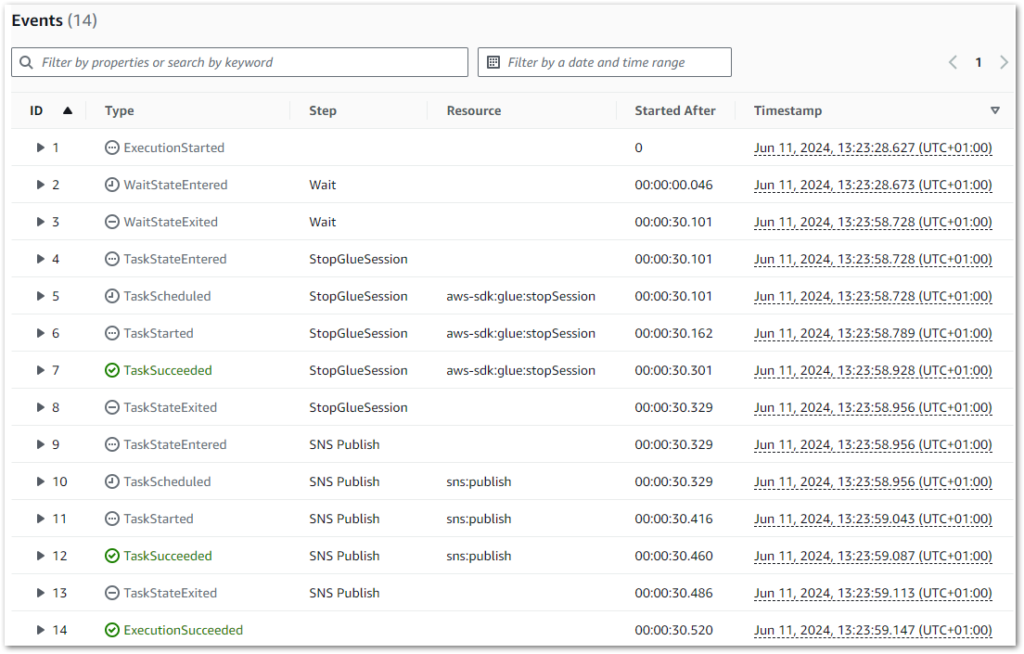
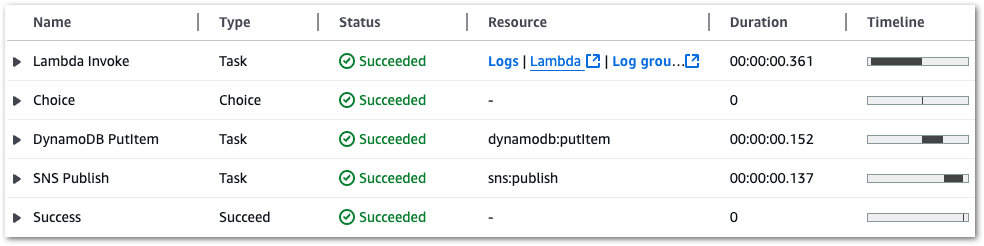
The Step Functions execution succeeds:

stepfunctions graph testsuccess

Each state completes successfully:

2025 02 26 StateViewSuccess

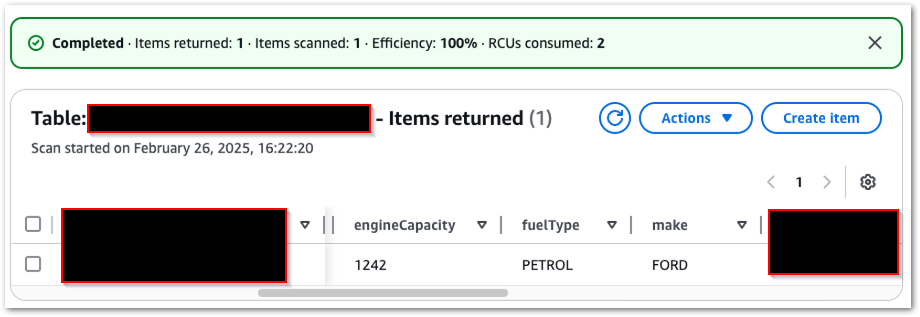
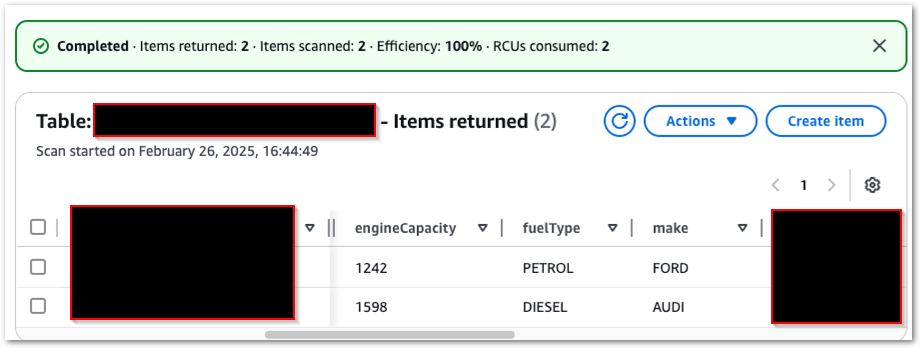
My DynamoDB table now contains one item:

2025 02 26 DyDBTable1

I receive a confirmation email from SNS:

2025 02 26 SNSSuccessFord

If I send the same request again, the existing DynamoDB item is overwritten because the primary key remains the same.

Valid Request: Audi

Next, what happens if I make a valid request for a different car? The steps repeat as above, and my DynamoDB table now has two items:

2025 02 26 DyDBTable2

And I get a different email:
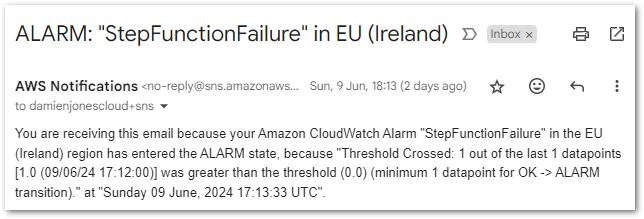
2025 02 26 SNSSuccessAudi

Invalid Request

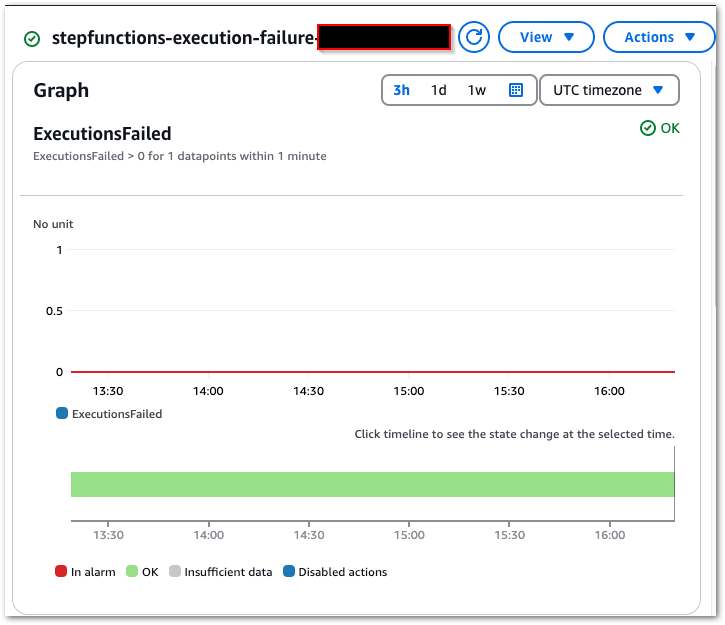
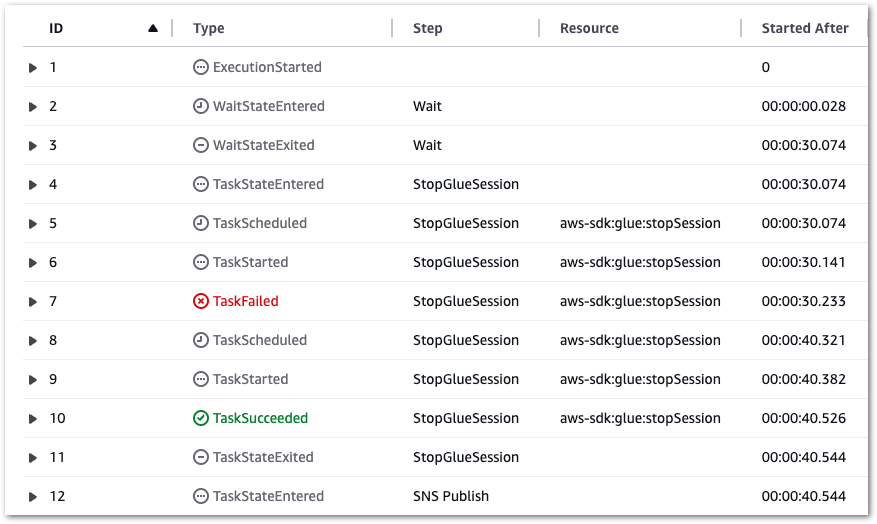
Next, what happens if the car in my request doesn’t exist? Well, it does fail, but in an unexpected way:

stepfunctions graphfail

The API returns an error response:

JSON
"Payload": {
      "statusCode": 500,
      "body": "{\"error\": \"API request failed: 400 Client Error: Bad Request for url"}"
    }

I’d expected the response to be passed to the Choice state, which would then notice the 500 status code and start the Fail process. But this happened instead:

2025 02 26 StateViewFail

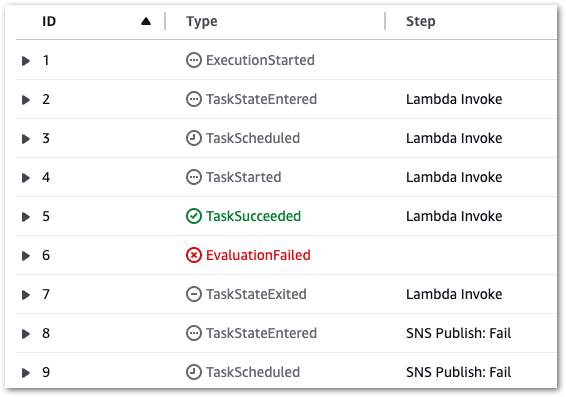
The failure occurs at the assignment of the Lambda action variable! It attempts to assign a yearOfManufacture value from the API response body to a variable, but since there is no response body the assignment fails:

JSON
{
  "cause": "An error occurred while executing the state 'Lambda Invoke' (entered at the event id #2). The JSONata expression '$states.result.Payload.body.yearOfManufacture ' specified for the field 'Assign/yearOfManufacture ' returned nothing (undefined).",
  "error": "States.QueryEvaluationError",
  "location": "Assign/registrationNumber",
  "state": "Lambda Invoke"
}

I also get an email, but this one is less fancy as it just dumps the whole output:

2025 02 26 SNSFail

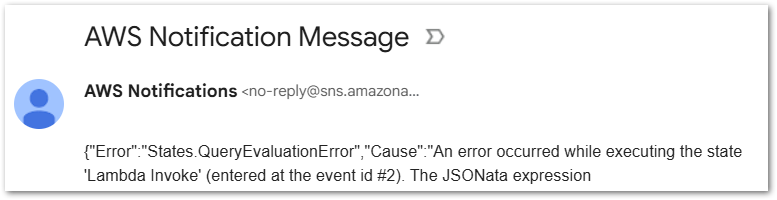
So I still get my Fail outcome – just not in the expected way. Despite this, the Choice state remains valuable for preventing invalid data from entering DynamoDB.

No Request

Finally, what happens if no data is passed to the state machine at all?

Actually, this situation is very similar to the invalid request! There’s a different error message in the log:

JSON
"Payload": {
      "statusCode": 400,
      "body": "{\"error\": \"Registration number not provided\"}"
    }

But otherwise it’s the same events and outcome. The Lambda variable assignment fails, triggering an SNS email and an ExecutionFailed result.
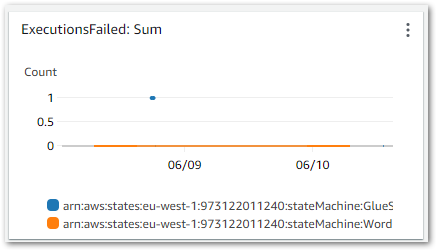
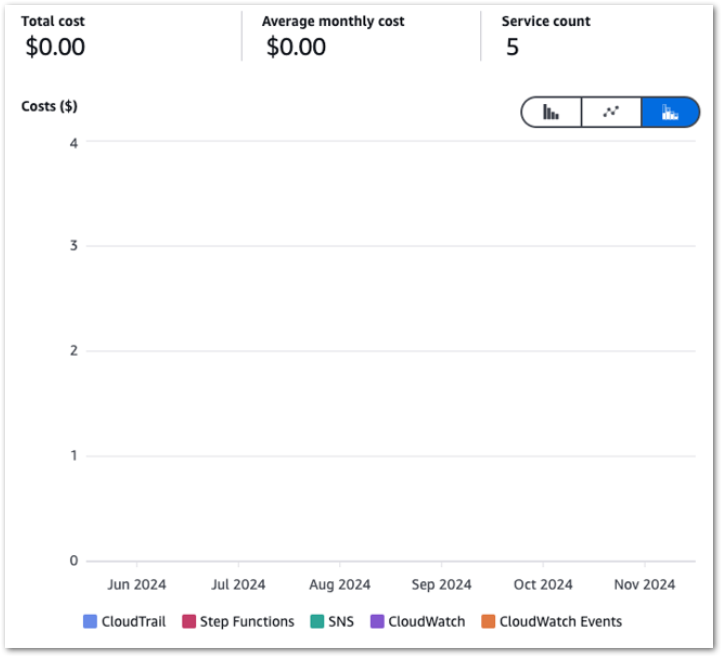
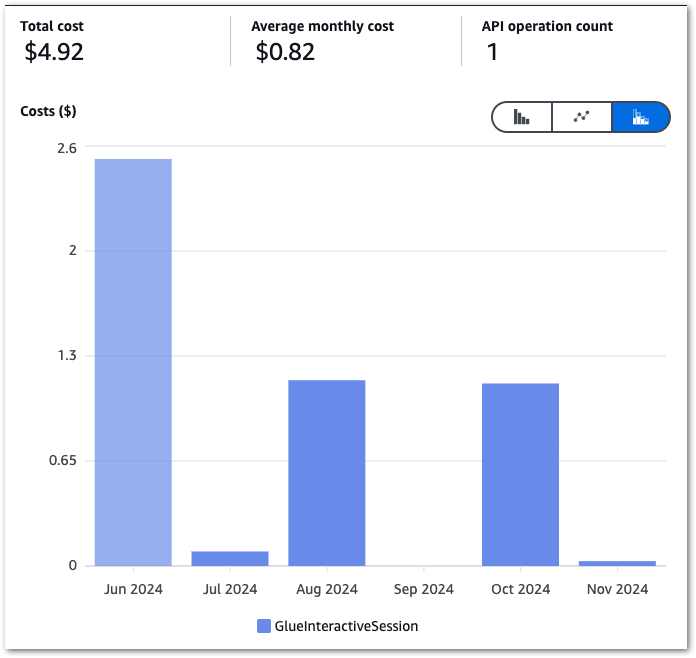
Cost Analysis

This section examines the costs of my simplified Step Functions variables workflow. This section is brief since all services used in this workflow fall within the AWS Free Tier! For transparency, I’ll include my billing metrics for the month. These are account-wide, and I’m still nowhere near paying AWS anything!

DynamoDB:

$0.1415 per million read request units (EU (Ireland))30.5 ReadRequestUnits
$0.705 per million write request units (EU (Ireland))13 WriteRequestUnits

Lambda:

AWS Lambda – Compute Free Tier – 400,000 GB-Seconds – EU (Ireland)76.219 Second
AWS Lambda – Requests Free Tier – 1,000,000 Requests – EU (Ireland)110 Request

SNS:

First 1,000 Amazon SNS Email/Email-JSON Notifications per month are free19 Notifications
First 1,000,000 Amazon SNS API Requests per month are free289 Requests

Step Functions:

$0 for first 4,000 state transitions431 StateTransitions

This experiment demonstrates how cost-effective Step Functions can be. As long as my usage remains within the Free Tier, I pay nothing! If my workflow grows, I’ll monitor costs and optimise accordingly.

Summary

In this post, I used AWS Step Functions variables and JSONata to create a simplified API data capture workflow with Lambda and DynamoDB.

With a background in SQL and Python, I’m no stranger to variables, and I love that they’re now a native part of Step Functions. AWS keeps enhancing Step Functions every few months, making it more powerful and versatile. The introduction of variables unlocks new possibilities for data manipulation, serverless applications and event-driven workflows, and I’m excited to explore them further in the coming months!

For a visual walkthrough of Step Functions variables and JSONata, check out this Serverless Office Hours episode with AWS Principal Developer Advocates Eric Johnson and Julian Wood:

If this post has been useful then the button below has links for contact, socials, projects and sessions:

SharkLinkButton 1

Thanks for reading ~~^~~

Categories
Developing & Application Integration

Low-Code S3 Key Validation With AWS Step Functions & JSONata

In this post, I use JSONata to add low-code S3 object key validation to an AWS Step Functions state machine.

Table of Contents

Introduction

In 2024, I worked a lot with AWS Step Functions. I built several for different tasks, wrote multiple blog posts about them and talked about them a fair bit. So when AWS introduced JSONata support for Step Functions last year, I was very interested. Although I had no prior JSONata experience, I heard positive feedback and made a mental note to explore its use cases.

Well, there’s no time like the present! And as I was starting to create the first Project Wolfie resources I realised some of my requirements were a perfect fit.

Firstly, I will examine what JSONata is, how it works and why it’s useful. Next, I will outline my architecture and create some low-code S3 key validation JSONata expressions. Finally, I’ll test these expressions and review their outputs.

JSONata & AWS

This section introduces JSONata and examines its syntax and benefits.

Introducing JSONata

JSONata is a lightweight query and transformation language for JSON, developed by Andrew Coleman in 2016. Specifically inspired by XPath and SQL, it enables sophisticated queries using a compact and intuitive notation.

JSONata provides built-in operators and functions for efficiently extracting and transforming data into any JSON structure. It also supports user-defined functions, allowing for advanced expressions that enhance the querying of dynamic JSON data.

For a visual introduction, check out this JSONata overview:

JSONata Syntax Essentials

JSONata has a simple and expressive syntax. Its path-based approach lets developers easily navigate nested structures. It combines functional programming with dot notation for navigation, brackets for filtering and pipeline operators for chaining.

JSONata operations include transformations like:

  • Arithmetic ($price * 1.2)
  • Conditional Logic ($price > 100 ? 'expensive' : 'affordable').
  • Filtering ($orders[status = 'shipped'])
  • String Operations ($firstName & ' ' & $lastName)

The JSONata site includes full documentation and a JSONata Exerciser for experimenting.

JSONata In AWS Step Functions

JSONata was introduced to AWS Step Functions in November 2024. Using JSONata in Step Functions requires setting the QueryLanguage field to JSONata in the state machine definition. This action replaces the traditional JSONPath fields with two JSONata fields:

  • Arguments: Used to customise data sent to state actions.
  • Output: Used to transform results into custom state output.

Additionally, the Assign field sets variables that can be stored and reused across the workflow.

In AWS Step Functions, JSONata expressions are enclosed in {% %} delimiters but otherwise follow standard JSONata syntax. They access data using the $states reserved variable with the following structures:

  • State input is accessed using $states.input
  • Context information is accessed using $states.context
  • Task results (if successful) are accessed using $states.result
  • Error outputs (if existing) are accessed using $states.errorOutput

Step Functions includes standard JSONata functions as well as AWS-specific additions like $partition, $range, $hash, $random, and $uuid. Some functions, such as $eval, are not supported.

Here are some JSONata examples from the AWS Step Functions Developer Guide:

Plaintext
{% $states.input.title %}

{% $current_price <= $states.input.desired_priced %}

{% $parse($states.input.json_string) %}

Talking more about this subject is AWS Principle Developer Advocate Eric Johnson:

JSONata Benefits

So why is JSONata in AWS a big deal?

Low Maintenance: JSONata use removes the need for Lambda runtime updates, dependency management and security patching. JSONata expressions are self-contained and version-free, reducing debugging and testing effort.

Simpler Development Workflow: JSONata’s standardised syntax removes decisions about languages, runtimes and tooling. This improves consistency, simplifies collaboration and speeds up development.

Releases Capacity: JSONata use reduces reliance on AWS Lambda, freeing up Lambda concurrency slots for more complex tasks. This minimises throttling risks and can lower Lambda costs.

Faster Execution: JSONata runs inside AWS services, avoiding cold starts, IAM role checks and network latency. Most JSONata transformations are complete in milliseconds, making it ideal for high-throughput APIs and real-time systems.

Architecture

This section explains the key features and events used in my low-code S3 validation architecture with JSONata.

Object Created Event

My process starts when an S3 object is created. For this post, I’m using Amazon EventBridge‘s sample S3 Object Created event:

JSON
{
  "version": "0",
  "id": "17793124-05d4-b198-2fde-7ededc63b103",
  "detail-type": "Object Created",
  "source": "aws.s3",
  "account": "123456789012",
  "time": "2021-11-12T00:00:00Z",
  "region": "ca-central-1",
  "resources": ["arn:aws:s3:::example-bucket"],
  "detail": {
    "version": "0",
    "bucket": {
      "name": "example-bucket"
    },
    "object": {
      "key": "example-key",
      "size": 5,
      "etag": "b1946ac92492d2347c6235b4d2611184",
      "version-id": "IYV3p45BT0ac8hjHg1houSdS1a.Mro8e",
      "sequencer": "00617F08299329D189"
    },
    "request-id": "N4N7GDK58NMKJ12R",
    "requester": "123456789012",
    "source-ip-address": "1.2.3.4",
    "reason": "PutObject"
  }
}

Here, the highlighted key field is vital as it identifies the uploaded object. This field will be used in the validation processes.

Choice State

In AWS Step Functions, Choice states introduce conditional logic to a state machine. They assess conditions and guide execution accordingly, allowing workflows to branch dynamically based on input data. When used with JSONata, a Choice state must contain the following fields:

  • Condition field – a JSONata expression that evaluates to true/false.
  • Next field – a value that must match a state name in the state machine.

For example, this Choice state checks if a variable foo equals 1:

Plaintext
{"Condition": "{% $foo = 1 %}",  "Next": "NumericMatchState"}

If $foo = 1, the condition is true and the workflow transitions to a NumericMatchState state.

Architecture Diagram

Now let’s put this all together into an architecture diagram:

Here,

  1. A file is uploaded to an Amazon S3 Bucket.
  2. S3 creates an Object Created event.
  3. Amazon EventBridge matches the event record to an event rule.
  4. Eventbridge executes the AWS Step Functions state machine and passes the event to it as JSON input.
  5. The state machine transitions through the various choice states.
  6. The state machine transitions to the fail state if any choice state criteria are not met.
  7. The state machine transitions to the success state if all choice state criteria are met.

Expression Creation

In this section, I create JSONata expressions to perform low-code S3 validation. For clarity, I’ll use this sample S3 event including an object key which closely resembles my actual S3 path:

JSON
{
  "version": "0",
  ...
  "detail": {
    "version": "0",
    "bucket": {
      "name": "data-lakehouse-raw"
    },
    "object": {
      "key": "iTunes/iTunes-AllTunes-2025-02-01.txt",
      "size": 5,
      ...
    },
    "request-id": "N4N7GDK58NMKJ12R",
    "requester": "123456789012",
    "source-ip-address": "1.2.3.4",
    "reason": "PutObject"
  }
}

S3 Key TXT Suffix Check

This JSONata expression checks if the S3 object key ends with txt:

Plaintext
{% $lowercase($split($split($states.input.detail.object.key, '/')[-1], '.')[-1]) = 'txt' %}

For better readability:

Plaintext
{% 
  $lowercase(
    $split(
      $split($states.input.detail.object.key, '/')[-1], 
    '.')[-1]
  ) = 'txt' 
%}

Let’s walk through this step by step:

1. Accessing The S3 Object Key

Extract the key from the event using $states.input:

Plaintext
$states.input.detail.object.key

Output: "iTunes/iTunes-AllTunes-2025-02-01.txt"

2. Splitting By / To Extract The Filename

Break the key into an array with %split using / as the delimiter:

Plaintext
$split($states.input.detail.object.key, '/')

Output: ["iTunes", "iTunes-AllTunes-2025-02-01.txt"]

Now, retrieve the array’s last element (the object name) using [-1]:

Plaintext
$split(...)[-1]

Output: "iTunes-AllTunes-2025-02-01.txt"

3. Splitting By . To Extract The File Suffix

Break the filename with $split again, using . as the delimiter:

Plaintext
$split($split(...)[-1], '.')

Output: ["iTunes-AllTunes-2025-02-01", "txt"]

Now, retrieve the last element (the suffix) using [-1]:

Plaintext
$split($split(...)[-1], '.')[-1]

Output: "txt"

4. Converting To Lowercase For Case-Insensitive Matching

Use $lowercase to convert the suffix to lowercase:

Plaintext
$lowercase($split(...)[-1], '.')[-1])

Output: "txt"

The $lowercase function ensures consistency, as files with TXT, Txt, or tXt extensions will still match correctly. Here, there is no change as txt is already lowercase.

5. Comparing Against 'txt'

Finally, compare the result to 'txt':

Plaintext
$lowercase($split(...)[-1], '.')[-1]) = 'txt'

Output: true

This means that files ending in .txt pass validation, while others fail.

S3 Key iTunes String Check

This JSONata expression checks if the S3 object key contains iTunes.

Plaintext
{% $contains($split($states.input.detail.object.key, '/')[-1], 'iTunes') %}

For better readability:

Plaintext
{% 
  $contains(
    $split(
      $states.input.detail.object.key, '/')[-1],
    'iTunes'
  ) 
%}

I’m not using $lowercase this time, as iTunes is the correct spelling.

1. Extract The Filename

This is unchanged from the last expression:

Plaintext
$split($states.input.detail.object.key, '/')[-1]

Output: "iTunes-AllTunes-2025-02-01.txt"

2. Check If The String Contains 'iTunes'

The $contains function checks if the string contains the specified substring. It returns true if the substring exists; otherwise, it returns false.

Plaintext
$contains($split(...)[-1], 'iTunes')

Output: true ✅ if 'iTunes' appears anywhere in the filename.

So:

  • "iTunes-AllTunes-2025-02-01.txt"true
  • "itunes-AllTunes-2025-02-01.txt"false (case-sensitive)

S3 Key Date Check

This JSONata expression checks if the S3 object key contains a date with format YYYY-MM-DD.

Plaintext
{% $exists($match($split($states.input.detail.object.key, '/')[-1], /\d{4}-\d{2}-\d{2}/)) %}

For better readability:

Plaintext
$exists(
  $match(
    $split($states.input.detail.object.key, '/')[-1], 
    /\d{4}-\d{2}-\d{2}/
  )
)

1. Extract The Filename

This is unchanged from the first expression:

Plaintext
$split($states.input.detail.object.key, '/')[-1]

Output: "iTunes-AllTunes-2025-02-01.txt"

2. Apply The Regex Match

The $match function applies the substring to the provided regular expression (regex). If found, an array of objects is returned containing the following fields:

  • match – the substring that was matched by the regex.
  • index – the offset (starting at zero) within the substring.
  • groups – if the regex contains capturing groups (parentheses), this contains an array of strings representing each captured group.

In this JSONata expression:

Plaintext
$match(..., /\d{4}-\d{2}-\d{2}/)

The regex looks for:

  • \d{4} → Four digits (year)
  • - → Hyphen separator
  • \d{2} → Two digits (month)
  • - → Another hyphen
  • \d{2} → Two digits (day)

Output:

JSON
{
  "match": "2025-02-01",
  "index": 16,
  "groups": []
}

3. Convert To Boolean With $exists

I can’t use the $match output yet as the Choice state needs a boolean output. Enter $exists. This function returns true for a successful match; otherwise, it returns false.

Plaintext
$exists($match(..., /\d{4}-\d{2}-\d{2}/))

Output: true ✅ if a date is found.

Here, $exists returns true as a date is present. However, note that JSONata lacks built-in functions to validate dates. For example:

  • "2025-02-01"true (valid date)
  • "2025-02-31"true (invalid date but still matches format)

An AWS Lambda function would be needed for strict date validation.

Combining JSONata Expressions

Although I’ve created separate Choice states for each JSONata expression in this section, I will add that all the expressions can be combined into a single Choice state using and:

Plaintext
{% $lowercase($split($split($states.input.detail.object.key, '/')[-1], '.')[-1]) = 'txt' and $contains($split($states.input.detail.object.key, '/')[-1], 'iTunes') and $exists($match($split($states.input.detail.object.key, '/')[-1], /\\d{4}-\\d{2}-\\d{2}/)) %}

For better readability:

Plaintext
{% 
  $lowercase(
    $split(
      $split(
        $states.input.detail.object.key, '/')[-1], '.')[-1]) = 'txt' 
and 
  $contains(
    $split(
      $states.input.detail.object.key, '/')[-1], 'iTunes') 
and 
  $exists(
    $match(
      $split(
        $states.input.detail.object.key, '/')[-1], /\\d{4}-\\d{2}-\\d{2}/)) 
%}

When deciding whether to do this, consider these benefits:

  • Simplified Structure: Reducing the number of states can make the state machine easier to understand and maintain visually. Instead of multiple branching paths, all logic is in one centralised Choice state.
  • Cost Optimisation: AWS Step Functions Standard Workflows pricing is based on the number of state transitions. Combining multiple Choice states into one reduces transitions, potentially lowering costs for high-volume workflows.
  • Minimises Transition Latency: Each state transition adds a slight delay. By managing all logic within a single Choice state, the workflow runs more efficiently due to the reduced transitions.

Against these tradeoffs:

  • Added Complexity: A complex Choice state with many conditions can be difficult to read, debug, and modify. It may require deeply nested logic, which makes future updates challenging.
  • Limited Observability: If multiple conditions are combined into one state, debugging failures becomes more difficult as it is unclear which condition caused an unexpected transition.
  • Potential Scaling Difficulty: As the workflow evolves, adding more conditions to a single Choice state can become unmanageable. Ultimately, this situation may require breaking it up.

Final Workflows

Finally, let’s see what the workflows look like. Firstly, this workflow has separate Choice states for each JSONata expression:

stepfunctions graph Data Ingestion iTunes

Data-Ingestion-iTunes ASL on GitHub.

Next, this workflow has one Choice state for all JSONata expressions:

stepfunctions graph Data Ingestion iTunes all

Data-Ingestion-iTunes-All ASL on GitHub.

Testing

To ensure my low-code JSONata expressions work as expected, I ran several tests against different S3 object keys. These tests validate:

  • File Suffix (.txt)
  • Key Content (iTunes)
  • Date Format (YYYY-MM-DD)

Suffix Validation Tests

Test CaseS3 KeyExpectedActual
Valid Suffix (.txt)"iTunes/iTunes-2025-02-01.txt"Proceed to iTunes Check✅ Success → Next: iTunes String Check
Invalid Suffix (.csv)"iTunes/iTunes-2025-02-01.csv"Fail (No further checks)❌ Failure → No further checks
Missing Suffix"iTunes/iTunes-2025-02-01"Fail (No further checks)❌ Failure → No further checks

Key Content Validation Tests

Test CaseS3 KeyExpectedActual
Valid “iTunes” Key"iTunes/iTunes-2025-02-01.txt"Proceed to Date Check✅ Success → Next: Date Check
Incorrect Case (itunes instead of iTunes)"iTunes/itunes-2025-02-01.txt"Fail (No further checks)❌ Failure → No further checks
Missing Key String""Fail (No further checks)❌ Failure → No further checks

Date Format Validation Tests

Test CaseS3 KeyExpectedActual
Correct Date Format (YYYY-MM-DD)"iTunes/iTunes-2025-02-01.txt"Success (Validation complete)✅ Success → Validation complete!
Incorrect Date Format (Missing Day)"iTunes/iTunes-2025-02.txt"Fail (No further checks)❌ Failure → No further checks
Missing Date"iTunes/iTunes.txt"Fail (No further checks)❌ Failure → No further checks

Edge Case: Impossible Date

Test CaseS3 KeyExpectedActual
⚠️ Impossible Date (2025-02-31)"iTunes/iTunes-2025-02-31.txt"Fail (Ideally)Unexpected Success (JSONata does not validate real-world dates)

These tests confirm that JSONata expressions can effectively validate S3 object keys based on file suffixes, key contents and date formats. However, while JSONata can check formatting (YYYY-MM-DD) it does not validate real-world dates. If strict date validation is needed then an AWS Lambda function would be required.

Summary

In this post, I used JSONata to add low-code S3 object key validation to an AWS Step Functions state machine. This approach simplifies the validation process and reduces the reliance on more complex Lambda functions.

My first impressions of JSONata are very good! It’s already reduced both the number and size of Project Wolfie’s Lambda functions, and there’s still lots of JSONata to explore. In the meantime, these further videos by Eric Johnson explore more advanced JSONata Step Function applications:

If this post has been useful then the button below has links for contact, socials, projects and sessions:

SharkLinkButton 1

Thanks for reading ~~^~~

Categories
Developing & Application Integration

Event-Based Cost Control In AWS Glue: Build

In this post, I build my event-based AWS Glue automated cost control process using serverless managed services.

Table of Contents

Introduction

Last time, I examined some unexpected AWS Glue costs and designed an event-based cost control process architecture. I also wrote this user story:

As an AWS account owner, I want Glue interactive sessions to stop automatically after a chosen duration so that I don’t accidentally generate unexpected and avoidable costs.

Here, I’m going to build my event-based Glue cost control process using these AWS services:

  • SNS
  • CloudTrail
  • Step Functions
  • EventBridge
  • CloudWatch

The order is based on dependencies, which I will explain shortly. Some of these resources already exist, so let’s start by reviewing those.

Existing Resources

I have two existing SNS topics that this process will use. These are general-purpose topics used for all my Step Functions notifications. They are:

  • failure-stepfunction
  • success-stepfunction

Both topics are largely alike, with the main difference being the distinct subaddressing in their respective email endpoints.

CloudTrail

Let’s start by examining an AWS Glue CreateSession CloudTrail event record. I haven’t included a full Glue CreateSession CloudTrail event record here because:

  • They’re around 90 lines long. Each.
  • They contain sensitive data.

The AWS documentation covers CloudTrail record contents in full for those curious.

Here’s part of a Glue CreateSession CloudTrail event record. This one shows session glue-studio-datapreview-e09f88a9-4d7f-4e64-95f2-e435fbd1963a:

JSON
{
    "eventSource": "glue.amazonaws.com",
    "eventName": "CreateSession",
    "requestParameters": {
        "id": "glue-studio-datapreview-e09f88a9-4d7f-4e64-95f2-e435fbd1963a",
        "command": {
            "name": "glueetl",
            "pythonVersion": "3"
        },
        "idleTimeout": 30,
        "maxCapacity": 2,
        "glueVersion": "4.0",
        "requestOrigin": "GlueStudioDataPreview"
    },
}

Here, requestParameters contains the new session’s details including its ID:

JSON
{
    "eventSource": "glue.amazonaws.com",
    "eventName": "CreateSession",
    "requestParameters": {
        "id": "glue-studio-datapreview-e09f88a9-4d7f-4e64-95f2-e435fbd1963a",
        "command": {
            "name": "glueetl",
            "pythonVersion": "3"
        },
        "idleTimeout": 30,
        "maxCapacity": 2,
        "glueVersion": "4.0",
        "requestOrigin": "GlueStudioDataPreview"
    },
}

This is the Glue Interactive Session’s unique identifier. I’ll be using this in my event-based Glue cost control build shortly. For now, understand that:

  • The Glue Interactive Session’s ID is found in the event record’s requestParameters object.
  • The requestParameters object is in turn found in the event record’s details object.

This is represented as:

JSON
detail.requestParameters.id

I’m going to pass this ID to a Step Functions state machine later. Speaking of which…

Step Functions

In this section, I start creating my event-based Glue cost control build automation. This consists of two components:

  • An event router – built with an EventBridge rule.
  • A service orchestrator – built with a Step Functions state machine.

Since the state machine will be the EventBridge rule’s target, I must create the state machine first.

State Machine Actions

The state machine’s architecture was covered in my previous post. As a reminder, when given a Glue SessionID the state machine must:

  • Wait for a set period.
  • Stop the Glue session.
  • Trigger a confirmation email.

So let’s run through each step, starting with how the Glue SessionID is acquired.

Getting Glue Session ID

When executing a Step Functions state machine, an optional JSON input can be specified. There are several ways to supply this input:

2024 12 14 StateMachineInputJSON

For my event-based Glue cost control build, a typical JSON input will be:

JSON
{
  "session_id": "glue-studio-datapreview-123-456-789"
}

This can then be used in the other states as "$.session_id"

The state machine must then enter a wait state.

Wait

Step Functions has a built-in Wait state for handling delays. I want a thirty-second delay. This is configurable both in Workflow Studio and Amazon States Language (ASL):

JSON
    "Wait": {
      "Type": "Wait",
      "Seconds": 30,
      "Next": "StopGlueSession"
    },

The state machine must then stop the Glue session.

Glue: Stop Session

To understand what’s needed here, let’s review the Glue StopSession API reference. ID is the only required parameter, which comes from the earlier JSON input.

This is represented in ASL as:

JSON
{
  "Id.$": "$.session_id"
}

Now, as discussed previously, this action can fail. In the example below, a Glue StopSession request fails because the session is still being provisioned. Since nothing has started, there is nothing to stop:

JSON
{
  "cause": "Session is in PROVISIONING status (Service: Glue, Status Code: 400, Request ID: null)",
  "error": "Glue.IllegalSessionStateException",
  "resource": "stopSession",
  "resourceType": "aws-sdk:glue"
}

To that end, I’ve added retry parameters. Upon error, StopGlueSession will retry three times, with a ten-second delay between attempts. If the third retry fails, then the state machine’s error handling will be invoked.

This is the state’s ASL:

JSON
    "StopGlueSession": {
      "Type": "Task",
      "Resource": "arn:aws:states:::aws-sdk:glue:stopSession",
      "Parameters": {
        "Id.$": "$.session_id"
      },
      "Next": "SNS Publish",
      "Retry": [
        {
          "ErrorEquals": [
            "States.ALL"
          ],
          "IntervalSeconds": 10,
          "MaxAttempts": 3
        }
      ]
    },

Where:

  • "Id.$": "$.session_id" is the Glue SessionID from the JSON input.
  • "ErrorEquals": ["States.ALL"] captures all errors.
  • "IntervalSeconds": 10, "MaxAttempts": 3 sets the retry parameters.

Finally, the state machine must trigger a confirmation email.

SNS: Publish

I usually avoid state machine success notifications to avoid alarm fatigue, but I decided to include them here for two reasons:

  • I can check the state machine is working without accessing AWS.
  • I can see excessive activity without viewing logs.

Here, I publish a message to my existing success-stepfunction SNS topic using SNS’s optimised integration:

JSON
"SNS Publish": {
      "Type": "Task",
      "Resource": "arn:aws:states:::sns:publish",
      "Parameters": {
        "TopicArn": "arn:aws:sns:eu-west-1:[REDACTED]:success-stepfunction",
        "Message.$": "States.Format('Hi! AWS Step Functions has stopped this Glue session for you: {}', $)"
      },
      "End": true
    }

I customised the Message.$ parameter using the States.Format intrinsic function:

  • The string starting with 'Hi!... is the message I want SNS to use.
  • {} is a placeholder for the value I want to insert.
  • $ is the state machine data to insert into {}

This produces a better email notification for the user:

Hi! AWS Step Functions has stopped this Glue session for you: {Id=glue-studio-datapreview-3f905608-50f1-4b9e-80e2-f4071feb2282}

Finally, "End": true stops the state machine.

Final Workflow

The state machine is now as follows:

stepfunctions graph

With this auto-generated ASL:

JSON
{
  "StartAt": "Wait",
  "States": {
    "Wait": {
      "Type": "Wait",
      "Seconds": 30,
      "Next": "StopGlueSession"
    },
    "StopGlueSession": {
      "Type": "Task",
      "Resource": "arn:aws:states:::aws-sdk:glue:stopSession",
      "Parameters": {
        "Id.$": "$.session_id"
      },
      "Next": "SNS Publish",
      "Retry": [
        {
          "ErrorEquals": [
            "States.ALL"
          ],
          "IntervalSeconds": 10,
          "MaxAttempts": 3
        }
      ]
    },
    "SNS Publish": {
      "Type": "Task",
      "Resource": "arn:aws:states:::sns:publish",
      "Parameters": {
        "TopicArn": "arn:aws:sns:eu-west-1:[REDACTED]:success-stepfunction",
        "Message.$": "States.Format('Hi! AWS Step Functions has stopped this Glue session for you: {}', $)"
      },
      "End": true
    }
  },
  "Comment": "When given a Glue SessionID start a wait, stop the session and send an SNS message."
}

There’s one more aspect to sort out. What happens if the state machine fails?

Error Logging

Firstly, let’s examine the state of events if the state machine fails:

  • A Glue session must have started.
  • An Eventbridge Rule must have sent the event to Step Functions.
  • One of the state machine states must have failed.

Unless the failing state is SNS:Publish, then there is an active Glue session still incurring costs. Therefore, triggering an alarm is much more appropriate than a notification. Alarm creation requires sending the state machine logs to CloudWatch.

By default, new state machines do not enable logging due to storage expenses. However, in this case, the log storage cost will be significantly lower than that of an unattended Glue Session. So I activate the logging for my state machine.

Step Functions log levels range from ALL to ERROR to FATAL to OFF, which are explained in the AWS documentation. As I’m only interested in failures, I select ERROR and include the execution data. This consists of execution input, data passed between states and execution output:

2024 12 14 StateMachineLogging

Next, I create a new CloudWatch log group called /aws/vendedlogs/states/GlueSession-WaitAndStop-Logs. This will form the basis of my failure alerting.

CloudWatch

Here, I configure the CloudWatch resources for my event-based Glue cost control build.

Log Groups & Metrics

The previously configured GlueSession-WaitAndStop-Logs group receives all the Step Functions state machine’s ERROR events. In most cases, these are Glue.IllegalSessionStateException events:

JSON
{
    "id": "7",
    "type": "TaskFailed",
    "details": {
        "cause": "Session is in PROVISIONING status (Service: Glue, Status Code: 400, Request ID: b1baaf14-ae89-4106-a286-87cf5445de6c)",
        "error": "Glue.IllegalSessionStateException",
        "resource": "stopSession",
        "resourceType": "aws-sdk:glue"
    },

Note the TaskFailed event type – it indicates the failure of a single state, not the entire state machine. Thus, I don’t need alerts for those events.

However, there are also ExecutionFailed events like these:

JSON
{
    "id": "5",
    "type": "ExecutionFailed",
    "details": {
        "cause": "An error occurred while executing the state 'StopGlueSession' (entered at the event id #4). The JSONPath '$.session_id' specified for the field 'Id.$' could not be found in the input '{\n  \"sessionId\": \"\"\n}'",
        "error": "States.Runtime"
    },

I definitely want to know about these! ExecutionFailed means the entire state machine failed, and there’s probably a Glue Session still running!

These events are captured as ExecutionsFailed CloudWatch metrics. Keep in mind that the AWS Step Functions console automatically publishes various metrics irrespective of logging configurations, including ExecutionFailed. However, in my experience, having both the metrics and failure logs centralised in CloudWatch simplifies troubleshooting.

Next, let’s use these metrics to create an alarm.

Alarm

Creating a CloudWatch alarm begins with selecting the ExecutionsFailed metric from States > Execution Metrics

2024 12 13 CWMetrics

This alarm will have a static value threshold with a value greater than zero, which is checked every minute. When the alarm’s state is In Alarm, an email notification will be sent to my failure-stepfunction SNS topic.

Finally, CloudWatch creates a new alarm graph:

2024 12 13 CWAlarm

So that’s everything state machine needs. Next, how do I pass the Glue SessionID to it?

EventBridge

In this section, I create the EventBridge Rule responsible for handling my event-based Glue cost control build’s events.

EventBridge Rule Anatomy

EventBridge Rules specify the criteria for routing events from an event bus to designated targets like Lambda functions, Step Functions and SQS queues. They use event patterns to filter incoming events and identify targets to route to, enabling event-driven and event-based workflows without custom processing logic.

Creating an EventBridge Rule involves three steps:

  • Define rule detail
  • Build event pattern
  • Select target

Define Rule Detail

Besides the name and description, this section is mainly concerned with:

  • Event Bus: The event bus to monitor for events. Default is fine.
  • Rule Type: EventBridge’s rule type. This can either match an event pattern or operate on a schedule (this is different from EventBridge Scheduler – Ed).

Next, let’s discuss event patterns!

Build Event Pattern

Firstly, event patterns are a very expansive topic, so please refer to the EventBridge user guide afterwards for definitions and examples.

Event patterns act as filters, defining how EventBridge identifies whether to send an event to a target. The EventBridge console provides options for sample events and testing patterns.

As a reminder, this is part of a typical CreateSession event record from which I want to capture ID:

JSON
"eventSource": "glue.amazonaws.com",
"eventName": "CreateSession",
"requestParameters": {
  "id": "glue-studio-datapreview-3f905608-50f1-4b9e-80e2-f4071feb2282",
  "role": "arn:aws:iam::[REDACTED]:role/service-role/AWSGlueServiceRole-wordpress_bronze",
        "command": {
            "name": "glueetl",
            "pythonVersion": "3"
        },
        "idleTimeout": 30
....

EventBridge currently has three pattern creation methods:

  • Schema: Using either manual entry or the schema registry.
  • Pattern Form: Using pre-defined EventBridge templates.
  • Custom Pattern: Using a manual JSON editor.

Pattern Form offers a series of dropdowns that quickly construct the desired pattern:

2024 12 28 EventBridgeEventPattern

Selecting AWS Services > Glue > AWS API Call via CloudTrail creates this event pattern:

JSON
{
  "source": ["aws.glue"],
  "detail-type": ["AWS API Call via CloudTrail"],
  "detail": {
    "eventSource": ["glue.amazonaws.com"]
  }
}

This will send all Glue events to the target, so it could use some refinement. An eventName can be added to the pattern either by manual editing or via the Specific Operation(s) setting.

The updated pattern will now only send Glue CreateSession events:

JSON
{
  "source": ["aws.glue"],
  "detail-type": ["AWS API Call via CloudTrail"],
  "detail": {
    "eventSource": ["glue.amazonaws.com"],
    "eventName": ["CreateSession"]
  }
}

Select Target

Finally, I must select the EventBridge Rule’s target – my state machine. This is why I created the state machine first; for it to be an EventBridge target it must first exist.

At this point, I could pass the whole event to the state machine. However, the state machine had no way to parse the SessionID from the event. While JSONata could now meet this requirement, it wasn’t a Step Functions feature back in June.

Luckily, EventBridge offers relevant settings here. One of these – an Input Transformer – can customise an event’s text before EventBridge sends it to the rule’s target. Input Transformers consist of an Input Path and Input Template.

An Input Path uses a JSON path and key-value pairs to reference items in events and store them as variables. For instance, capturing ID from this event:

JSON
"eventSource": "glue.amazonaws.com",
"eventName": "CreateSession",
"requestParameters": {
  "id": "glue-studio-datapreview-3f905608-50f1-4b9e-80e2-f4071feb2282",
  "role": "arn:aws:iam::[REDACTED]:role/service-role/AWSGlueServiceRole-wordpress_bronze",
        "command": {
            "name": "glueetl",
            "pythonVersion": "3"
        },
        "idleTimeout": 30
....

Requires this Input Path:

JSON
{
  "id": "$.detail.requestParameters.id"
}

In which:

  1. $.detail accesses the detail object of the CloudTrail event record.
  2. $.detail.requestParameters accesses the requestParameters object within detail.
  3. Finally, $.detail.requestParameters.id accesses the id value within requestParameters.

This is passed to an Input Template, mapping the path’s output to a templated key-value pair. This is then passed to the rule target verbatim, replacing placeholders with the Input Path values.

So this template:

JSON
{
  "session_id": "<id>"
}

Produces a JSON object comprising a "session_id": string and the Input Path’s Glue SessionID value:

JSON
{
  "session_id": "glue-studio-datapreview-3f905608-50f1-4b9e-80e2-f4071feb2282"
}

This will be passed as the JSON input when executing the state machine.

That’s everything done now. So let’s see if it works!

Testing

This section tests my event-based Glue cost control build.

In the following tests, a Glue Interactive Session was started with the build fully active and was observed in the AWS console. AWS assigned the SessionID glue-studio-datapreview-3f905608-50f1-4b9e-80e2-f4071feb2282.

EventBridge Rule

Expectation: When a Glue CreateSession CloudTrail event record is created:

  • EventBridge matches the CloudTrail event record to my EventBridge Rule.
  • The EventBridge Rule triggers and defines a session_id variable.
  • The EventBridge Rule executes my target state machine with session_id JSON input.

Result: CloudWatch indicates EventBridge matched the CloudTrail Event Record to my EventBridge Rule’s Event Pattern, executing the intended actions:

2024 06 11 EventBridgeCWGraph

The EventBridge Rule’s extracts the glue-studio-datapreview-3f905608-50f1-4b9e-80e2-f4071feb2282 SessionID from the CloudTrail Event Record and adds it as a JSON input when executing the targeted GlueSession-WaitAndStop state machine.

Step Functions State Machine

Expectation: When a Glue CreateSession CloudTrail event record is created:

  • State machine is executed with session_id JSON input.
  • Glue StopSession API is called after 30 seconds.
  • If the first StopSession API call fails, a retry occurs after ten seconds.
  • A confirmation email is sent to the user.

Result: State machine executes successfully:

2024 06 11 StepFGraph

The state machine logs also correctly show a thirty-second wait between rows 2 and 3 (the start and end of the Wait state):

2024 06 11 StepFExec

Additionally, if a Glue.IllegalSessionStateException error occurs, a retry occurs after ten seconds (see rows 7 and 8):

2024 12 13 SFRetry

Finally, SNS sends the correct email to the user:

2024 06 11 GmailNotif

The failure alarm is tested later.

Glue Session

Expectation: When an Interactive Session starts while the EventBridge Rule is enabled, it is automatically stopped thirty seconds after becoming active.

Result: This session runs for seventy seconds. Although this exceeds thirty seconds, keep in mind that the session needs to be provisioned before it can be stopped.

2024 06 11 GlueSessionConsole

These results can also be verified using the Glue Get-Session AWS CLI command:

Bash
[cloudshell-user@ip-[REDACTED] ~]$ aws glue get-session --id glue-studio-datapreview-3f905608-50f1-4b9e-80e2-f4071feb2282

{
    "Session": {
        "Id": "glue-studio-datapreview-3f905608-50f1-4b9e-80e2-f4071feb2282",
        "CreatedOn": "2024-06-11T12:23:04.586000+00:00",
        "Status": "STOPPED",
        
	[REDACTED]
	
        "WorkerType": "G.1X",
        "CompletedOn": "2024-06-11T12:24:30.210000+00:00",
        "ExecutionTime": 70.384,
        "DPUSeconds": 140.768,
        "IdleTimeout": 30
    }
}
(END)

CloudWatch Alarm

The CloudWatch Alarm was tested by briefly changing the Step Function state machine’s IAM policy to deny the StopSession action and then starting a new Interactive Session, forcing the desired failure without altering the cost control process itself.

Expectation: If the state machine fails, then a CloudWatch Alert is sent to the user.

Result: Upon the state machine’s failure, an ExecutionsFailed metric is emitted to CloudWatch, shown in this chart:

2024 06 11 CloudWatchMetric

This triggers the CloudWatch Alarm when its Sum > 0 threshold condition is met, changing the alarm’s state to In Alarm and sending an email notification using my failure-stepfunction SNS topic:

2024 06 11 CloudWatchAlerting

And with that, all tests are successful. Now let’s look at the costs.

Cost Analysis

This section analyses the costs of my event-based Glue cost control build. There are two aspects to this:

  • Cost Expenditure: How much is the cost control process costing me to run?
  • Cost Savings: How much money am I saving on the stopped Glue Sessions?

Because the biggest test of all is whether this build satisfies the user story. Does it prevent unexpected and avoidable costs?

Cost Expenditure

Firstly, let’s examine my event-based Glue cost control build costs between June 2024 and November 2024:

2024 12 13 CostsZero

So I guess this kinda makes my point. Zero cost doesn’t mean zero usage though, so let’s check the bills for that period.

Caveat: I didn’t tag any of my resources (yes ok I know), so this usage is for the entire account.

CloudTrail & CloudWatch Usage

CloudTrail FreeEventsRecorded:

Service Period Metric Quantity
CloudTrail 2024-06 FreeEventsRecorded 33,217
CloudTrail 2024-07 FreeEventsRecorded 28,993
CloudTrail 2024-08 FreeEventsRecorded 40,682
CloudTrail 2024-09 FreeEventsRecorded 29,891
CloudTrail 2024-10 FreeEventsRecorded 36,208
CloudTrail 2024-11 FreeEventsRecorded 28,630

CloudWatch Alarms:

Service Period Metric Quantity
CloudWatch 2024-06 Alarms 0.919
CloudWatch 2024-07 Alarms 2
CloudWatch 2024-08 Alarms 2.126
CloudWatch 2024-09 Alarms 2
CloudWatch 2024-10 Alarms 2
CloudWatch 2024-11 Alarms 2

CloudWatch Metrics:

Service Period Metric Quantity
CloudWatch 2024-06 Metrics 5.29
CloudWatch 2024-07 Metrics 0.372
CloudWatch 2024-08 Metrics 4.766
CloudWatch 2024-09 Metrics 0.003
CloudWatch 2024-10 Metrics 4.003
CloudWatch 2024-11 Metrics 4.626

CloudWatch Requests:

Service Period Metric Quantity
CloudWatch 2024-06 Requests 696
CloudWatch 2024-07 Requests 15
CloudWatch 2024-08 Requests 230
CloudWatch 2024-09 Requests 0
CloudWatch 2024-10 Requests 181
CloudWatch 2024-11 Requests 122

EventBridge, SNS & Step Functions Usage

EventBridge EventsInvocation:

Service Period Metric Quantity
EventBridge 2024-06 EventsInvocation 30
EventBridge 2024-07 EventsInvocation 31
EventBridge 2024-08 EventsInvocation 31
EventBridge 2024-09 EventsInvocation 30
EventBridge 2024-10 EventsInvocation 31
EventBridge 2024-11 EventsInvocation 30

SNS NotificationDeliveryAttempts-SMTP:

Service Period Metric Quantity
SNS 2024-06 NotificationDeliveryAttempts-SMTP 52
SNS 2024-07 NotificationDeliveryAttempts-SMTP 29
SNS 2024-08 NotificationDeliveryAttempts-SMTP 85
SNS 2024-09 NotificationDeliveryAttempts-SMTP 2
SNS 2024-10 NotificationDeliveryAttempts-SMTP 58
SNS 2024-11 NotificationDeliveryAttempts-SMTP 11

SNS Requests:

Service Period Metric Quantity
SNS 2024-06 Requests-Tier1 315
SNS 2024-07 Requests-Tier1 542
SNS 2024-08 Requests-Tier1 553
SNS 2024-09 Requests-Tier1 325
SNS 2024-10 Requests-Tier1 366
SNS 2024-11 Requests-Tier1 299

Step Functions StateTransition:

Service Period Metric Quantity
Step Functions 2024-06 StateTransition 388
Step Functions 2024-07 StateTransition 180
Step Functions 2024-08 StateTransition 566
Step Functions 2024-09 StateTransition 300
Step Functions 2024-10 StateTransition 616
Step Functions 2024-11 StateTransition 362

All within free tier. So how did Glue fare?

Cost Savings

Next, let’s pull my InteractiveSessions costs between June 2024 and November 2024:

2024 12 13 CostsGlue

The high June costs kickstarted this process, and there’s a massive difference between June and the others! September isn’t a mistake – I was kinda busy.

Glue Costs

Here are the actual costs:

Service Period Metric Quantity Cost $
Glue 2024-06 InteractiveSessions 5.731 DPU-Hour 2.52
Glue 2024-07 InteractiveSessions 0.197 DPU-Hour 0.09
Glue 2024-08 InteractiveSessions 2.615 DPU-Hour 1.15
Glue 2024-09 InteractiveSessions 0.000 DPU-Hour 0.00
Glue 2024-10 InteractiveSessions 2.567 DPU-Hour 1.13
Glue 2024-11 InteractiveSessions 0.079 DPU-Hour 0.03
TOTAL 4.92

While these aren’t exactly huge sums, there are two items to consider here:

Glue Estimated Savings

Finally, what saving does this represent? While I can’t get a value from AWS Billing, I can reasonably estimate one. Firstly, using the AWS Calculator for Glue I calculated the cost of an Interactive Session that times out:

2 DPUs x 0.50 hours x 0.44 USD per DPU-Hour = 0.44 USD

https://calculator.aws/#/createCalculator/Glue

Next, I went back through my records and found how many sessions had been stopped each month:

Period Stops
2024-06 11
2024-07 5
2024-08 61
2024-09 0
2024-10 53
2024-11 2

Caveat: To be fair to AWS, some sessions were created while I was working on a Glue ETL job with automation enabled. So, while the automation was continually stopping sessions, I was constantly starting new ones. Thus, Glue isn’t the money pit I perhaps make out, and I’m not that careless with leaving them on!

By multiplying the number of stopped sessions by 0.44, I can determine each month’s potential cost, then subtract the actual cost to find the estimated savings:

Period Stops Potential Cost $ Actual Cost $ Est. Saving $
2024-06 11 4.84 2.52 2.32
2024-07 5 2.20 0.09 2.11
2024-08 61 26.84 1.15 25.69
2024-09 0 0.00 0.00 0.00
2024-10 53 23.32 1.13 22.19
2024-11 2 0.88 0.03 0.85
TOTAL 132 58.08 4.92 53.16

Almost $55! Even if I reduce that by 50% based on the caveat, that’s still around a $25 saving. And with no setup costs!

Summary

In this post, I built my event-based AWS Glue automated cost control process using serverless managed services.

I’m pleased with the outcome! My generally busy Summer and Autumn inadvertently tested this process for six months, and it’s been fine throughout! I may soon extend the state machine’s waiting duration, which only needs a parameter change for one state.

The great thing about this process is that it isn’t limited to Glue; EventBridge can use nearly all AWS services as event sources. I’m seriously impressed with EventBridge. It’s poked me about Glacier restores, scheduled my ETLs and now is also saving me a few quid!

If this post has been useful then the button below has links for contact, socials, projects and sessions:

SharkLinkButton 1

Thanks for reading ~~^~~