Categories
Architecture & Resilience

amazonwebshark’s Abandoned 2019 AWS Architecture

In this post, I respond to January 2024’s T-SQL Tuesday #170 Invitation by examining amazonwebshark’s abandoned 2019 AWS architecture.

tsql tuesday

Table of Contents

Introduction

amazonwebshark is two years old today!

One of a kind 500

I wrote an analysis post last year, and when deciding on the second birthday’s topic I saw this month’s T-SQL Tuesday invitation from Reitse Eskens:

“What projects did you abandon but learn a lot from?”

One immediately sprang to mind! Since this T-SQL Tuesday falls on amazonwebshark’s second birthday, it seemed a good time to evaluate it.

Rewind to 2019. I was new to AWS and was studying towards their Certified Cloud Practitioner certification. To that end, I set up an AWS account and tried several tutorials including an S3 static website.

After earning the certification, I kept the site going to continue my learning journey. I made the site into a blog and chose a snappy (Groan – Ed) name…amazonwebshark. In fact, that site is still around!

I’ll start by looking at the site architecture, then examine what went wrong and end with how it influenced the current amazonwebshark site. For the rest of this post, I’ll refer to amazonwebshark 2019 as awshark2019 and the current version as awshark2021.

How awshark2019 Was Built

In this section, I examine the architecture behind awshark2019.

Hugo Static Site Generator

Hugo is an open-source static site generator written in the Go programming language. Go is known for its efficiency and performance, making Hugo’s build process very fast.

Hugo’s content files are written in Markdown which enables easy post creation and formatting. These Markdown posts are then converted to static HTML files at build time. The built site has a file system structure and can be deployed to platforms like traditional web servers, content delivery networks (CDNs), and cloud storage services.

Speaking of which…

S3 Static Site

awshark2019 has been operating out of a public S3 bucket since its creation:

2024 01 04 S3WebsiteBucketOverview

This won’t be a particularly technical section, as the AWS documentation and tutorial are already great resources for this S3 feature. So let’s talk about the benefits of static sites instead:

  • Since static websites consist of pre-built HTML, CSS, and JavaScript files, they load quickly and can scale rapidly.
  • Static websites are inherently more secure and maintainable because there’s no server-side code execution, database vulnerabilities or plugin updates.
  • All site processing is done before deployment, so the only ongoing cost is for storage. awshark2019 weighs in at around 4MB, so in the four years it has been live this has been essentially free.

So far this all sounds good. What went wrong?

Why awshark2019 Failed

In this section, I examine awshark2019’s problems. Why was the 2019 architecture abandoned?

Unclear Objectives

Firstly, awshark2019 had no clear purpose.

In my experience, good blogs have their purpose nailed down. It could be automation, data, biscuits…anything as long as it becomes consistent and plays to the creator’s strengths.

With awshark2019, some posts are about S3 Static Sites and Billing Alerts. These are good topics to explore. However, almost half of the posts are about creating the site and are in a web design category. But the blog isn’t about web design, and I’ve never been a web designer!

Rounding things off, the About page is…the Hugo default. So who is the site for? If I, as the blog creator, don’t know that then what chance does anyone else have?

Poor Content

Secondly, as awshark2019’s objectives were unclear the content was…not very good. The topic choices are disjointed, some of the posts are accidental documentation rehashes and ultimately there’s little value.

Let’s take the example of Adding An Elastic IP To An Amazon Linux EC2 Instance. The post explores the basics, shows the AWS console changes and mentions costs. This is fine, but there’s not much else here. If I wrote this post today, I’d define a proper use case and explore the problem more by pinging the instance’s IP before and after a stoppage. This shows the problem instead of telling it.

Another post examines Setting Up A Second AWS Account With AWS Organizations. There’s more here than the IP address post, but there’s no context. What am I doing with the second account? Why does my use case support the use of AWS Organisations? What problems is it helping me solve?

There’s nothing in these posts that I can’t get from the AWS documentation and no new insights for readers.

Awkward To Publish

Finally, awshark2019 was too complex to publish. More accurately, Hugo’s deployment process wasn’t the problem. The way I was doing it was.

Hugo sites can be deployed in several ways. These centre around putting files and folders in a location accessible by the deployment service. So far so good.

But instead of automating this process, I had a horrible manual workflow of creating and testing the site locally, and then manually overwriting the existing S3 objects. This quickly got so tedious that I eventually ran out of enthusiasm.

What I Learned

In this section, I examine what I learned from the abandoned 2019 architecture when creating awshark2021.

Decide On Scope

My first key awshark2021 decision was the blog’s purpose.

While ‘Welcome To My Blog’ posts are something of a cliche, I took the time to write Introducing amazonwebshark as a standard to hold myself to:

By writing about my experiences I can check and confirm my understanding of new topics, give myself points of reference for future projects and exam revision, evidence my development where necessary and help myself out in the moments when my imposter syndrome sees an opportunity to strike.

Introducting amazonwebshark: What Is amazonwebshark For?

awshark2021 took as much admin away as possible, letting me explore topics and my curiosity instead. amazonwebshark was, and is, a place for me to:

  • Try things
  • Make mistakes
  • Improve myself
  • Be creative

While this is firstly a technology and cloud computing blog, I allow myself some freedom (for example the Me category) as long as the outcome is potentially useful. To this end, I’ve also written about life goals, problem-solving and public speaking.

Add Value

Secondly, let’s examine the posts themselves.

I probably average about eight hours of writing per post. I want to get the most out of that time investment, so I try to ensure my posts add value to their subject matter. There’s no set process for this, as value can take many forms like:

  • Examining how I apply services to my situation or use case.
  • Raising awareness of topics with low coverage.
  • Detailing surprising or unexpected event handling.

My attitude has always been that I’m not here to tell people how and why to do things. I’m here to tell people how and why I did things. Through this process, I can potentially help others in the technology community while also helping myself.

Post introspection and feedback have led to improvements in my working practises like:

It could be argued that amazonwebshark is a big ongoing peer review. It’s made me a better engineer and has hopefully helped others out too.

Keep It Simple

Finally, let’s discuss architecture.

awshark2021 is a WordPress blog, currently hosted on Hostinger servers. While this architecture isn’t free and has tradeoffs, it offers a fast, reliable deployment path managed by organisations specialising in this field.

This is exactly what I wanted for awshark2021:

…my main focus was to get the ball rolling and get something online. I’ve wanted to start a blog for some time, but have run into problems like knowledge gaps, time pressures and running out of enthusiasm.

Introducing amazonwebshark: Why Didn’t You Use AWS For Hosting?

I enjoy writing, so my priority is there. If I begin seriously considering a serverless amazonwebshark, one of the core tests will be the deployment process. For now, the managed services I’m paying for meet my needs and let me focus on creativity over admin.

Summary

In this post, I responded to January 2024’s T-SQL Tuesday #170 Invitation by examining amazonwebshark’s abandoned 2019 AWS architecture.

It’s unfair to blame the architecture. Rather, my implementation of it was at fault. awshark2019 was a good idea but suffered from poor and over-ambitious architectural decisions. I’ve considered deleting it. But if nothing else it reminds me of a few things:

  • I won’t always get it right first time.
  • It doesn’t have to be perfect.
  • Enjoy the process.

awshark2019’s lessons have allowed awshark2021 to reach two years. Happy birthday!

If this post has been useful, the button below has links for contact, socials, projects and sessions:

SharkLinkButton 1

Thanks for reading ~~^~~

Categories
Data & Analytics

Ingesting iTunes Data Into AWS With Python And Athena

In this post, I will update my existing iTunes Python ETL to return a Parquet file, which I will then upload to S3 and view using Athena.

Table of Contents

Introduction

In my last post, I made an ETL that exported data from a CSV into a Pandas DataFrame using AWS Data Wrangler. That post ended with the transformed data being saved locally as a new CSV.

It’s time to do something with that data! I want to analyse my iTunes data and look for trends and insights into my listening habits. I also want to access these insights in the cloud, as my laptop is a bit bulky and quite slow. Finally, I’d prefer to keep my costs to a minimum.

Here, I’ll show how AWS and Python can be used together to meet these requirements. Let’s start with AWS.

Amazon S3

In this section, I will update my S3 setup. I’ll create some new buckets and explain my approach.

New S3 Buckets

Currently, I have a single S3 bucket containing my iTunes Export CSV. Moving forward, this bucket will contain all of my unmodified source objects, otherwise known as raw data.

To partner the raw objects bucket, I now have an ingested objects bucket. This bucket will contain objects where the data has been transformed in some way. My analytics tools and Athena tables will point here for their data.

Speaking of Athena, the other new bucket will be used for Athena’s query results. Although Athena is serverless, it still needs a place to record queries and store results. Creating this bucket now will save time later on.

Having separate buckets for each of these functions isn’t a requirement, although it is something I prefer to do. Before moving on, I’d like to run through some of the benefits I find with this approach.

Advantages Of Multiple Buckets

Firstly, having buckets with clearly defined purposes makes navigation way easier. I always know where to find objects, and rarely lose track of or misplace them.

Secondly, having multiple buckets usually makes my S3 paths shorter. This doesn’t sound like much of a benefit upfront, but the S3 path textboxes in the AWS console are quite small, and using long S3 paths in the command line can be a pain.

Finally, I find security and access controls are far simpler to implement with a multi-bucket setup. Personally I prefer “You can’t come into this house/bucket” over “You can come into this house/bucket, but you can’t go into this room/prefix”. However, both S3 buckets and S3 prefixes can be used as IAM policy resources so there’s technically no difference.

That concludes the S3 section. Next, let’s set up Athena.

Amazon Athena

In this section, I’ll get Athena ready for use. I’ll show the process I followed and explain my key decisions. Let’s start with my reasons for choosing Athena.

Why Athena?

Plenty has been written about Athena’s benefits over the years. So instead of retreading old ground, I’ll discuss what makes Athena a good choice for this particular use case.

Firstly, Athena is cheap. The serverless nature of Athena means I only pay for what I query, scan and store, and I’ve yet to see a charge for Athena in the three years I’ve been an AWS customer.

Secondly, like S3, Athena’s security is managed by IAM. I can use IAM policies to control who and what can access my Athena data, and can monitor that access in CloudTrail. This also means I can manage access to Athena independently of S3.

Finally, Athena is highly available. Authorised calls to the service have a 99.9% Monthly Uptime Percentage SLA and Athena benefits from S3’s availability and durability. This allows 24/7 access to Athena data for users and applications.

Setting Up Athena

To start this section, I recommend reading the AWS Athena Getting Started documentation for a great Athena introduction. I’ll cover some basics here, but I can’t improve on the AWS documentation.

Athena needs three things to get off the ground:

  • An S3 path for Athena query results.
  • A database for Athena tables.
  • A table for interacting with S3 data objects.

I’ve already talked about the S3 path, so let’s move on to the database. A database in Athena is a logical grouping for the tables created in it. Here, I create a blog_amazonwebshark database using the following script:

CREATE DATABASE blog_amazonwebshark

Next, I enter the column names from my iTunes Export CSV into Athena’s Create Table form, along with appropriate data types for each column. In response, the form creates this Athena table:

The form adds several table properties to the table’s DDL. These, along with the data types, are expanded on in the Athena Create Table documentation.

Please note that I have removed the S3 path from the LOCATION property to protect my data. The actual Athena table is pointing at an S3 prefix in my ingested objects bucket that will receive my transformed iTunes data.

Speaking of data, the form offers several choices of source data format including CSV, JSON and Parquet. I chose Parquet, but why do this when I’m already getting a CSV? Why create extra work?

Let me explain.

About Parquet

Apache Parquet is a file format that supports fast processing for complex data. It can essentially be seen as the next generation of CSV. Both formats have their place, but at scale CSV files have large file sizes and slow performance.

In contrast, Parquet files have built-in compression and indexing for rapid data location and retrieval. In addition, the data in Parquet files is organized by column, resulting in smaller sizes and faster queries.

This also results in Athena cost savings as Athena only needs to read the columns relevant to the queries being run. If the same data was in a CSV, Athena would have to read the entire CSV whether the data is needed or not.

For further reading, Databricks have a great Parquet section in their glossary.

That’s everything for Athena. Now I need to update my Python scripts.

Python

In this section, I’ll make changes to my Basic iTunes ETL to include my new S3 and Athena resources and to replace the CSV output with a Parquet file. Let’s start with some variables.

New Python Variables

My first update is a change to ETL_ITU_Play_Variables.py, which contains my global variables. Originally there were two S3 global variables – S3_BUCKET containing the bucket name and S3_PREFIX containing the S3 prefix path leading to the raw data:

S3_BUCKET
S3_PREFIX

Now I have two buckets and two prefixes, so it makes sense to update the variable names. I now have two additional global variables, adding _RAW to the originals and _INGESTED to the new ones for clarity:

S3_BUCKET_RAW
S3_PREFIX_RAW

S3_BUCKET_INGESTED
S3_PREFIX_INGESTED

Changing CSV To Parquet

The next change is to ETL_ITU_Play.py. The initial version converts a Pandas DataFrame to CSV using pandas.DataFrame.to_csv. I’m now replacing this with awswrangler.s3.to_parquet, which needs three parameters:

Put together, it looks like this:

wr.s3.to_parquet(
    df = df,
    boto3_session = session,
    path = s3_path_ingested

Before committing my changes, I took the time to put the main workings of my ETL in a class. This provides a clean structure for my Python script and will make it easier to reuse in future projects.

That completes the changes. Let’s review what has been created.

Architecture

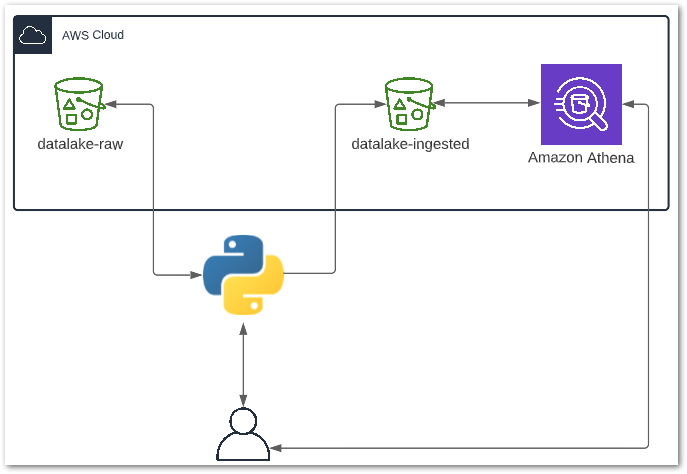
Here is an architectural diagram of how everything fits together:

Here is a breakdown of the processes involved:

  1. User runs the Python ETL script locally.
  2. Python reads the CSV object in datalake-raw S3 bucket.
  3. Python extracts data from CSV into a DataFrame and transforms several columns.
  4. Python writes the DataFrame to datalake-ingested S3 bucket as a Parquet file.
  5. Python notifies User of a successful run.
  6. User sends query to Athena.
  7. Athena reads data from datalake-ingested S3 bucket.
  8. Athena returns query results to User.

Testing

In this section, I will test my resources to make sure they work as expected. Bare in mind that this setup hasn’t been designed with production use in mind, so my testing is somewhat limited and would be insufficient for production deployment.

Testing Python

TEST: Upload a CSV to the datalake-raw S3 bucket, then run the Python script. The Python script must run successfully and print updates in the terminal throughout.

RESULT: I upload an iTunes Export CSV to the datalake-raw S3 bucket:

The Python script runs, printing the following output in the terminal:

Creating DataFrame.
DataFrame columns are Index(['Name', 'Artist', 'Album', 'Genre', 'Time', 'Track Number', 'Year', 'Date Modified', 'Date Added', 'Bit Rate', 'Plays', 'Last Played', 'Skips', 'Last Skipped', 'My Rating', 'Location'], dtype='object')
Deleting unnecessary DataFrame columns.
Renaming DataFrame columns.
Reformatting DateTime DataFrame columns.
Creating Date Columns From DateTime Columns.
Creating MyRatingDigit Column.
Replacing blank values to prevent IntCastingNaN errors.
Setting Data Types.
Creating Parquet file from DataFrame.
Processes complete.

Testing S3

TEST: After the Python script successfully runs, the datalake-ingested S3 bucket must contain an itunesdata.parquet object.

RESULT: Upon accessing the datalake-ingested S3 bucket, an itunesdata.parquet object is found:

(On an unrelated note, look at the size difference between the Parquet and CSV files!)

Testing Athena

TEST: When the datalake-ingested S3 bucket contains an itunesdata.parquet object, data from the iTunes Export CSV must be shown when the following Athena query is run:

SELECT * FROM basic_itunes_python_etl;

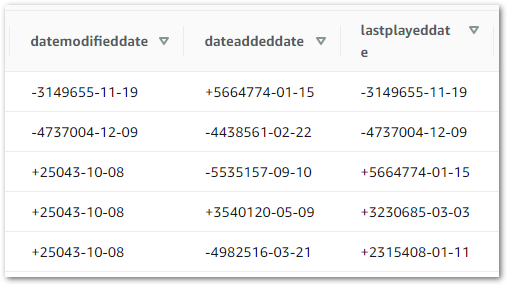
RESULT: Most of the Athena results match the iTunes Export data. However, the transformed dates did not match expectations:

This appears to be a formatting problem, as some parts of a date format are still visible.

To diagnose the problem I wanted to see how these columns were being stored in the Parquet file. I used mukunku’s ParquetViewer for this, which is described in the GitHub repo as:

…a quick and dirty utility that I created to easily view Apache Parquet files on Windows desktop machines.

It works very well!

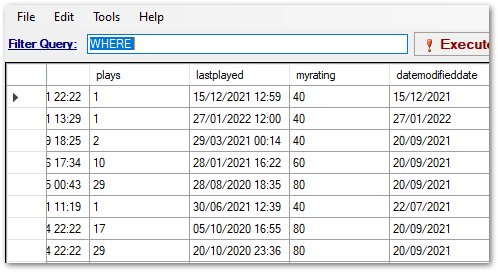
Here is a screenshot of the data. The lastplayed column has dates and times, while the datamodifieddate column has dates only:

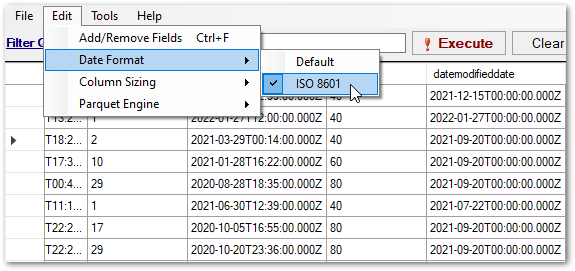
The cause of the problem becomes apparent when the date columns are viewed using the ISO 8601 format:

The date columns are all using timestamps, even when no times are included!

A potential fix would be to change the section of my Python ETL script that handles data types. Instead, I update the data types used in my Athena table from date:

  `datemodifieddate` date, 
  `dateaddeddate` date, 
  `lastplayeddate` date, 

To timestamp:

  `datemodifieddate` timestamp, 
  `dateaddeddate` timestamp, 
  `lastplayeddate` timestamp, 

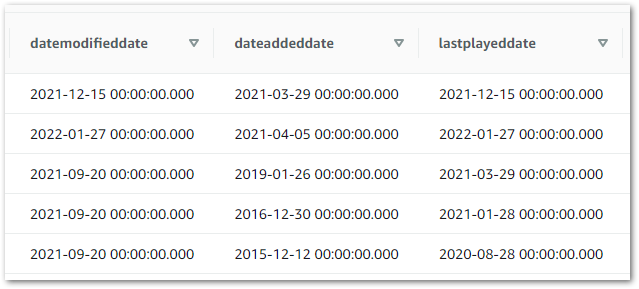
This time, when I view my Athena table the values all appear as expected:

Scripts

My ETL_ITU_Play.py file commit from 2022-08-08 can be viewed here:

ETL_ITU_Play.py on GitHub

My updated repo readme can be viewed here:

README.md on GitHub

Summary

In this post, I updated my existing iTunes Python ETL to return a Parquet file, which I then uploaded S3 and viewed using Athena. I explained my reasoning for choosing S3, Athena and the Parquet file format, and I handled a data formatting issue.

If this post has been useful, please feel free to follow me on the following platforms for future updates:

Thanks for reading ~~^~~
Categories
Developing & Application Integration

Uploading Music Files To Amazon S3 (PowerShell Mix)

In this post, I will upload lossless music files from my laptop to one of my Amazon S3 buckets using PowerShell.

Table of Contents

Introduction

For several months I’ve been going through some music from an old hard drive. These music files are currently on my laptop, and exist mainly as lossless .flac files.

For each file I’m doing the following:

  • Creating an .mp3 copy of each lossless file.
  • Storing the .mp3 file on my laptop.
  • Uploading a copy of the lossless file to S3 Glacier.
  • Transferring the original lossless file from my laptop to my desktop PC.

I usually do the uploads using the S3 console, and have been meaning to automate the process for some time. So I decided to write some code to upload files to S3 for me, in this case using PowerShell.

Prerequisites

Before starting to write my PowerShell script, I have done the following on my laptop:

Version 0: Functionality

Version 0 gets the basic functionality in place. No bells and whistles here – I just want to upload a file to an S3 bucket prefix, stored using the Glacier Flexible Retrieval storage class.

V0: Writing To S3

I am using the PowerShell Write-S3Object cmdlet to upload my files to S3. This cmdlet needs a couple of parameters to do what’s required:

  • -BucketName: The S3 bucket receiving the files.
  • -Folder: The folder on my laptop containing the files.
  • -KeyPrefix: The S3 bucket key prefix to assign to the uploaded objects.
  • -StorageClass: The S3 storage class to assign to the uploaded objects.

I create a variable for each of these so that my script is easier to read as I continue its development. I couldn’t find the inputs that the -StorageClass parameter uses in the Write-S3Object documentation. In the end, I found them in the S3 PutObject API Reference.

Valid inputs are as follows:

STANDARD | REDUCED_REDUNDANCY | STANDARD_IA | ONEZONE_IA | INTELLIGENT_TIERING | GLACIER | DEEP_ARCHIVE | OUTPOSTS | GLACIER_IR

V0: Code

V0BasicRedacted.ps1

#Set Variables
$LocalSource = "C:\Users\Files\"
$S3BucketName = "my-s3-bucket"
$S3KeyPrefix = "Folder\SubFolder\"
$S3StorageClass = "GLACIER"


#Upload File To S3
Write-S3Object -BucketName $S3BucketName -Folder $LocalSource -KeyPrefix $S3KeyPrefix -StorageClass $S3StorageClass
V0BasicRedacted.ps1 On GitHub

V0: Evaluation

Version 0 offers me the following benefits:

  • I don’t have to log onto the S3 console for uploads anymore.
  • Forgetting to specify Glacier Flexible Retrieval as the S3 storage class is no longer a problem. The script does this for me.
  • Starting an upload to S3 is now as simple as right-clicking the script and selecting Run With PowerShell from the Windows Context Menu.

Version 0 works great, but I’ll give away one of my S3 bucket names if I start sharing a non-redacted version. This has been known to cause security issues in severe cases. Ideally, I’d like to separate the variables from the Powershell commands, so let’s work on that next.

Version 1: Security

Version 1 enhances the security of my script by separating my variables from my PowerShell commands. To make this work without breaking things, I’m using the following features:

To take advantage of these features, I’ve made two new files in my repo:

  • Variables.ps1 for my variables.
  • V1Security.ps1 for my Write-S3Object command.

So let’s now talk about how this all works.

V1: Isolating Variables With Dot Sourcing

At the moment, my script is broken. Running Variables.ps1 will create the variables but do nothing with them. Running V1Security.ps1 will fail as the variables aren’t in that script anymore.

This is where Dot Sourcing comes in. Using Dot Sourcing lets PowerShell look for code in other places. Here, when I run V1Security.ps1 I want PowerShell to look for variables in Variables.ps1.

To dot source a script, type a dot (.) and a space before the script path. As both of my files are in the same folder, PowerShell doesn’t even need the full path:

. .\EDMTracksLosslessS3Upload-Variables.ps1

Now my script works again! But I still have the same problem – if Variables.ps1 is committed to GitHub at any point then my variables are still visible. How can I stop that?

This time it’s Git to the rescue. I need a .gitignore file.

V1: Selective Tracking With .gitignore

.gitignore is a way of telling Git what not to include in commits. Entering a file, folder or pattern into a repo’s .gitignore file tells Git not to track it.

When Visual Studio Code finds a .gitignore file, it helps out by making visual changes in response to the file’s contents. When I create a .gitignore file and add the following lines to it:

#Ignore PowerShell Files Containing Variables

EDMTracksLosslessS3Upload-V0Basic.ps1
EDMTracksLosslessS3Upload-Variables.ps1

Visual Studio Code’s Explorer tab will show those files as grey:

They won’t be visible at all in the Source Control tab:

And finally, when committed to GitHub the ignored files are not present:

Before moving on, I found this Steve Griffith .gitignore tutorial helpful in introducing the basics:

And this DevOps Journey tutorial helps show how .gitignore behaves within Visual Studio Code:

V1: Code

gitignore Version 1

#Ignore PowerShell Files Containing Variables

EDMTracksLosslessS3Upload-V0Basic.ps1
EDMTracksLosslessS3Upload-Variables.ps1

V1Security.ps1

#Load Variables
. .\EDMTracksLosslessS3Upload-Variables.ps1


#Upload File To S3
Write-S3Object -BucketName $S3BucketName -Folder $LocalSource -KeyPrefix $S3KeyPrefix -StorageClass $S3StorageClass
V1Security.ps1 On GitHub

VariablesBlank.ps1 Version 1

#Set Variables


#The local file path for objects to upload to S3
#E.g. "C:\Users\Files\"
$LocalSource =

#The S3 bucket to upload the objects to
#E.g. "my-s3-bucket"
$S3BucketName =

#The S3 bucket prefix / folder to upload the objects to (if applicable)
#E.g. "Folder\SubFolder\"
$S3KeyPrefix =

#The S3 Storage Class to upload to
#E.g. "GLACIER"
$S3StorageClass =
Version 1 VariablesBlank.ps1 On GitHub

V1: Evaluation

Version 1 now gives me the benefits of Version 0 with the following additions:

  • My variables and commands have now been separated.
  • I can now call Variables.ps1 from other scripts in the same folder, knowing the variables will be the same each time for each script.
  • I can use .gitignore to make sure Variables.ps1 is never uploaded to my GitHub repo.

The next problem is one of visibility. I have no way to know if my uploads have been successful. Or if they were duplicated. Nor do I have any auditing.

The S3 console gives me a summary at the end of each upload:

It would be great to have something similar with my script! In addition, some error handling and quality control checks would increase my confidence levels.

Let’s get to work!

Version 2: Visibility

Version 2 enhances the visibility of my script. The length of the script grows a lot here, so let’s run through the changes and I’ll explain what’s going on.

As a starting point, I copied V1Security.ps1 and renamed it to V2Visibility.ps1.

V2: Variables.ps1 And .gitignore Changes

Additions are being made to these files as a result of the Version 2 changes. I’ll mention them as they come up, but it makes sense to cover a few things up-front:

  • I added External to all variable names in Variables.ps1 to keep track of them in the script. For example, $S3BucketName is now $ExternalS3BucketName.
  • There are some additional local file paths in Variables.ps1 that I’m using for transcripts and some post-upload checks.
  • .gitignore now includes a log file (more on that shortly) and the Visual Studio Code debugging folder.

V2: Transcripts

The first change is perhaps the simplest. PowerShell has built-in cmdlets for creating transcripts:

  • Start-Transcript creates a record of all or part of a PowerShell session in a separate file.
  • Stop-Transcript stops a transcript that was started by the Start-Transcript cmdlet.

These go at the start and end of V2Visibility.ps1, along with a local file path for the EDMTracksLosslessS3Upload.log file I’m using to record everything.

Start-Transcript -Path $ExternalTranscriptPath -IncludeInvocationHeader

This new path is stored in Variables.ps1. In addition, EDMTracksLosslessS3Upload.log has been added to .gitignore.

V2: Check If There Are Any Files

Now the error handing begins. I want the script to fail gracefully, and I start by checking that there are files in the correct folder. First I count the files using Get-ChildItem and Measure-Object:

$LocalSourceCount = (Get-ChildItem -Path $ExternalLocalSource | Measure-Object).Count

And then stop the script running if no files are found:

If ($LocalSourceCount -lt 1) 
{
Write-Output "No Local Files Found.  Exiting."
Start-Sleep -Seconds 10
Stop-Transcript
Exit
}

There are a couple of cmdlets here that make several appearances in Version 2:

  • Start-Sleep suspends PowerShell activity for the time stated. This gives me time to read the output when I’m running the script using the context menu.
  • Exit causes PowerShell to completely stop everything it’s doing. In this case, there’s no point continuing as there’s nothing in the folder.

If files are found, PowerShell displays the count and carries on:

Else 
{
Write-Output "$LocalSourceCount Local Files Found"          
}

V2: Check If The Files Are Lossless

Next, I want to stop any file uploads that don’t belong in the S3 bucket. The bucket should only contain lossless music – anything else should be rejected.

To arrange this, I first capture the extensions for each file using Get-ChildItem and [System.IO.Path]::GetExtension:

$LocalSourceObjectFileExtensions = Get-ChildItem -Path $ExternalLocalSource | ForEach-Object -Process { [System.IO.Path]::GetExtension($_) }

Then I check each extension using a ForEach loop. If an extension isn’t in the list, PowerShell will report this and exit the script:

ForEach ($LocalSourceObjectFileExtension In $LocalSourceObjectFileExtensions) 

{
If ($LocalSourceObjectFileExtension -NotIn ".flac", ".wav", ".aif", ".aiff") 
{
Write-Output "Unacceptable $LocalSourceObjectFileExtension file found.  Exiting."
Start-Sleep -Seconds 10
Stop-Transcript
Exit
}

If the extension is in the list, PowerShell records this and checks the next one:

Else 
{
Write-Output "Acceptable $LocalSourceObjectFileExtension file."
}

So now, if I attempt to upload an unacceptable .log file, the transcript will say:

**********************
Transcript started, output file is C:\Files\EDMTracksLosslessS3Upload.log

Checking extensions are valid for each local file.
Unacceptable .log file found.  Exiting.
**********************

Whereas an acceptable .flac file will produce:

**********************
Transcript started, output file is C:\Files\EDMTracksLosslessS3Upload.log

Checking extensions are valid for each local file.
Acceptable .flac file.
**********************

And when uploading multiple files:

**********************
Transcript started, output file is C:\Files\EDMTracksLosslessS3Upload.log

Checking extensions are valid for each local file.
Acceptable .flac file.
Acceptable .wav file.
Acceptable .flac file.
**********************

V2: Check If The Files Are Already In S3

The next step checks if the files are already in S3. This might not seem like a problem, as S3 usually overwrites an object if it already exists.

Thing is, this bucket is replicated. This means it’s also versioned. As a result, S3 will keep both copies in this scenario. In the world of Glacier this doesn’t cost much, but it will distort the bucket’s S3 Inventory. This could lead to confusion when I check them with Athena. And if I can stop this situation with some automation then I might as well.

I’m going to use the Get-S3Object cmdlet to query my bucket for each file. For this to work, I need two things:

  • -BucketName: This is in Variables.ps1.
  • -Key

-Key is the object’s S3 file path. For example, Folder\SubFolder\Music.flac. As the files shouldn’t be in S3 yet, these keys shouldn’t exist. So I’ll have to make them using PowerShell.

I start by getting all the filenames I want to check using Get-ChildItem and [System.IO.Path]::GetFileName:

$LocalSourceObjectFileNames = Get-ChildItem -Path $ExternalLocalSource | ForEach-Object -Process { [System.IO.Path]::GetFileName($_) }

Now I start another ForEach loop. I make an S3 key for each filename by combining it with $ExternalS3KeyPrefix in Variables.ps1:

ForEach ($LocalSourceObjectFileName In $LocalSourceObjectFileNames) 

{
$LocalSourceObjectFileNameS3Key = $ExternalS3KeyPrefix + $LocalSourceObjectFileName 

Then I query S3 using Get-S3Object and my constructed S3 key, and capture the result in a variable:

$LocalSourceObjectFileNameS3Check = Get-S3Object -BucketName $ExternalS3BucketName -Key $LocalSourceObjectFileNameS3Key

Get-S3Object should return null as the object shouldn’t exist.

If this doesn’t happen then the object is already in the bucket. In this situation, PowerShell identifies the file causing the problem and then exits the script:

If ($null -ne $LocalSourceObjectFileNameS3Check) 
{
Write-Output "File already exists in S3 bucket: $LocalSourceObjectFileName.  Please review.  Exiting."
Start-Sleep -Seconds 10
Stop-Transcript
Exit

If the file isn’t found then PowerShell continues to run:

Else 
{
Write-Output "$LocalSourceObjectFileName does not currently exist in S3 bucket."
}

Assuming no files are found at this point, the log will read as follows:

Checking if local files already exist in S3 bucket.
Checking S3 bucket for Artist-Track-ExtendedMix.flac
Artist-Track-ExtendedMix.flac does not currently exist in S3 bucket.
Checking S3 bucket for Artist-Track-OriginalMix.flac
Artist-Track-OriginalMix.flac does not currently exist in S3 bucket.

V2: Uploading Files Instead Of Folders

Now to start uploading to S3!

In Version 2 I’ve altered how this is done. Previously my script’s purpose was to upload a folder to S3 using the PowerShell cmdlet Write-S3Object.

Version 2 now uploads individual files instead. There is a reason for this that I’ll go into shortly.

This means I have to change things around as Write-S3Object now needs different parameters:

  • Instead of telling the -Folder parameter where the local folder is, I now need to tell the -File parameter where each file is located.
  • Instead of telling the -KeyPrefix parameter where to store the uploaded objects in S3, I now need to tell the -Key parameter the full S3 path for each object.

I’ll do -Key first. I start by opening another ForEach loop, and create an S3 key for each file in the same way I did earlier:

$LocalSourceObjectFileNameS3Key = $ExternalS3KeyPrefix + $LocalSourceObjectFileName 

Next is -File. I make the local file path for each file using variables I’ve already created:

$LocalSourceObjectFilepath = $ExternalLocalSource + "\" + $LocalSourceObjectFileName

Then I begin uploads for each file using Write-S3Object with the new -File and -Key parameters instead of -Folder and -KeyPrefix:

Write-Output "Starting S3 Upload Of $LocalSourceObjectFileName"

Write-S3Object -BucketName $ExternalS3BucketName -File $LocalSourceObjectFilepath -Key $LocalSourceObjectFileNameS3Key -StorageClass $ExternalS3StorageClass

The main benefit of this approach is that, if something goes wrong mid-upload, the transcript will tell me which uploads were successful. Version 1’s script would only tell me that uploads had started, so in the event of failure I’d need to check the S3 bucket’s contents.

Speaking of failure, wouldn’t it be good to check that the uploads worked?

V2: Were The Uploads Successful?

For this, I’m still working in the ForEach loop I started for the uploads. After an upload finishes, PowerShell checks if the object is in S3 using the Get-S3Object command I wrote earlier:

Write-Output "Starting S3 Upload Check Of $LocalSourceObjectFileName"
      
$LocalSourceObjectFileNameS3Check = Get-S3Object -BucketName $ExternalS3BucketName -Key $LocalSourceObjectFileNameS3Key

This time I want the object to be found, so null is a bad result.

Next, I get PowerShell to do some heavy lifting for me. I’ve created a pair of new local folders called S3WriteSuccess and S3WriteFail. The paths for these are stored in Variables.ps1.

If my S3 upload check doesn’t find anything and returns null, PowerShell moves the file from the source folder to S3WriteFail using Move-Item:

If ($null -eq $LocalSourceObjectFileNameS3Check) 

{
Write-Output "S3 Upload Check FAIL: $LocalSourceObjectFileName.  Moving to local Fail folder"
Move-Item -Path $LocalSourceObjectFilepath -Destination $ExternalLocalDestinationFail
}

If the object is found, PowerShell moves the file to S3WriteSuccess:

Else 

{
Write-Output "S3 Upload Check Success: $LocalSourceObjectFileName.  Moving to local Success folder"
Move-Item -Path $LocalSourceObjectFilepath -Destination $ExternalLocalDestinationSuccess           
} 

The ForEach loop then repeats with the next file until all are processed.

So now, a failed upload produces the following log:

**********************
Beginning S3 Upload Checks On Following Objects: StephenJKroos-Micrsh-OriginalMix
S3 Upload Check: StephenJKroos-Micrsh-OriginalMix.flac
S3 Upload Check FAIL: StephenJKroos-Micrsh-OriginalMix.  Moving to local Fail folder
**********************
Windows PowerShell transcript end
**********************

While a successful S3 upload produces this one:

**********************
Beginning S3 Upload Checks On Following Objects: StephenJKroos-Micrsh-OriginalMix
S3 Upload Check: StephenJKroos-Micrsh-OriginalMix.flac
S3 Upload Check Success: StephenJKroos-Micrsh-OriginalMix.  Moving to local Success folder
**********************
Windows PowerShell transcript end
**********************

PowerShell then shows a final message before ending the transcript:

Write-Output "All files processed.  Exiting."
Start-Sleep -Seconds 10
Stop-Transcript

V2: Code

gitignore Version 2

###################
###### FILES ######
###################

#Powershell Transcript log
EDMTracksLosslessS3Upload.log

#PowerShell Files Containing Variables
EDMTracksLosslessS3Upload-V0Basic.ps1

#PowerShell Files Containing Variables
EDMTracksLosslessS3Upload-Variables.ps1


#####################
###### FOLDERS ######
#####################

#VSCode Debugging
.vscode/
Version 2.gitignore On GitHub

V2Visibility.ps1

##################################
####### EXTERNAL VARIABLES #######
##################################


#Load External Variables Via Dot Sourcing
. .\EDMTracksLosslessS3Upload-Variables.ps1

#Start Transcript
Start-Transcript -Path $ExternalTranscriptPath -IncludeInvocationHeader


###############################
####### LOCAL VARIABLES #######
###############################


#Get count of items in $ExternalLocalSource
#Get list of filenames in $ExternalLocalSource
$LocalSourceCount = (Get-ChildItem -Path $ExternalLocalSource | Measure-Object).Count

#Get list of extensions in $ExternalLocalSource
$LocalSourceObjectFileExtensions = Get-ChildItem -Path $ExternalLocalSource | ForEach-Object -Process { [System.IO.Path]::GetExtension($_) }

#Get list of filenames in $ExternalLocalSource
$LocalSourceObjectFileNames = Get-ChildItem -Path $ExternalLocalSource | ForEach-Object -Process { [System.IO.Path]::GetFileName($_) }


##########################
####### OPERATIONS #######
##########################


#Check there are files in local folder.
Write-Output "Counting files in local folder."

#If local folder less than 1, output this and stop the script.  
If ($LocalSourceCount -lt 1) 

{
Write-Output "No Local Files Found.  Exiting."
Start-Sleep -Seconds 10
Stop-Transcript
Exit
}

#If files are found, output the count and continue.
Else 

{
Write-Output "$LocalSourceCount Local Files Found"          
}


#Check extensions are valid for each file.
Write-Output " "
Write-Output "Checking extensions are valid for each local file."

ForEach ($LocalSourceObjectFileExtension In $LocalSourceObjectFileExtensions) 

{
#If any extension is unacceptable, output this and stop the script. 
If ($LocalSourceObjectFileExtension -NotIn ".flac", ".wav", ".aif", ".aiff") 

{
Write-Output "Unacceptable $LocalSourceObjectFileExtension file found.  Exiting."
Start-Sleep -Seconds 10
Stop-Transcript
Exit
}

#If extension is fine, output the extension for each file and continue.
Else 
{
Write-Output "Acceptable $LocalSourceObjectFileExtension file."
}
}


#Check if local files already exist in S3 bucket.
Write-Output " "
Write-Output "Checking if local files already exist in S3 bucket."

#Do following actions for each file in local folder
ForEach ($LocalSourceObjectFileName In $LocalSourceObjectFileNames) 

{
#Create S3 object key using $ExternalS3KeyPrefix and current object's filename
$LocalSourceObjectFileNameS3Key = $ExternalS3KeyPrefix + $LocalSourceObjectFileName 

#Create local filepath for each object for the file move
$LocalSourceObjectFilepath = $ExternalLocalSource + "\" + $LocalSourceObjectFileName

#Output that S3 upload check is starting
Write-Output "Checking S3 bucket for $LocalSourceObjectFileName"
      
#Attempt to get S3 object data using $LocalSourceObjectFileNameS3Key
$LocalSourceObjectFileNameS3Check = Get-S3Object -BucketName $ExternalS3BucketName -Key $LocalSourceObjectFileNameS3Key

#If local file found in S3, output this and stop the script.
If ($null -ne $LocalSourceObjectFileNameS3Check) 

{
Write-Output "File already exists in S3 bucket: $LocalSourceObjectFileName.  Please review.  Exiting."
Start-Sleep -Seconds 10
Stop-Transcript
Exit
}

#If local file not found in S3, report this and continue.
Else 
{
Write-Output "$LocalSourceObjectFileName does not currently exist in S3 bucket."
}
}


#Output that S3 uploads are starting - count and file names
Write-Output " "
Write-Output "Starting S3 Upload Of $LocalSourceCount Local Files."
Write-Output "These files are as follows: $LocalSourceObjectFileNames"
Write-Output " "


#Do following actions for each file in local folder
ForEach ($LocalSourceObjectFileName In $LocalSourceObjectFileNames) 

{
#Create S3 object key using $ExternalS3KeyPrefix and current object's filename
$LocalSourceObjectFileNameS3Key = $ExternalS3KeyPrefix + $LocalSourceObjectFileName 

#Create local filepath for each object for the file move
$LocalSourceObjectFilepath = $ExternalLocalSource + "\" + $LocalSourceObjectFileName

#Output that S3 upload is starting
Write-Output "Starting S3 Upload Of $LocalSourceObjectFileName"

#Write object to S3 bucket
Write-S3Object -BucketName $ExternalS3BucketName -File $LocalSourceObjectFilepath -Key $LocalSourceObjectFileNameS3Key -StorageClass $ExternalS3StorageClass

#Output that S3 upload check is starting
Write-Output "Starting S3 Upload Check Of $LocalSourceObjectFileName"
      
#Attempt to get S3 object data using $LocalSourceObjectFileNameS3Key
$LocalSourceObjectFileNameS3Check = Get-S3Object -BucketName $ExternalS3BucketName -Key $LocalSourceObjectFileNameS3Key

#If $LocalSourceObjectFileNameS3Key doesn't exist in S3, move to local Fail folder.
If ($null -eq $LocalSourceObjectFileNameS3Check) 

{
Write-Output "S3 Upload Check FAIL: $LocalSourceObjectFileName.  Moving to local Fail folder"
Move-Item -Path $LocalSourceObjectFilepath -Destination $ExternalLocalDestinationFail
}

#If $LocalSourceObjectFileNameS3Key does exist in S3, move to local Success folder.
Else 
{
Write-Output "S3 Upload Check Success: $LocalSourceObjectFileName.  Moving to local Success folder"
Move-Item -Path $LocalSourceObjectFilepath -Destination $ExternalLocalDestinationSuccess           
}
}


#Stop Transcript
Write-Output " "
Write-Output "All files processed.  Exiting."
Start-Sleep -Seconds 10
Stop-Transcript
V2Visibility.ps1 On GitHub

VariablesBlank.ps1 Version 2

##################################
####### EXTERNAL VARIABLES #######
##################################

#The local file path for the transcript file
#E.g. "C:\Users\Files\"
$ExternalTranscriptPath =

#The local file path for objects to upload to S3
#E.g. "C:\Users\Files\"
$ExternalLocalSource =

#The S3 bucket to upload objects to
#E.g. "my-s3-bucket"
$ExternalS3BucketName =

#The S3 bucket prefix / folder to upload  objects to (if applicable)
#E.g. "Folder\SubFolder\"
$ExternalS3KeyPrefix =

#The S3 Storage Class to upload to
#E.g. "GLACIER"
$ExternalS3StorageClass =

#The local file path for moving successful S3 uploads to
#E.g. "C:\Users\Files\"
$ExternalLocalDestinationSuccess =

#The local file path for moving failed S3 uploads to
#E.g. "C:\Users\Files\"
$ExternalLocalDestinationFail =
Version 2 VariablesBlank.ps1 On GitHub

V2: Evaluation

Overall I’m very happy with how this all turned out! Version 2 took a script that worked with some supervision, and turned it into something I can set and forget.

The various checks now have my back if I select the wrong files or if my connection breaks. And, while the Get-S3Object checks mean that I’m making more S3 API calls, the increase won’t cause any bill spikes.

The following is a typical transcript that my script produces following a successful upload of two .flac files:

**********************
Transcript started, output file is C:\Users\Files\EDMTracksLosslessS3Upload.log
Counting files in local folder.
2 Local Files Found

Checking extensions are valid for each local file.
Acceptable .flac file.

Checking if local files already exist in S3 bucket.
Checking S3 bucket for MarkOtten-Tranquility-OriginalMix.flac
MarkOtten-Tranquility-OriginalMix.flac does not currently exist in S3 bucket.
Checking S3 bucket for StephenJKroos-Micrsh-OriginalMix.flac
StephenJKroos-Micrsh-OriginalMix.flac does not currently exist in S3 bucket.

Starting S3 Upload Of 2 Local Files.
These files are as follows: MarkOtten-Tranquility-OriginalMix StephenJKroos-Micrsh-OriginalMix.flac

Starting S3 Upload Of MarkOtten-Tranquility-OriginalMix.flac
Starting S3 Upload Check Of MarkOtten-Tranquility-OriginalMix.flac
S3 Upload Check Success: MarkOtten-Tranquility-OriginalMix.flac.  Moving to local Success folder
Starting S3 Upload Of StephenJKroos-Micrsh-OriginalMix.flac
Starting S3 Upload Check Of StephenJKroos-Micrsh-OriginalMix.flac
S3 Upload Check Success: StephenJKroos-Micrsh-OriginalMix.flac.  Moving to local Success folder

All files processed.  Exiting.
**********************
Windows PowerShell transcript end
End time: 20220617153926
**********************

GitHub ReadMe

To round everything off, I’ve written a ReadMe for the repo. This is written in Markdown using the template at makeareadme.com, and the finished article is available here.

Summary

In this post, I created a script to upload lossless music files from my laptop to one of my Amazon S3 buckets using PowerShell.

I introduced automation to perform checks before and after each upload, and logged the outputs to a transcript. I then produced a repo for the scripts, accompanied by a ReadMe document.

If this post has been useful, please feel free to follow me on the following platforms for future updates:

Thanks for reading ~~^~~