Categories
Architecture & Resilience

Event-Based Cost Control In AWS Glue: Architecture

In this post, I examine some unexpected AWS Glue costs and design an event-based cost control process architecture.

Table of Contents

Introduction

Last month, I finished a series of data pipeline posts using, among other services, AWS Glue. During this series I made many discoveries – some more desirable than others. One such undesirable was a cost spike in early June! Not enough to trigger a budget alarm, but still higher than expected at that time.

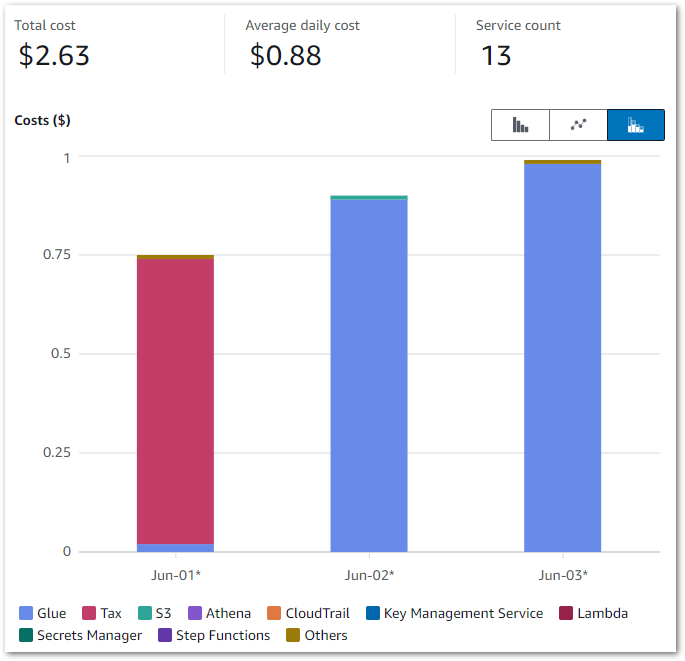
To Cost Explorer! These were the results:
2024 06 24 AWSCostsStartJune

Those Glue costs were…unexpected. While this doesn’t look like much, in contrast my entire May 2024 bill was $1.08. So June saw an almost 150% cost increase over just three days!

This post has two sections. Firstly, the Discovery section examines the costs in closer detail and considers potential solutions. Secondly, the Architecture section examines the decisions made for and the technical implementation of the chosen solution.

Discovery

This section examines the costs in closer detail and considers potential solutions. I’ll structure the cost analysis using three questions:

  • How are the costs made up?
  • What specifically is generating the costs?
  • Why are the costs being generated?

The How

Question 1: How are the costs made up?

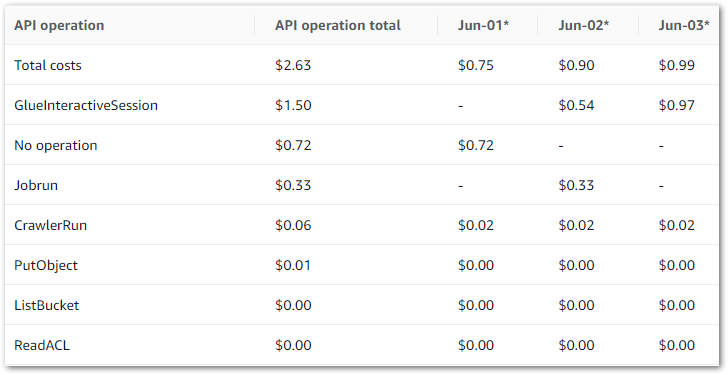
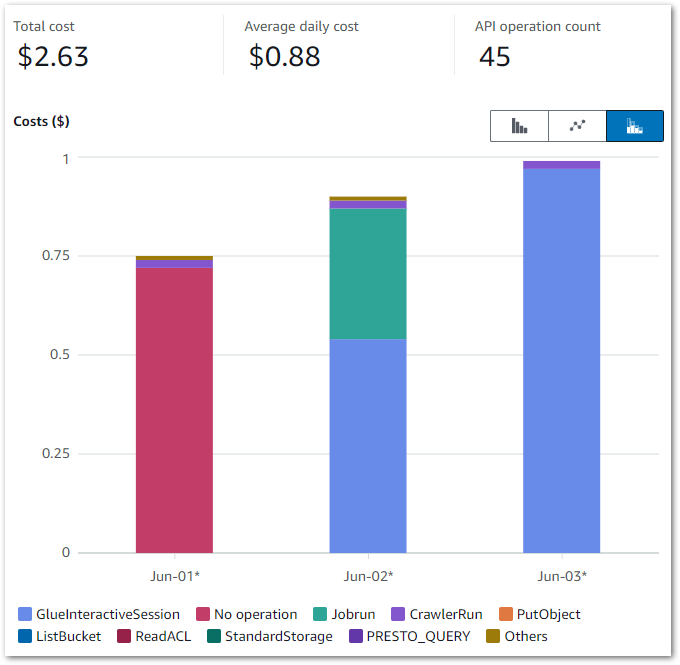
Firstly, let’s break down the costs. The earlier chart shows that Glue is the main cost driver – I now want to drill down into the API-level costs. I can do this by changing the chart’s dimension to API Operation.

This updates it to:
2024 06 24 AWSCostsStartJuneDimAPI

And the raw data to:

2024 06 24 AWSCostsStartJuneTable

The main costs here are all Glue APIs, with the top two being:

  • GlueInteractiveSession
  • Jobrun

No operation is tax – Ed

Jobrun was easy to account for, as I was testing some Glue ETL jobs at the time. But I was unfamiliar with GlueInteractiveSession, and as it was the biggest cost driver it became the focus of my ongoing investigation.

The What

Question 2: What specifically is generating the costs?

So what is the GlueInteractiveSession API? What does it do? And how does it accrue costs? Let’s begin with the AWS User Guide definition:

The interactive sessions API describes the AWS Glue API related to using AWS Glue interactive sessions to build and test extract, transform, and load (ETL) scripts for data integration.

https://docs.aws.amazon.com/glue/latest/dg/aws-glue-api-interactive-sessions.html

AWS Glue Interactive Sessions offer serverless, on-demand Apache Spark environments that work seamlessly with Glue ETL jobs. These sessions allow for the live development, testing, and enhancement of data processing steps and ETL tasks. They can easily connect to data from various AWS services such as S3, DynamoDB, and Redshift.

Interactive Sessions let users preview data without running full ETL jobs. This offers several benefits during development and testing:

  • Data modifications are only temporary during an Interactive Session, protecting the original data from undesired and unintended changes.
  • Jobs can be evaluated step by step rather than after each complete run, allowing for quicker development and testing compared to always executing the full job. And because of this…
  • When testing ETL steps, interactive sessions usually use fewer resources than a Glue job, thus reducing costs.

Speaking of costs, Glue Interactive Sessions billing is similar to Glue ETL Job billing and is based on the following factors:

  1. Duration: How long the session runs, measured in seconds.
  2. Resource Usage: The resources consumed during the session, such as CPU, memory, and storage.

This all sounds good. So why is my bill so high?

The Why

Question 3: Why are the costs being generated?

So I now know that:

  • The GlueInteractiveSession API is the main cost driver.
  • My Glue Interactive Sessions are linked to my AWS Glue ETL Jobs.

Let’s now examine why the GlueInteractiveSession API is suddenly generating higher costs.

The How chart shows that GlueInteractiveSession costs can happen irrespective of Jobrun costs. Indeed – on June 03 there were no Jobrun costs. So running Glue ETL jobs isn’t causing these charges.

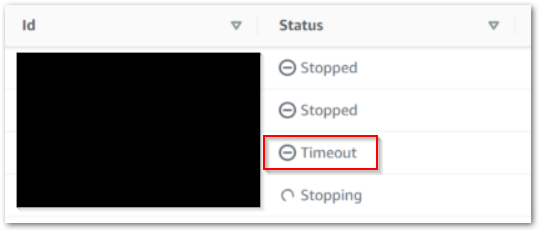
Helpfully, the AWS Glue console has a dedicated Interactive Sessions section that shows session instance histories. Upon inspection, I found lots of this:
2024 12 08 GlueSessionTImeout

So, timeouts. Timeouts are good. They stop Interactive Sessions from running indefinitely, and sessions started from the Glue console automatically get a 30-minute timeout.

What was more concerning was the number of timeouts I found: three on June 02 and six on June 03. That’s nine sessions, each of which timing out after 30 minutes. That’s four and a half hours of unused compute I’m being billed for! How are these timeouts happening?

…About that. I often open multiple browser tabs to compare screens quickly when I’m trying things out. Here, each new Glue ETL Job browser tab starts a new interactive session based on my commands, and I forget to close these sessions afterwards. Oops!

Solutions

So now I know the cost’s root cause is my own ineptitude, how do I fix this? There are several options:

Permission Blocking: I could deny CreateSession requests using IAM and SCPs. This solution works for non-data-facing AWS accounts but creates unreasonable barriers for Glue-based console workstreams elsewhere.

Parameter Adjustment: The CreateSession API has an IdleTimeout parameter that controls the number of minutes when idle before the session times out. Although this can be easily configured through the CLI or SDK, I haven’t found a way to adjust it in the console yet.

Local Sessions: AWS maintains a Glue Labs Docker image intended for local AWS Glue job script development and testing. This would replace the cloud-based Interactive Sessions entirely and is arguably the best solution for data teams and at scale. The main reason I’m not using it here is that I’m the only user of this particular AWS account.

Event-Based Automation: All Interactive Sessions are stopped using the StopSession API regardless of reason. This includes the timeout process. An automated mechanism that invokes this API after a set period would effectively emulate a timeout. Additionally, since I oversee this process, I’m able to swiftly adjust the duration as needed.

And so I finally have a user story:

As an AWS account owner, I want Glue interactive sessions to stop automatically after a chosen duration so that I don’t accidentally generate unexpected and avoidable costs.

Finally, there is one further topic I want to address…

Event-Based Vs Event-Driven

Let’s examine the difference between event-based and event-driven. Mainly because I thought this was an event-driven process for months until I did some digging.

Now, I’m no expert on this. However, James Eastham is. Go watch this. It’s only six minutes – I’ll wait.

Ok good. For those who are time-strapped or want the highlights:

  • Event-based systems are technical events. Represented in a data context as API calls like ObjectCreated and CrawlerStarted.
  • Event-driven systems are business events. Represented in a data context as processes like Refresh Started and Sales Data Ingested.

My Glue Cost Control system is event-based because it is governed entirely by AWS events and API calls: StartSession will trigger some AWS automation that ultimately invokes StopSession.

So what does that automation look like? Well…

Architecture

This section examines the decision-making and technical implementation of my AWS Glue event-based cost control architecture. In my investigations, I discovered that AWS is way ahead of me!

Existing AWS Solution

The AWS Big Data blog has a 2023 post about enforcing boundaries on AWS Glue interactive sessions using this architecture:
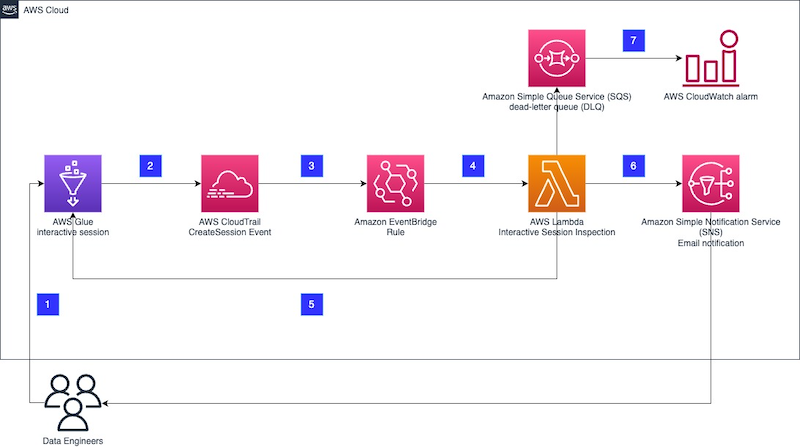
The whole process is listed here, and the post’s code is in a GitHub repo. In summary:

  • The Glue Interactive Session creates a CloudTrail Event Record.
  • An EventBridge Rule captures the event and invokes a Lambda function.
  • The Lambda function inspects the event and acts depending on set boundaries.
  • SNS handles user notifications.
  • SQS and CloudWatch handle errors.

I’m using this architecture as a basis for my event-based Glue cost control process with some changes.

Architectural Decisions

This section outlines my adjustments to the AWS architecture to better align with my event-based Glue cost control process.

Replace Lambda With Step Functions

The AWS solution uses a Lambda function for event inspection and API interaction. This function has lots going on. But my needs are far simpler and fall well within the remit of a Step Functions workflow.

Many AWS heavyweights evangelize Step Functions over Lambda. Most recently, Eric Johnson dedicated a slide of his 2024 re:Invent session to this mantra:

“Step Functions first,
Step Functions always.”

For this use case, I’m inclined to agree. Step Functions offers several advantages over Lambda here:

Service Integration: Lambda’s interactivity with other AWS services requires manual code (e.g. a Python boto3 client). Step Functions offer no-code AWS service integrations that interact directly with AWS APIs. So my Step Function will be faster to develop.

Error Handling: Lambda relies on the function code for error handling and retries. In contrast, Step Functions offer configurable built-in no-code error handling and retry mechanisms, making my Step Function more resilient.

Ongoing Maintenance: While AWS manages the Lambda service, the function code still needs runtime maintenance, security patching and general refactoring as it ages. Conversely, Step Functions use static JSON and YAML-based ASL, so my Step Function will require less ongoing maintenance.

Step Function Model

There are two Step Function models: Standard Workflows and Express Workflows. I’ll be using a Standard workflow here. Two factors drive this decision:

API Behaviour: Changing a Glue Interactive Session is not an idempotent action. Requesting a change to a session in an invalid state produces an IllegalSessionState exception. For example, the below error is thrown when trying to stop a Glue job that hasn’t yet been fully provisioned:

JSON
{
  "cause": "Session is in PROVISIONING status (Service: Glue, Status Code: 400, Request ID: null)",
  "error": "Glue.IllegalSessionStateException",
  "resource": "stopSession",
  "resourceType": "aws-sdk:glue"
}

Express Workflows utilize an at-least-once model, meaning an execution might run multiple times. Sending several requests that are very likely to fail will create confusion and waste resources. In contrast, Standard Workflows adhere to an exactly-once model with optional retries, significantly reducing the likelihood of these problems.

And speaking of resource use…

Cost: Express Workflow executions are charged according to how often they run, the duration of each run and the memory consumed during the process. Standard Workflow executions are billed based on the number of state transitions and feature a generous and indefinite free tier.

Standard Workflows are a better option here because my workflow requires waiting. While Express Workflows may not be too costly, I’d still be paying for the wait. And remember – the whole point is to reduce avoidable costs! Conversely, Standard Workflows would stay entirely within the free tier at the expected volumes.

Remove The SQS Queue

I’ve removed the SQS queue simply because I don’t need it here. It was originally intended to record events that triggered a Lambda function failure. However, the Step Function workflow’s inbuilt auditing will now capture this.

Considering the Frugal Architect Mindset and AWS Well-Architected Framework‘s Cost Optimization Pillar, the SQS queue’s financial and development costs are no longer justified. This cements its removal.

Architecture Diagram

This is my event-based Glue Cost Control process architecture diagram:

In this solution:

  1. User interacts with a Glue ETL Job and creates an Interactive Session.
  2. Glue CreateSession event is created.
  3. Glue CreateSession event creates a CloudTrail event record.
  4. EventBridge matches the event record to an event rule.
  5. Eventbridge extracts the event’s SessionID and passes it to the Step Functions workflow, which waits for the set duration.
  6. Workflow passes SessionID to the Glue StopSession API. This action retries twice if it is unsuccessful.
  7. Finally, Workflow triggers an SNS email confirming the session’s stop.

Additionally, several services send logs to CloudWatch and gain permissions using IAM. If the Step Function fails, a CloudWatch alarm triggers a user email.

Summary

In this post, I examined some unexpected AWS Glue costs and designed an event-based cost control process architecture.

Once I understood the problem clearly, I iterated on an existing AWS architecture to build my bespoke event-based process. My architecture diagram shows how the key components work together and provides a clear implementation roadmap. In the next post I’ll start the build!

If you found this post helpful, the button below will take you to my contact details, socials, projects, and sessions.

SharkLinkButton 1

Thanks for reading ~~^~~

Categories
Architecture & Resilience

amazonwebshark’s Abandoned 2019 AWS Architecture

In this post, I respond to January 2024’s T-SQL Tuesday #170 Invitation by examining amazonwebshark’s abandoned 2019 AWS architecture.

tsql tuesday

Table of Contents

Introduction

amazonwebshark is two years old today!

One of a kind 500

I wrote an analysis post last year, and when deciding on the second birthday’s topic I saw this month’s T-SQL Tuesday invitation from Reitse Eskens:

“What projects did you abandon but learn a lot from?”

One immediately sprang to mind! Since this T-SQL Tuesday falls on amazonwebshark’s second birthday, it seemed a good time to evaluate it.

Rewind to 2019. I was new to AWS and was studying towards their Certified Cloud Practitioner certification. To that end, I set up an AWS account and tried several tutorials including an S3 static website.

After earning the certification, I kept the site going to continue my learning journey. I made the site into a blog and chose a snappy (Groan – Ed) name…amazonwebshark. In fact, that site is still around!

I’ll start by looking at the site architecture, then examine what went wrong and end with how it influenced the current amazonwebshark site. For the rest of this post, I’ll refer to amazonwebshark 2019 as awshark2019 and the current version as awshark2021.

How awshark2019 Was Built

In this section, I examine the architecture behind awshark2019.

Hugo Static Site Generator

Hugo is an open-source static site generator written in the Go programming language. Go is known for its efficiency and performance, making Hugo’s build process very fast.

Hugo’s content files are written in Markdown which enables easy post creation and formatting. These Markdown posts are then converted to static HTML files at build time. The built site has a file system structure and can be deployed to platforms like traditional web servers, content delivery networks (CDNs), and cloud storage services.

Speaking of which…

S3 Static Site

awshark2019 has been operating out of a public S3 bucket since its creation:

2024 01 04 S3WebsiteBucketOverview

This won’t be a particularly technical section, as the AWS documentation and tutorial are already great resources for this S3 feature. So let’s talk about the benefits of static sites instead:

  • Since static websites consist of pre-built HTML, CSS, and JavaScript files, they load quickly and can scale rapidly.
  • Static websites are inherently more secure and maintainable because there’s no server-side code execution, database vulnerabilities or plugin updates.
  • All site processing is done before deployment, so the only ongoing cost is for storage. awshark2019 weighs in at around 4MB, so in the four years it has been live this has been essentially free.

So far this all sounds good. What went wrong?

Why awshark2019 Failed

In this section, I examine awshark2019’s problems. Why was the 2019 architecture abandoned?

Unclear Objectives

Firstly, awshark2019 had no clear purpose.

In my experience, good blogs have their purpose nailed down. It could be automation, data, biscuits…anything as long as it becomes consistent and plays to the creator’s strengths.

With awshark2019, some posts are about S3 Static Sites and Billing Alerts. These are good topics to explore. However, almost half of the posts are about creating the site and are in a web design category. But the blog isn’t about web design, and I’ve never been a web designer!

Rounding things off, the About page is…the Hugo default. So who is the site for? If I, as the blog creator, don’t know that then what chance does anyone else have?

Poor Content

Secondly, as awshark2019’s objectives were unclear the content was…not very good. The topic choices are disjointed, some of the posts are accidental documentation rehashes and ultimately there’s little value.

Let’s take the example of Adding An Elastic IP To An Amazon Linux EC2 Instance. The post explores the basics, shows the AWS console changes and mentions costs. This is fine, but there’s not much else here. If I wrote this post today, I’d define a proper use case and explore the problem more by pinging the instance’s IP before and after a stoppage. This shows the problem instead of telling it.

Another post examines Setting Up A Second AWS Account With AWS Organizations. There’s more here than the IP address post, but there’s no context. What am I doing with the second account? Why does my use case support the use of AWS Organisations? What problems is it helping me solve?

There’s nothing in these posts that I can’t get from the AWS documentation and no new insights for readers.

Awkward To Publish

Finally, awshark2019 was too complex to publish. More accurately, Hugo’s deployment process wasn’t the problem. The way I was doing it was.

Hugo sites can be deployed in several ways. These centre around putting files and folders in a location accessible by the deployment service. So far so good.

But instead of automating this process, I had a horrible manual workflow of creating and testing the site locally, and then manually overwriting the existing S3 objects. This quickly got so tedious that I eventually ran out of enthusiasm.

What I Learned

In this section, I examine what I learned from the abandoned 2019 architecture when creating awshark2021.

Decide On Scope

My first key awshark2021 decision was the blog’s purpose.

While ‘Welcome To My Blog’ posts are something of a cliche, I took the time to write Introducing amazonwebshark as a standard to hold myself to:

By writing about my experiences I can check and confirm my understanding of new topics, give myself points of reference for future projects and exam revision, evidence my development where necessary and help myself out in the moments when my imposter syndrome sees an opportunity to strike.

Introducting amazonwebshark: What Is amazonwebshark For?

awshark2021 took as much admin away as possible, letting me explore topics and my curiosity instead. amazonwebshark was, and is, a place for me to:

  • Try things
  • Make mistakes
  • Improve myself
  • Be creative

While this is firstly a technology and cloud computing blog, I allow myself some freedom (for example the Me category) as long as the outcome is potentially useful. To this end, I’ve also written about life goals, problem-solving and public speaking.

Add Value

Secondly, let’s examine the posts themselves.

I probably average about eight hours of writing per post. I want to get the most out of that time investment, so I try to ensure my posts add value to their subject matter. There’s no set process for this, as value can take many forms like:

  • Examining how I apply services to my situation or use case.
  • Raising awareness of topics with low coverage.
  • Detailing surprising or unexpected event handling.

My attitude has always been that I’m not here to tell people how and why to do things. I’m here to tell people how and why I did things. Through this process, I can potentially help others in the technology community while also helping myself.

Post introspection and feedback have led to improvements in my working practises like:

It could be argued that amazonwebshark is a big ongoing peer review. It’s made me a better engineer and has hopefully helped others out too.

Keep It Simple

Finally, let’s discuss architecture.

awshark2021 is a WordPress blog, currently hosted on Hostinger servers. While this architecture isn’t free and has tradeoffs, it offers a fast, reliable deployment path managed by organisations specialising in this field.

This is exactly what I wanted for awshark2021:

…my main focus was to get the ball rolling and get something online. I’ve wanted to start a blog for some time, but have run into problems like knowledge gaps, time pressures and running out of enthusiasm.

Introducing amazonwebshark: Why Didn’t You Use AWS For Hosting?

I enjoy writing, so my priority is there. If I begin seriously considering a serverless amazonwebshark, one of the core tests will be the deployment process. For now, the managed services I’m paying for meet my needs and let me focus on creativity over admin.

Summary

In this post, I responded to January 2024’s T-SQL Tuesday #170 Invitation by examining amazonwebshark’s abandoned 2019 AWS architecture.

It’s unfair to blame the architecture. Rather, my implementation of it was at fault. awshark2019 was a good idea but suffered from poor and over-ambitious architectural decisions. I’ve considered deleting it. But if nothing else it reminds me of a few things:

  • I won’t always get it right first time.
  • It doesn’t have to be perfect.
  • Enjoy the process.

awshark2019’s lessons have allowed awshark2021 to reach two years. Happy birthday!

If this post has been useful, the button below has links for contact, socials, projects and sessions:

SharkLinkButton 1

Thanks for reading ~~^~~

Categories
Architecture & Resilience

Automating Application Management With Winget

In this post, I try automating my laptop’s application management with the Windows Package Manager tool Winget.

Table of Contents

Introduction

After much frustration with my laptop’s performance, I finally booked it in for upgrades to an SSD hard drive and 16GB RAM. It’s now very responsive and far faster!

The shop originally planned to clone my existing HDD drive onto the new SSD. Unfortunately, the clone kept failing due to some bad sectors. Fortunately, this didn’t present a risk of data loss – most of my files are in OneDrive, and everything else is either in Amazon S3 or on external drives.

The failing clone meant that none of my previously installed programs and packages were on the new drive. I wasn’t flying blind here though, as I regularly use the free Belarc Advisor tool to create a list of installed programs.

But this is a heavily manual process, and the Belarc Advisor files contain a lot of unnecessary data that isn’t easy to use. So I found myself looking for an alternative!

User Story

In this section, I outline the problem I want to solve.

I want to capture a list of all applications installed on a given Windows device so that I can audit my device and have a better disaster recovery strategy.

ACCEPTANCE CRITERIA:

The process must be fully automated. I don’t want another job to do – I want the device to own this process.

The process must be efficient. Belarc Advisor gets the job done, but it takes time to load and does a bunch of other stuff that I don’t need.

There is no budget. Belarc Advisor isn’t ideal, but it’s free. I don’t want to start spending money on this problem now.

Introducing Winget

This section explains what Winget is and examines some of the features and benefits it offers.

What Is Winget?

Winget is a Windows Package Manager that helps install, upgrade, configure and delete applications on Windows 10 and Windows 11.

Package Managers look through configured repositories like the Windows Package Manager Community Repository for applications. If the application is available, it will be downloaded from the repository and installed onto the device.

Microsoft has open-sourced Winget, and has committed it to their GitHub account. After installation, Winget is accessible via the Windows Terminal, PowerShell, and the Command Prompt.

Package Manager Benefits

Package Managers like Winget offer several benefits over traditional methods:

  • Applications are installed as CLI commands, so there is no need to navigate to different websites or go through multiple installation steps.
  • Their repositories enforce a strict submission policy and use standardized package formats, so applications are installed consistently and reliably.
  • They manage application dependencies. If a desired application needs another application to work, the package manager will automatically install that application as well.
  • They lend themselves well to CI/CD pipelines, IAC and disaster recovery, as package manager commands can be used in scripts and automated processes.
  • Community tools like winstall exist that can create batch-installation Winget commands and scripts using a web GUI.

Winget Commands

Winget regularly receives new commands, a list of which is maintained by Microsoft. These commands can be loosely grouped into:

For this post, I will be focusing on the last group.

winget list displays a list of installed applications. The list includes the current version and the package’s source, and has several filtration options.

The winget list syntax is:

winget list [[-q] \<query>] [\<options>]

winget export creates and exports a JSON file of apps to a specified path.

This JSON file can combine with the winget import command to allow the batch-installing of applications and the creation of build environments.

winget export‘s JSON files do not include applications that are unavailable in the Windows Package Manager Community Repository. In these cases, the export command will show a warning.

The winget export syntax is:

winget export [-o] <output> [<options>]

Winget Scripting With VSCode

In this section, I write a script that will run the Winget commands.

I’m writing the script using Visual Studio Code, as this allows me to write the Winget script in the same way as other PowerShell scripts I’ve written.

Unique Filename

Firstly, I want to give each file a unique filename to make sure nothing is overwritten. A good way to do that here is by capturing Get-Date‘s output formatted as the ISO 8601 standard:

$RunDate = Get-Date -Format 'yyyy-MM-dd-HHmm'

This returns a string with an appropriate level of granularity, as I’m not going to be running this script multiple times a minute:

2023-04-26-1345

Winget Export Code

Next, I’ll script my export command.

I need to tell Winget where to create the file, and what to call it. I create a new folder for the exports and capture its path in a $ExportsFilePath variable.

Then I create a $ExportsFileName variable for the first part of the export file’s name. It uses a WingetExport string and the device’s name, which PowerShell can access using $env:computername:

$ExportsFileName = 'WingetExport' + '-' + $env:computername + '-'

Including the computer’s name means I can run this script on different devices and know which export files belong to which device:

WingetExport-LAPTOP-IFIJ32T-

My third $ExportsOutput variable joins everything together to produce an acceptable string for winget export‘s output argument:

$ExportsOutput = $ExportsFilePath + '\' + $ExportsFileName  + $RunDate + '.json'

An example of which is:

C:\{PATH}\WingetExport-LAPTOP-IFIJ32T-2023-04-26-1345.json

Finally, I can script the full command. This command creates an export file at the desired location and includes application version numbers for accuracy and auditing:

winget export --output $ExportsOutput --include-versions

Here are some sample exports:

{
  "$schema": "https://aka.ms/winget-packages.schema.2.0.json",
  "CreationDate": "2023-04-27T11:02:04.321-00:00",
  "Sources": [
    {
      "Packages": [
        {
          "PackageIdentifier": "Git.Git",
          "Version": "2.40.0"
        },
        {
          "PackageIdentifier": "Anki.Anki",
          "Version": "2.1.61"
        },
        {
          "PackageIdentifier": "Microsoft.PowerToys",
          "Version": "0.69.1"
        }
      ],
      "SourceDetails": {
        "Argument": "https://cdn.winget.microsoft.com/cache",
        "Identifier": "Microsoft.Winget.Source_8wekyb3d8bbwe",
        "Name": "winget",
        "Type": "Microsoft.PreIndexed.Package"
      }
    }
  ],
  "WinGetVersion": "1.4.10173"
}

As a reminder, these exports don’t include applications that are unavailable in Winget. This means winget export alone doesn’t meet the user story requirements, so there is still work to do!

Winget List Code

Finally, I’ll script my list command. This is mostly similar to the export command and I create the file path in the same way:

$ListsOutput = $ListsFilePath + '\' + $ListsFileName + $RunDate + '.txt'

The filename is changed for accuracy, and the suffix is now TXT as no JSON is produced:

WingetList-LAPTOP-IFIJ32T-2023-04-25-2230.txt

Now, while winget list shows all applications on the device, it has no argument to save this list anywhere. For that, I need to pipe the winget list output to a PowerShell command that does create files – Out-File:

winget list | Out-File -FilePath $ListsOutput

Out-File writes the list to the $ListsOutput path, producing rows like these:

Name Id Version Available Source
Anki Anki.Anki 2.1.61 winget
Audacity 2.4.2 Audacity.Audacity 2.4.2 3.2.4 winget
DBeaver 23.0.2 dbeaver.dbeaver 23.0.2 winget
S3 Browser version 10.8.1 S3 Browser_is1 10.8.1

The entire script takes around 10 seconds to run in an open PowerShell session and produces no CPU spikes or memory load. The script is on my GitHub with redacted file paths.

Automation With Task Scheduler

In this section, I put Task Scheduler in charge of automating my application management Winget script.

What Is The Task Scheduler?

Task Scheduler began life on Windows 95 and is still used today by applications including Dropbox, Edge and OneDrive. Parts of it aren’t great. The Send Email and Display Message features are deprecated, and monitoring and error handling relies on creating additional tasks that are triggered by failure events.

However, it’s handy for running local scripts and has no dependencies as it’s built into Windows. It supports a variety of use cases which can be scripted or created in the GUI. Existing tasks are exportable as XML.

Creating A New Task

There is plentiful documentation for the Task Scheduler. The Microsoft Learn developer resources cover every inch of it, and these Windows Central and Windows Reports guides are great resources with extensive coverage.

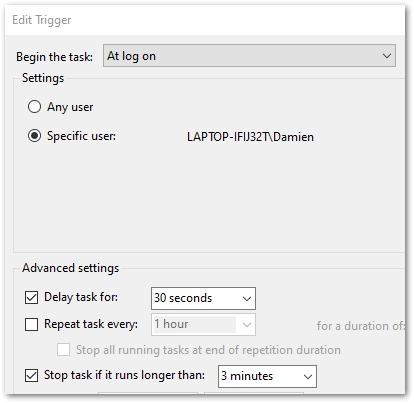
In my case, I create a new ApplicationInventory task, set to trigger every time I log on to Windows:

2023 04 25 TaskSchedulerTrigger

The task starts powershell.exe, passing an argument of -file "C:\{PATH}\ApplicationInventory.ps1".

This works, but will force a PowerShell window to open every time the schedule runs. This can be stopped by configuring the task to Run whether user is logged on or not. Yup – it feels a bit hacky. But it works!

I now have a new scheduled task:

2023 04 25 TaskSchedulerNewTask

Testing

An important part of automating my application management with Winget is making sure everything works! In this section, I check the script and automation processes are working as expected.

I’ll start with the task automation. Task Scheduler has a History tab, which filters events from Event Viewer. Upon checking this tab, I can see the chain of events marking a successful execution:

2023 04 25 TaskSchedulerHistory

When I check the WingetExport folder, it contains an export file created on 25/04/2023 at 22:30:

2023 04 25 AppInventoryExports

And there are similar findings in the WingetList folder:

2023 04 25 AppInventoryLists

Both files open successfully and contain the expected data. Success!

Summary

In this post, I try automating my laptop’s application management with the Windows Package Manager tool Winget.

If this post has been useful, please feel free to follow me on the following platforms for future updates:

Thanks for reading ~~^~~