Categories
Developing & Application Integration

Low-Code S3 Key Validation With AWS Step Functions & JSONata

In this post, I use JSONata to add low-code S3 object key validation to an AWS Step Functions state machine.

Table of Contents

Introduction

In 2024, I worked a lot with AWS Step Functions. I built several for different tasks, wrote multiple blog posts about them and talked about them a fair bit. So when AWS introduced JSONata support for Step Functions last year, I was very interested. Although I had no prior JSONata experience, I heard positive feedback and made a mental note to explore its use cases.

Well, there’s no time like the present! And as I was starting to create the first Project Wolfie resources I realised some of my requirements were a perfect fit.

Firstly, I will examine what JSONata is, how it works and why it’s useful. Next, I will outline my architecture and create some low-code S3 key validation JSONata expressions. Finally, I’ll test these expressions and review their outputs.

JSONata & AWS

This section introduces JSONata and examines its syntax and benefits.

Introducing JSONata

JSONata is a lightweight query and transformation language for JSON, developed by Andrew Coleman in 2016. Specifically inspired by XPath and SQL, it enables sophisticated queries using a compact and intuitive notation.

JSONata provides built-in operators and functions for efficiently extracting and transforming data into any JSON structure. It also supports user-defined functions, allowing for advanced expressions that enhance the querying of dynamic JSON data.

For a visual introduction, check out this JSONata overview:

JSONata Syntax Essentials

JSONata has a simple and expressive syntax. Its path-based approach lets developers easily navigate nested structures. It combines functional programming with dot notation for navigation, brackets for filtering and pipeline operators for chaining.

JSONata operations include transformations like:

  • Arithmetic ($price * 1.2)
  • Conditional Logic ($price > 100 ? 'expensive' : 'affordable').
  • Filtering ($orders[status = 'shipped'])
  • String Operations ($firstName & ' ' & $lastName)

The JSONata site includes full documentation and a JSONata Exerciser for experimenting.

JSONata In AWS Step Functions

JSONata was introduced to AWS Step Functions in November 2024. Using JSONata in Step Functions requires setting the QueryLanguage field to JSONata in the state machine definition. This action replaces the traditional JSONPath fields with two JSONata fields:

  • Arguments: Used to customise data sent to state actions.
  • Output: Used to transform results into custom state output.

Additionally, the Assign field sets variables that can be stored and reused across the workflow.

In AWS Step Functions, JSONata expressions are enclosed in {% %} delimiters but otherwise follow standard JSONata syntax. They access data using the $states reserved variable with the following structures:

  • State input is accessed using $states.input
  • Context information is accessed using $states.context
  • Task results (if successful) are accessed using $states.result
  • Error outputs (if existing) are accessed using $states.errorOutput

Step Functions includes standard JSONata functions as well as AWS-specific additions like $partition, $range, $hash, $random, and $uuid. Some functions, such as $eval, are not supported.

Here are some JSONata examples from the AWS Step Functions Developer Guide:

Plaintext
{% $states.input.title %}

{% $current_price <= $states.input.desired_priced %}

{% $parse($states.input.json_string) %}

Talking more about this subject is AWS Principle Developer Advocate Eric Johnson:

JSONata Benefits

So why is JSONata in AWS a big deal?

Low Maintenance: JSONata use removes the need for Lambda runtime updates, dependency management and security patching. JSONata expressions are self-contained and version-free, reducing debugging and testing effort.

Simpler Development Workflow: JSONata’s standardised syntax removes decisions about languages, runtimes and tooling. This improves consistency, simplifies collaboration and speeds up development.

Releases Capacity: JSONata use reduces reliance on AWS Lambda, freeing up Lambda concurrency slots for more complex tasks. This minimises throttling risks and can lower Lambda costs.

Faster Execution: JSONata runs inside AWS services, avoiding cold starts, IAM role checks and network latency. Most JSONata transformations are complete in milliseconds, making it ideal for high-throughput APIs and real-time systems.

Architecture

This section explains the key features and events used in my low-code S3 validation architecture with JSONata.

Object Created Event

My process starts when an S3 object is created. For this post, I’m using Amazon EventBridge‘s sample S3 Object Created event:

JSON
{
  "version": "0",
  "id": "17793124-05d4-b198-2fde-7ededc63b103",
  "detail-type": "Object Created",
  "source": "aws.s3",
  "account": "123456789012",
  "time": "2021-11-12T00:00:00Z",
  "region": "ca-central-1",
  "resources": ["arn:aws:s3:::example-bucket"],
  "detail": {
    "version": "0",
    "bucket": {
      "name": "example-bucket"
    },
    "object": {
      "key": "example-key",
      "size": 5,
      "etag": "b1946ac92492d2347c6235b4d2611184",
      "version-id": "IYV3p45BT0ac8hjHg1houSdS1a.Mro8e",
      "sequencer": "00617F08299329D189"
    },
    "request-id": "N4N7GDK58NMKJ12R",
    "requester": "123456789012",
    "source-ip-address": "1.2.3.4",
    "reason": "PutObject"
  }
}

Here, the highlighted key field is vital as it identifies the uploaded object. This field will be used in the validation processes.

Choice State

In AWS Step Functions, Choice states introduce conditional logic to a state machine. They assess conditions and guide execution accordingly, allowing workflows to branch dynamically based on input data. When used with JSONata, a Choice state must contain the following fields:

  • Condition field – a JSONata expression that evaluates to true/false.
  • Next field – a value that must match a state name in the state machine.

For example, this Choice state checks if a variable foo equals 1:

Plaintext
{"Condition": "{% $foo = 1 %}",  "Next": "NumericMatchState"}

If $foo = 1, the condition is true and the workflow transitions to a NumericMatchState state.

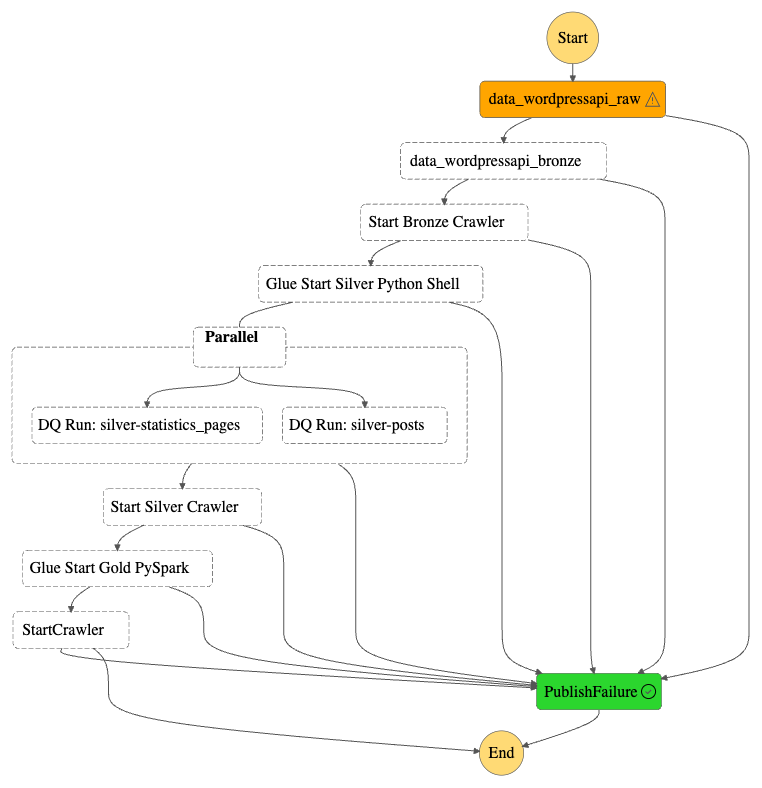
Architecture Diagram

Now let’s put this all together into an architecture diagram:

Here,

  1. A file is uploaded to an Amazon S3 Bucket.
  2. S3 creates an Object Created event.
  3. Amazon EventBridge matches the event record to an event rule.
  4. Eventbridge executes the AWS Step Functions state machine and passes the event to it as JSON input.
  5. The state machine transitions through the various choice states.
  6. The state machine transitions to the fail state if any choice state criteria are not met.
  7. The state machine transitions to the success state if all choice state criteria are met.

Expression Creation

In this section, I create JSONata expressions to perform low-code S3 validation. For clarity, I’ll use this sample S3 event including an object key which closely resembles my actual S3 path:

JSON
{
  "version": "0",
  ...
  "detail": {
    "version": "0",
    "bucket": {
      "name": "data-lakehouse-raw"
    },
    "object": {
      "key": "iTunes/iTunes-AllTunes-2025-02-01.txt",
      "size": 5,
      ...
    },
    "request-id": "N4N7GDK58NMKJ12R",
    "requester": "123456789012",
    "source-ip-address": "1.2.3.4",
    "reason": "PutObject"
  }
}

S3 Key TXT Suffix Check

This JSONata expression checks if the S3 object key ends with txt:

Plaintext
{% $lowercase($split($split($states.input.detail.object.key, '/')[-1], '.')[-1]) = 'txt' %}

For better readability:

Plaintext
{% 
  $lowercase(
    $split(
      $split($states.input.detail.object.key, '/')[-1], 
    '.')[-1]
  ) = 'txt' 
%}

Let’s walk through this step by step:

1. Accessing The S3 Object Key

Extract the key from the event using $states.input:

Plaintext
$states.input.detail.object.key

Output: "iTunes/iTunes-AllTunes-2025-02-01.txt"

2. Splitting By / To Extract The Filename

Break the key into an array with %split using / as the delimiter:

Plaintext
$split($states.input.detail.object.key, '/')

Output: ["iTunes", "iTunes-AllTunes-2025-02-01.txt"]

Now, retrieve the array’s last element (the object name) using [-1]:

Plaintext
$split(...)[-1]

Output: "iTunes-AllTunes-2025-02-01.txt"

3. Splitting By . To Extract The File Suffix

Break the filename with $split again, using . as the delimiter:

Plaintext
$split($split(...)[-1], '.')

Output: ["iTunes-AllTunes-2025-02-01", "txt"]

Now, retrieve the last element (the suffix) using [-1]:

Plaintext
$split($split(...)[-1], '.')[-1]

Output: "txt"

4. Converting To Lowercase For Case-Insensitive Matching

Use $lowercase to convert the suffix to lowercase:

Plaintext
$lowercase($split(...)[-1], '.')[-1])

Output: "txt"

The $lowercase function ensures consistency, as files with TXT, Txt, or tXt extensions will still match correctly. Here, there is no change as txt is already lowercase.

5. Comparing Against txt

Finally, compare the result to 'txt':

Plaintext
$lowercase($split(...)[-1], '.')[-1]) = 'txt'

Output: true

This means that files ending in .txt pass validation, while others fail.

S3 Key iTunes String Check

This JSONata expression checks if the S3 object key contains iTunes.

Plaintext
{% $contains($split($states.input.detail.object.key, '/')[-1], 'iTunes') %}

For better readability:

Plaintext
{% 
  $contains(
    $split(
      $states.input.detail.object.key, '/')[-1],
    'iTunes'
  ) 
%}

I’m not using $lowercase this time, as iTunes is the correct spelling.

1. Extract The Filename

This is unchanged from the last expression:

Plaintext
$split($states.input.detail.object.key, '/')[-1]

Output: "iTunes-AllTunes-2025-02-01.txt"

2. Check If The String Contains 'iTunes

The $contains function checks if the string contains the specified substring. It returns true if the substring exists; otherwise, it returns false.

Plaintext
$contains($split(...)[-1], 'iTunes')

Output: true ✅ if 'iTunes‘ appears anywhere in the filename.

So:

  • "iTunes-AllTunes-2025-02-01.txt"true
  • "itunes-AllTunes-2025-02-01.txt"false (case-sensitive)

S3 Key Date Check

This JSONata expression checks if the S3 object key contains a date with format YYYY-MM-DD.

Plaintext
{% $exists($match($split($states.input.detail.object.key, '/')[-1], /\d{4}-\d{2}-\d{2}/)) %}

For better readability:

Plaintext
$exists(
  $match(
    $split($states.input.detail.object.key, '/')[-1], 
    /\d{4}-\d{2}-\d{2}/
  )
)

1. Extract The Filename

This is unchanged from the first expression:

Plaintext
$split($states.input.detail.object.key, '/')[-1]

Output: "iTunes-AllTunes-2025-02-01.txt"

2. Apply The Regex Match

The $match function applies the substring to the provided regular expression (regex). If found, an array of objects is returned containing the following fields:

  • match – the substring that was matched by the regex.
  • index – the offset (starting at zero) within the substring.
  • groups – if the regex contains capturing groups (parentheses), this contains an array of strings representing each captured group.

In this JSONata expression:

Plaintext
$match(..., /\d{4}-\d{2}-\d{2}/)

The regex looks for:

  • \d{4} → Four digits (year)
  • - → Hyphen separator
  • \d{2} → Two digits (month)
  • - → Another hyphen
  • \d{2} → Two digits (day)

Output:

JSON
{
  "match": "2025-02-01",
  "index": 16,
  "groups": []
}

3. Convert To Boolean With $exists

I can’t use the $match output yet as the Choice state needs a boolean output. Enter $exists. This function returns true for a successful match; otherwise, it returns false.

Plaintext
$exists($match(..., /\d{4}-\d{2}-\d{2}/))

Output: true ✅ if a date is found.

Here, $exists returns true as a date is present. However, ote that JSONata lacks built-in functions to validate dates. For example:

  • "2025-02-01"true (valid date)
  • "2025-02-31"true (invalid date but still matches format)

An AWS Lambda function would be needed for strict date validation.

Combining JSONata Expressions

Although I’ve created separate Choice states for each JSONata expression in this section, I will add that all the expressions can be combined into a single Choice state using and:

Plaintext
{% $lowercase($split($split($states.input.detail.object.key, '/')[-1], '.')[-1]) = 'txt' and $contains($split($states.input.detail.object.key, '/')[-1], 'iTunes') and $exists($match($split($states.input.detail.object.key, '/')[-1], /\\d{4}-\\d{2}-\\d{2}/)) %}

For better readability:

Plaintext
{% 
  $lowercase(
    $split(
      $split(
        $states.input.detail.object.key, '/')[-1], '.')[-1]) = 'txt' 
and 
  $contains(
    $split(
      $states.input.detail.object.key, '/')[-1], 'iTunes') 
and 
  $exists(
    $match(
      $split(
        $states.input.detail.object.key, '/')[-1], /\\d{4}-\\d{2}-\\d{2}/)) 
%}

When deciding whether to do this, consider these benefits:

  • Simplified Structure: Reducing the number of states can make the state machine easier to understand and maintain visually. Instead of multiple branching paths, all logic is in one centralised Choice state.
  • Cost Optimisation: AWS Step Functions Standard Workflows pricing is based on the number of state transitions. Combining multiple Choice states into one reduces transitions, potentially lowering costs for high-volume workflows.
  • Minimises Transition Latency: Each state transition adds a slight delay. By managing all logic within a single Choice state, the workflow runs more efficiently due to the reduced transitions.

Against these tradeoffs:

  • Added Complexity: A complex Choice state with many conditions can be difficult to read, debug, and modify. It may require deeply nested logic, which makes future updates challenging.
  • Limited Observability: If multiple conditions are combined into one state, debugging failures becomes more difficult as it is unclear which condition caused an unexpected transition.
  • Potential Scaling Difficulty: As the workflow evolves, adding more conditions to a single Choice state can become unmanageable. Ultimately, this situation may require breaking it up.
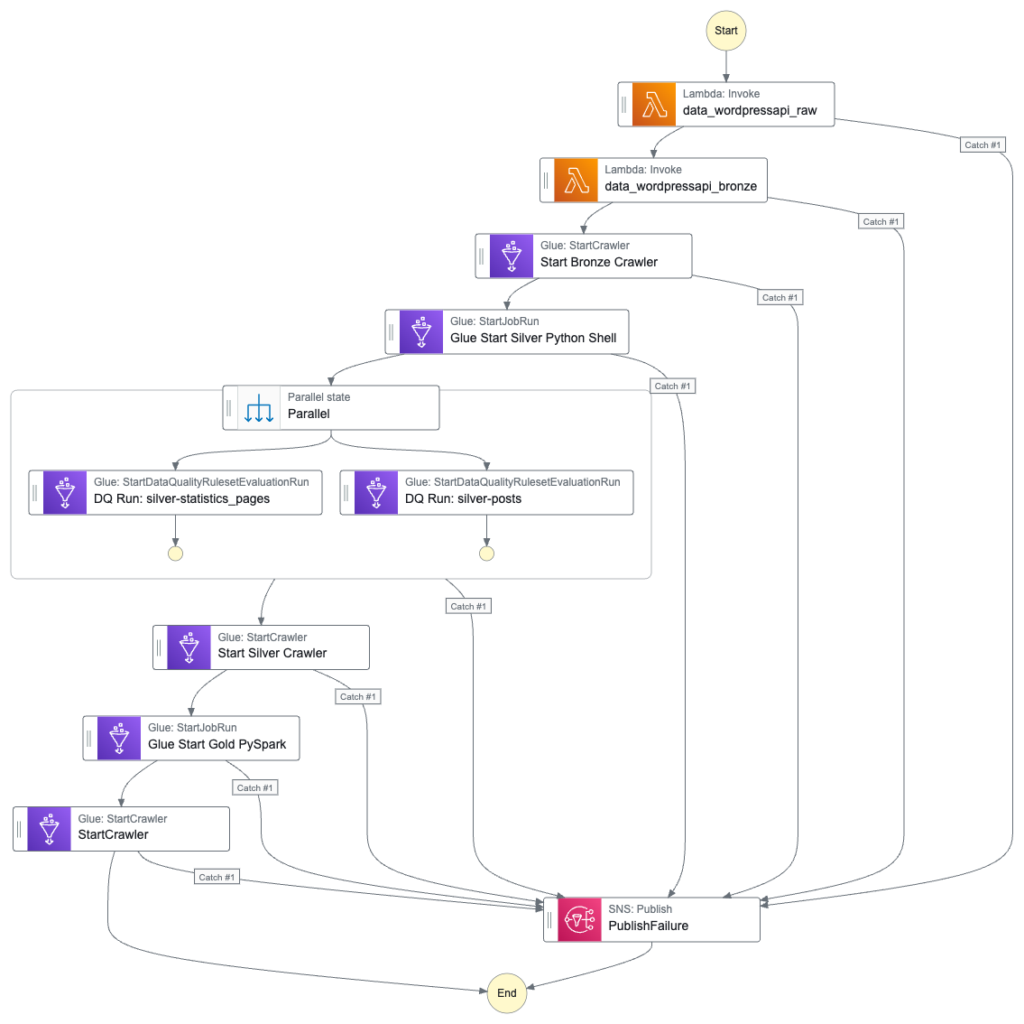
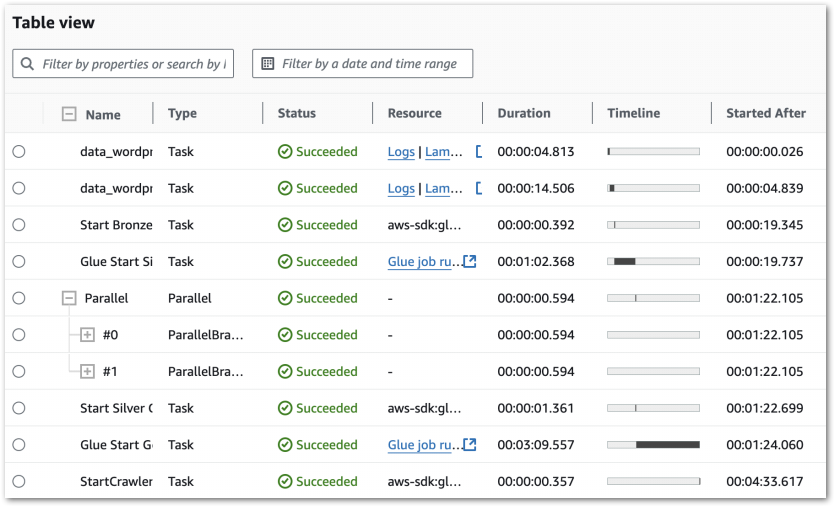
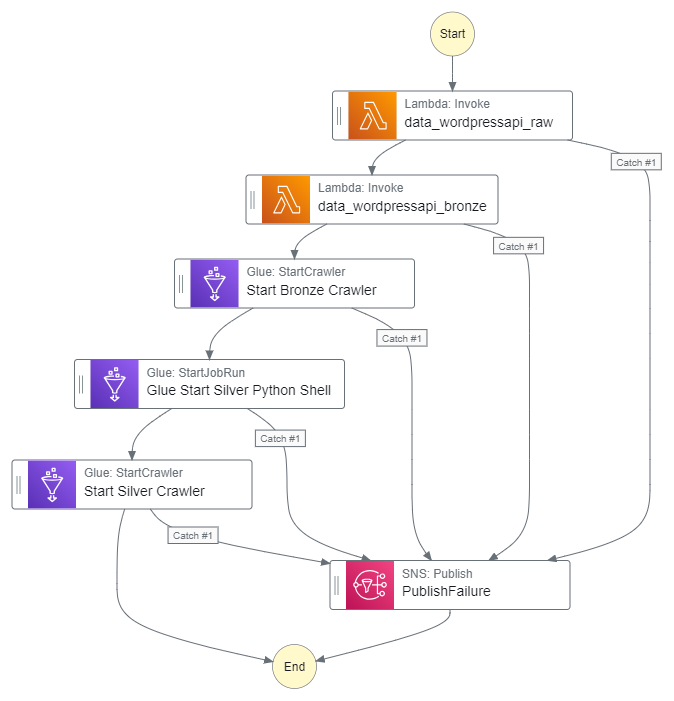
Final Workflows

Finally, let’s see what the workflows look like. Firstly, this workflow has separate Choice states for each JSONata expression:

stepfunctions graph Data Ingestion iTunes

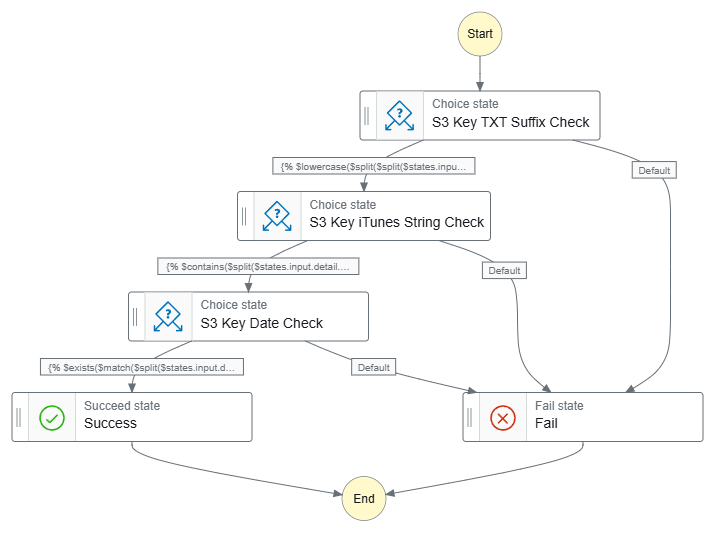
Data-Ingestion-iTunes ASL on GitHub.

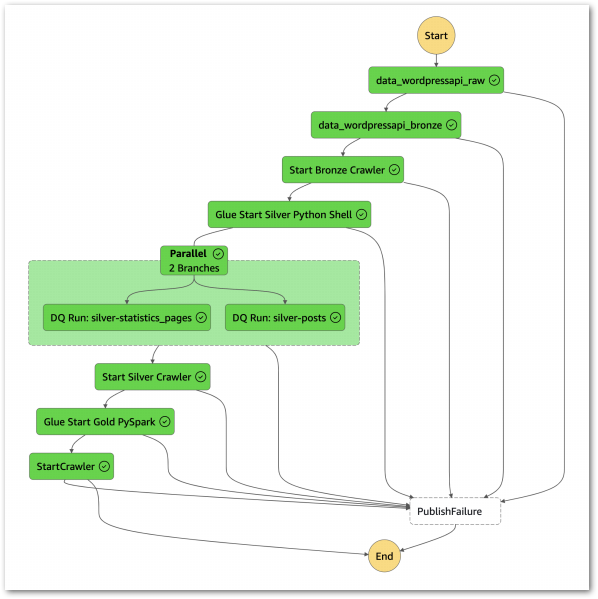
Next, this workflow has one Choice state for all JSONata expressions:

stepfunctions graph Data Ingestion iTunes all

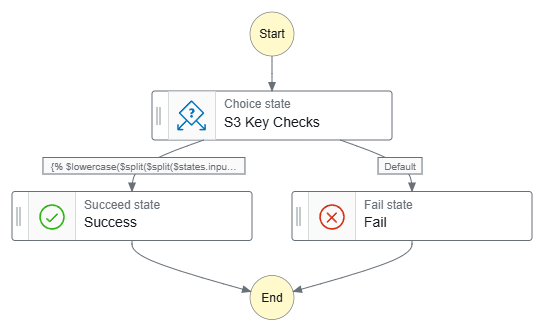
Data-Ingestion-iTunes-All ASL on GitHub.

Testing

To ensure my low-code JSONata expressions work as expected, I ran several tests against different S3 object keys. These tests validate:

  • File Suffix (.txt)
  • Key Content (iTunes)
  • Date Format (YYYY-MM-DD)

Suffix Validation Tests

Test CaseS3 KeyExpectedActual
Valid Suffix (.txt)"iTunes/iTunes-2025-02-01.txt"Proceed to iTunes Check✅ Success → Next: iTunes String Check
Invalid Suffix (.csv)"iTunes/iTunes-2025-02-01.csv"Fail (No further checks)❌ Failure → No further checks
Missing Suffix"iTunes/iTunes-2025-02-01"Fail (No further checks)❌ Failure → No further checks

Key Content Validation Tests

Test CaseS3 KeyExpectedActual
Valid “iTunes” Key"iTunes/iTunes-2025-02-01.txt"Proceed to Date Check✅ Success → Next: Date Check
Incorrect Case (itunes instead of iTunes)"iTunes/itunes-2025-02-01.txt"Fail (No further checks)❌ Failure → No further checks
Missing Key String""Fail (No further checks)❌ Failure → No further checks

Date Format Validation Tests

Test CaseS3 KeyExpectedActual
Correct Date Format (YYYY-MM-DD)"iTunes/iTunes-2025-02-01.txt"Success (Validation complete)✅ Success → Validation complete!
Incorrect Date Format (Missing Day)"iTunes/iTunes-2025-02.txt"Fail (No further checks)❌ Failure → No further checks
Missing Date"iTunes/iTunes.txt"Fail (No further checks)❌ Failure → No further checks

Edge Case: Impossible Date

Test CaseS3 KeyExpectedActual
⚠️ Impossible Date (2025-02-31)"iTunes/iTunes-2025-02-31.txt"Fail (Ideally)Unexpected Success (JSONata does not validate real-world dates)

These tests confirm that JSONata expressions can effectively validate S3 object keys based on file suffixes, key contents and date formats. However, while JSONata can check formatting (YYYY-MM-DD) it does not validate real-world dates. If strict date validation is needed then an AWS Lambda function would be required.

Summary

In this post, I used JSONata to add low-code S3 object key validation to an AWS Step Functions state machine. This approach simplifies the validation process and reduces the reliance on more complex Lambda functions.

My first impressions of JSONata are very good! It’s already reduced both the number and size of Project Wolfie’s Lambda functions, and there’s still lots of JSONata to explore. In the meantime, these further videos by Eric Johnson explore more advanced JSONata Step Function applications:

If this post has been useful then the button below has links for contact, socials, projects and sessions:

SharkLinkButton 1

Thanks for reading ~~^~~

Categories
Data & Analytics

Gold Layer PySpark ETL With AWS Glue Studio

In this post, I create my WordPress data pipeline’s Gold ETL process using PySpark and the AWS Glue Studio visual interface.

Table of Contents

Introduction

Time to finish my WordPress AWS data pipeline! Here it is so far:

AWS Cloud
AWS Cloud
EventBridge
Schedule
EventBridge…
AWS Step Functions workflow
3
3
AWS Lambda Raw Function
AWS Lambda Ra…
AWS SNS Topic
AWS SNS Topic
2
2
State
Machine
State…
AWS Lambda Bronze Function
AWS Lambda Br…
F
F
5
5
AWS Glue
Bronze Crawler
AWS Glue…
4
4
AWS Glue
Silver ETL Job
AWS Glue…
F
F
F
F
1
1
F
F
EventBridge
Scheduler
EventBridge…
AWS SNS Topic
AWS SNS Topic
User
User
CloudWatch Logs
CloudWatch Lo…
F
F
F
F
Text is not SVG – cannot display

In which;

In the Medallion Lakehouse Architecture, this covers both the Bronze and Silver layers that handle raw and processed data respectively. Now I’ll start aggregating my WordPress data for reporting and analytics. For this, I’ll use AWS Glue Studio.

Firstly, I’ll explore Glue Studio and its features. Next, I’ll architect and build an ETL job using Glue Studio’s visual editor while examining some of Glue’s behaviours. Finally, I’ll update my WordPress Data Pipeline Step Functions workflow and examine costs.

Let’s begin with Glue Studio.

AWS Glue Studio

This section introduces Glue Studio and examines Apache Spark.

AWS Glue Studio

AWS Glue Studio is a serverless tool designed for data-centric tasks like automating data preparation, orchestrating data quality checks and creating ETL jobs. It integrates with other AWS services, and also interacts with data from sources like RDS, Redshift and S3. It is ideal for simplifying data transformation and integration processes. The AWS documentation contains full details of Glue Studio’s features.

Under the hood, Glue Studio uses PySpark, the Python API for Apache Spark. Workflows can be created both as code and via Glue Studio’s visual interface. Glue Studio supports Git version control systems for change management, and integrates several observability tools including AWS IAM for security and Amazon CloudWatch for logging. Additionally, Glue also has its own monitoring and orchestration tools.

But wait – Spark? PySpark? What?!

Apache Spark

Apache Spark is an open-source framework designed to process large-scale data quickly. Spark enables distributed computing, allowing tasks to be performed across multiple machines for faster and more efficient data processing. It has existed since 2014.

Known for its speed, Spark processes data in memory, significantly reducing the need for slower disk operations associated with older systems. Spark is commonly used for big data analytics, machine learning and real-time data processing in industries that handle massive datasets.

PySpark

PySpark is a Python interface for Apache Spark. It allows operations to be distributed across clusters of machines while maintaining the accessibility and ease of Python. PySpark’s combination of Python’s simplicity and Spark’s power makes it a practical, accessible solution for handling extensive datasets in a fast and scalable way.

Glue Studio’s visual interface automatically writes PySpark code in real time. For example, this boilerplate Python script is created with each new Glue PySpark job:

Python
import sys
from awsglue.transforms import *
from awsglue.utils import getResolvedOptions
from pyspark.context import SparkContext
from awsglue.context import GlueContext
from awsglue.job import Job

args = getResolvedOptions(sys.argv, ["JOB_NAME"])
sc = SparkContext()
glueContext = GlueContext(sc)
spark = glueContext.spark_session
job = Job(glueContext)
job.init(args["JOB_NAME"], args)

For those curious, this DataEng video provides a technical explanation of each import:

So that’s the basics of AWS Glue Studio. Now let’s see what the solution looks like.

Architecture

This section examines my proposed solution’s architecture. Much of this architecture is similar to both the Bronze and Silver layers. I’ll examine the new Gold Glue PySpark ELT job first, followed by the updated WordPress data pipeline Step Function workflow.

Glue Gold ETL Job

Firstly, this is the Gold Glue PySpark ETL job:

While updating CloudWatch Logs throughout:

  1. Gold Glue ETL job extracts data from wordpress-api Silver S3 objects and then performs PySpark transformations.
  2. Gold Glue PySpark ETL job loads the transformed data into Gold S3 bucket as Parquet objects.

Step Function Workflow

Next, the updated Step Function workflow:

While updating the workflow’s CloudWatch Log Group throughout:

  1. An EventBridge Schedule executes the Step Functions workflow. Lambda Raw function is invoked.
    • Invocation Fails: Publish SNS message. Workflow then ends.
    • Invocation Succeeds: Invoke Lambda Bronze function.
  2. Lambda Bronze function is invoked.
    • Invocation Fails: Publish SNS message. Workflow then ends.
    • Invocation Succeeds: Run Glue Bronze Crawler.
  3. Glue Bronze Crawler runs.
    • Run Fails: Publish SNS message. Workflow then ends.
    • Run Succeeds: Update Glue Data Catalog. Run Glue Silver ETL job.
  4. Glue Silver ETL job runs.
    • Run Fails: Publish SNS message. Workflow then ends.
    • Run Succeeds: Run Glue Silver Data Quality Checks.
  5. Glue Silver Data Quality Checks run.
    • Run Fails: Publish SNS message. Workflow then ends.
    • Run Succeeds: Run Glue Silver Crawler.
  6. Glue Silver Crawler runs.
    • Run Fails: Publish SNS message. Workflow then ends.
    • Run Succeeds: Update Glue Data Catalog. Run Glue Gold ETL job.
  7. Glue Gold PySpark ETL job runs.
    • Run Fails: Publish SNS message. Workflow then ends.
    • Run Succeeds: Run Glue Gold Crawler.
  8. Glue Gold Crawler runs.
    • Run Fails: Publish SNS message. Workflow then ends.
    • Run Succeeds: Update Glue Data Catalog. Workflow then ends.

Additionally, an SNS message is published if the Step Functions workflow fails.

Gold ETL Job

In this section, I create my Gold Glue PySpark ETL job. Firstly, I’ll define the job’s requirements. Next, I’ll build the job in Glue Studio, and finally I’ll examine Glue’s inbuilt monitoring.

Requirements

Let’s begin by understanding the Gold Layer. Databricks defines it as curated, business-level data:

Data in the Gold layer of the lakehouse is typically organised in consumption-ready “project-specific” databases. The Gold layer is for reporting and uses more de-normalised and read-optimised data models with fewer joins. The final layer of data transformations and data quality rules are applied here.

https://www.databricks.com/glossary/medallion-architecture

The concept of a gold layer is nothing new. Other names include aggregated, enriched and consumption layers. The idea is the same in all cases – producing refined and aggregated datasets that are easily consumable by analytics tools, machine learning models and production applications.

This Gold ETL job will produce an aggregation of both the posts and statistics_pages Silver datasets. The Gold dataset will contain view statistics and post creation data, limited to blog posts.

This will involve:

  • Joining the Silver datasets.
  • Removing unneeded columns to reduce the Gold dataset’s size.
  • Renaming columns to improve the Gold dataset’s legibility.
  • Filtering the Gold dataset to remove unneeded data.

So let’s get started!

Job Creation

This section splits the Gold Glue PySpark ETL job creation process into separate steps for each part.

Sources

Firstly, let’s define the data sources. There are two sources, both of which are folders in the data-lakehouse-silver S3 bucket:

  • wordpress_api/posts/
  • wordpress_api/statistics_pages/

Each source needs a separate node specifying the S3 path and data format. This example shows the Silver posts dataset, where the wordpress_api/posts/ S3 path is selected:

2024 10 25 AWSGlueStudioNodeSource

Finally, this is the Source node’s PySpark code for both posts and statistics_pages:

Python
# Script generated for node S3 Silver statistics_pages
S3Silverstatistics_pages_node1724058965930 = glueContext.create_dynamic_frame.from_options(
  format_options={}, 
  connection_type="s3", 
  format="parquet", 
  connection_options={
    "paths": ["s3://data-lakehouse-silver/wordpress_api/statistics_pages/"], 
    "recurse": True
    },
  transformation_ctx="S3Silverstatistics_pages_node1724058965930"
 )

# Script generated for node S3 Silver posts
S3Silverposts_node1724058915313 = glueContext.create_dynamic_frame.from_options(
  format_options={}, 
  connection_type="s3", 
  format="parquet", 
  connection_options={
    "paths": ["s3://data-lakehouse-silver/wordpress_api/posts/"], 
    "recurse": True
    },
  transformation_ctx="S3Silverposts_node1724058915313"
 )

Join Transformation

From AWS:

The Join transform allows you to combine two datasets into one. You specify the key names in the schema of each dataset to compare.

https://docs.aws.amazon.com/glue/latest/dg/transforms-configure-join.html

This node essentially creates a SQL join using columns from the selected sources. Here, I’ve inner joined posts.ID to statistics_pages.ID:

2024 10 25 AWSGlueStudioNodeJoin

Rows from the Silver datasets that match the join condition are merged into a new row in an output DynamicFrame that will ultimately become the Gold dataset. This frame includes all columns from both Silver datasets.

The ETL visual now shows two source nodes linked to the Join node:

2024 10 25 AWSGlueStudioDAGSourceJoin

Finally, this is the Join node’s PySpark code:

Python
# Script generated for node Join
Join_node1724059035756 = Join.apply(
  frame1=S3Silverposts_node1724058915313,
  frame2=S3Silverstatistics_pages_node1724058965930,
  keys1=["ID"],
  keys2=["id"],
  transformation_ctx="Join_node1724059035756"
  )

Change Schema Transformation

Now it’s time to do some cleaning!

From AWS:

Change Schema transform remaps the source data property keys into the desired configured for the target data. In a Change Schema transform node, you can:

  • Change the name of multiple data property keys.
  • Change the data type of the data property keys, if the new data type is supported and there is a transformation path between the two data types.
  • Choose a subset of data property keys by indicating which data property keys you want to drop.
https://docs.aws.amazon.com/glue/latest/dg/transforms-configure-applymapping.html

Firstly, I set the Join node as the Change Schema node’s parent to update the ETL visual:

2024 10 25 AWSGlueStudioDAGJoinSchema

Following the join, the Gold dataset can be simplified and optimised. Here’s an example of what the Change Schema node looks like in action:

2024 10 25 AWSGlueStudioNodeSchema

Here

  • Source Key shows the current column name.
  • Target Key handles column name changes.
  • Data Type sets the data type.
  • Ticking a Drop box removes that column from the output DynamicFrame

I’ve listed my changes below. Bold items appear in the example.

Firstly, these columns are dropped due to duplication or redundancy:

posts:

  • posts.post_modified
  • post_modified_day
  • post_modified_month
  • post_modified_todate
  • post_modified_year

statistics_pages:

  • date_todate
  • id
  • type
  • uri

Additionally, these columns are renamed to add context:

posts:

  • post_date_todate to post_date

statistics_pages:

  • page_id to statistics_id
  • date to statistics_date
  • date_year to statistics_date_year
  • date_month to statistics_date_month
  • date_day to statistics_date_day

Finally, this is the Change Schema node’s PySpark code:

Python
# Script generated for node Change Schema
ChangeSchema_node1724059144495 = ApplyMapping.apply(
  frame=Join_node1724059035756, 
  mappings=[
    ("ID", "bigint", "post_ID", "long"), 
    ("post_title", "string", "post_title", "string"), 
    ("post_status", "string", "post_status", "string"), 
    ("post_parent", "bigint", "post_parent", "long"), 
    ("post_type", "string", "post_type", "string"), 
    ("post_date_todate", "timestamp", "post_date", "timestamp"), 
    ("post_date_year", "bigint", "post_date_year", "long"), 
    ("post_date_month", "bigint", "post_date_month", "long"), 
    ("post_date_day", "bigint", "post_date_day", "long"), 
    ("page_id", "bigint", "statistics_id", "long"), 
    ("date", "timestamp", "statistics_date", "timestamp"), 
    ("count", "bigint", "statistics_count", "long"), 
    ("date_year", "bigint", "statistics_date_year", "long"), 
    ("date_month", "bigint", "statistics_date_month", "long"), 
    ("date_day", "bigint", "statistics_date_day", "long")
    ], 
  transformation_ctx="ChangeSchema_node1724059144495"
  )

Filter Transformation

The joined, cleaned dataset contains data about all amazonwebshark content. I only want the posts data, so next I’ll filter everything else out.

From AWS:

Use the Filter transform to create a new dataset by filtering records from the input dataset based on a regular expression. Rows that don’t satisfy the filter condition are removed from the output.

https://docs.aws.amazon.com/glue/latest/dg/transforms-filter.html

Firstly, I set the Change Schema node as the Filter node’s parent to update the ETL visual:

2024 10 25 AWSGlueStudioDAGSchemaFilter

Next, I set the filter conditions. I only need one condition here – keep all dataset rows where post_type matches post:

2024 10 25 AWSGlueStudioNodeFilter

Finally, this is the Filter node’s PySpark code:

Python
# Script generated for node Filter
Filter_node1724060106174 = Filter.apply(
  frame=ChangeSchema_node1724059144495, 
  f=lambda row: (bool(re.match("post", row["post_type"]))),
 transformation_ctx="Filter_node1724060106174"
 )

Target

Finally, I must choose a target location for my Gold dataset.

Target uses the same interface as the Source node. This time, a Gold S3 bucket folder path wordpress_api/statistics_postname/ is specified. Everything else is the same as Source. The Target node offers significant versatility, detailed in the AWS target node documentation.

In summary, this is the Target node’s PySpark code:

Python
# Script generated for node S3 Gold
S3Gold_node1724060393283 = glueContext.write_dynamic_frame.from_options(
  frame=Filter_node1724060106174, 
  connection_type="s3", 
  format="glueparquet", 
  connection_options={
    "path": "s3://data-lakehouse-gold/wordpress_api/statistics_postname/", 
    "partitionKeys": []
    },
 format_options={"compression": "snappy"}, 
 transformation_ctx="S3Gold_node1724060393283"
 )

And here’s the full ETL visual:

2024 10 25 AWSGlueStudioDAGFinal

The full Glue job PySpark script is available in this post’s GitHub repo.

Job Properties

Next, I’ll examine some of my Glue job’s properties. This section only covers some key properties as there are loads. For a fuller view, please review the AWS Job Property documentation.

Additional properties like bookmarks, quality checks, scheduling and version control are also available. I’ve written about quality checks before, and the other properties could all be posts in themselves. For now, let’s move on to execution.

Job Execution

Each PySpark Glue job has several logging sources that are aggregated into the job’s Run tab. The summary shows properties including job status, durations and DPU capacity:

2024 10 25 AWSGlueStudioRunsLowerDetails

Each job can then be viewed in further detail, with insights including:

These resources are increasingly useful as Glue jobs scale. They show resource utilisation, query plans and node configuration which is essential when optimising and troubleshooting big data processes.

Ok, so my job is configured and running successfully. Now let’s review the outputs.

Glue Outputs & Behaviours

This section examines the outputs of my Gold Glue PySpark ETL job and the behaviours influencing them.

For clarity, this is not a case of finding and fixing errors. Rather, this is an exploration of how a Glue PySpark job’s output can differ from expectations. Coming in, I was more familiar with using pandas for ETL and initially found these behaviours confusing. So I wrote this section with that in mind, as it may help others in similar positions down the road.

Firstly I’ll demonstrate a behaviour. Next, I’ll explain why it happens. Finally, I’ll examine if it can be changed. Although, just because something can be done doesn’t mean that it should be.

Run 1: Multiple Objects

Previously, the Bronze and Silver layers ultimately produced single objects for each dataset. Conversely, my Gold PySpark job creates four objects with the same RunID:

2024 10 29 TestingObjectsFour

Ok – that’s unexpected. What’s more, if I run the job again then I get another four files with a new RunID. So that’s eight in total:

2024 10 29 TestingObjectsEight

There’s two behaviours here that differ from the previous layers:

  • Each run produces multiple objects instead of one.
  • Each run creates new objects instead of replacing existing ones.

Let’s examine the multiple objects first.

What’s Happening?

This occurs due to data partitioning.

As mentioned earlier, AWS Glue uses Apache Spark. Spark enables distributed computing by breaking down data into smaller parts. The presence of multiple objects is a direct outcome of this partitioning approach, offering benefits such as:

  • Parallel Processing: With data spread across multiple files, Spark workers can access different parts of the dataset simultaneously instead of fighting for a single object. This approach balances the workload and accelerates both read and write operations.
  • Fault Tolerance: If a write operation fails, only the impacted object needs reprocessing rather than the entire dataset. This design enhances resilience and reduces the risk of complete data loss.
  • Memory Management: Each Spark worker processes only its assigned data partition rather than the full dataset. This improves data loading efficiency and helps prevent memory exhaustion.

Can I Change It?

I couldn’t find a way to change this behaviour within Glue Studio. Glue is very capable of deriving partitions, so this isn’t surprising.

While it can be done, this involves manually changing the autogenerated PySpark script. Glue allows this at the cost of disabling the job’s visual design features:

Unlocking the job script will convert your job from visual mode to script-only mode. This action cannot be undone. To keep a copy of the visual-mode job, clone the job on the Jobs page of Glue Studio.

The change itself uses the coalesce method of Glue’s DynamicFrame class to control the number of partitions. This involves:

  • An additional import:
Python
from awsglue.dynamicframe import DynamicFrame
  • Converting the dynamic frame to a Spark DataFrame using coalesce(n). Here, coalesce(1) forces the output into a single object:
Python
single_file_df = Filter_node1724060106174.toDF().coalesce(1)
Python
single_file_dyf = DynamicFrame.fromDF(single_file_df, glueContext, "single_file_dyf")

The Glue job now produces a single Parquet object.

This should be used with care. Too many partitions can reduce response times by requiring more reads than necessary. Too few can hinder Spark’s workload distribution abilities. Here, having one object cripples it completely thus removing a key Spark benefit.

Run 2: Objects Not Replaced

Ok, let’s keep coalesce(1) in place because it makes this example easier. Running this job variant creates a single object:

2024 10 29 TestingObjectsOne

Running it again produces a second object with a new RunID:

2024 10 29 TestingObjectsTwo

Why isn’t the first object being replaced?

What’s Happening?

There are good reasons for this. Here’s why a replace function isn’t built in:

  • Spark Architecture: Spark processes data in parallel, with each task running separately. With this setup, replacing a single piece of data in an object is challenging. So instead, Spark jobs either create entirely new objects or replace data partitions.
  • S3 Architecture: S3 stores data as objects rather than files, so it doesn’t have folder-level replacements like a typical file system. When S3 ‘replaces’ an object, it actually creates a new version of the object with the same name and removes the old one.
  • Data Management Features: Writing new objects for each job run enables features like versioning, time travel and incremental processing with formats like Apache Iceberg and Delta Lake. It also avoids issues like access conflicts and deadlocks, since existing data remains unchanged while new data is written.

Can I Change It?

So…yes. Creating a boto3 S3 client and running a conditional delete during the job would achieve the desired effect:

Python
# Define S3 bucket and prefix for output path
output_bucket = "data-lakehouse-gold"
output_prefix = "wordpress_api/statistics_postname/"

# Initialize S3 client and clear existing objects in the output path
s3 = boto3.client('s3')
response = s3.list_objects_v2(Bucket=output_bucket, Prefix=output_prefix)

# Check if there are any files and delete them
if 'Contents' in response:
    for obj in response['Contents']:
        s3.delete_object(Bucket=output_bucket, Key=obj['Key'])

But, at this point, is this really a Spark use case anymore? For an ETL job requiring object replacement, I would initially lean towards using a Glue Python Shell job or the AWS SDK for pandas Lambda layer because:

  • Fewer cloud resources would be used, making the job cheaper than a PySpark job.
  • Fewer Python imports would be needed, reducing the script size and dependencies.
  • With appropriate settings, Lambda may run the script faster than Glue.

Suitability should always be a key consideration with cloud architectures. Taking time to choose the right service saves a lot of headaches later on.

Step Functions Update

This section integrates the Gold resources into my existing WordPress Data Pipeline Step Function workflow.

The Gold workflow update is similar to the Silver one. Firstly, I need a new Glue: StartJobRun action running the Gold Glue PySpark ETL job:

JSON
{
  "JobName": "WordPress_Gold_statisticspagespostsjoin"
}

Also, a new Glue: StartCrawler action running the Gold crawler:

JSON
{
  "Name": "wordpress-gold"
}

Here is how my Step Function workflow looks with these changes:

stepfunctions graph

The workflow’s IAM role needs new allow permissions too. Firstly, glue:StartJobRun and glue:GetJobRun on the WordPress_Gold_statisticspagespostsjoin Glue job:

JSON
{
	"Version": "2012-10-17",
	"Statement": [
		{
			"Sid": "VisualEditor0",
			"Effect": "Allow",
			"Action": [
				"glue:StartJobRun",
				"glue:GetJobRun"
			],
			"Resource": [
				"arn:aws:glue:eu-west-1: REDACTED:job/WordPress_Gold_statisticspagespostsjoin"
			]
		}
	]
}

(glue:GetJobRun lets the workflow check the job’s progress – Ed)

Next, glue:StartCrawler on the wordpress-gold crawler:

JSON
{
	"Version": "2012-10-17",
	"Statement": [
		{
			"Sid": "VisualEditor0",
			"Effect": "Allow",
			"Action": [
				"glue:StartCrawler"
			],
			"Resource": [
				"arn:aws:glue:eu-west-1:REDACTED:crawler/wordpress-gold"
			]
		}
	]
}

With these permissions, the workflow executes successfully:

2024 10 29 StepFunctionResultsGraph

I can get further details from the workflow’s Table view. This includes task durations, resource log links and a visual timeline of each state:

2024 10 29 StepFunctionResultsTable

Further Step Functions console details are in this 2022 Ben Smith AWS post.

Cost Analysis

This section examines my costs for the updated Step Function workflow.

Here, my Cost Explorer chart runs from 04 November to 14 November. It is grouped by API Operation and excludes tax.

2024 11 15 CostsGold

My main costs are from Glue’s Jobrun and CrawlerRun operations. Each ruleset now costs around $0.17 a day to run. This has increased from last time’s $0.09, but that’s to be expected as I’m running two Glue jobs now.

My crawlers now cost $0.06 a day, averaging $0.02 for each of the Bronze, Silver and Gold crawlers. The purple blip is for Glue Interactive Sessions – I have something coming up on those. Beyond that, I’m paying for some S3 PutObject calls and everything else is within the free tier.

Note that on Nov 06, it….broke. A failed call to the WordPress API brought the whole workflow down:

stepfunctions graph error

This proves my error handling works though! A forced stop and graceful failure is preferable to having data in an unknown state, especially in a production environment!

Summary

In this post, I created my WordPress data pipeline’s Gold ETL process using PySpark and the AWS Glue Studio visual interface.

I found Glue Studio to be highly user-friendly. It enhances job observability with comprehensive monitoring tools, and makes PySpark script creation significantly easier through its visual editor. Additionally, it integrates smoothly with other Glue features and the broader AWS ecosystem, offering extensive and intuitive customisation options.

This wraps up the WordPress AWS Data Pipeline project. This series aimed to demonstrate how different AWS services can work together to build efficient and cost-effective data pipelines. Through it, I’ve gained new insights and have several fresh ideas to explore!

If this post has been useful then the button below has links for contact, socials, projects and sessions:

SharkLinkButton 1

Thanks for reading ~~^~~

Categories
Data & Analytics

Silver Layer Python ETL With The AWS Glue ETL Job Script Editor

In this post, I create my WordPress data pipeline’s Silver ETL process using Python and the AWS Glue ETL Job Script Editor.

Table of Contents

Introduction

Last time I worked on my WordPress AWS data pipeline, I produced my Bronze layer data and created a Glue Crawler to derive the schema of the Bronze S3 objects. It’s now time to start cleaning that data to prepare it for reporting, aggregation and consumption.

I’m also currently studying for the AWS Certified Data Engineer – Associate certification. While revising for this I learned the capabilities of the AWS Glue ETL Job Script Editor, and it seemed an ideal fit for my Silver ETL process. So I decided to make a post out of it and see how things went!

Firstly, I’ll examine the AWS Glue ETL Job Script Editor and how it will benefit my Silver ETL process. Then I’ll define the architecture of the Silver ETL job and how it fits into the existing data pipeline. Next, I’ll script and test the job. Finally, I’ll integrate it into the pipeline and explore the job’s costs.

Glue ETL Job Script Editor

This section examines the AWS Glue ETL Script Editor and Python Shell and considers some of Python Shell’s benefits and limitations.

Script Editor & Python Shell

Script Editor is a feature of AWS Glue. It offers serverless Spark, Ray and Python shells, enabling data transformation, preparation and cleaning with no infrastructure management. Scripts can be both uploaded and created from scratch, and version control is configurable to several Git services.

This post focuses on AWS Glue Python Shell. Introduced in 2019, Python Shell jobs suit small to medium-sized tasks as part of an ETL workflow.

Python Shell Pros

This section examines some of Python Shell’s benefits.

Low Cost

Python Shell jobs are the cheapest of the Glue job types to run. Glue charges are based on data processing units (DPUs). A single standard DPU currently provides 4 vCPU and 16 GB of memory. While regular Glue ETL jobs using Apache Spark need at least 2 DPUs, Python Shell jobs default to using only 1/16 (or 0.0625) DPU!

This can also be extended to 1 DPU, resulting in faster completion times. Like AWS Lambda, charges accrue based on resource usage and duration. So increased resource allocation can potentially create further savings.

This section was correct as of August 2024 – the latest pricing data is on the AWS Glue pricing site.

Low Barrier To Entry

Python Shell jobs offer accessibility for those from a scripting background. When creating a new script in the console, users only need to choose the engine (in this case Python) and whether the script is being uploaded or created fresh. And that’s it! No configuring interpreters, environments or dependencies.

Python Shell jobs also integrate with other AWS services. They can easily connect to data sources like S3, RDS and DynamoDB. They can be automated with Glue Workflows and Triggers. IAM can also control access to both the Python Shell job and the AWS services it interacts with.

Included Python Libraries

AWS Glue Python Shell includes a variety of built-in Python libraries that are useful for ETL tasks. These libraries cover a range of functionalities such as data processing, machine learning, and interacting with AWS services.

They include:

This AWS post has a full table of included libraries and their versions. Additional libraries can be installed and imported using PIP.

Some people will quickly see issues with this list though…

Python Shell Cons

This section examines some of Python Shell’s limitations.

Outdated Python Versions & Libraries

While the included libraries are welcome, they are also quite outdated. For example, boto3‘s included version is 1.21.21 while the current version is 1.34.150. pandas is at 1.4.2 in the table and 2.2.2 online.

This is likely due to the supported Python versions – currently Python 3.6 and Python 3.9. Now, while Python 3.9 isn’t out of support until October 2025, it was released back in October 2020 and has had three major upgrades since. Worse, Python 3.6 ended life at Christmas 2021!

With the Data Engineer Associate certification drawing attention to various AWS data services, it’s a shame that this feature is so far behind. This would be a great modernisation tool for importing legacy Python scripts into Glue, but the last feature update was in 2022 and it’s really starting to lag behind now.

No Visual Editor

Yes I know it’s a script editor but hear me out.

Let’s briefly segue to AWS IAM. In the early days, updating IAM policies had the potential of losing afternoons to missing braces or errant commas. There was no native AWS validation tooling and the whole thing felt like a dark art for those less experienced.

Then AWS released an IAM visual policy editor. And things went from this:

2024 07 30 IAMPolicyJSON

To this!

2024 07 30 IAMPolicyDown

This transformed the IAM policy-writing process. The guesswork was gone – new policies could be written using dropdowns and checkboxes. And AWS would generate the same code each time, in the same way and to the same standard.

In today’s AWS console, IAM can be administrated both visually and as JSON. Updates made in the visual editor reflect in the code in real-time, and vice versa. And the IAM IDE immediately flags syntax issues, unclosed keypairs and whatnot.

This interface would work so well with Glue Script Editor. It would simplify and encourage using Script Editor, creating standardised code by default and reducing development time. No more syntax violations, verbose comments or missing dependencies – AWS could handle all that.

This doesn’t even need AI – it would just be procedural code generation. Something like selecting awswrangler from a dropdown list, then selecting an S3 location to read or write and a file type to expect. Or even a list of code snippets for the included libraries. These features could all lighten the dev load.

Limited IDE

Let’s consider AWS Lambda’s IDE:

2024 07 30 LambdaIDE

Its benefits include:

  • Code autocompletion
  • Integrated testing
  • Integrated monitoring

And tons of other user-focused functionality. Conversely, this is the Glue Script Editor IDE:

2024 07 30 GlueIDE

Hmm.

Now don’t get me wrong – I’m not asking for Lambda Lite. But something a bit more than Notepad would be nice. AWS are currently making a massive deal of Amazon CodeWhisperer and Amazon Q Developer‘s autocomplete actions, but here pandas isn’t even suggested when I type import pan. And it’s an included library!

The obvious solution is to just use Lambda. But Glue Script Editor offers a sweet spot where it runs custom Python while operating entirely within the AWS Glue service. This is helpful for features like Glue Triggers and Workflows that can’t currently trigger Lambda functions. It’s also helpful with AWS Organisations, where using Glue Script Editor for Python ETL can enable SCPs that entirely block access to AWS Lambda for data-centric accounts.

So Why Use It?

So are Glue Python Shell jobs worth considering with these limitations? Definately! There are several use cases favouring them:

  • Legacy ETL jobs that either can’t use recent Python versions and libraries, or simply don’t need them.
  • Simple, lightweight tasks that don’t require the more advanced (and expensive) features of Apache Spark or Ray.
  • Tasks that need to run quickly, as Python Shells have faster startup times than the Spark environments used by regular Glue ETL jobs.
  • Long-running ETL tasks unsuitable for AWS Lambda, as Python Shell jobs can run for up to 48 hours compared to Lambda’s 15 minutes. Thanks to Yan Cui‘s blog for that one!

For my requirements, a Python Shell job makes sense because I’m doing simple transformations on small volumes of data.

Architecture

This section examines the architecture of my proposed solution. Much of this architecture is similar to the Bronze layer. I’ll examine the new Silver ELT job, followed by the updated data pipeline Step Function workflow.

Glue Silver ETL Job

Firstly, this is the Glue Silver ETL job:

Amazon S3
Bronze Bucket
Amazon S3…
Amazon S3
Silver Bucket
Amazon S3…
AWS Glue
Silver ETL Job
AWS Glue…
Amazon CloudWatch
Logs
Amazon CloudWatch…
1
1
2
2
AWS Cloud
AWS Cloud
Text is not SVG – cannot display

While updating CloudWatch Logs throughout:

  1. Silver Glue ETL job extracts data from wordpress-api Bronze S3 objects and performs Python transformations.
  2. Silver Glue ETL job loads the transformed data into Silver S3 bucket as Parquet objects.

Step Function Workflow

Next, the updated Step Function workflow:

AWS Cloud
AWS Cloud
EventBridge
Schedule
EventBridge…
AWS Step Functions workflow
3
3
AWS Lambda Raw Function
AWS Lambda Ra…
AWS SNS Topic
AWS SNS Topic
2
2
State
Machine
State…
AWS Lambda Bronze Function
AWS Lambda Br…
F
F
5
5
AWS Glue
Bronze Crawler
AWS Glue…
4
4
AWS Glue
Silver ETL Job
AWS Glue…
F
F
F
F
1
1
F
F
EventBridge
Scheduler
EventBridge…
AWS SNS Topic
AWS SNS Topic
User
User
CloudWatch Logs
CloudWatch Lo…
F
F
F
F
Text is not SVG – cannot display

While updating the workflow’s CloudWatch Log Group throughout:

  1. An EventBridge Schedule executes the Step Functions workflow.
  2. Raw Lambda function is invoked.
    • Invocation Fails: Publish SNS message. Workflow ends.
    • Invocation Succeeds: Invoke Bronze Lambda function.
  3. Bronze Lambda function is invoked.
    • Invocation Fails: Publish SNS message. Workflow ends.
    • Invocation Succeeds: Run Glue Crawler.
  4. Glue Crawler runs.
    • Run Fails: Publish SNS message. Workflow ends.
    • Run Succeeds: Update Glue Data Catalog. Run Glue Silver ETL job.
  5. Glue Silver ETL job runs.
    • Run Fails: Publish SNS message. Workflow ends.
    • Run Succeeds: Workflow ends.

An SNS message is published if the Step Functions workflow fails.

Silver ETL Job

In this section, I create the Silver ETL Python script for the AWS Glue Script Editor. Firstly I’ll define the script’s requirements. Next, I’ll translate them into Python code, and finally I’ll create the ETL script and upload it to Git.

Requirements

Firstly, let’s define the requirements for this data pipeline layer. So what does a typical Silver ETL process involve?

Databricks defines the Silver layer as cleansed and conformed data:

In the Silver layer of the lakehouse, the data from the Bronze layer is matched, merged, conformed and cleansed (“just-enough”) so that the Silver layer can provide an “Enterprise view” of all its key business entities, concepts and transactions. (e.g. master customers, stores, non-duplicated transactions and cross-reference tables).

https://www.databricks.com/glossary/medallion-architecture

Because my data source is a WordPress MySQL database, most of the cleansing and conforming work I’d expect to do has already been done there! That said, there’s data that I definitely won’t need, as well as other transformations I can apply to help downstream reporting.

Some of the following transformations can be done at the SQL reporting level with date and string functions. However, these add repetitive load and complexity to queries, which can be avoided by some cleaning transformations. Roche’s Maxim of Data Transformation applies here:

Data should be transformed as far upstream as possible, and as far downstream as necessary.

https://ssbipolar.com/2021/05/31/roches-maxim/

The Silver layer transformations I’m doing here are:

Column Removal

Many columns are empty or unneeded, so now is the time to remove them. This will reduce the data held in the Silver objects, making them cheaper to store and faster to query.

My script uses the pandas.DataFrame.drop function to remove columns by specifying column names. Here, a term_order column is dropped from the DataFrame df:

Python
df = df.drop(columns=['term_order'])

Date Splitting

Dates are tough to analyse and don’t aggregate well, as each date is effectively three different data points in one field. Splitting dates into years, months and days improves data bucketing, query granularity and time series analytics.

My script uses the pandas to_datetime function to convert scalar, array-like, Series or DataFrame/dict-like objects to pandas datetime objects.

Here, values in the date column of the DataFrame df are converted from strings to datetime objects and stored in a new date_todate column. Next, the year attribute of each date_todate column object is extracted and stored in a new date_year column. Finally, the same happens for month and day attributes:

Python
df['date_todate'] = pd.to_datetime(df['date'])

df['date_year'] = df['date_todate'].dt.year
df['date_month'] = df['date_todate'].dt.month
df['date_day'] = df['date_todate'].dt.day

String Editing

Some columns use HTML character entity names for reserved characters. For example, &amp; in place of &. This is great for rendering HTML but not great for analytics.

My script uses the str.replace string method to return a copy of each string with all occurrences of the specified substring replaced by a new one. Here, all instances of & amp; in the name column are overwritten with &:

Python
df['name'] = df['name'].str.replace('& amp;','&')

So that’s the transformations. What else is the script doing?

Python Script

Most of the Silver script processes are similar to the Bronze script ones, including:

  • Logging
  • Getting parameters
  • Accessing S3 objects

So most functionality is reused from my Bronze Lambda function, which is fully documented in this post. To summarise the imports:

Python
import logging                          # Logging
import boto3                            # AWS Interactions
import botocore                         # AWS Exceptions
import awswrangler as wr                # S3 Interactions
import pandas as pd                     # Data Manipulation
from botocore.client import BaseClient  # AWS Type Hints

Some changes have been made for the Silver script:

  • Parameters, object names and logs have been updated from Bronze to Silver:
Python
parametername_snstopic: str = '/sns/data/lakehouse/silver'

logging.info("Getting S3 Silver parameter...")

s3_bucket_silver = get_parameter_from_ssm(client_ssm, parametername_s3bucket_silver)
  • New functionality identifies the AWS AccountID the script is running in:
Python
# Get & display AWS AccountID
identity = client_sts.get_caller_identity()
account_id = identity['Account']
logging.info(f"Starting in AWS Account ID {account_id}")

This is more of a sanity check for me – I have several AWS accounts and want to check I’ve accessed the right one!

  • A test that stops the current loop interaction if the object name doesn’t match one of the expected ones:
Python
# Check if object is mapped and bypass if not.
if object_name not in {'posts', 'statistics_pages', 'term_relationship', 'term_taxonomy', 'terms'}:

logging.warning(f'{object_name} is not currently mapped.  Skipping transform...')

object_count_failure += 1
continue

Finally, I wrote a new function for my Silver transformation logic. This isn’t included here (although it is in my repo) because it’s long. Very long! My first thought was to decouple the ETL processes from each other and write separate scripts for each object. So 5 in total.

However, Python Shell jobs are billed per second with a 1-minute minimum. So 5 jobs = 5 minutes billed. But the job only takes around 60 seconds to process all five objects! I’d have run up 5 times the usage and 5 times the cost for no real benefit.

The full script is in my Github repo.

Testing was quick because it was effectively repeating the Bronze script tests with new parameters. After successfully testing the script locally, it’s time to get it working in AWS!

Uploading & Testing

In this section I upload my Silver ETL script, integrate it with AWS Glue Script Editor and AWS Step Functions and test everything works as expected.

Creating The Python Shell Job

Firstly, let’s get my script into AWS Glue. There are several ways of doing this. If the script is uploaded to S3 then AWS can create a Glue ETL job with the AWS CLI create-job command:

Bash

 aws glue create-job --name python-job-cli --role Glue_DefaultRole 
     --command '{"Name" :  "pythonshell", "PythonVersion": "3.9", "ScriptLocation" : "s3://DOC-EXAMPLE-BUCKET/scriptname.py"}'  
     --max-capacity 0.0625

And with the AWS CloudFormation AWS::Glue::Job resource:

YAML
AWSTemplateFormatVersion: 2010-09-09
Resources:
  Python39Job:
    Type: 'AWS::Glue::Job'
    Properties:
      Command:
        Name: pythonshell
        PythonVersion: '3.9'
        ScriptLocation: 's3://DOC-EXAMPLE-BUCKET/scriptname.py'
      MaxRetries: 0
      Name: python-39-job
      Role: RoleName           
        

Scripts can also be pulled from Git repositories. Here I’ll create my Silver ETL job in the Glue Script Editor console. This creates a new Python script in an S3 bucket location of s3://aws-glue-assets-[AWSAccountID]-[Region]/scripts/.

Next, the new job needs an IAM role with appropriate permissions for the AWS services the script interacts with. Other parameters, including maximum DPU, job timeout value and Python version, can also be set. In addition, Glue Data Quality checks are also supported. And, once saved, the Glue job can have a schedule applied.

Testing Job Execution

AWS Glue records data for each job execution and publishes extensive details and logs:

2024 08 09 AWSGlueJobRun

Glue stores details about the job and Python environment, and logs are published and stored in Amazon Cloudwatch.

And so begins the testing! Initially, I was getting one of my own Python boto3 exceptions:

ValueError: No SNS topic returned.

Easy to fix. This IAM policy was based on the same one that my Bronze Lambda function uses. But the Silver ETL script uses different AWS resources so some IAM policy ARNs need to change. Specifically, the Silver ETL job’s IAM role needs to allow:

  • ssm:GetParameter on the required Parameter Store parameters.
  • sns:Publish on the required SNS topics.
  • s3:GetObject on the data-lakehouse-silver/wordpress_api/* objects.

With these changes, the Silver ETL job runs perfectly and creates new objects in the Silver S3 bucket:

2024 08 09 MonitoringTimeline

With the Glue job running and S3 object creation verified successfully, it’s time to validate the data.

Data Integration & Validation

Validating the data involves two processes:

  • Integrating the data into the Glue Data Catalog.
  • Querying the data with Amazon Athena.

There are several ways to update the Glue Data Catalog, and here I’ll create a new Glue Crawler using a similar setup to my Bronze Crawler. This time the crawler is reading objects from the Silver S3 bucket instead of the Bronze one, and the new Glue Data Catalog tables are prefixed with silver- instead of bronze-.

The Silver crawler creates these new tables in the Glue Data Catalog’s wordpress_api database:

2024 08 06 GlueDataCatalog

This gives Athena visibility of the tables, enabling data validation via SQL query execution. Querying wordpress_api.silver-terms shows the removed column and updated strings:

2024 08 06 AthenaSilverTerms

And querying wordpress_api.silver-statistics_pages shows the split dates:

2024 08 06 AthenaSilverStatistics pages

Looks good! Now that everything has been validated, let’s add these steps to the WordPress Data Pipeline.

Step Function Update

The WordPress Data Pipeline Step Function workflow that I started back in March continues to grow. There’s a new job and a second crawler to add to it now!

The Silver crawler is added in the same way as the Bronze one (including the IAM changes) so let’s focus on adding the new Glue Python Shell ETL job.

Adding Glue ETL jobs to a Step Function workflow is well documented The task uses the StartJobRun Glue API action under the hood and has an optimized integration that enables the .sync integration pattern. Enabling this means the Step Functions workflow waits for the StartJobRun request to complete before progressing to the next state.

However, my workflow currently lacks IAM permissions to run the Silver Glue ETL job. So I make a new IAM policy that allows the glue:StartJobRun action on the Silver Glue ETL job and attach it to the workflow’s IAM role:

JSON
{
	"Version": "2012-10-17",
	"Statement": [
		{
			"Sid": "VisualEditor0",
			"Effect": "Allow",
			"Action": [
				"glue:StartJobRun"
			],
			"Resource": "arn:aws:glue:eu-west-1:[REDACTED]:job/wordpressapi_silver"
		}
	]
}

My Step Function workflow now looks like this:

2024 08 09 stepfunctions graph

Let’s execute the Step Function workflow and check it works.

Step Function Test

Upon execution, everything works as intended. The new StartGlueJob action is triggered and the Glue ETL job is successful:

2024 08 06 GlueJobDetails

But the Step Function doesn’t transition to the next step. In fact it continued running to the point I had to stop it myself after several minutes:

2024 08 06 StepFunctionsStop

So what’s going on? I asked Amazon Q about this behaviour, and in its response were the following points:

  1. Step Functions uses a “sync” integration with AWS Glue, which means it relies on polling the status of the Glue job using the GetJobRun API call.
  2. The polling schedule is designed to be once per minute for the first 10 minutes, and then every 5 minutes thereafter. This is to avoid excessive API calls to Glue.
Amazon Q

Q also linked to this AWS repost answer with further details:

This is an expected behavior in case of .sync integration with AWS Glue. Service integrations that use the .sync pattern require additional IAM permissions where Step Functions will make use of a managed Eventbridge rule to monitor the status of the job. However, AWS Glue does not support Eventbridge integration and thus, Step Functions polls the job status using the GetJobRun API call to fetch the status of the job.

https://repost.aws/questions/QUFFlHcbvIQFe-bS3RAi7TWA/a-glue-job-in-a-step-function-is-taking-so-long-to-continue-the-next-step

This made things clearer. When Step Functions starts a Glue ETL job using a StartGlueJob action with optimized integration, Step Functions determines that job’s status (and thus when to transition to the next action) by calling Glue’s GetJobRun API.

However, my workflow’s IAM role doesn’t have permission to do that! And because Step Functions can’t determine the ETL job’s status, it doesn’t know that the job has finished and the next state transition never happens! Everything stops!

This is resolved by adding the glue:GetJobRun action to the workflow’s IAM policy:

JSON
{
	"Version": "2012-10-17",
	"Statement": [
		{
			"Sid": "VisualEditor0",
			"Effect": "Allow",
			"Action": [
				"glue:StartJobRun",
				"glue:GetJobRun"
			],
			"Resource": "arn:aws:glue:eu-west-1:REDACTED:job/wordpressapi_silver"
		}
	]
}

This time, the Glue GetJobRun API calls are successful. The Step Functions workflow validates that the ETL job has finished, moves to the next state as intended and ultimately completes successfully:

2024 08 06 ExecutionSuccessFull

Thanks Amazon Q!

Costs

Finally, let’s look at the costs for my Glue Script Editor Silver ETL Job resources.

This graph shows all Glue API costs between 2024-07-31 (first AWS job execution) and 2024-09-09:

2024 08 09 CostExplorerGlue

Of the $0.38:

  • $0.37 is the CrawlerRun API for the two Glue Crawlers I’m running.
  • $0.01 is the Jobrun API for the 15 job runs between 2024-07-31 and 2024-09-09.

So all things considered, very manageable!

Summary

In this post, I created my WordPress data pipeline’s Silver ETL process using Python and the AWS Glue ETL Job Script Editor.

I found the Script Editor jobs very useful. They offer Lambda’s benefits of scalability, managed infrastructure and integration with other AWS services, combined with data-centric libraries and features that make it easier to hit the ground running development-wise. It has clear limitations and could do with some AWS TLC, but it was a good fit here and rivals Lambda for some future ETL processes I have planned.

If this post has been useful then the button below has links for contact, socials, projects and sessions:

SharkLinkButton 1

Thanks for reading ~~^~~