In this post, I use AWS Glue Data Quality checks and rulesets to apply bespoke veracity checks to my WordPress datasets.
Table of Contents
- Introduction
- AWS Glue Data Quality
- Ruleset Creation
- Ruleset Testing
- Ruleset Orchestration
- Cost Analysis
- Summary
Introduction
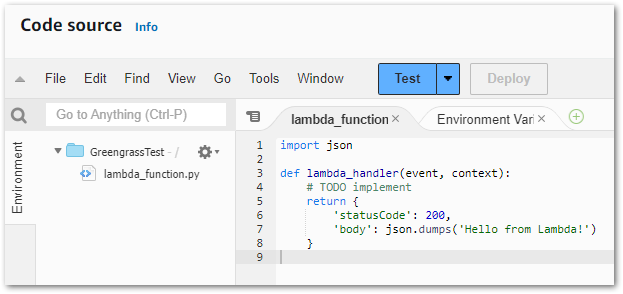
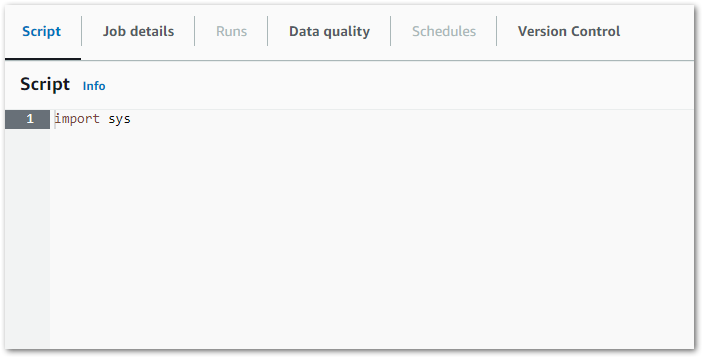
In my last post, I used the AWS Glue ETL Job Script Editor to write a Silver ETL Python script. Within that script and the ones prior, there are checks like:
- Did the WordPress API respond?
- Does the SSM parameter exist?
- Does the pandas DataFrame contain data?
If these checks all pass then datasets are created in various S3 buckets. But before I use these datasets for reporting and analytics, I should check their quality first.
In my Building And Automating Serverless Auto-Scaling Data Pipelines In AWS session, I talk about the Four V’s of Big Data. One of these Vs is Veracity – the measure of data’s truthfulness, accuracy and quality. AWS Glue offers veracity checks with AWS Glue Data Quality.
Launched in 2023, AWS Glue Data Quality measures and monitors data quality and veracity. It is built on top of an open-source framework, and provides a managed, serverless experience with machine learning augmentation.
Firstly, I’ll examine AWS Glue Data Quality and some of its features. Then I’ll use it to recommend rules for some of my Silver layer data objects, and then customise those recommendations as needed. Next, I’ll create and test a Glue Data Quality job using those rules. Finally, I’ll examine my Glue Data Quality costs.
AWS Glue Data Quality
This section introduces AWS Glue Data Quality and examines some of its features.
What Is Glue Data Quality?
From AWS:
AWS Glue Data Quality evaluates and monitors the quality of your data based on rules that you define. This makes it easy to identify the data that needs action. You can then monitor and evaluate changes to your datasets as they evolve over time.
https://docs.aws.amazon.com/glue/latest/dg/data-quality-gs-studio.html
AWS Glue Data Quality features include:
- Creating & recommending sets of data quality rules.
- Running the data quality rules as on-demand and scheduled jobs.
- Monitoring and reporting against the data quality results.
So how do data quality rules work?
Glue Data Quality Rules
From AWS:
AWS Glue Data Quality currently supports 18 built-in rule types under four categories:
https://aws.amazon.com/glue/faqs/
- Consistency rules check if data across different columns agrees by looking at column correlations.
- Accuracy rules check if record counts meet a set threshold and if columns are not empty, match certain patterns, have valid data types, and have valid values.
- Integrity rules check if duplicates exist in a dataset.
- Completeness rules check if data in your datasets do not have missing values.
AWS Glue Data Quality rules are defined using Data Quality Definition Language (DQDL). DQDL uses a Rules list containing comma-separated rules in square brackets.
For example, this DQLD rule checks for missing values in customer-id and unique values in order-id:
Rules = [
   IsComplete "customer-id",
   IsUnique "order-id"
]
AWS maintains a DQDL reference that advises about syntax, structure, expressions, and rule types. Now all of this can be a lot to take in, so a good way of getting started is to get AWS to do some of the heavy lifting…
Glue Data Quality Rule Recommendations
Getting to grips with new features can be daunting. To help out, AWS Glue Data Quality can analyse data in the Glue Data Catalog. This process uses machine learning to identify and recommend rules for the analysed data. These rules can then be used and changed as needed.
Glue Data Quality recommendations are generated using Amazon’s Deequ open-source framework, which is tested on Amazon’s own petabyte-scale datasets. AWS has documented the recommendation generation process, and has released supporting videos like:
So that’s enough theory – let’s build something!
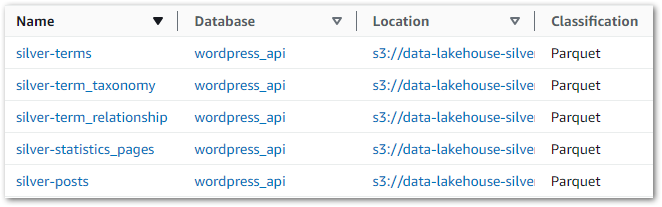
Ruleset Creation
In this section, I create a Glue Data Quality veracity ruleset for my silver-statistcs_pages dataset by generating and customising Glue’s recommendations.
Generating Recommendations
Firstly, I told Glue Data Quality to scan the dataset and recommend some rules. Two minutes later, Glue returned these:
Rules = [
    RowCount between 4452 and 17810,
    IsComplete "page_id",
    StandardDeviation "page_id" between 2444.94 and 2702.3,
    Uniqueness "page_id" > 0.95,
    ColumnValues "page_id" <= 8925,
    IsComplete "uri",
    ColumnLength "uri" <= 190,
    IsComplete "type",
    ColumnValues "type" in ["post","home","page","category","post_tag","archive","author","search"],
    ColumnValues "type" in ["post","home"] with threshold >= 0.94,
    ColumnLength "type" between 3 and 9,
    IsComplete "date",
    IsComplete "count",
    ColumnValues "count" in ["1","2","3","4","5","6"] with threshold >= 0.9,
    StandardDeviation "count" between 3.89 and 4.3,
    ColumnValues "count" <= 93,
    IsComplete "id",
    ColumnValues "id" in ["92","11","281","7","1143","1902","770","1217","721","1660","2169","589","371","67","484","4","898","0","691","2029","1606","2686","1020","2643","2993","1400","30","167","2394"] with threshold >= 0.89,
    StandardDeviation "id" between 820.3 and 906.65,
    ColumnValues "id" <= 3532,
    IsComplete "date_todate",
    IsComplete "date_year",
    ColumnValues "date_year" in ["2023","2024","2022"],
    ColumnValues "date_year" between 2021 and 2025,
    IsComplete "date_month",
    ColumnValues "date_month" in ["6","7","5","4","3","8","2","1","11","12","10","9"],
    ColumnValues "date_month" in ["6","7","5","4","3","8","2","1","11","12","10"] with threshold >= 0.94,
    StandardDeviation "date_month" between 3.09 and 3.41,
    ColumnValues "date_month" <= 12,
    IsComplete "date_day",
    ColumnValues "date_day" in ["13","7","12","8","6","3","19","20","17","4","9","14","1","16","2","11","5","15","10","26","21","25","24","18","27","22","28","30","23","29","31"],
    ColumnValues "date_day" in ["13","7","12","8","6","3","19","20","17","4","9","14","1","16","2","11","5","15","10","26","21","25","24","18","27","22","28","30"] with threshold >= 0.91,
    StandardDeviation "date_day" between 8.3 and 9.18,
    ColumnValues "date_day" <= 31
]
A lot is going on here, so let’s deep a little deeper.
Recommendations Analysis
As with many machine learning processes, some human validation of the results is wise before moving forward.
While Glue Data Quality can predict rules based on its ML model and the data supplied, I have years of familiarity with the data and can intuit likely future trends and patterns. As Glue currently lacks this intuition, some recommendations are more useful than others. Let’s examine some of them and I’ll elaborate.
Firstly, these recommendations are totally fine:
IsComplete "page_id",
IsComplete "uri",
IsComplete "date",
IsComplete "count",
IsComplete checks whether all of the values in a column are complete with no NULL values present. This is completely reasonable and should apply to all columns in the silver-statistics_pages data. An easy win.
However, some recommendations need work:
ColumnValues "date_year" in ["2023","2024","2022"],
ColumnValues "date_year" between 2021 and 2025,
ColumnValues runs an expression against the values in a column. These rules (which are both checking the same thing as DQDL’s BETWEEN is exclusive) state that:
date_year must be 2022, 2023 or 2024
This is fine for now, as 2024 is the current year and the first statistics are from 2022. But a post published next year will cause this rule to fail. And not because of incorrect data – because of incorrect rule configuration. Hello false positives!
Finally, some suggestions are outright wrong. For example:
ColumnValues "page_id" <= 8925,This rule checks that the page_id column doesn’t exceed 8925. But page_id is a primary key! It auto-increments with every new row! So this rule will fail almost immediately, and so is completely unsuitable.
Ok so let’s fix them!
Recommendations Modifications
Firstly, let’s fix the date_year rule by replacing the range with a minimum value:
ColumnValues "date_year" >= 2021,Now let’s fix the page_id rule. This column is a primary key in the WordPress MySQL database, so every value should be unique. Therefore the ruleset should check page_id for uniqueness.
As it turns out I’m spoilt for choice here! There are (at least) three relevant rules I can use:
IsUnique "page_id",
IsPrimaryKey "page_id",
Uniqueness "page_id" = 1.0,
Let’s examine them:
IsUniquechecks whether all of the values in a column are unique. Exactly what I’m after.
IsPrimaryKeygoes a step further, verifying that a column contains a primary key by checking if all of the values in the column are unique and complete (non-null).
- Finally,
Uniquenesschecks the percentage of unique values in a column against a given expression. In my example,"page_id" = 1.0states that eachpage_idcolumn value must be 100% unique.
So why not use them all? Well, besides that being overkill there is a cost implication. Like many Glue services, AWS Glue Data Quality is billed by job duration (per DPU hour). If I keep all three rules then I’m doing the same check three times. This is wasteful and creates unnecessary costs.
Here, the IsPrimaryKey check most closely matches the source column (itself a primary key) so I’ll use that.
Elsewhere, I’m simplifying date_month and date_day. While these are correct:
ColumnValues "date_month" in ["6","7","5","4","3","8","2","1","11","12","10","9"],
ColumnValues "date_day" in ["13","7","12","8","6","3","19","20","17","4","9","14","1","16","2","11","5","15","10","26","21","25","24","18","27","22","28","30","23","29","31"],
It’s far simpler to read as:
ColumnValues "date_month" between 0 and 13,
ColumnValues "date_day" between 0 and 32,
Finally, I did some housekeeping to reduce the ruleset’s duration:
- Removed all the duplicate checks.
IsCompletewas fine for most. ColumnLengthchecks are gone as the WordPress database already enforces character limits.StandardDeviationchecks are also gone as they don’t add any value here.
Now let’s use these suggestions as a starting point for my own ruleset.
Customising A Ruleset
In addition to the above rules and changes, the following rules have been added to the silver-statistics_pages ruleset:
ColumnCount checks the dataset’s column count against a given expression. This checks there are ten columns in silver-statistics_pages:
ColumnCount = 10RowCount checks a dataset’s row count against a given expression. This checks there are more than zero rows in silver-statistics_pages:
RowCount > 0RowCountMatch checks the ratio of the primary dataset’s row count and a reference dataset’s row count against the given expression. This checks that the row count of silver-statistics_pages and bronze-statistics_pages are the same (100%):
RowCountMatch "wordpress_api.bronze-statistics_pages" = 1.0ReferentialIntegrity checks to what extent the values of a set of columns in the primary dataset are a subset of the values of a set of columns in a reference dataset. This checks that each silver-statistics_pages ID value is present in silver-posts:
ReferentialIntegrity "id" "wordpress_api.silver-posts.id" = 1.0Finally, here is my finished silver-statistics_pages ruleset:
# silver-statistics_pages data quality rules

Rules = [
    # all data
    ColumnCount = 10,
    RowCount > 0,
    RowCountMatch "wordpress_api.bronze-statistics_pages" = 1.0,

    # page_id
    IsPrimaryKey "page_id",

    # uri
    IsComplete "uri",

    # type
    IsComplete "type",

    # date
    IsComplete "date",
    ColumnValues "date_todate" <= now(),

    # count
    IsComplete "count",
    ColumnValues "count" between 0 and 1000,

    # id
    IsComplete "id",
    ReferentialIntegrity "id" "wordpress_api.silver-posts.id" = 1.0,

    # date_todate
    IsComplete "date_todate",
    ColumnValues "date_todate" <= now(),

    # date_year
    IsComplete "date_year",
    ColumnValues "date_year" >= 2021,

    # date_month
    IsComplete "date_month",
    ColumnValues "date_month" between 0 and 13,

    # date_day
    IsComplete "date_day",
    ColumnValues "date_day" between 0 and 32

]
Once a ruleset is created, it can be edited, cloned and run. So let’s test it out!
Ruleset Testing
In this section, I test my Glue Data Quality veracity ruleset and act on its findings. But first I need to get it running…
Job Test: Data Fetch Fail
Running my ruleset for the first time, it didn’t take long for a problem to appear:
Exception in User Class: java.lang.RuntimeException :
Failed to fetch data.
Please check the logs in CloudWatch to get more details.
Uh oh. Guess it’s time to check CloudWatch. This wasn’t an easy task the first time round!
Glue Data Quality generates two new log groups:
aws-glue/data-quality/erroraws-glue/data-quality/output
And each Data Quality job run creates five log streams:
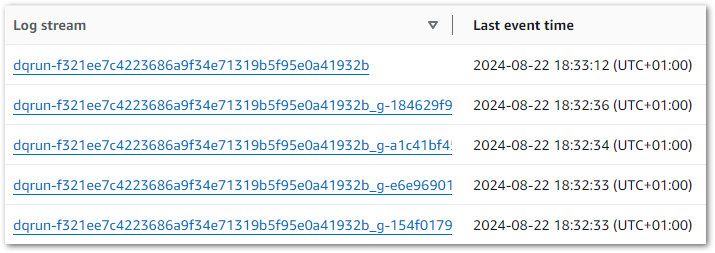
But there’s no clear hint of where to start! So I dived in and started reading the error logs. After some time, it turned out I actually needed the output logs. Oh well.
And in an output log stream’s massive stack trace:
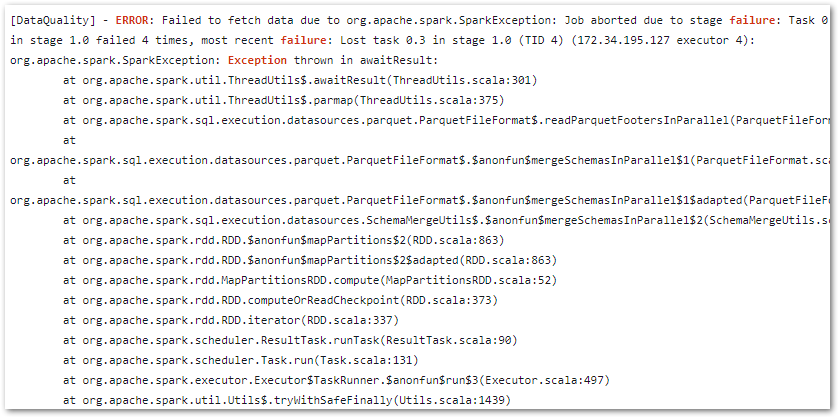
Was my problem:
Caused by:
java.io.FileNotFoundException:
No such file or directory
's3://data-lakehouse-bronze/wordpress_api/statistics_pages/statistics_pages.parquet'
No such directory? Well, there definitely is! Sounds like a permissions issue. What gives?
So, remember my RowCountMatch check? It’s trying to compare the silver-statistics_pages row count to the bronze-statistics_pages row count. Like most AWS services, AWS Glue uses an IAM role to interact with AWS resources – in this case the Bronze and Silver Lakehouse S3 buckets.
So let’s check:
- Can the Glue Data Quality check’s IAM role read from the Silver Lakehouse S3 bucket? Yup!
- Can it read from the Bronze one? Ah…
Adding s3:GetObject for the bronze S3 path to the Glue Data Quality check’s IAM role fixed this error. Now the job runs and returns results!
Job Test: Constraint Not Met
Next up, I got an interesting message from my ColumnValues "count" rule:
ColumnValues "count" between 0 and 1000

Value: 93.0 does not meet the constraint requirement!
That’s…a lot! Then I realised I’d set the rule conditions to between 0 and 1 instead of between 0 and 1000. Oops…
Then I got a confusing result from my ReferentialIntegrity "id" "wordpress_api.silver-posts.id" = 1.0 rule:
ReferentialIntegrity "id" "wordpress_api.silver-posts.id" = 1.0

Value: 0.9763982102908277 does not meet the constraint requirement.
As a reminder, ReferentialIntegrity checks to what extent the values of a set of columns in the primary dataset are a subset of the values of a set of columns in a reference dataset. And because "wordpress_api.silver-statistics_pages.id" values are based entirely on "wordpress_api.silver-posts.id" values, they should be a perfect match!
Time to investigate. I launched Athena and put this query together:
SELECT
sp.id AS stats_id
,p.id AS post_id
FROM "wordpress_api"."silver-statistics_pages" AS sp
LEFT JOIN "wordpress_api"."silver-posts" AS p
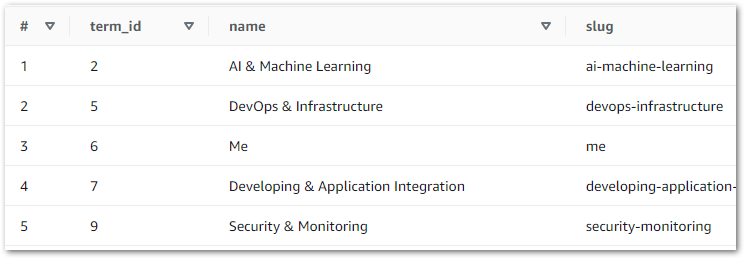
ON sp.id = p.idAnd the results quickly highlighted a problem:
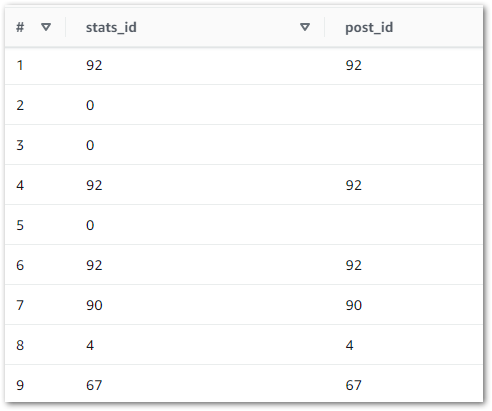
Here, the LEFT JOIN retrieves all silver-statistics_pages IDs and each row’s matching ID from silver-posts. The empty spaces represent NULLs, where no matching silver-posts ID was found. So what’s going on? What is stats_id zero in silver-statistics_pages?
Reviewing the silver-statistics_pages uri column shows that ID zero is amazonwebshark’s home page. As the WordPress posts table doesn’t record anything about the home page, the statistics_pages table can’t link to anything in posts. So ID zero is used to prevent missing data.
Knowing this, how can I update the rule? In June 2024 AWS added DQDL WHERE clause support, so I tried to add a “where statistics_pages ID isn’t zero” condition. But in testing the editor either didn’t run the check properly or rejected my syntax entirely. So eventually I settled for changing the check’s threshold from = 1.0 to >= 0.9. Maybe something to revisit in a few months.
Run History & Reporting
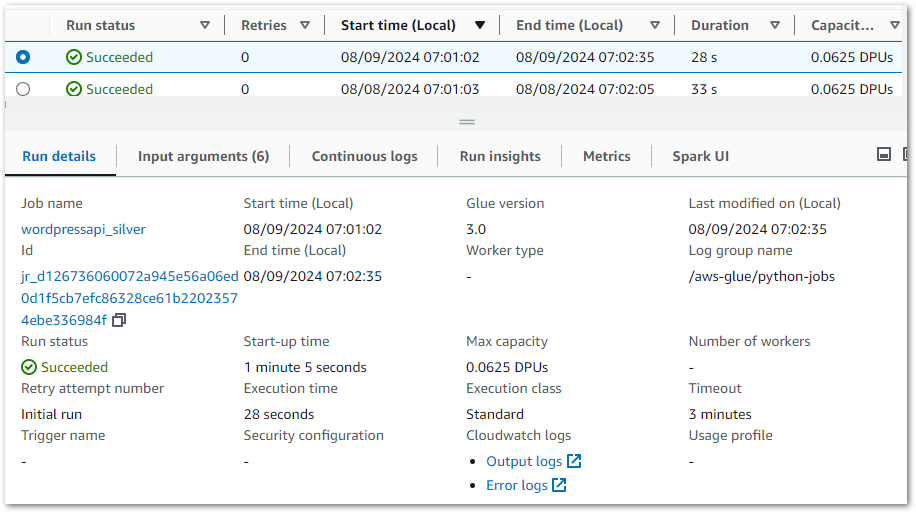
So now all my rules are working, what benefits do I get? Firstly, AWS Glue shows the job’s run history including status, result and start/stop times:
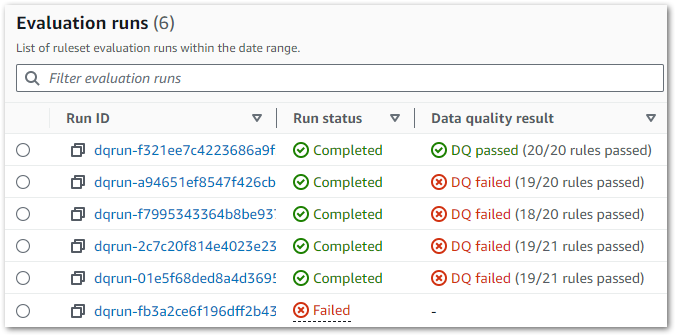
Each run is expandable, showing details like duration, overall score and each check’s output. Results are also downloadable – in testing this gave me an unreadable file but adding a JSON suffix let me view the contents:
{
"ResultId": "dqresult-e76896fe1ab1dd3436cf12b719da726416d4e64e",
"Score": 0.95,
"DataSource": {
"GlueTable": {
"DatabaseName": "wordpress_api",
"TableName": "silver-statistics_pages",
"CatalogId": "973122011240"
}
},
"RulesetName": "silver-statistics_pages",
"StartedOn": "2024-08-22T17:23:20.468Z",
"CompletedOn": "2024-08-22T17:23:45.680Z",
"RulesetEvaluationRunId": "dqrun-a94651ef8547f426cb977c9451c39061c68aefbd",
"RuleResults": [
{
"Name": "Rule_1",
"Description": "ColumnCount = 10",
"Result": "PASS",
"EvaluatedMetrics": {
"Dataset.*.ColumnCount": 10
}
},
{
"Name": "Rule_2",
"Description": "RowCount > 0",
"Result": "PASS",
"EvaluatedMetrics": {
"Dataset.*.RowCount": 8940
}
},
{
"Name": "Rule_3",
"Description": "RowCountMatch \"wordpress_api.bronze-statistics_pages\" = 1.0",
"Result": "PASS",
"EvaluatedMetrics": {
"Dataset.wordpress_api.bronze-statistics_pages.RowCountMatch": 1
}
},
{
"Name": "Rule_4",
"Description": "IsPrimaryKey \"page_id\"",
"Result": "PASS",
"EvaluatedMetrics": {
"Column.page_id.Completeness": 1,
"Column.page_id.Uniqueness": 1
}
},
[REDACTED Rules 5 to 19 for space - Ed]
{
"Name": "Rule_20",
"Description": "ColumnValues \"date_day\" between 0 and 32",
"Result": "PASS",
"EvaluatedMetrics": {
"Column.date_day.Maximum": 31,
"Column.date_day.Minimum": 1
}
}
]
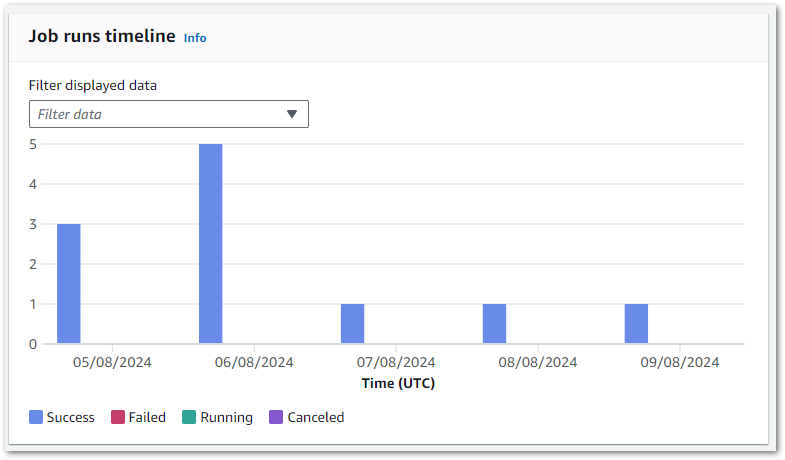
}Finally, there’s a snapshot chart showing the results trend of the last ten runs:
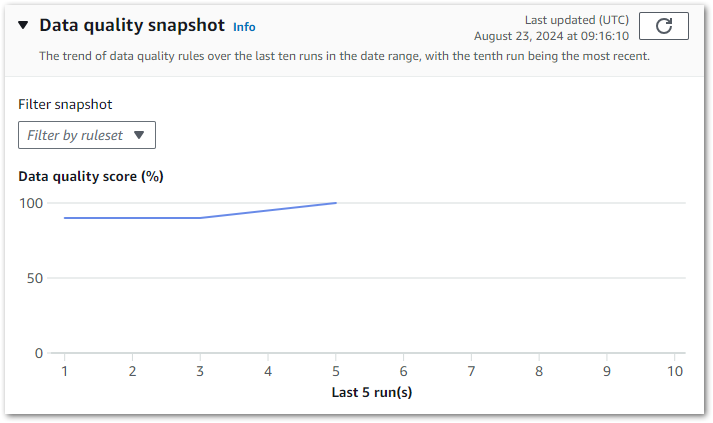
Although not downloadable, this can still be screen-grabbed and used to certify the data’s quality to stakeholders. Additionally, AWS has documented a visualisation solution using Lambda, S3 and Athena.
Additional Data Quality Ruleset
With the silver-statistics_pages ruleset testing complete, I added a second dataset check before I moved on. This ruleset is applied to silver-posts.
The checks are very similar to silver-statistics_pages in terms of rules and criteria. So in the interests of space I’ve committed it to my GitHub repo.
Now, let’s add my Glue Data Quality checks into my WordPress pipeline.
Ruleset Orchestration
In this section, I integrate my Glue Data Quality veracity checks into my existing WordPress Data Pipeline Step Function workflow.
Step Function Integration
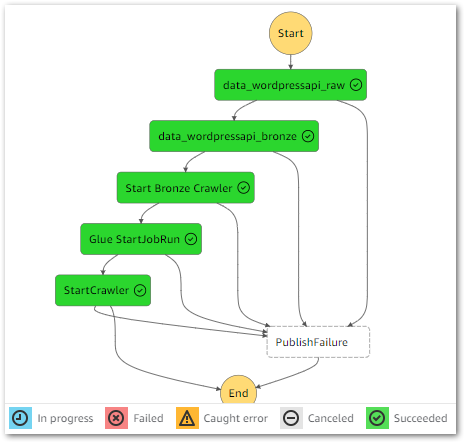
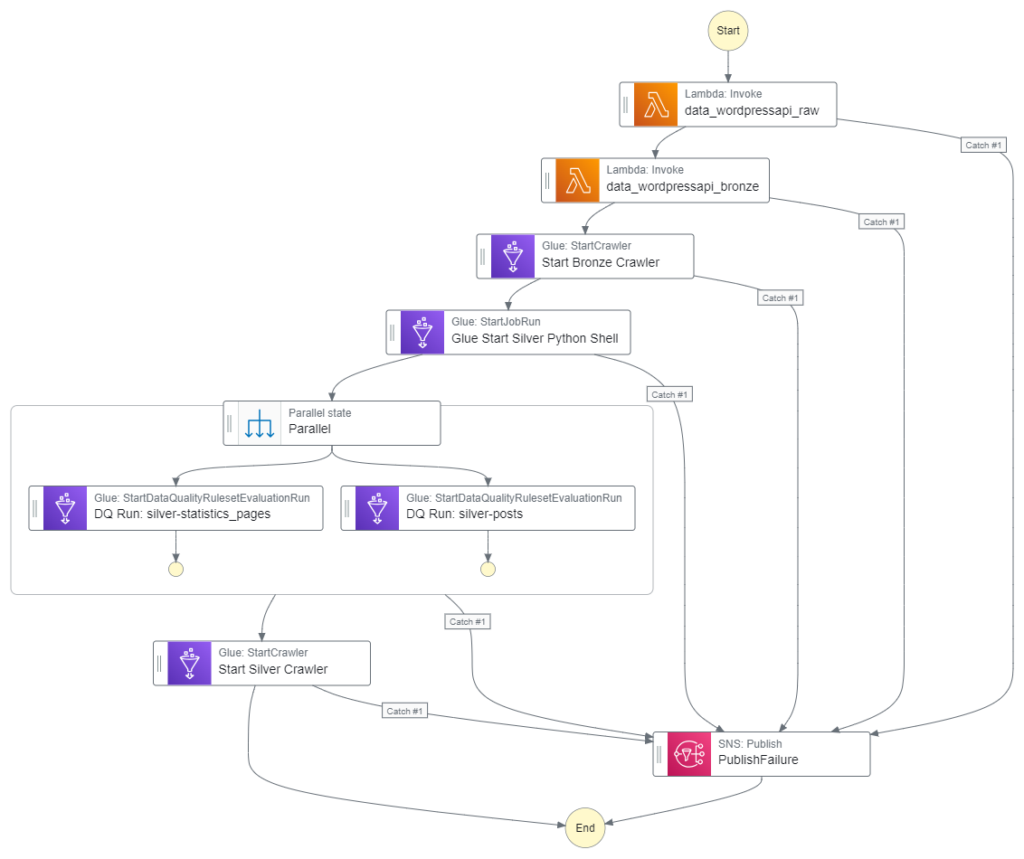
As a quick reminder, here’s how the Step Function workflow currently looks:
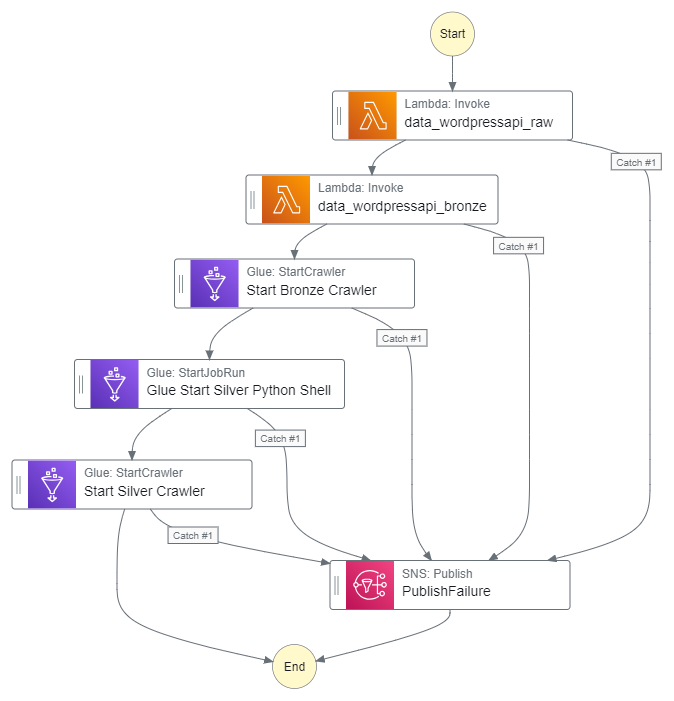
This workflow controls the ingestion, validation, crawling and ETL processes associated with my WordPress API data. I’ll insert the quality checks between the Silver ETL job and the Silver crawler.
AWS Step Functions runs Glue Data Quality checks using the StartDataQualityRulesetEvaluationRun task. This task uses an AWS SDK integration, calling the StartDataQualityRulesetEvaluationRun API with the following parameters:
- Data source (AWS Glue table) associated with the run.
- IAM role to run the checks with.
- Ruleset(s) to run.
Optional parameters are also available. In the case of my silver-statistics_pages ruleset, the API parameters are as follows:
{
  "DataSource": {
    "GlueTable": {
      "DatabaseName": "wordpress_api",
      "TableName": "silver-statistics_pages"
    }
  },
  "Role": "Glue-S3ReadOnly",
  "RulesetNames": [
    "silver-statistics_pages"
  ]
}
Because the TableName parameter is different for the silver-posts checks, each check needs a separate action. However, I can use a Parallel state because both actions can run simultaneously. This will take full advantage of AWS’s systems, yielding faster execution times for my workflow.
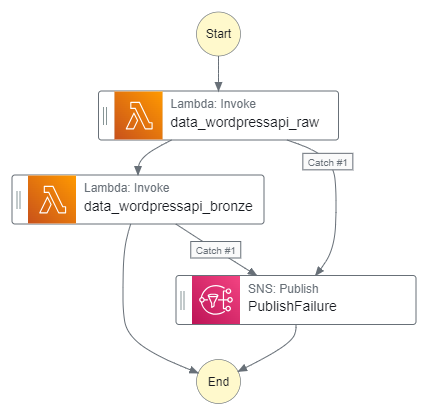
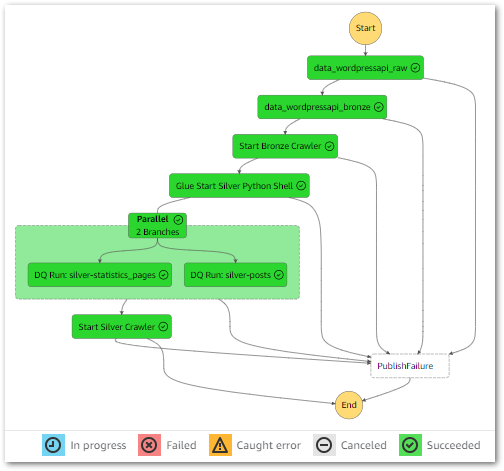
Here is how my Step Function workflow looks with these changes:
This workflow is executed by an EventBridge Schedule running daily at 07:00.
Step Function Testing
Testing time! My workflow needs new IAM permissions to perform its new tasks. These are:
glue:StartDataQualityRulesetEvaluationRun
This lets the workflow start the silver-statistics_pages and silver-posts Data Quality jobs.
iam:PassRole
A Glue Data Quality job must assume an IAM role to access AWS resources successfully. Without iam:PassRole the workflow can’t do this and the check fails.
glue:GetTable
The workflow must access the Glue Data Catalog while running, requiring glue:GetTable on the desired region’s Data Catalog ARN to get the required metadata.
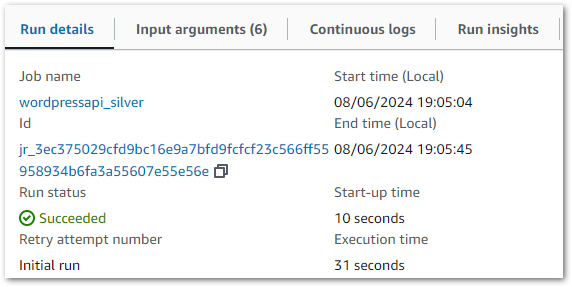
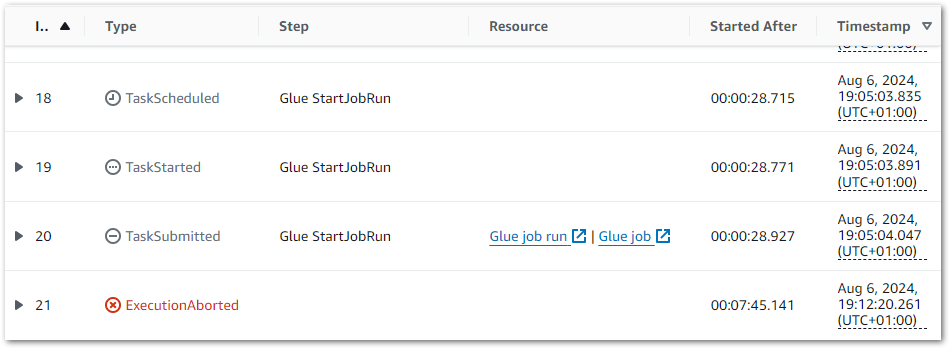
With these updates, the workflow executes successfully:
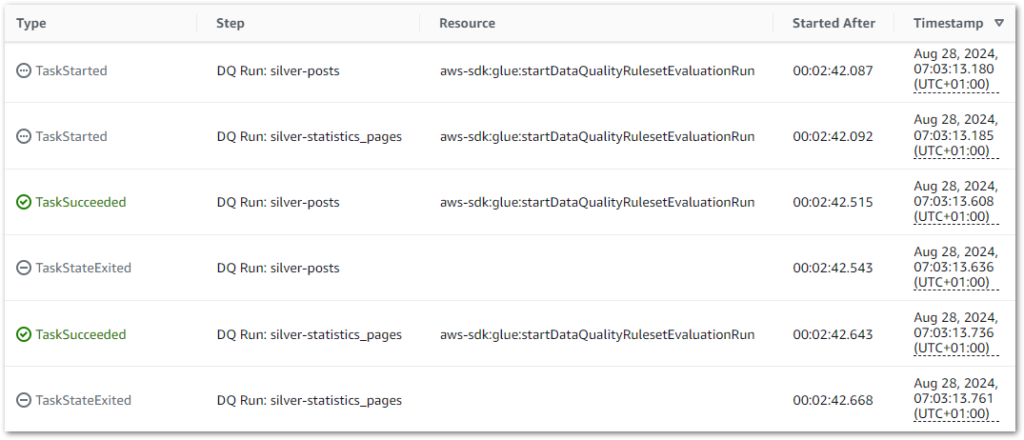
During the parallel state, both Data Quality jobs successfully start and finish within milliseconds of each other instead of running sequentially:
Cost Analysis
In this section, I examine my costs for the updated Step Function workflow.
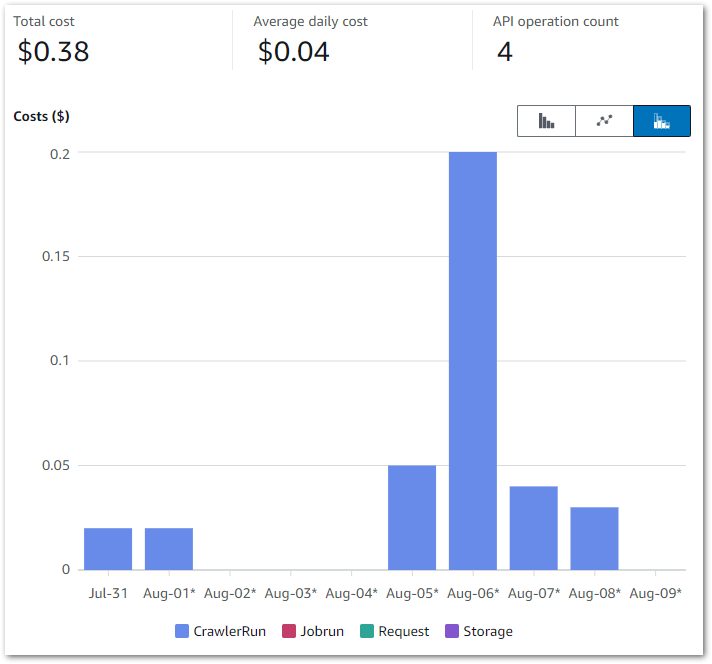
This Cost Explorer chart runs from 16 August to the end of August. It is grouped by API Operation and excludes some APIs that aren’t part of this workload.

Some notes:
- I was experimenting with Glue Data Quality from 19 August to 22 August. This period generates the highest Glue
Jobruncosts – $0.23 on the 20th and $0.27 on the 22nd. - The
silver-statistics_pagesruleset was added to the Step Function workflow on the 26th. Thesilver-postsruleset was then added on the 27th. - The
CrawlerRundaily costs are usually $0.04, with some experiments generating higher costs.
My main costs are from Glue’s Jobrun and CrawlerRun operations, which was expected. Each ruleset costs around $0.09 a day to run, while each crawler continues to cost $0.02 a day. Beyond that I’m paying for some S3 PutObject calls, and everything else is within the free tier.
Separately, AWS has tested Data Quality rulesets of varying complexity. Their accrued costs ranged from $0.18 for the least complex to $0.54 for the most complex. So on par with mine!
Summary
In this post, I used AWS Glue Data Quality checks and rulesets to apply bespoke veracity checks to my WordPress datasets.
I think AWS Glue Data Quality is a very effective veracity tool. The simple syntax, quick execution and deep AWS integration offer a good solution to a core Data Engineering issue. It’s great that datasets can be compared with other datasets in the Glue Data Catalog, and the baked-in reporting and visuals make Glue’s findings immediately accessible to both technical engineers and non-technical stakeholders. I look forward to seeing what future Glue Data Quality releases will offer!
If this post has been useful then the button below has links for contact, socials, projects and sessions:

Thanks for reading ~~^~~