In this post, I create my WordPress data pipeline’s Gold ETL process using PySpark and the AWS Glue Studio visual interface.
Table of Contents
- Introduction
- AWS Glue Studio
- Architecture
- Gold ETL Job
- Glue Outputs & Behaviours
- Step Functions Update
- Cost Analysis
- Summary
Introduction
Time to finish my WordPress AWS data pipeline! Here it is so far:
In which;
- Lambda is handling WordPress API data extraction.
- Glue is crawling the data for the data catalog…
- …and transforming the data with Python…
- …and running data quality checks.
- Step Functions is handling orchestration.
- EventBridge Scheduler is handing automation.
In the Medallion Lakehouse Architecture, this covers both the Bronze and Silver layers that handle raw and processed data respectively. Now I’ll start aggregating my WordPress data for reporting and analytics. For this, I’ll use AWS Glue Studio.
Firstly, I’ll explore Glue Studio and its features. Next, I’ll architect and build an ETL job using Glue Studio’s visual editor while examining some of Glue’s behaviours. Finally, I’ll update my WordPress Data Pipeline Step Functions workflow and examine costs.
Let’s begin with Glue Studio.
AWS Glue Studio
This section introduces Glue Studio and examines Apache Spark.
AWS Glue Studio
AWS Glue Studio is a serverless tool designed for data-centric tasks like automating data preparation, orchestrating data quality checks and creating ETL jobs. It integrates with other AWS services, and also interacts with data from sources like RDS, Redshift and S3. It is ideal for simplifying data transformation and integration processes. The AWS documentation contains full details of Glue Studio’s features.
Under the hood, Glue Studio uses PySpark, the Python API for Apache Spark. Workflows can be created both as code and via Glue Studio’s visual interface. Glue Studio supports Git version control systems for change management, and integrates several observability tools including AWS IAM for security and Amazon CloudWatch for logging. Additionally, Glue also has its own monitoring and orchestration tools.
But wait – Spark? PySpark? What?!
Apache Spark
Apache Spark is an open-source framework designed to process large-scale data quickly. Spark enables distributed computing, allowing tasks to be performed across multiple machines for faster and more efficient data processing. It has existed since 2014.
Known for its speed, Spark processes data in memory, significantly reducing the need for slower disk operations associated with older systems. Spark is commonly used for big data analytics, machine learning and real-time data processing in industries that handle massive datasets.
PySpark
PySpark is a Python interface for Apache Spark. It allows operations to be distributed across clusters of machines while maintaining the accessibility and ease of Python. PySpark’s combination of Python’s simplicity and Spark’s power makes it a practical, accessible solution for handling extensive datasets in a fast and scalable way.
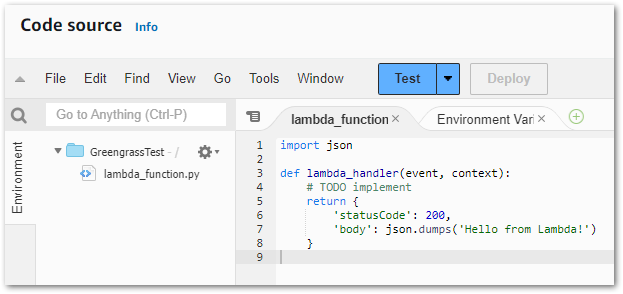
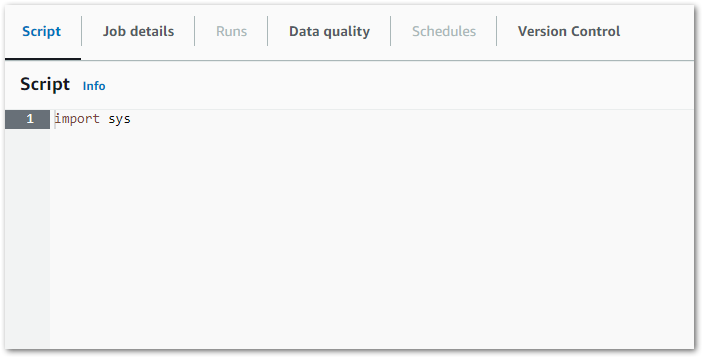
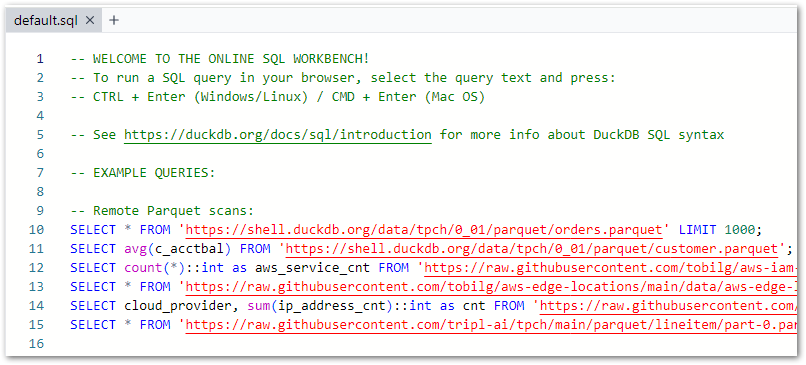
Glue Studio’s visual interface automatically writes PySpark code in real time. For example, this boilerplate Python script is created with each new Glue PySpark job:
import sys
from awsglue.transforms import *
from awsglue.utils import getResolvedOptions
from pyspark.context import SparkContext
from awsglue.context import GlueContext
from awsglue.job import Job

args = getResolvedOptions(sys.argv, ["JOB_NAME"])
sc = SparkContext()
glueContext = GlueContext(sc)
spark = glueContext.spark_session
job = Job(glueContext)
job.init(args["JOB_NAME"], args)
For those curious, this DataEng video provides a technical explanation of each import:
So that’s the basics of AWS Glue Studio. Now let’s see what the solution looks like.
Architecture
This section examines my proposed solution’s architecture. Much of this architecture is similar to both the Bronze and Silver layers. I’ll examine the new Gold Glue PySpark ELT job first, followed by the updated WordPress data pipeline Step Function workflow.
Glue Gold ETL Job
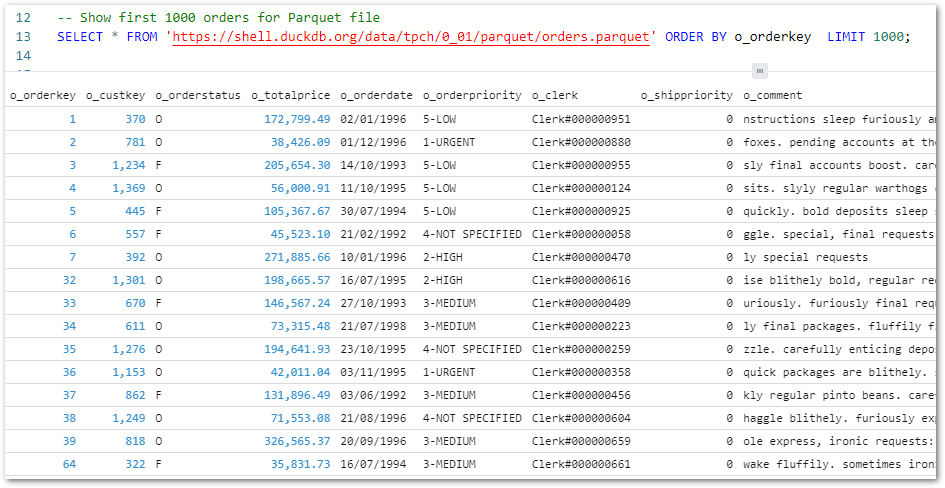
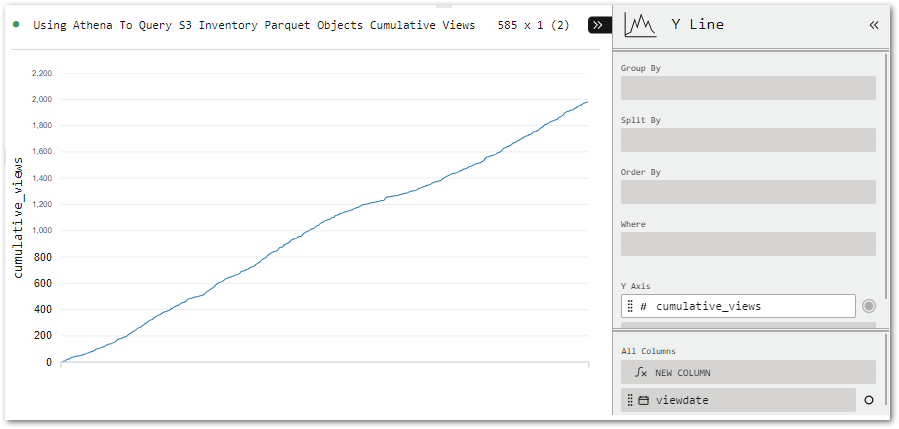
Firstly, this is the Gold Glue PySpark ETL job:
While updating CloudWatch Logs throughout:
- Gold Glue ETL job extracts data from
wordpress-apiSilver S3 objects and then performs PySpark transformations. - Gold Glue PySpark ETL job loads the transformed data into Gold S3 bucket as Parquet objects.
Step Function Workflow
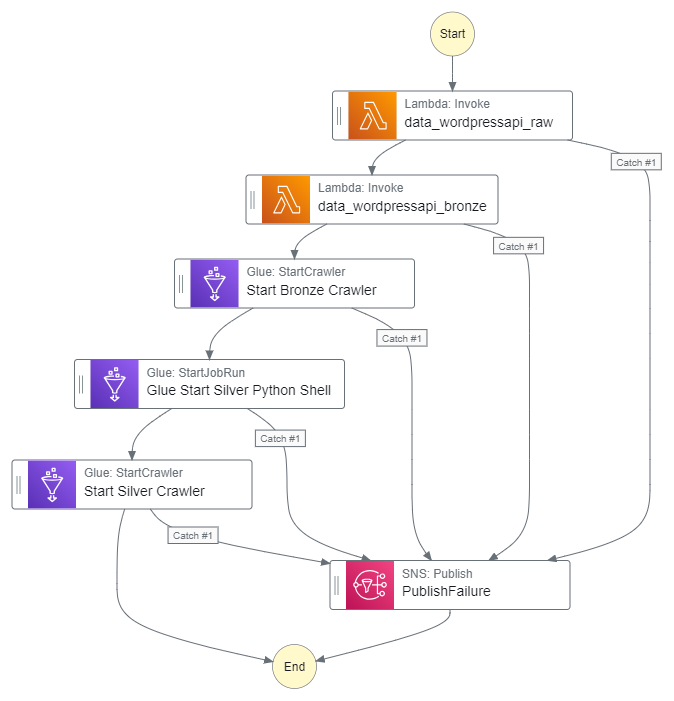
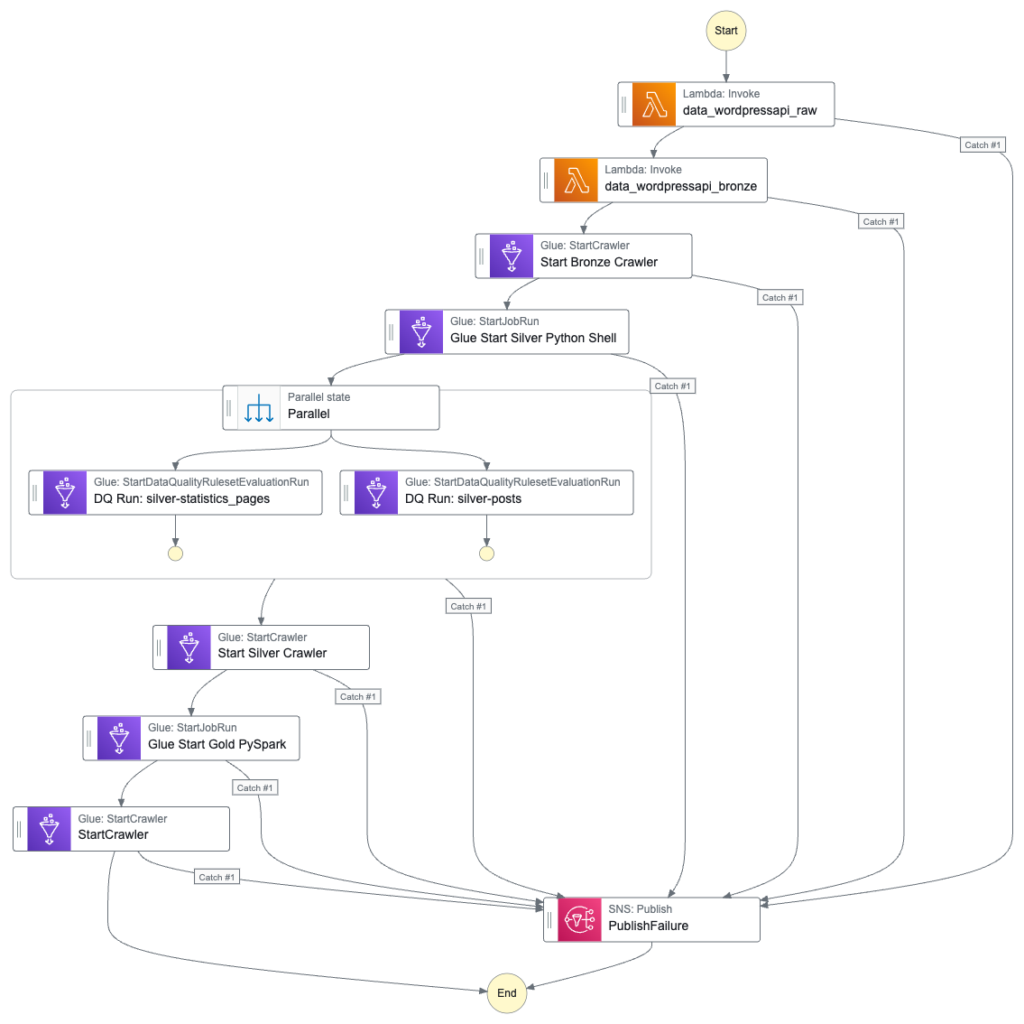
Next, the updated Step Function workflow:
While updating the workflow’s CloudWatch Log Group throughout:
- An EventBridge Schedule executes the Step Functions workflow. Lambda Raw function is invoked.
- Invocation Fails: Publish SNS message. Workflow then ends.
- Invocation Succeeds: Invoke Lambda Bronze function.
- Lambda Bronze function is invoked.
- Invocation Fails: Publish SNS message. Workflow then ends.
- Invocation Succeeds: Run Glue Bronze Crawler.
- Glue Bronze Crawler runs.
- Run Fails: Publish SNS message. Workflow then ends.
- Run Succeeds: Update Glue Data Catalog. Run Glue Silver ETL job.
- Glue Silver ETL job runs.
- Run Fails: Publish SNS message. Workflow then ends.
- Run Succeeds: Run Glue Silver Data Quality Checks.
- Glue Silver Data Quality Checks run.
- Run Fails: Publish SNS message. Workflow then ends.
- Run Succeeds: Run Glue Silver Crawler.
- Glue Silver Crawler runs.
- Run Fails: Publish SNS message. Workflow then ends.
- Run Succeeds: Update Glue Data Catalog. Run Glue Gold ETL job.
- Glue Gold PySpark ETL job runs.
- Run Fails: Publish SNS message. Workflow then ends.
- Run Succeeds: Run Glue Gold Crawler.
- Glue Gold Crawler runs.
- Run Fails: Publish SNS message. Workflow then ends.
- Run Succeeds: Update Glue Data Catalog. Workflow then ends.
Additionally, an SNS message is published if the Step Functions workflow fails.
Gold ETL Job
In this section, I create my Gold Glue PySpark ETL job. Firstly, I’ll define the job’s requirements. Next, I’ll build the job in Glue Studio, and finally I’ll examine Glue’s inbuilt monitoring.
Requirements
Let’s begin by understanding the Gold Layer. Databricks defines it as curated, business-level data:
Data in the Gold layer of the lakehouse is typically organised in consumption-ready “project-specific” databases. The Gold layer is for reporting and uses more de-normalised and read-optimised data models with fewer joins. The final layer of data transformations and data quality rules are applied here.
https://www.databricks.com/glossary/medallion-architecture
The concept of a gold layer is nothing new. Other names include aggregated, enriched and consumption layers. The idea is the same in all cases – producing refined and aggregated datasets that are easily consumable by analytics tools, machine learning models and production applications.
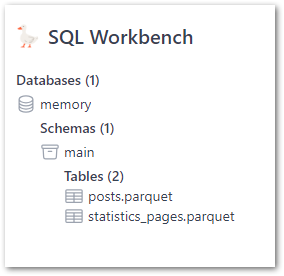
This Gold ETL job will produce an aggregation of both the posts and statistics_pages Silver datasets. The Gold dataset will contain view statistics and post creation data, limited to blog posts.
This will involve:
- Joining the Silver datasets.
- Removing unneeded columns to reduce the Gold dataset’s size.
- Renaming columns to improve the Gold dataset’s legibility.
- Filtering the Gold dataset to remove unneeded data.
So let’s get started!
Job Creation
This section splits the Gold Glue PySpark ETL job creation process into separate steps for each part.
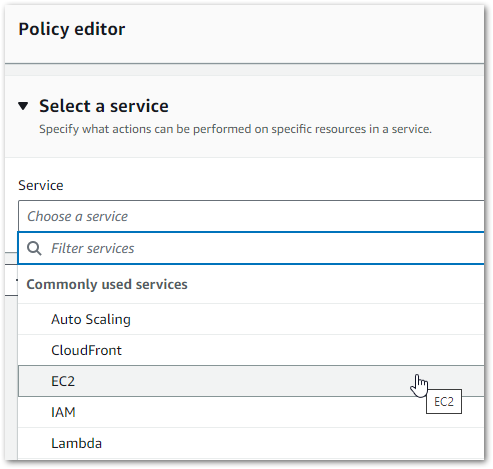
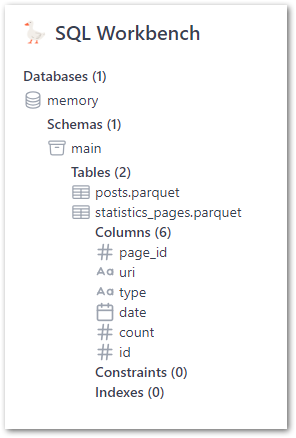
Sources
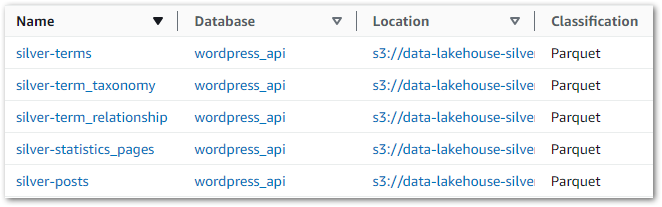
Firstly, let’s define the data sources. There are two sources, both of which are folders in the data-lakehouse-silver S3 bucket:
wordpress_api/posts/wordpress_api/statistics_pages/
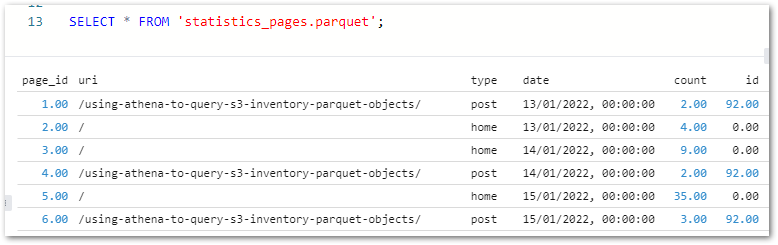
Each source needs a separate node specifying the S3 path and data format. This example shows the Silver posts dataset, where the wordpress_api/posts/ S3 path is selected:

Finally, this is the Source node’s PySpark code for both posts and statistics_pages:
# Script generated for node S3 Silver statistics_pages
S3Silverstatistics_pages_node1724058965930 = glueContext.create_dynamic_frame.from_options(
  format_options={},
  connection_type="s3",
  format="parquet",
  connection_options={
    "paths": ["s3://data-lakehouse-silver/wordpress_api/statistics_pages/"],
    "recurse": True
    },
  transformation_ctx="S3Silverstatistics_pages_node1724058965930"
 )

# Script generated for node S3 Silver posts
S3Silverposts_node1724058915313 = glueContext.create_dynamic_frame.from_options(
  format_options={},
  connection_type="s3",
  format="parquet",
  connection_options={
    "paths": ["s3://data-lakehouse-silver/wordpress_api/posts/"],
    "recurse": True
    },
  transformation_ctx="S3Silverposts_node1724058915313"
 )
Join Transformation
From AWS:
The Join transform allows you to combine two datasets into one. You specify the key names in the schema of each dataset to compare.
https://docs.aws.amazon.com/glue/latest/dg/transforms-configure-join.html
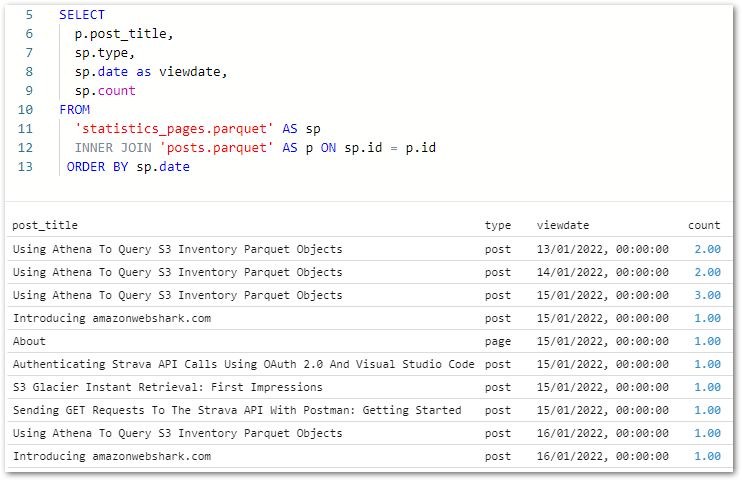
This node essentially creates a SQL join using columns from the selected sources. Here, I’ve inner joined posts.ID to statistics_pages.ID:
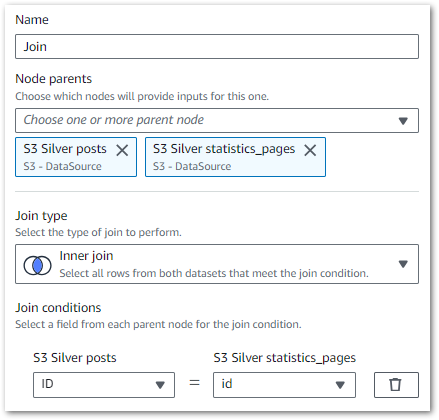
Rows from the Silver datasets that match the join condition are merged into a new row in an output DynamicFrame that will ultimately become the Gold dataset. This frame includes all columns from both Silver datasets.
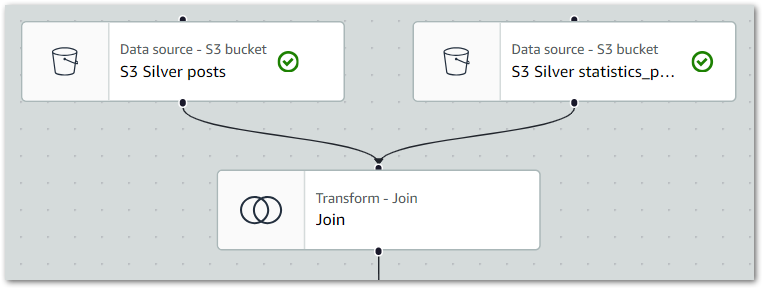
The ETL visual now shows two source nodes linked to the Join node:
Finally, this is the Join node’s PySpark code:
# Script generated for node Join
Join_node1724059035756 = Join.apply(
  frame1=S3Silverposts_node1724058915313,
  frame2=S3Silverstatistics_pages_node1724058965930,
  keys1=["ID"],
  keys2=["id"],
  transformation_ctx="Join_node1724059035756"
  )
Change Schema Transformation
Now it’s time to do some cleaning!
From AWS:
A Change Schema transform remaps the source data property keys into the desired configured for the target data. In a Change Schema transform node, you can:
https://docs.aws.amazon.com/glue/latest/dg/transforms-configure-applymapping.html
- Change the name of multiple data property keys.
- Change the data type of the data property keys, if the new data type is supported and there is a transformation path between the two data types.
- Choose a subset of data property keys by indicating which data property keys you want to drop.
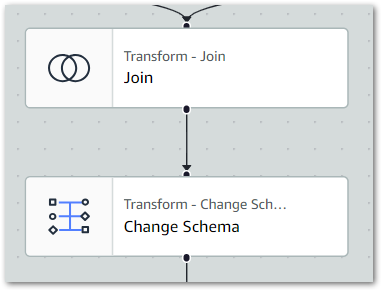
Firstly, I set the Join node as the Change Schema node’s parent to update the ETL visual:
Following the join, the Gold dataset can be simplified and optimised. Here’s an example of what the Change Schema node looks like in action:
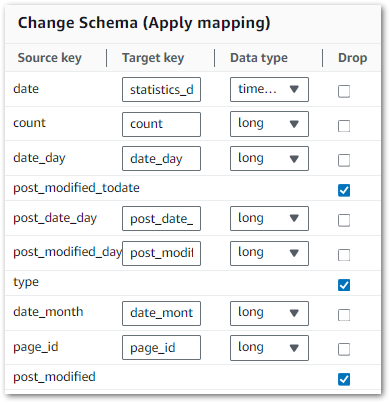
Here
Source Keyshows the current column name.Target Keyhandles column name changes.Data Typesets the data type.- Ticking a
Dropbox removes that column from the outputDynamicFrame
I’ve listed my changes below. Bold items appear in the example.
Firstly, these columns are dropped due to duplication or redundancy:
posts:
posts.post_modifiedpost_modified_daypost_modified_monthpost_modified_todatepost_modified_year
statistics_pages:
date_todateidtypeuri
Additionally, these columns are renamed to add context:
posts:
post_date_todatetopost_date
statistics_pages:
page_idtostatistics_iddatetostatistics_datedate_yeartostatistics_date_yeardate_monthtostatistics_date_monthdate_daytostatistics_date_day
Finally, this is the Change Schema node’s PySpark code:
# Script generated for node Change Schema
ChangeSchema_node1724059144495 = ApplyMapping.apply(
  frame=Join_node1724059035756,
  mappings=[
    ("ID", "bigint", "post_ID", "long"),
    ("post_title", "string", "post_title", "string"),
    ("post_status", "string", "post_status", "string"),
    ("post_parent", "bigint", "post_parent", "long"),
    ("post_type", "string", "post_type", "string"),
    ("post_date_todate", "timestamp", "post_date", "timestamp"),
    ("post_date_year", "bigint", "post_date_year", "long"),
    ("post_date_month", "bigint", "post_date_month", "long"),
    ("post_date_day", "bigint", "post_date_day", "long"),
    ("page_id", "bigint", "statistics_id", "long"),
    ("date", "timestamp", "statistics_date", "timestamp"),
    ("count", "bigint", "statistics_count", "long"),
    ("date_year", "bigint", "statistics_date_year", "long"),
    ("date_month", "bigint", "statistics_date_month", "long"),
    ("date_day", "bigint", "statistics_date_day", "long")
    ],
  transformation_ctx="ChangeSchema_node1724059144495"
  )
Filter Transformation
The joined, cleaned dataset contains data about all amazonwebshark content. I only want the posts data, so next I’ll filter everything else out.
From AWS:
Use the Filter transform to create a new dataset by filtering records from the input dataset based on a regular expression. Rows that don’t satisfy the filter condition are removed from the output.
https://docs.aws.amazon.com/glue/latest/dg/transforms-filter.html
Firstly, I set the Change Schema node as the Filter node’s parent to update the ETL visual:
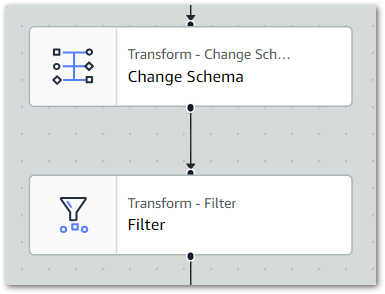
Next, I set the filter conditions. I only need one condition here – keep all dataset rows where post_type matches post:

Finally, this is the Filter node’s PySpark code:
# Script generated for node Filter
Filter_node1724060106174 = Filter.apply(
  frame=ChangeSchema_node1724059144495,
  f=lambda row: (bool(re.match("post", row["post_type"]))),
 transformation_ctx="Filter_node1724060106174"
 )
Target
Finally, I must choose a target location for my Gold dataset.
Target uses the same interface as the Source node. This time, a Gold S3 bucket folder path wordpress_api/statistics_postname/ is specified. Everything else is the same as Source. The Target node offers significant versatility, detailed in the AWS target node documentation.
In summary, this is the Target node’s PySpark code:
# Script generated for node S3 Gold
S3Gold_node1724060393283 = glueContext.write_dynamic_frame.from_options(
  frame=Filter_node1724060106174,
  connection_type="s3",
  format="glueparquet",
  connection_options={
    "path": "s3://data-lakehouse-gold/wordpress_api/statistics_postname/",
    "partitionKeys": []
    },
 format_options={"compression": "snappy"},
 transformation_ctx="S3Gold_node1724060393283"
 )
And here’s the full ETL visual:
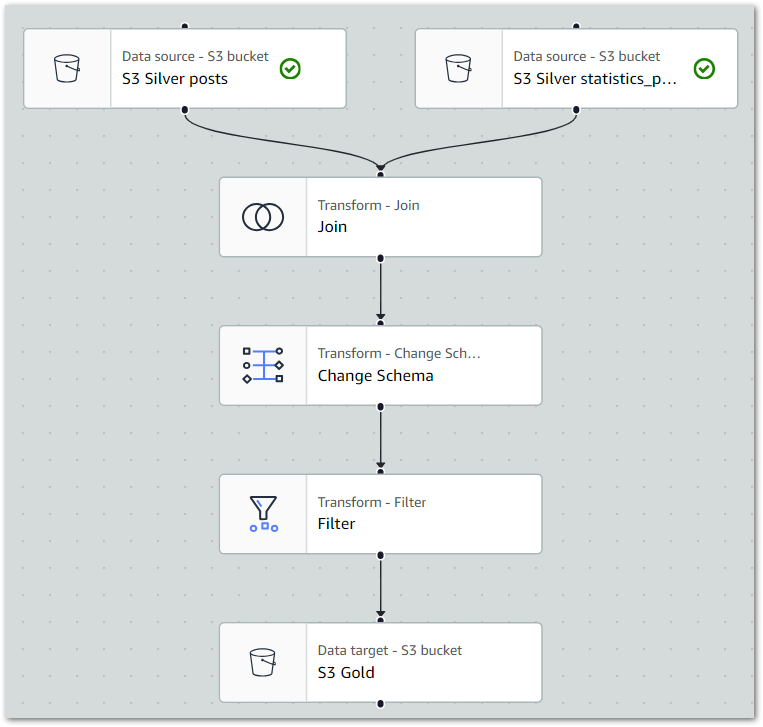
The full Glue job PySpark script is available in this post’s GitHub repo.
Job Properties
Next, I’ll examine some of my Glue job’s properties. This section only covers some key properties as there are loads. For a fuller view, please review the AWS Job Property documentation.
- Glue Version 4.0: This determines the Apache Spark and Python versions available to the job. I usually go with the most recent. AWS has documented each version’s features.
- 2x G 1X Workers: This determines the resources available to the job, and therefore how much money the job costs to run. Each G.1X worker maps to 1 DPU (4 vCPUs, 16 GB of memory) with 84GB disk space. This is plenty for what I need. AWS has documented each worker’s specifications and suggested use cases.
- Job Insights: This creates additional CloudWatch log streams to simplify both job debugging and optimisation. I usually switch this on for testing. AWS has documented this feature’s benefits and requirements.
Additional properties like bookmarks, quality checks, scheduling and version control are also available. I’ve written about quality checks before, and the other properties could all be posts in themselves. For now, let’s move on to execution.
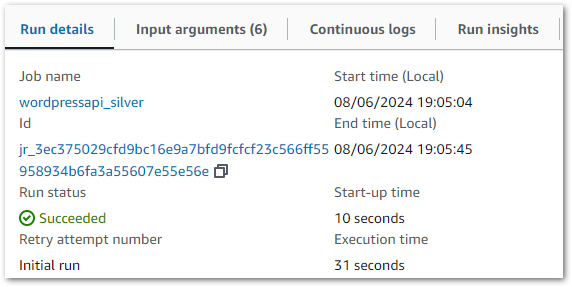
Job Execution
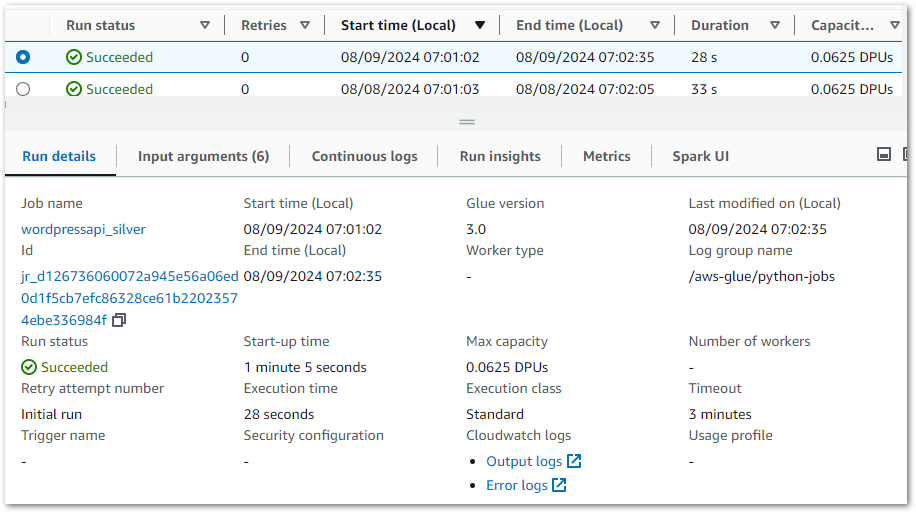
Each PySpark Glue job has several logging sources that are aggregated into the job’s Run tab. The summary shows properties including job status, durations and DPU capacity:
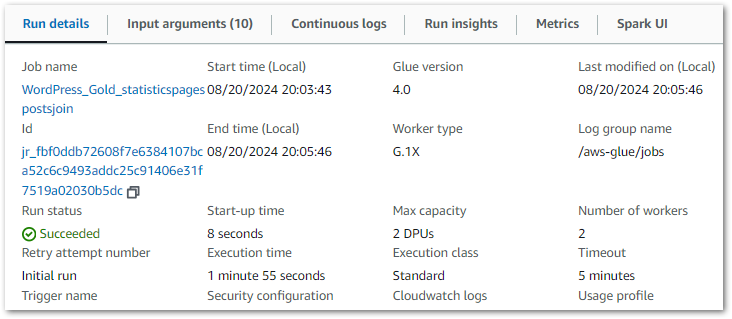
Each job can then be viewed in further detail, with insights including:
- Input arguments set at execution.
- CloudWatch metrics.
- Apache Spark driver logs and web UI.
These resources are increasingly useful as Glue jobs scale. They show resource utilisation, query plans and node configuration which is essential when optimising and troubleshooting big data processes.
Ok, so my job is configured and running successfully. Now let’s review the outputs.
Glue Outputs & Behaviours
This section examines the outputs of my Gold Glue PySpark ETL job and the behaviours influencing them.
For clarity, this is not a case of finding and fixing errors. Rather, this is an exploration of how a Glue PySpark job’s output can differ from expectations. Coming in, I was more familiar with using pandas for ETL and initially found these behaviours confusing. So I wrote this section with that in mind, as it may help others in similar positions down the road.
Firstly I’ll demonstrate a behaviour. Next, I’ll explain why it happens. Finally, I’ll examine if it can be changed. Although, just because something can be done doesn’t mean that it should be.
Run 1: Multiple Objects
Previously, the Bronze and Silver layers ultimately produced single objects for each dataset. Conversely, my Gold PySpark job creates four objects with the same RunID:

Ok – that’s unexpected. What’s more, if I run the job again then I get another four files with a new RunID. So that’s eight in total:
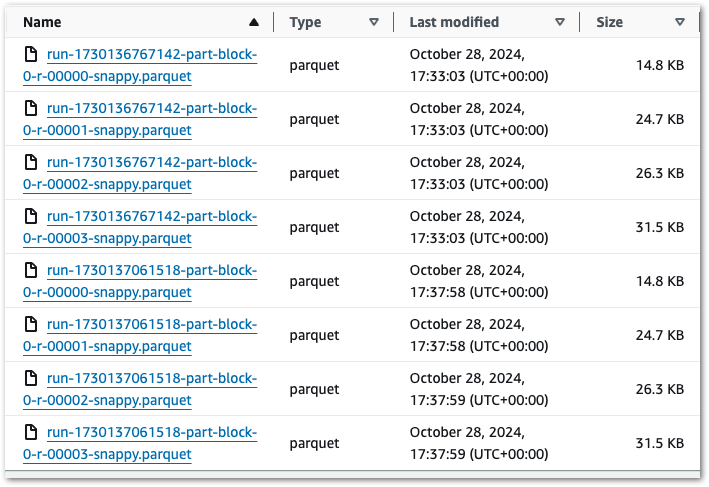
There’s two behaviours here that differ from the previous layers:
- Each run produces multiple objects instead of one.
- Each run creates new objects instead of replacing existing ones.
Let’s examine the multiple objects first.
What’s Happening?
This occurs due to data partitioning.
As mentioned earlier, AWS Glue uses Apache Spark. Spark enables distributed computing by breaking down data into smaller parts. The presence of multiple objects is a direct outcome of this partitioning approach, offering benefits such as:
- Parallel Processing: With data spread across multiple files, Spark workers can access different parts of the dataset simultaneously instead of fighting for a single object. This approach balances the workload and accelerates both read and write operations.
- Fault Tolerance: If a write operation fails, only the impacted object needs reprocessing rather than the entire dataset. This design enhances resilience and reduces the risk of complete data loss.
- Memory Management: Each Spark worker processes only its assigned data partition rather than the full dataset. This improves data loading efficiency and helps prevent memory exhaustion.
Can I Change It?
I couldn’t find a way to change this behaviour within Glue Studio. Glue is very capable of deriving partitions, so this isn’t surprising.
While it can be done, this involves manually changing the autogenerated PySpark script. Glue allows this at the cost of disabling the job’s visual design features:
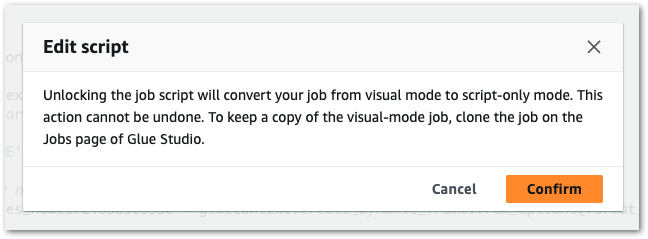
The change itself uses the coalesce method of Glue’s DynamicFrame class to control the number of partitions. This involves:
- An additional import:
from awsglue.dynamicframe import DynamicFrame- Converting the dynamic frame to a Spark DataFrame using
coalesce(n). Here,coalesce(1)forces the output into a single object:
single_file_df = Filter_node1724060106174.toDF().coalesce(1)- Converting the Spark DataFrame back to a dynamic frame before writing, as
write_dynamic_frame.from_options()only accepts DynamicFrames as input:
single_file_dyf = DynamicFrame.fromDF(single_file_df, glueContext, "single_file_dyf")The Glue job now produces a single Parquet object.
This should be used with care. Too many partitions can reduce response times by requiring more reads than necessary. Too few can hinder Spark’s workload distribution abilities. Here, having one object cripples it completely thus removing a key Spark benefit.
Run 2: Objects Not Replaced
Ok, let’s keep coalesce(1) in place because it makes this example easier. Running this job variant creates a single object:

Running it again produces a second object with a new RunID:
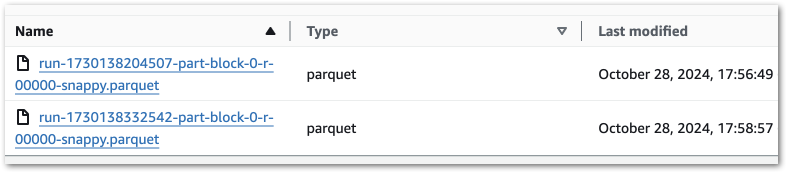
Why isn’t the first object being replaced?
What’s Happening?
There are good reasons for this. Here’s why a replace function isn’t built in:
- Spark Architecture: Spark processes data in parallel, with each task running separately. With this setup, replacing a single piece of data in an object is challenging. So instead, Spark jobs either create entirely new objects or replace data partitions.
- S3 Architecture: S3 stores data as objects rather than files, so it doesn’t have folder-level replacements like a typical file system. When S3 ‘replaces’ an object, it actually creates a new version of the object with the same name and removes the old one.
- Data Management Features: Writing new objects for each job run enables features like versioning, time travel and incremental processing with formats like Apache Iceberg and Delta Lake. It also avoids issues like access conflicts and deadlocks, since existing data remains unchanged while new data is written.
Can I Change It?
So…yes. Creating a boto3 S3 client and running a conditional delete during the job would achieve the desired effect:
# Define S3 bucket and prefix for output path
output_bucket = "data-lakehouse-gold"
output_prefix = "wordpress_api/statistics_postname/"

# Initialize S3 client and clear existing objects in the output path
s3 = boto3.client('s3')
response = s3.list_objects_v2(Bucket=output_bucket, Prefix=output_prefix)

# Check if there are any files and delete them
if 'Contents' in response:
    for obj in response['Contents']:
        s3.delete_object(Bucket=output_bucket, Key=obj['Key'])
But, at this point, is this really a Spark use case anymore? For an ETL job requiring object replacement, I would initially lean towards using a Glue Python Shell job or the AWS SDK for pandas Lambda layer because:
- Fewer cloud resources would be used, making the job cheaper than a PySpark job.
- Fewer Python imports would be needed, reducing the script size and dependencies.
- With appropriate settings, Lambda may run the script faster than Glue.
Suitability should always be a key consideration with cloud architectures. Taking time to choose the right service saves a lot of headaches later on.
Step Functions Update
This section integrates the Gold resources into my existing WordPress Data Pipeline Step Function workflow.
The Gold workflow update is similar to the Silver one. Firstly, I need a new Glue: StartJobRun action running the Gold Glue PySpark ETL job:
{
  "JobName": "WordPress_Gold_statisticspagespostsjoin"
}
Also, a new Glue: StartCrawler action running the Gold crawler:
{
  "Name": "wordpress-gold"
}
Here is how my Step Function workflow looks with these changes:
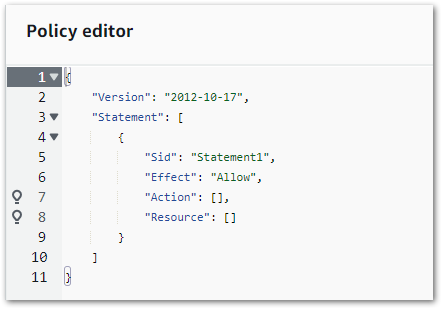
The workflow’s IAM role needs new allow permissions too. Firstly, glue:StartJobRun and glue:GetJobRun on the WordPress_Gold_statisticspagespostsjoin Glue job:
{
	"Version": "2012-10-17",
	"Statement": [
		{
			"Sid": "VisualEditor0",
			"Effect": "Allow",
			"Action": [
				"glue:StartJobRun",
				"glue:GetJobRun"
			],
			"Resource": [
				"arn:aws:glue:eu-west-1: REDACTED:job/WordPress_Gold_statisticspagespostsjoin"
			]
		}
	]
}(glue:GetJobRun lets the workflow check the job’s progress – Ed)
Next, glue:StartCrawler on the wordpress-gold crawler:
{
"Version": "2012-10-17",
"Statement": [
{
"Sid": "VisualEditor0",
"Effect": "Allow",
"Action": [
"glue:StartCrawler"
],
"Resource": [
"arn:aws:glue:eu-west-1:REDACTED:crawler/wordpress-gold"
]
}
]
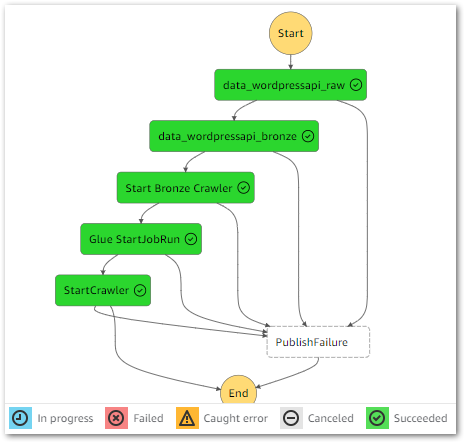
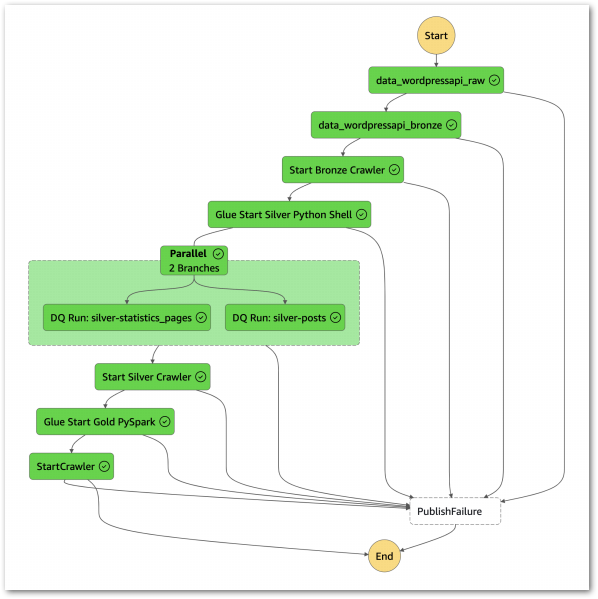
}With these permissions, the workflow executes successfully:
I can get further details from the workflow’s Table view. This includes task durations, resource log links and a visual timeline of each state:
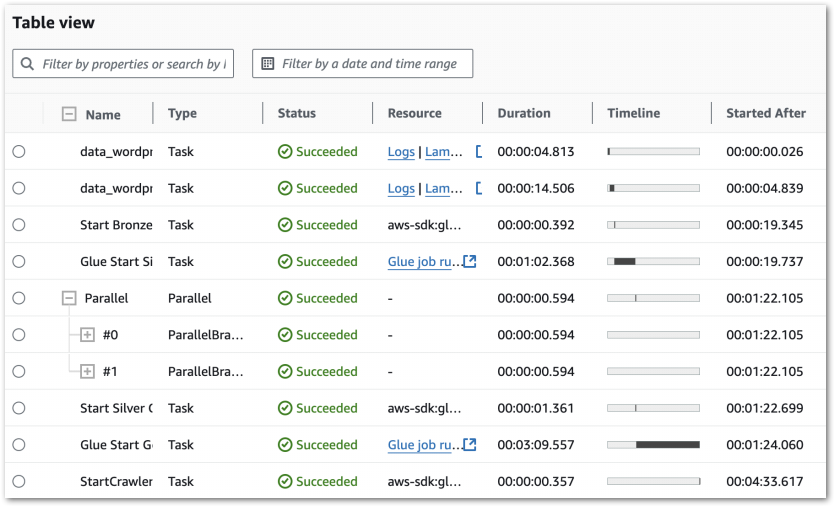
Further Step Functions console details are in this 2022 Ben Smith AWS post.
Cost Analysis
This section examines my costs for the updated Step Function workflow.
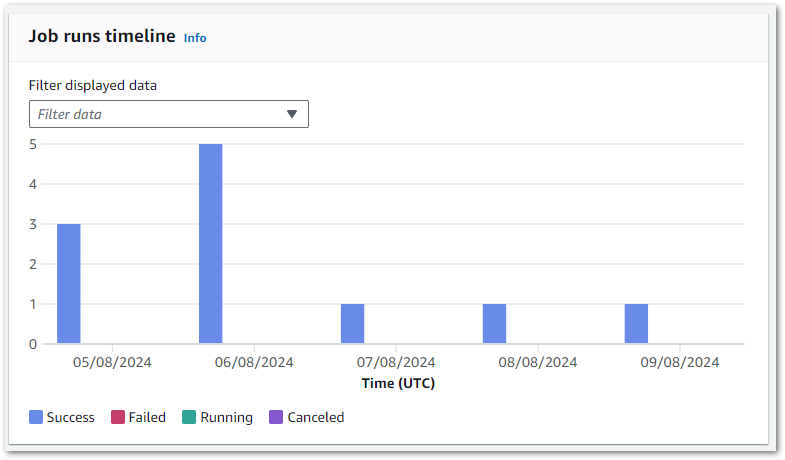
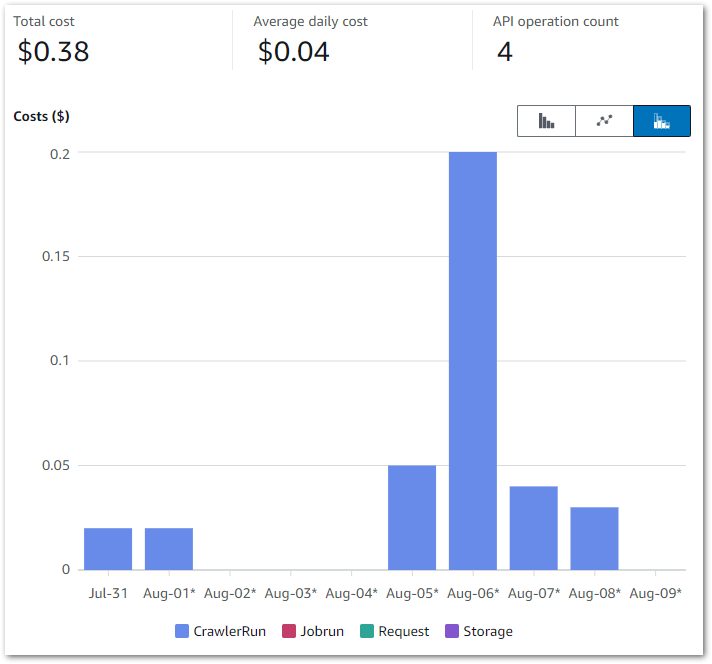
Here, my Cost Explorer chart runs from 04 November to 14 November. It is grouped by API Operation and excludes tax.
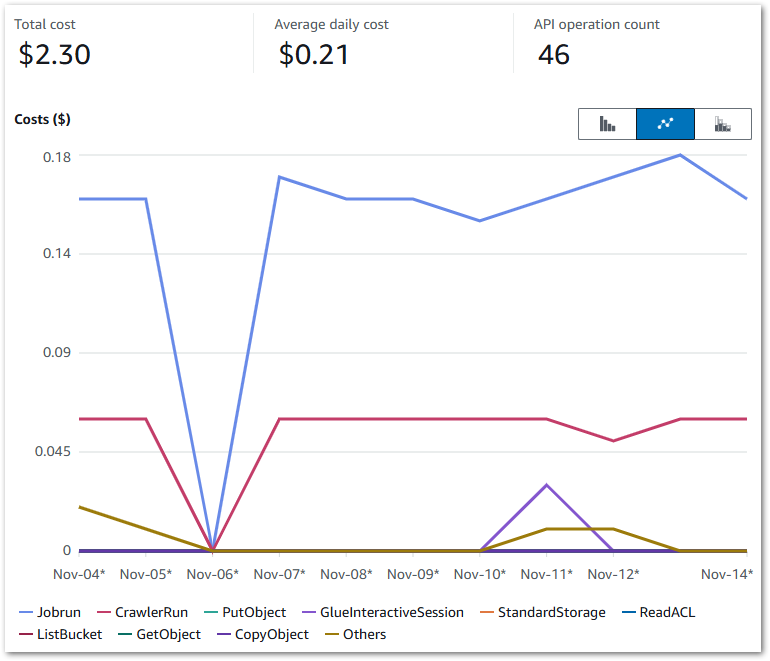
My main costs are from Glue’s Jobrun and CrawlerRun operations. Each ruleset now costs around $0.17 a day to run. This has increased from last time’s $0.09, but that’s to be expected as I’m running two Glue jobs now.
My crawlers now cost $0.06 a day, averaging $0.02 for each of the Bronze, Silver and Gold crawlers. The purple blip is for Glue Interactive Sessions – I have something coming up on those. Beyond that, I’m paying for some S3 PutObject calls and everything else is within the free tier.
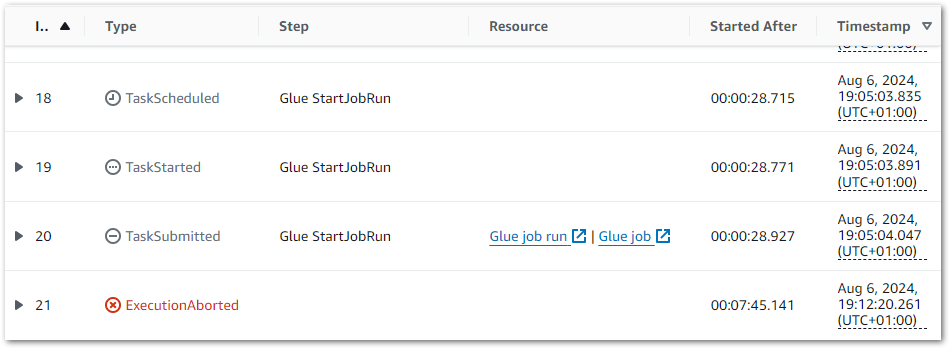
Note that on Nov 06, it….broke. A failed call to the WordPress API brought the whole workflow down:
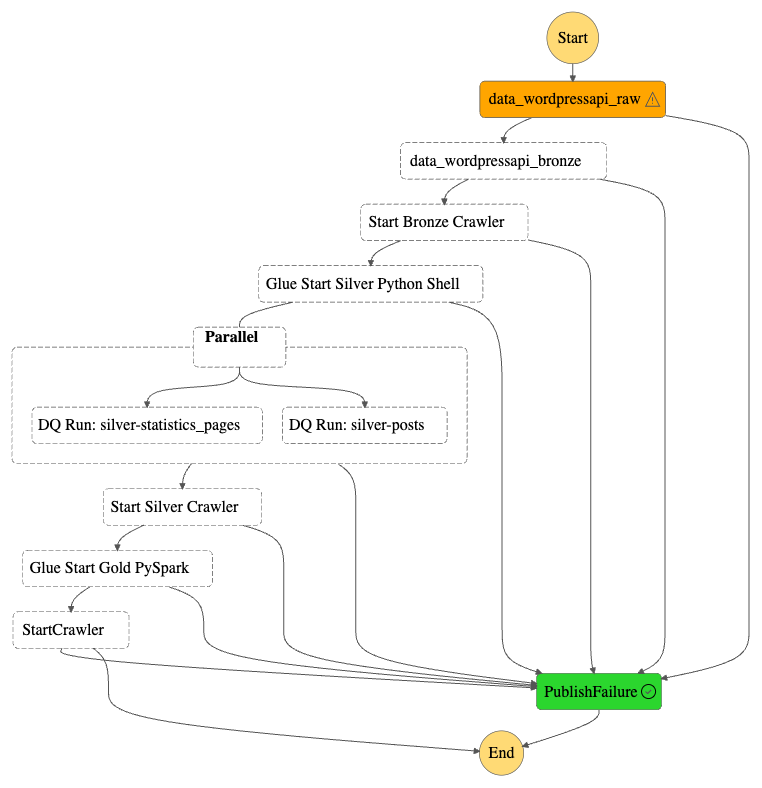
This proves my error handling works though! A forced stop and graceful failure is preferable to having data in an unknown state, especially in a production environment!
Summary
In this post, I created my WordPress data pipeline’s Gold ETL process using PySpark and the AWS Glue Studio visual interface.
I found Glue Studio to be highly user-friendly. It enhances job observability with comprehensive monitoring tools, and makes PySpark script creation significantly easier through its visual editor. Additionally, it integrates smoothly with other Glue features and the broader AWS ecosystem, offering extensive and intuitive customisation options.
This wraps up the WordPress AWS Data Pipeline project. This series aimed to demonstrate how different AWS services can work together to build efficient and cost-effective data pipelines. Through it, I’ve gained new insights and have several fresh ideas to explore!
If this post has been useful then the button below has links for contact, socials, projects and sessions:

Thanks for reading ~~^~~