Categories
Architecture & Resilience

Event-Based Cost Control In AWS Glue: Architecture

In this post, I examine some unexpected AWS Glue costs and design an event-based cost control process architecture.

Table of Contents

Introduction

Last month, I finished a series of data pipeline posts using, among other services, AWS Glue. During this series I made many discoveries – some more desirable than others. One such undesirable was a cost spike in early June! Not enough to trigger a budget alarm, but still higher than expected at that time.

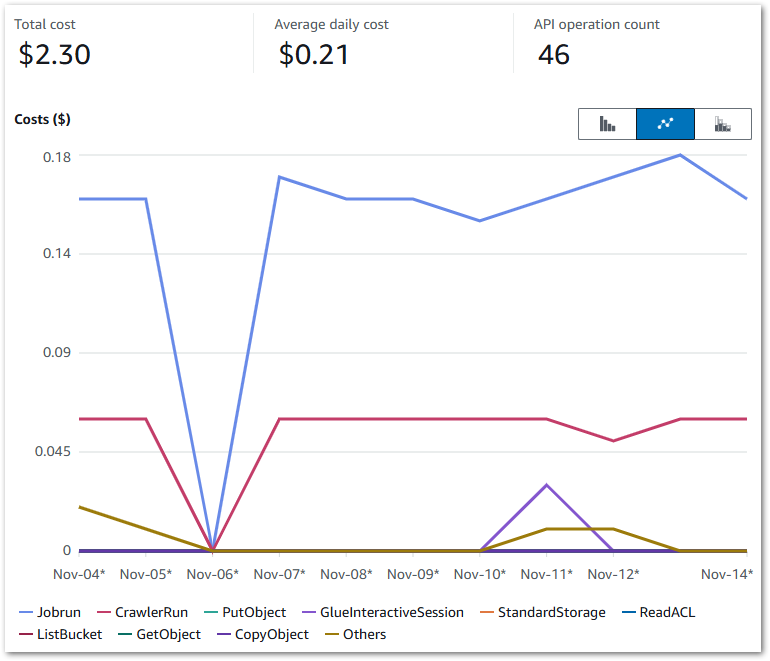
To Cost Explorer! These were the results:

2024 06 24 AWSCostsStartJune

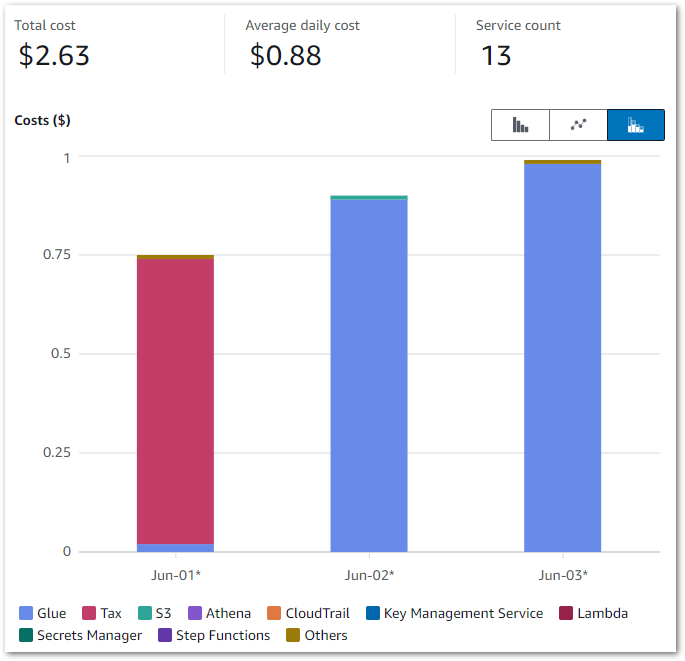
Those Glue costs were…unexpected. While this doesn’t look like much, in contrast my entire May 2024 bill was $1.08. So June saw an almost 150% cost increase over just three days!

This post has two sections. Firstly, the Discovery section examines the costs in closer detail and considers potential solutions. Secondly, the Architecture section examines the decisions made for and the technical implementation of the chosen solution.

Discovery

This section examines the costs in closer detail and considers potential solutions. I’ll structure the cost analysis using three questions:

  • How are the costs made up?
  • What specifically is generating the costs?
  • Why are the costs being generated?

The How

Question 1: How are the costs made up?

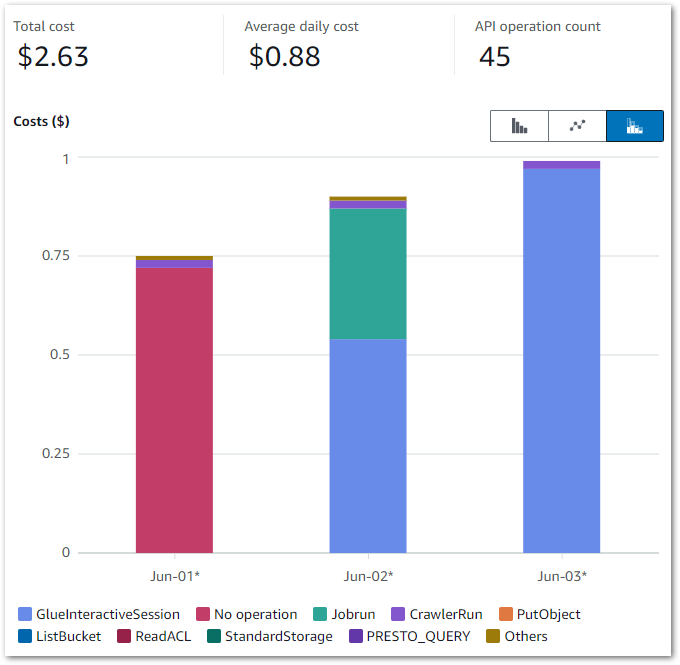
Firstly, let’s break down the costs. The earlier chart shows that Glue is the main cost driver – I now want to drill down into the API-level costs. I can do this by changing the chart’s dimension to API Operation.

This updates it to:

2024 06 24 AWSCostsStartJuneDimAPI

And the raw data to:

2024 06 24 AWSCostsStartJuneTable

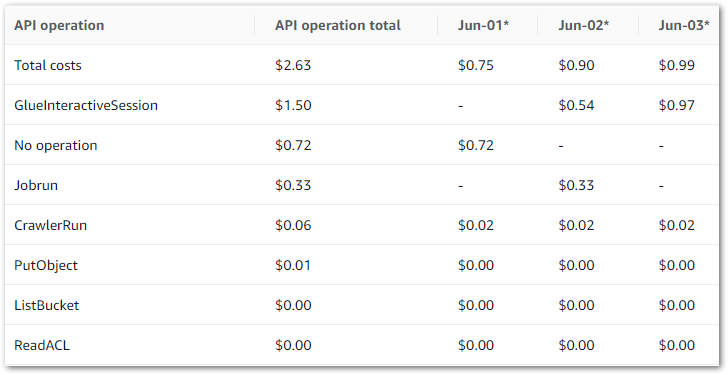
The main costs here are all Glue APIs, with the top two being:

  • GlueInteractiveSession
  • Jobrun

No operation is tax – Ed

Jobrun was easy to account for, as I was testing some Glue ETL jobs at the time. But I was unfamiliar with GlueInteractiveSession, and as it was the biggest cost driver it became the focus of my ongoing investigation.

The What

Question 2: What specifically is generating the costs?

So what is the GlueInteractiveSession API? What does it do? And how does it accrue costs? Let’s begin with the AWS User Guide definition:

The interactive sessions API describes the AWS Glue API related to using AWS Glue interactive sessions to build and test extract, transform, and load (ETL) scripts for data integration.

https://docs.aws.amazon.com/glue/latest/dg/aws-glue-api-interactive-sessions.html

AWS Glue Interactive Sessions offer serverless, on-demand Apache Spark environments that work seamlessly with Glue ETL jobs. These sessions allow for the live development, testing, and enhancement of data processing steps and ETL tasks. They can easily connect to data from various AWS services such as S3, DynamoDB, and Redshift.

Interactive Sessions let users preview data without running full ETL jobs. This offers several benefits during development and testing:

  • Data modifications are only temporary during an Interactive Session, protecting the original data from undesired and unintended changes.
  • Jobs can be evaluated step by step rather than after each complete run, allowing for quicker development and testing compared to always executing the full job. And because of this…
  • When testing ETL steps, interactive sessions usually use fewer resources than a Glue job, thus reducing costs.

Speaking of costs, Glue Interactive Sessions billing is similar to Glue ETL Job billing and is based on the following factors:

  1. Duration: How long the session runs, measured in seconds.
  2. Resource Usage: The resources consumed during the session, such as CPU, memory, and storage.

This all sounds good. So why is my bill so high?

The Why

Question 3: Why are the costs being generated?

So I now know that:

  • The GlueInteractiveSession API is the main cost driver.
  • My Glue Interactive Sessions are linked to my AWS Glue ETL Jobs.

Let’s now examine why the GlueInteractiveSession API is suddenly generating higher costs.

The How chart shows that GlueInteractiveSession costs can happen irrespective of Jobrun costs. Indeed – on June 03 there were no Jobrun costs. So running Glue ETL jobs isn’t causing these charges.

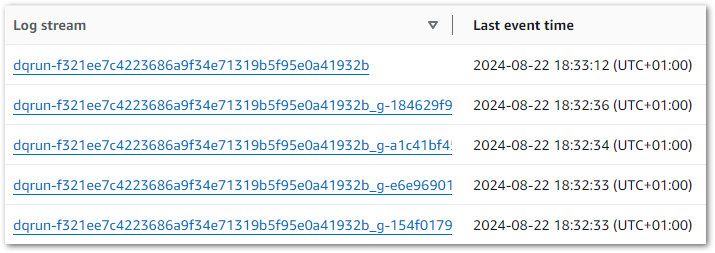
Helpfully, the AWS Glue console has a dedicated Interactive Sessions section that shows session instance histories. Upon inspection, I found lots of this:

2024 12 08 GlueSessionTImeout

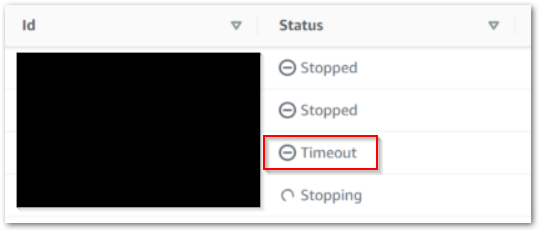
So, timeouts. Timeouts are good. They stop Interactive Sessions from running indefinitely, and sessions started from the Glue console automatically get a 30-minute timeout.

What was more concerning was the number of timeouts I found: three on June 02 and six on June 03. That’s nine sessions, each of which timing out after 30 minutes. That’s four and a half hours of unused compute I’m being billed for! How are these timeouts happening?

…About that. I often open multiple browser tabs to compare screens quickly when I’m trying things out. Here, each new Glue ETL Job browser tab starts a new interactive session based on my commands, and I forget to close these sessions afterwards. Oops!

Solutions

So now I know the cost’s root cause is my own ineptitude, how do I fix this? There are several options:

Permission Blocking: I could deny CreateSession requests using IAM and SCPs. This solution works for non-data-facing AWS accounts but creates unreasonable barriers for Glue-based console workstreams elsewhere.

Parameter Adjustment: The CreateSession API has an IdleTimeout parameter that controls the number of minutes when idle before the session times out. Although this can be easily configured through the CLI or SDK, I haven’t found a way to adjust it in the console yet.

Local Sessions: AWS maintains a Glue Labs Docker image intended for local AWS Glue job script development and testing. This would replace the cloud-based Interactive Sessions entirely and is arguably the best solution for data teams and at scale. The main reason I’m not using it here is that I’m the only user of this particular AWS account.

Event-Based Automation: All Interactive Sessions are stopped using the StopSession API regardless of reason. This includes the timeout process. An automated mechanism that invokes this API after a set period would effectively emulate a timeout. Additionally, since I oversee this process, I’m able to swiftly adjust the duration as needed.

And so I finally have a user story:

As an AWS account owner, I want Glue interactive sessions to stop automatically after a chosen duration so that I don’t accidentally generate unexpected and avoidable costs.

Finally, there is one further topic I want to address…

Event-Based Vs Event-Driven

Let’s examine the difference between event-based and event-driven. Mainly because I thought this was an event-driven process for months until I did some digging.

Now, I’m no expert on this. However, James Eastham is. Go watch this. It’s only six minutes – I’ll wait.

Ok good. For those who are time-strapped or want the highlights:

  • Event-based systems are technical events. Represented in a data context as API calls like ObjectCreated and CrawlerStarted.
  • Event-driven systems are business events. Represented in a data context as processes like Refresh Started and Sales Data Ingested.

My Glue Cost Control system is event-based because it is governed entirely by AWS events and API calls: StartSession will trigger some AWS automation that ultimately invokes StopSession.

So what does that automation look like? Well…

Architecture

This section examines the decision-making and technical implementation of my AWS Glue event-based cost control architecture. In my investigations, I discovered that AWS is way ahead of me!

Existing AWS Solution

The AWS Big Data blog has a 2023 post about enforcing boundaries on AWS Glue interactive sessions using this architecture:

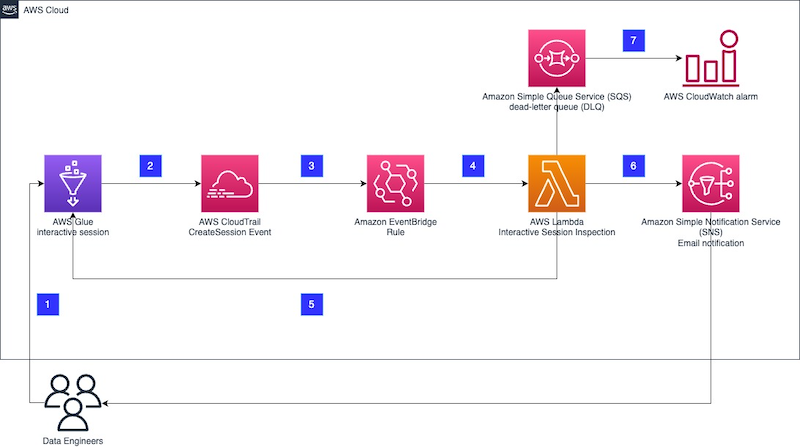
The whole process is listed here, and the post’s code is in a GitHub repo. In summary:

  • The Glue Interactive Session creates a CloudTrail Event Record.
  • An EventBridge Rule captures the event and invokes a Lambda function.
  • The Lambda function inspects the event and acts depending on set boundaries.
  • SNS handles user notifications.
  • SQS and CloudWatch handle errors.

I’m using this architecture as a basis for my event-based Glue cost control process with some changes.

Architectural Decisions

This section outlines my adjustments to the AWS architecture to better align with my event-based Glue cost control process.

Replace Lambda With Step Functions

The AWS solution uses a Lambda function for event inspection and API interaction. This function has lots going on. But my needs are far simpler and fall well within the remit of a Step Functions workflow.

Many AWS heavyweights evangelize Step Functions over Lambda. Most recently, Eric Johnson dedicated a slide of his 2024 re:Invent session to this mantra:

“Step Functions first,
Step Functions always.”

For this use case, I’m inclined to agree. Step Functions offers several advantages over Lambda here:

Service Integration: Lambda’s interactivity with other AWS services requires manual code (e.g. a Python boto3 client). Step Functions offer no-code AWS service integrations that interact directly with AWS APIs. So my Step Function will be faster to develop.

Error Handling: Lambda relies on the function code for error handling and retries. In contrast, Step Functions offer configurable built-in no-code error handling and retry mechanisms, making my Step Function more resilient.

Ongoing Maintenance: While AWS manages the Lambda service, the function code still needs runtime maintenance, security patching and general refactoring as it ages. Conversely, Step Functions use static JSON and YAML-based ASL, so my Step Function will require less ongoing maintenance.

Step Function Model

There are two Step Function models: Standard Workflows and Express Workflows. I’ll be using a Standard workflow here. Two factors drive this decision:

API Behaviour: Changing a Glue Interactive Session is not an idempotent action. Requesting a change to a session in an invalid state produces an IllegalSessionState exception. For example, the below error is thrown when trying to stop a Glue job that hasn’t yet been fully provisioned:

JSON
{
  "cause": "Session is in PROVISIONING status (Service: Glue, Status Code: 400, Request ID: null)",
  "error": "Glue.IllegalSessionStateException",
  "resource": "stopSession",
  "resourceType": "aws-sdk:glue"
}

Express Workflows utilize an at-least-once model, meaning an execution might run multiple times. Sending several requests that are very likely to fail will create confusion and waste resources. In contrast, Standard Workflows adhere to an exactly-once model with optional retries, significantly reducing the likelihood of these problems.

And speaking of resource use…

Cost: Express Workflow executions are charged according to how often they run, the duration of each run and the memory consumed during the process. Standard Workflow executions are billed based on the number of state transitions and feature a generous and indefinite free tier.

Standard Workflows are a better option here because my workflow requires waiting. While Express Workflows may not be too costly, I’d still be paying for the wait. And remember – the whole point is to reduce avoidable costs! Conversely, Standard Workflows would stay entirely within the free tier at the expected volumes.

Remove The SQS Queue

I’ve removed the SQS queue simply because I don’t need it here. It was originally intended to record events that triggered a Lambda function failure. However, the Step Function workflow’s inbuilt auditing will now capture this.

Considering the Frugal Architect Mindset and AWS Well-Architected Framework‘s Cost Optimization Pillar, the SQS queue’s financial and development costs are no longer justified. This cements its removal.

Architecture Diagram

This is my event-based Glue Cost Control process architecture diagram:

In this solution:

  1. User interacts with a Glue ETL Job and creates an Interactive Session.
  2. Glue CreateSession event is created.
  3. Glue CreateSession event creates a CloudTrail event record.
  4. EventBridge matches the event record to an event rule.
  5. Eventbridge extracts the event’s SessionID and passes it to the Step Functions workflow, which waits for the set duration.
  6. Workflow passes SessionID to the Glue StopSession API. This action retries twice if it is unsuccessful.
  7. Finally, Workflow triggers an SNS email confirming the session’s stop.

Additionally, several services send logs to CloudWatch and gain permissions using IAM. If the Step Function fails, a CloudWatch alarm triggers a user email.

Summary

In this post, I examined some unexpected AWS Glue costs and designed an event-based cost control process architecture.

Once I understood the problem clearly, I iterated on an existing AWS architecture to build my bespoke event-based process. My architecture diagram shows how the key components work together and provides a clear implementation roadmap. In the next post I’ll start the build!

If you found this post helpful, the button below will take you to my contact details, socials, projects, and sessions.

SharkLinkButton 1

Thanks for reading ~~^~~

Categories
Data & Analytics

Gold Layer PySpark ETL With AWS Glue Studio

In this post, I create my WordPress data pipeline’s Gold ETL process using PySpark and the AWS Glue Studio visual interface.

Table of Contents

Introduction

Time to finish my WordPress AWS data pipeline! Here it is so far:

AWS Cloud
AWS Cloud
EventBridge
Schedule
EventBridge…
AWS Step Functions workflow
3
3
AWS Lambda Raw Function
AWS Lambda Ra…
AWS SNS Topic
AWS SNS Topic
2
2
State
Machine
State…
AWS Lambda Bronze Function
AWS Lambda Br…
F
F
5
5
AWS Glue
Bronze Crawler
AWS Glue…
4
4
AWS Glue
Silver ETL Job
AWS Glue…
F
F
F
F
1
1
F
F
EventBridge
Scheduler
EventBridge…
AWS SNS Topic
AWS SNS Topic
User
User
CloudWatch Logs
CloudWatch Lo…
F
F
F
F
Text is not SVG – cannot display

In which;

In the Medallion Lakehouse Architecture, this covers both the Bronze and Silver layers that handle raw and processed data respectively. Now I’ll start aggregating my WordPress data for reporting and analytics. For this, I’ll use AWS Glue Studio.

Firstly, I’ll explore Glue Studio and its features. Next, I’ll architect and build an ETL job using Glue Studio’s visual editor while examining some of Glue’s behaviours. Finally, I’ll update my WordPress Data Pipeline Step Functions workflow and examine costs.

Let’s begin with Glue Studio.

AWS Glue Studio

This section introduces Glue Studio and examines Apache Spark.

AWS Glue Studio

AWS Glue Studio is a serverless tool designed for data-centric tasks like automating data preparation, orchestrating data quality checks and creating ETL jobs. It integrates with other AWS services, and also interacts with data from sources like RDS, Redshift and S3. It is ideal for simplifying data transformation and integration processes. The AWS documentation contains full details of Glue Studio’s features.

Under the hood, Glue Studio uses PySpark, the Python API for Apache Spark. Workflows can be created both as code and via Glue Studio’s visual interface. Glue Studio supports Git version control systems for change management, and integrates several observability tools including AWS IAM for security and Amazon CloudWatch for logging. Additionally, Glue also has its own monitoring and orchestration tools.

But wait – Spark? PySpark? What?!

Apache Spark

Apache Spark is an open-source framework designed to process large-scale data quickly. Spark enables distributed computing, allowing tasks to be performed across multiple machines for faster and more efficient data processing. It has existed since 2014.

Known for its speed, Spark processes data in memory, significantly reducing the need for slower disk operations associated with older systems. Spark is commonly used for big data analytics, machine learning and real-time data processing in industries that handle massive datasets.

PySpark

PySpark is a Python interface for Apache Spark. It allows operations to be distributed across clusters of machines while maintaining the accessibility and ease of Python. PySpark’s combination of Python’s simplicity and Spark’s power makes it a practical, accessible solution for handling extensive datasets in a fast and scalable way.

Glue Studio’s visual interface automatically writes PySpark code in real time. For example, this boilerplate Python script is created with each new Glue PySpark job:

Python
import sys
from awsglue.transforms import *
from awsglue.utils import getResolvedOptions
from pyspark.context import SparkContext
from awsglue.context import GlueContext
from awsglue.job import Job

args = getResolvedOptions(sys.argv, ["JOB_NAME"])
sc = SparkContext()
glueContext = GlueContext(sc)
spark = glueContext.spark_session
job = Job(glueContext)
job.init(args["JOB_NAME"], args)

For those curious, this DataEng video provides a technical explanation of each import:

So that’s the basics of AWS Glue Studio. Now let’s see what the solution looks like.

Architecture

This section examines my proposed solution’s architecture. Much of this architecture is similar to both the Bronze and Silver layers. I’ll examine the new Gold Glue PySpark ELT job first, followed by the updated WordPress data pipeline Step Function workflow.

Glue Gold ETL Job

Firstly, this is the Gold Glue PySpark ETL job:

While updating CloudWatch Logs throughout:

  1. Gold Glue ETL job extracts data from wordpress-api Silver S3 objects and then performs PySpark transformations.
  2. Gold Glue PySpark ETL job loads the transformed data into Gold S3 bucket as Parquet objects.

Step Function Workflow

Next, the updated Step Function workflow:

While updating the workflow’s CloudWatch Log Group throughout:

  1. An EventBridge Schedule executes the Step Functions workflow. Lambda Raw function is invoked.
    • Invocation Fails: Publish SNS message. Workflow then ends.
    • Invocation Succeeds: Invoke Lambda Bronze function.
  2. Lambda Bronze function is invoked.
    • Invocation Fails: Publish SNS message. Workflow then ends.
    • Invocation Succeeds: Run Glue Bronze Crawler.
  3. Glue Bronze Crawler runs.
    • Run Fails: Publish SNS message. Workflow then ends.
    • Run Succeeds: Update Glue Data Catalog. Run Glue Silver ETL job.
  4. Glue Silver ETL job runs.
    • Run Fails: Publish SNS message. Workflow then ends.
    • Run Succeeds: Run Glue Silver Data Quality Checks.
  5. Glue Silver Data Quality Checks run.
    • Run Fails: Publish SNS message. Workflow then ends.
    • Run Succeeds: Run Glue Silver Crawler.
  6. Glue Silver Crawler runs.
    • Run Fails: Publish SNS message. Workflow then ends.
    • Run Succeeds: Update Glue Data Catalog. Run Glue Gold ETL job.
  7. Glue Gold PySpark ETL job runs.
    • Run Fails: Publish SNS message. Workflow then ends.
    • Run Succeeds: Run Glue Gold Crawler.
  8. Glue Gold Crawler runs.
    • Run Fails: Publish SNS message. Workflow then ends.
    • Run Succeeds: Update Glue Data Catalog. Workflow then ends.

Additionally, an SNS message is published if the Step Functions workflow fails.

Gold ETL Job

In this section, I create my Gold Glue PySpark ETL job. Firstly, I’ll define the job’s requirements. Next, I’ll build the job in Glue Studio, and finally I’ll examine Glue’s inbuilt monitoring.

Requirements

Let’s begin by understanding the Gold Layer. Databricks defines it as curated, business-level data:

Data in the Gold layer of the lakehouse is typically organised in consumption-ready “project-specific” databases. The Gold layer is for reporting and uses more de-normalised and read-optimised data models with fewer joins. The final layer of data transformations and data quality rules are applied here.

https://www.databricks.com/glossary/medallion-architecture

The concept of a gold layer is nothing new. Other names include aggregated, enriched and consumption layers. The idea is the same in all cases – producing refined and aggregated datasets that are easily consumable by analytics tools, machine learning models and production applications.

This Gold ETL job will produce an aggregation of both the posts and statistics_pages Silver datasets. The Gold dataset will contain view statistics and post creation data, limited to blog posts.

This will involve:

  • Joining the Silver datasets.
  • Removing unneeded columns to reduce the Gold dataset’s size.
  • Renaming columns to improve the Gold dataset’s legibility.
  • Filtering the Gold dataset to remove unneeded data.

So let’s get started!

Job Creation

This section splits the Gold Glue PySpark ETL job creation process into separate steps for each part.

Sources

Firstly, let’s define the data sources. There are two sources, both of which are folders in the data-lakehouse-silver S3 bucket:

  • wordpress_api/posts/
  • wordpress_api/statistics_pages/

Each source needs a separate node specifying the S3 path and data format. This example shows the Silver posts dataset, where the wordpress_api/posts/ S3 path is selected:

2024 10 25 AWSGlueStudioNodeSource

Finally, this is the Source node’s PySpark code for both posts and statistics_pages:

Python
# Script generated for node S3 Silver statistics_pages
S3Silverstatistics_pages_node1724058965930 = glueContext.create_dynamic_frame.from_options(
  format_options={}, 
  connection_type="s3", 
  format="parquet", 
  connection_options={
    "paths": ["s3://data-lakehouse-silver/wordpress_api/statistics_pages/"], 
    "recurse": True
    },
  transformation_ctx="S3Silverstatistics_pages_node1724058965930"
 )

# Script generated for node S3 Silver posts
S3Silverposts_node1724058915313 = glueContext.create_dynamic_frame.from_options(
  format_options={}, 
  connection_type="s3", 
  format="parquet", 
  connection_options={
    "paths": ["s3://data-lakehouse-silver/wordpress_api/posts/"], 
    "recurse": True
    },
  transformation_ctx="S3Silverposts_node1724058915313"
 )

Join Transformation

From AWS:

The Join transform allows you to combine two datasets into one. You specify the key names in the schema of each dataset to compare.

https://docs.aws.amazon.com/glue/latest/dg/transforms-configure-join.html

This node essentially creates a SQL join using columns from the selected sources. Here, I’ve inner joined posts.ID to statistics_pages.ID:

2024 10 25 AWSGlueStudioNodeJoin

Rows from the Silver datasets that match the join condition are merged into a new row in an output DynamicFrame that will ultimately become the Gold dataset. This frame includes all columns from both Silver datasets.

The ETL visual now shows two source nodes linked to the Join node:

2024 10 25 AWSGlueStudioDAGSourceJoin

Finally, this is the Join node’s PySpark code:

Python
# Script generated for node Join
Join_node1724059035756 = Join.apply(
  frame1=S3Silverposts_node1724058915313,
  frame2=S3Silverstatistics_pages_node1724058965930,
  keys1=["ID"],
  keys2=["id"],
  transformation_ctx="Join_node1724059035756"
  )

Change Schema Transformation

Now it’s time to do some cleaning!

From AWS:

Change Schema transform remaps the source data property keys into the desired configured for the target data. In a Change Schema transform node, you can:

  • Change the name of multiple data property keys.
  • Change the data type of the data property keys, if the new data type is supported and there is a transformation path between the two data types.
  • Choose a subset of data property keys by indicating which data property keys you want to drop.
https://docs.aws.amazon.com/glue/latest/dg/transforms-configure-applymapping.html

Firstly, I set the Join node as the Change Schema node’s parent to update the ETL visual:

2024 10 25 AWSGlueStudioDAGJoinSchema

Following the join, the Gold dataset can be simplified and optimised. Here’s an example of what the Change Schema node looks like in action:

2024 10 25 AWSGlueStudioNodeSchema

Here

  • Source Key shows the current column name.
  • Target Key handles column name changes.
  • Data Type sets the data type.
  • Ticking a Drop box removes that column from the output DynamicFrame

I’ve listed my changes below. Bold items appear in the example.

Firstly, these columns are dropped due to duplication or redundancy:

posts:

  • posts.post_modified
  • post_modified_day
  • post_modified_month
  • post_modified_todate
  • post_modified_year

statistics_pages:

  • date_todate
  • id
  • type
  • uri

Additionally, these columns are renamed to add context:

posts:

  • post_date_todate to post_date

statistics_pages:

  • page_id to statistics_id
  • date to statistics_date
  • date_year to statistics_date_year
  • date_month to statistics_date_month
  • date_day to statistics_date_day

Finally, this is the Change Schema node’s PySpark code:

Python
# Script generated for node Change Schema
ChangeSchema_node1724059144495 = ApplyMapping.apply(
  frame=Join_node1724059035756, 
  mappings=[
    ("ID", "bigint", "post_ID", "long"), 
    ("post_title", "string", "post_title", "string"), 
    ("post_status", "string", "post_status", "string"), 
    ("post_parent", "bigint", "post_parent", "long"), 
    ("post_type", "string", "post_type", "string"), 
    ("post_date_todate", "timestamp", "post_date", "timestamp"), 
    ("post_date_year", "bigint", "post_date_year", "long"), 
    ("post_date_month", "bigint", "post_date_month", "long"), 
    ("post_date_day", "bigint", "post_date_day", "long"), 
    ("page_id", "bigint", "statistics_id", "long"), 
    ("date", "timestamp", "statistics_date", "timestamp"), 
    ("count", "bigint", "statistics_count", "long"), 
    ("date_year", "bigint", "statistics_date_year", "long"), 
    ("date_month", "bigint", "statistics_date_month", "long"), 
    ("date_day", "bigint", "statistics_date_day", "long")
    ], 
  transformation_ctx="ChangeSchema_node1724059144495"
  )

Filter Transformation

The joined, cleaned dataset contains data about all amazonwebshark content. I only want the posts data, so next I’ll filter everything else out.

From AWS:

Use the Filter transform to create a new dataset by filtering records from the input dataset based on a regular expression. Rows that don’t satisfy the filter condition are removed from the output.

https://docs.aws.amazon.com/glue/latest/dg/transforms-filter.html

Firstly, I set the Change Schema node as the Filter node’s parent to update the ETL visual:

2024 10 25 AWSGlueStudioDAGSchemaFilter

Next, I set the filter conditions. I only need one condition here – keep all dataset rows where post_type matches post:

2024 10 25 AWSGlueStudioNodeFilter

Finally, this is the Filter node’s PySpark code:

Python
# Script generated for node Filter
Filter_node1724060106174 = Filter.apply(
  frame=ChangeSchema_node1724059144495, 
  f=lambda row: (bool(re.match("post", row["post_type"]))),
 transformation_ctx="Filter_node1724060106174"
 )

Target

Finally, I must choose a target location for my Gold dataset.

Target uses the same interface as the Source node. This time, a Gold S3 bucket folder path wordpress_api/statistics_postname/ is specified. Everything else is the same as Source. The Target node offers significant versatility, detailed in the AWS target node documentation.

In summary, this is the Target node’s PySpark code:

Python
# Script generated for node S3 Gold
S3Gold_node1724060393283 = glueContext.write_dynamic_frame.from_options(
  frame=Filter_node1724060106174, 
  connection_type="s3", 
  format="glueparquet", 
  connection_options={
    "path": "s3://data-lakehouse-gold/wordpress_api/statistics_postname/", 
    "partitionKeys": []
    },
 format_options={"compression": "snappy"}, 
 transformation_ctx="S3Gold_node1724060393283"
 )

And here’s the full ETL visual:

2024 10 25 AWSGlueStudioDAGFinal

The full Glue job PySpark script is available in this post’s GitHub repo.

Job Properties

Next, I’ll examine some of my Glue job’s properties. This section only covers some key properties as there are loads. For a fuller view, please review the AWS Job Property documentation.

Additional properties like bookmarks, quality checks, scheduling and version control are also available. I’ve written about quality checks before, and the other properties could all be posts in themselves. For now, let’s move on to execution.

Job Execution

Each PySpark Glue job has several logging sources that are aggregated into the job’s Run tab. The summary shows properties including job status, durations and DPU capacity:

2024 10 25 AWSGlueStudioRunsLowerDetails

Each job can then be viewed in further detail, with insights including:

These resources are increasingly useful as Glue jobs scale. They show resource utilisation, query plans and node configuration which is essential when optimising and troubleshooting big data processes.

Ok, so my job is configured and running successfully. Now let’s review the outputs.

Glue Outputs & Behaviours

This section examines the outputs of my Gold Glue PySpark ETL job and the behaviours influencing them.

For clarity, this is not a case of finding and fixing errors. Rather, this is an exploration of how a Glue PySpark job’s output can differ from expectations. Coming in, I was more familiar with using pandas for ETL and initially found these behaviours confusing. So I wrote this section with that in mind, as it may help others in similar positions down the road.

Firstly I’ll demonstrate a behaviour. Next, I’ll explain why it happens. Finally, I’ll examine if it can be changed. Although, just because something can be done doesn’t mean that it should be.

Run 1: Multiple Objects

Previously, the Bronze and Silver layers ultimately produced single objects for each dataset. Conversely, my Gold PySpark job creates four objects with the same RunID:

2024 10 29 TestingObjectsFour

Ok – that’s unexpected. What’s more, if I run the job again then I get another four files with a new RunID. So that’s eight in total:

2024 10 29 TestingObjectsEight

There’s two behaviours here that differ from the previous layers:

  • Each run produces multiple objects instead of one.
  • Each run creates new objects instead of replacing existing ones.

Let’s examine the multiple objects first.

What’s Happening?

This occurs due to data partitioning.

As mentioned earlier, AWS Glue uses Apache Spark. Spark enables distributed computing by breaking down data into smaller parts. The presence of multiple objects is a direct outcome of this partitioning approach, offering benefits such as:

  • Parallel Processing: With data spread across multiple files, Spark workers can access different parts of the dataset simultaneously instead of fighting for a single object. This approach balances the workload and accelerates both read and write operations.
  • Fault Tolerance: If a write operation fails, only the impacted object needs reprocessing rather than the entire dataset. This design enhances resilience and reduces the risk of complete data loss.
  • Memory Management: Each Spark worker processes only its assigned data partition rather than the full dataset. This improves data loading efficiency and helps prevent memory exhaustion.

Can I Change It?

I couldn’t find a way to change this behaviour within Glue Studio. Glue is very capable of deriving partitions, so this isn’t surprising.

While it can be done, this involves manually changing the autogenerated PySpark script. Glue allows this at the cost of disabling the job’s visual design features:

Unlocking the job script will convert your job from visual mode to script-only mode. This action cannot be undone. To keep a copy of the visual-mode job, clone the job on the Jobs page of Glue Studio.

The change itself uses the coalesce method of Glue’s DynamicFrame class to control the number of partitions. This involves:

  • An additional import:
Python
from awsglue.dynamicframe import DynamicFrame
  • Converting the dynamic frame to a Spark DataFrame using coalesce(n). Here, coalesce(1) forces the output into a single object:
Python
single_file_df = Filter_node1724060106174.toDF().coalesce(1)
Python
single_file_dyf = DynamicFrame.fromDF(single_file_df, glueContext, "single_file_dyf")

The Glue job now produces a single Parquet object.

This should be used with care. Too many partitions can reduce response times by requiring more reads than necessary. Too few can hinder Spark’s workload distribution abilities. Here, having one object cripples it completely thus removing a key Spark benefit.

Run 2: Objects Not Replaced

Ok, let’s keep coalesce(1) in place because it makes this example easier. Running this job variant creates a single object:

2024 10 29 TestingObjectsOne

Running it again produces a second object with a new RunID:

2024 10 29 TestingObjectsTwo

Why isn’t the first object being replaced?

What’s Happening?

There are good reasons for this. Here’s why a replace function isn’t built in:

  • Spark Architecture: Spark processes data in parallel, with each task running separately. With this setup, replacing a single piece of data in an object is challenging. So instead, Spark jobs either create entirely new objects or replace data partitions.
  • S3 Architecture: S3 stores data as objects rather than files, so it doesn’t have folder-level replacements like a typical file system. When S3 ‘replaces’ an object, it actually creates a new version of the object with the same name and removes the old one.
  • Data Management Features: Writing new objects for each job run enables features like versioning, time travel and incremental processing with formats like Apache Iceberg and Delta Lake. It also avoids issues like access conflicts and deadlocks, since existing data remains unchanged while new data is written.

Can I Change It?

So…yes. Creating a boto3 S3 client and running a conditional delete during the job would achieve the desired effect:

Python
# Define S3 bucket and prefix for output path
output_bucket = "data-lakehouse-gold"
output_prefix = "wordpress_api/statistics_postname/"

# Initialize S3 client and clear existing objects in the output path
s3 = boto3.client('s3')
response = s3.list_objects_v2(Bucket=output_bucket, Prefix=output_prefix)

# Check if there are any files and delete them
if 'Contents' in response:
    for obj in response['Contents']:
        s3.delete_object(Bucket=output_bucket, Key=obj['Key'])

But, at this point, is this really a Spark use case anymore? For an ETL job requiring object replacement, I would initially lean towards using a Glue Python Shell job or the AWS SDK for pandas Lambda layer because:

  • Fewer cloud resources would be used, making the job cheaper than a PySpark job.
  • Fewer Python imports would be needed, reducing the script size and dependencies.
  • With appropriate settings, Lambda may run the script faster than Glue.

Suitability should always be a key consideration with cloud architectures. Taking time to choose the right service saves a lot of headaches later on.

Step Functions Update

This section integrates the Gold resources into my existing WordPress Data Pipeline Step Function workflow.

The Gold workflow update is similar to the Silver one. Firstly, I need a new Glue: StartJobRun action running the Gold Glue PySpark ETL job:

JSON
{
  "JobName": "WordPress_Gold_statisticspagespostsjoin"
}

Also, a new Glue: StartCrawler action running the Gold crawler:

JSON
{
  "Name": "wordpress-gold"
}

Here is how my Step Function workflow looks with these changes:

stepfunctions graph

The workflow’s IAM role needs new allow permissions too. Firstly, glue:StartJobRun and glue:GetJobRun on the WordPress_Gold_statisticspagespostsjoin Glue job:

JSON
{
	"Version": "2012-10-17",
	"Statement": [
		{
			"Sid": "VisualEditor0",
			"Effect": "Allow",
			"Action": [
				"glue:StartJobRun",
				"glue:GetJobRun"
			],
			"Resource": [
				"arn:aws:glue:eu-west-1: REDACTED:job/WordPress_Gold_statisticspagespostsjoin"
			]
		}
	]
}

(glue:GetJobRun lets the workflow check the job’s progress – Ed)

Next, glue:StartCrawler on the wordpress-gold crawler:

JSON
{
	"Version": "2012-10-17",
	"Statement": [
		{
			"Sid": "VisualEditor0",
			"Effect": "Allow",
			"Action": [
				"glue:StartCrawler"
			],
			"Resource": [
				"arn:aws:glue:eu-west-1:REDACTED:crawler/wordpress-gold"
			]
		}
	]
}

With these permissions, the workflow executes successfully:

2024 10 29 StepFunctionResultsGraph

I can get further details from the workflow’s Table view. This includes task durations, resource log links and a visual timeline of each state:

2024 10 29 StepFunctionResultsTable

Further Step Functions console details are in this 2022 Ben Smith AWS post.

Cost Analysis

This section examines my costs for the updated Step Function workflow.

Here, my Cost Explorer chart runs from 04 November to 14 November. It is grouped by API Operation and excludes tax.

2024 11 15 CostsGold

My main costs are from Glue’s Jobrun and CrawlerRun operations. Each ruleset now costs around $0.17 a day to run. This has increased from last time’s $0.09, but that’s to be expected as I’m running two Glue jobs now.

My crawlers now cost $0.06 a day, averaging $0.02 for each of the Bronze, Silver and Gold crawlers. The purple blip is for Glue Interactive Sessions – I have something coming up on those. Beyond that, I’m paying for some S3 PutObject calls and everything else is within the free tier.

Note that on Nov 06, it….broke. A failed call to the WordPress API brought the whole workflow down:

stepfunctions graph error

This proves my error handling works though! A forced stop and graceful failure is preferable to having data in an unknown state, especially in a production environment!

Summary

In this post, I created my WordPress data pipeline’s Gold ETL process using PySpark and the AWS Glue Studio visual interface.

I found Glue Studio to be highly user-friendly. It enhances job observability with comprehensive monitoring tools, and makes PySpark script creation significantly easier through its visual editor. Additionally, it integrates smoothly with other Glue features and the broader AWS ecosystem, offering extensive and intuitive customisation options.

This wraps up the WordPress AWS Data Pipeline project. This series aimed to demonstrate how different AWS services can work together to build efficient and cost-effective data pipelines. Through it, I’ve gained new insights and have several fresh ideas to explore!

If this post has been useful then the button below has links for contact, socials, projects and sessions:

SharkLinkButton 1

Thanks for reading ~~^~~

Categories
Data & Analytics

Bespoke Veracity Checks With AWS Glue Data Quality

In this post, I use AWS Glue Data Quality checks and rulesets to apply bespoke veracity checks to my WordPress datasets.

Table of Contents

Introduction

In my last post, I used the AWS Glue ETL Job Script Editor to write a Silver ETL Python script. Within that script and the ones prior, there are checks like:

If these checks all pass then datasets are created in various S3 buckets. But before I use these datasets for reporting and analytics, I should check their quality first.

In my Building And Automating Serverless Auto-Scaling Data Pipelines In AWS session, I talk about the Four V’s of Big Data. One of these Vs is Veracity – the measure of data’s truthfulness, accuracy and quality. AWS Glue offers veracity checks with AWS Glue Data Quality.

Launched in 2023, AWS Glue Data Quality measures and monitors data quality and veracity. It is built on top of an open-source framework, and provides a managed, serverless experience with machine learning augmentation.

Firstly, I’ll examine AWS Glue Data Quality and some of its features. Then I’ll use it to recommend rules for some of my Silver layer data objects, and then customise those recommendations as needed. Next, I’ll create and test a Glue Data Quality job using those rules. Finally, I’ll examine my Glue Data Quality costs.

AWS Glue Data Quality

This section introduces AWS Glue Data Quality and examines some of its features.

What Is Glue Data Quality?

From AWS:

AWS Glue Data Quality evaluates and monitors the quality of your data based on rules that you define. This makes it easy to identify the data that needs action. You can then monitor and evaluate changes to your datasets as they evolve over time.

https://docs.aws.amazon.com/glue/latest/dg/data-quality-gs-studio.html

AWS Glue Data Quality features include:

  • Creating & recommending sets of data quality rules.
  • Running the data quality rules as on-demand and scheduled jobs.
  • Monitoring and reporting against the data quality results.

So how do data quality rules work?

Glue Data Quality Rules

From AWS:

AWS Glue Data Quality currently supports 18 built-in rule types under four categories:

  1. Consistency rules check if data across different columns agrees by looking at column correlations.
  2. Accuracy rules check if record counts meet a set threshold and if columns are not empty, match certain patterns, have valid data types, and have valid values.
  3. Integrity rules check if duplicates exist in a dataset.
  4. Completeness rules check if data in your datasets do not have missing values.
https://aws.amazon.com/glue/faqs/

AWS Glue Data Quality rules are defined using Data Quality Definition Language (DQDL). DQDL uses a Rules list containing comma-separated rules in square brackets.

For example, this DQLD rule checks for missing values in customer-id and unique values in order-id:

Plaintext
Rules = [
   IsComplete "customer-id",
   IsUnique "order-id"
]

AWS maintains a DQDL reference that advises about syntax, structure, expressions, and rule types. Now all of this can be a lot to take in, so a good way of getting started is to get AWS to do some of the heavy lifting…

Glue Data Quality Rule Recommendations

Getting to grips with new features can be daunting. To help out, AWS Glue Data Quality can analyse data in the Glue Data Catalog. This process uses machine learning to identify and recommend rules for the analysed data. These rules can then be used and changed as needed.

Glue Data Quality recommendations are generated using Amazon’s Deequ open-source framework, which is tested on Amazon’s own petabyte-scale datasets. AWS has documented the recommendation generation process, and has released supporting videos like:

So that’s enough theory – let’s build something!

Ruleset Creation

In this section, I create a Glue Data Quality veracity ruleset for my silver-statistcs_pages dataset by generating and customising Glue’s recommendations.

Generating Recommendations

Firstly, I told Glue Data Quality to scan the dataset and recommend some rules. Two minutes later, Glue returned these:

Plaintext
Rules = [
    RowCount between 4452 and 17810,
    IsComplete "page_id",
    StandardDeviation "page_id" between 2444.94 and 2702.3,
    Uniqueness "page_id" > 0.95,
    ColumnValues "page_id" <= 8925,
    IsComplete "uri",
    ColumnLength "uri" <= 190,
    IsComplete "type",
    ColumnValues "type" in ["post","home","page","category","post_tag","archive","author","search"],
    ColumnValues "type" in ["post","home"] with threshold >= 0.94,
    ColumnLength "type" between 3 and 9,
    IsComplete "date",
    IsComplete "count",
    ColumnValues "count" in ["1","2","3","4","5","6"] with threshold >= 0.9,
    StandardDeviation "count" between 3.89 and 4.3,
    ColumnValues "count" <= 93,
    IsComplete "id",
    ColumnValues "id" in ["92","11","281","7","1143","1902","770","1217","721","1660","2169","589","371","67","484","4","898","0","691","2029","1606","2686","1020","2643","2993","1400","30","167","2394"] with threshold >= 0.89,
    StandardDeviation "id" between 820.3 and 906.65,
    ColumnValues "id" <= 3532,
    IsComplete "date_todate",
    IsComplete "date_year",
    ColumnValues "date_year" in ["2023","2024","2022"],
    ColumnValues "date_year" between 2021 and 2025,
    IsComplete "date_month",
    ColumnValues "date_month" in ["6","7","5","4","3","8","2","1","11","12","10","9"],
    ColumnValues "date_month" in ["6","7","5","4","3","8","2","1","11","12","10"] with threshold >= 0.94,
    StandardDeviation "date_month" between 3.09 and 3.41,
    ColumnValues "date_month" <= 12,
    IsComplete "date_day",
    ColumnValues "date_day" in ["13","7","12","8","6","3","19","20","17","4","9","14","1","16","2","11","5","15","10","26","21","25","24","18","27","22","28","30","23","29","31"],
    ColumnValues "date_day" in ["13","7","12","8","6","3","19","20","17","4","9","14","1","16","2","11","5","15","10","26","21","25","24","18","27","22","28","30"] with threshold >= 0.91,
    StandardDeviation "date_day" between 8.3 and 9.18,
    ColumnValues "date_day" <= 31
]

A lot is going on here, so let’s deep a little deeper.

Recommendations Analysis

As with many machine learning processes, some human validation of the results is wise before moving forward.

While Glue Data Quality can predict rules based on its ML model and the data supplied, I have years of familiarity with the data and can intuit likely future trends and patterns. As Glue currently lacks this intuition, some recommendations are more useful than others. Let’s examine some of them and I’ll elaborate.

Firstly, these recommendations are totally fine:

Plaintext
IsComplete "page_id",
IsComplete "uri",
IsComplete "date",
IsComplete "count",

IsComplete checks whether all of the values in a column are complete with no NULL values present. This is completely reasonable and should apply to all columns in the silver-statistics_pages data. An easy win.

However, some recommendations need work:

Plaintext
ColumnValues "date_year" in ["2023","2024","2022"],
ColumnValues "date_year" between 2021 and 2025,

ColumnValues runs an expression against the values in a column. These rules (which are both checking the same thing as DQDL’s BETWEEN is exclusive) state that:

date_year must be 2022, 2023 or 2024

This is fine for now, as 2024 is the current year and the first statistics are from 2022. But a post published next year will cause this rule to fail. And not because of incorrect data – because of incorrect rule configuration. Hello false positives!

Finally, some suggestions are outright wrong. For example:

Plaintext
ColumnValues "page_id" <= 8925,

This rule checks that the page_id column doesn’t exceed 8925. But page_id is a primary key! It auto-increments with every new row! So this rule will fail almost immediately, and so is completely unsuitable.

Ok so let’s fix them!

Recommendations Modifications

Firstly, let’s fix the date_year rule by replacing the range with a minimum value:

Plaintext
ColumnValues "date_year" >= 2021,

Now let’s fix the page_id rule. This column is a primary key in the WordPress MySQL database, so every value should be unique. Therefore the ruleset should check page_id for uniqueness.

As it turns out I’m spoilt for choice here! There are (at least) three relevant rules I can use:

Plaintext
IsUnique "page_id",
IsPrimaryKey "page_id",
Uniqueness "page_id" = 1.0,

Let’s examine them:

  • IsUnique checks whether all of the values in a column are unique. Exactly what I’m after.
  • IsPrimaryKey goes a step further, verifying that a column contains a primary key by checking if all of the values in the column are unique and complete (non-null).
  • Finally, Uniqueness checks the percentage of unique values in a column against a given expression. In my example, "page_id" = 1.0 states that each page_id column value must be 100% unique.

So why not use them all? Well, besides that being overkill there is a cost implication. Like many Glue services, AWS Glue Data Quality is billed by job duration (per DPU hour). If I keep all three rules then I’m doing the same check three times. This is wasteful and creates unnecessary costs.

Here, the IsPrimaryKey check most closely matches the source column (itself a primary key) so I’ll use that.

Elsewhere, I’m simplifying date_month and date_day. While these are correct:

Plaintext
ColumnValues "date_month" in ["6","7","5","4","3","8","2","1","11","12","10","9"],
ColumnValues "date_day" in ["13","7","12","8","6","3","19","20","17","4","9","14","1","16","2","11","5","15","10","26","21","25","24","18","27","22","28","30","23","29","31"],

It’s far simpler to read as:

Plaintext
ColumnValues "date_month" between 0 and 13,
ColumnValues "date_day" between 0 and 32,

Finally, I did some housekeeping to reduce the ruleset’s duration:

  • Removed all the duplicate checks. IsComplete was fine for most.
  • ColumnLength checks are gone as the WordPress database already enforces character limits.
  • StandardDeviation checks are also gone as they don’t add any value here.

Now let’s use these suggestions as a starting point for my own ruleset.

Customising A Ruleset

In addition to the above rules and changes, the following rules have been added to the silver-statistics_pages ruleset:

ColumnCount checks the dataset’s column count against a given expression. This checks there are ten columns in silver-statistics_pages:

Plaintext
ColumnCount = 10

RowCount checks a dataset’s row count against a given expression. This checks there are more than zero rows in silver-statistics_pages:

Plaintext
RowCount > 0

RowCountMatch checks the ratio of the primary dataset’s row count and a reference dataset’s row count against the given expression. This checks that the row count of silver-statistics_pages and bronze-statistics_pages are the same (100%):

Plaintext
RowCountMatch "wordpress_api.bronze-statistics_pages" = 1.0

ReferentialIntegrity checks to what extent the values of a set of columns in the primary dataset are a subset of the values of a set of columns in a reference dataset. This checks that each silver-statistics_pages ID value is present in silver-posts:

Plaintext
ReferentialIntegrity "id" "wordpress_api.silver-posts.id" = 1.0

Finally, here is my finished silver-statistics_pages ruleset:

Plaintext
# silver-statistics_pages data quality rules

Rules = [
    # all data
    ColumnCount = 10,
    RowCount > 0,
    RowCountMatch "wordpress_api.bronze-statistics_pages" = 1.0,
    
    # page_id
    IsPrimaryKey "page_id",
    
    # uri
    IsComplete "uri",
    
    # type
    IsComplete "type",
    
    # date
    IsComplete "date",
    ColumnValues "date_todate" <= now(),
    
    # count
    IsComplete "count",
    ColumnValues "count" between 0 and 1000,
    
    # id
    IsComplete "id",
    ReferentialIntegrity "id" "wordpress_api.silver-posts.id" = 1.0,
    
    # date_todate
    IsComplete "date_todate",
    ColumnValues "date_todate" <= now(),
    
    # date_year
    IsComplete "date_year",
    ColumnValues "date_year" >= 2021,
    
    # date_month
    IsComplete "date_month",
    ColumnValues "date_month" between 0 and 13,
    
    # date_day
    IsComplete "date_day",
    ColumnValues "date_day" between 0 and 32

]

Once a ruleset is created, it can be edited, cloned and run. So let’s test it out!

Ruleset Testing

In this section, I test my Glue Data Quality veracity ruleset and act on its findings. But first I need to get it running…

Job Test: Data Fetch Fail

Running my ruleset for the first time, it didn’t take long for a problem to appear:

Plaintext
Exception in User Class: java.lang.RuntimeException : 
Failed to fetch data. 
Please check the logs in CloudWatch to get more details.

Uh oh. Guess it’s time to check CloudWatch. This wasn’t an easy task the first time round!

Glue Data Quality generates two new log groups:

  • aws-glue/data-quality/error
  • aws-glue/data-quality/output

And each Data Quality job run creates five log streams:

2024 08 23 LogStream

But there’s no clear hint of where to start! So I dived in and started reading the error logs. After some time, it turned out I actually needed the output logs. Oh well.

And in an output log stream’s massive stack trace:

2024 08 23 Stacktrace
This isn’t even half of it – Ed

Was my problem:

Plaintext
Caused by:
java.io.FileNotFoundException:
No such file or directory
's3://data-lakehouse-bronze/wordpress_api/statistics_pages/statistics_pages.parquet'

No such directory? Well, there definitely is! Sounds like a permissions issue. What gives?

So, remember my RowCountMatch check? It’s trying to compare the silver-statistics_pages row count to the bronze-statistics_pages row count. Like most AWS services, AWS Glue uses an IAM role to interact with AWS resources – in this case the Bronze and Silver Lakehouse S3 buckets.

So let’s check:

  • Can the Glue Data Quality check’s IAM role read from the Silver Lakehouse S3 bucket? Yup!
  • Can it read from the Bronze one? Ah…

Adding s3:GetObject for the bronze S3 path to the Glue Data Quality check’s IAM role fixed this error. Now the job runs and returns results!

Job Test: Constraint Not Met

Next up, I got an interesting message from my ColumnValues "count" rule:

Plaintext
ColumnValues "count" between 0 and 1000

Value: 93.0 does not meet the constraint requirement!

That’s…a lot! Then I realised I’d set the rule conditions to between 0 and 1 instead of between 0 and 1000. Oops…

Then I got a confusing result from my ReferentialIntegrity "id" "wordpress_api.silver-posts.id" = 1.0 rule:

Plaintext
ReferentialIntegrity "id" "wordpress_api.silver-posts.id" = 1.0 

Value: 0.9763982102908277 does not meet the constraint requirement.

As a reminder, ReferentialIntegrity checks to what extent the values of a set of columns in the primary dataset are a subset of the values of a set of columns in a reference dataset. And because "wordpress_api.silver-statistics_pages.id" values are based entirely on "wordpress_api.silver-posts.id" values, they should be a perfect match!

Time to investigate. I launched Athena and put this query together:

SQL
SELECT 
sp.id AS stats_id
,p.id AS post_id
FROM "wordpress_api"."silver-statistics_pages" AS sp
LEFT JOIN "wordpress_api"."silver-posts" AS p 
ON sp.id = p.id

And the results quickly highlighted a problem:

2024 08 23 AthenaResults

Here, the LEFT JOIN retrieves all silver-statistics_pages IDs and each row’s matching ID from silver-posts. The empty spaces represent NULLs, where no matching silver-posts ID was found. So what’s going on? What is stats_id zero in silver-statistics_pages?

Reviewing the silver-statistics_pages uri column shows that ID zero is amazonwebshark’s home page. As the WordPress posts table doesn’t record anything about the home page, the statistics_pages table can’t link to anything in posts. So ID zero is used to prevent missing data.

Knowing this, how can I update the rule? In June 2024 AWS added DQDL WHERE clause support, so I tried to add a “where statistics_pages ID isn’t zero” condition. But in testing the editor either didn’t run the check properly or rejected my syntax entirely. So eventually I settled for changing the check’s threshold from = 1.0 to >= 0.9. Maybe something to revisit in a few months.

Run History & Reporting

So now all my rules are working, what benefits do I get? Firstly, AWS Glue shows the job’s run history including status, result and start/stop times:

2024 08 23 DQHistory

Each run is expandable, showing details like duration, overall score and each check’s output. Results are also downloadable – in testing this gave me an unreadable file but adding a JSON suffix let me view the contents:

JSON
{
	"ResultId": "dqresult-e76896fe1ab1dd3436cf12b719da726416d4e64e",
	"Score": 0.95,
	"DataSource": {
		"GlueTable": {
			"DatabaseName": "wordpress_api",
			"TableName": "silver-statistics_pages",
			"CatalogId": "973122011240"
		}
	},
	"RulesetName": "silver-statistics_pages",
	"StartedOn": "2024-08-22T17:23:20.468Z",
	"CompletedOn": "2024-08-22T17:23:45.680Z",
	"RulesetEvaluationRunId": "dqrun-a94651ef8547f426cb977c9451c39061c68aefbd",
	"RuleResults": [
		{
			"Name": "Rule_1",
			"Description": "ColumnCount = 10",
			"Result": "PASS",
			"EvaluatedMetrics": {
				"Dataset.*.ColumnCount": 10
			}
		},
		{
			"Name": "Rule_2",
			"Description": "RowCount > 0",
			"Result": "PASS",
			"EvaluatedMetrics": {
				"Dataset.*.RowCount": 8940
			}
		},
		{
			"Name": "Rule_3",
			"Description": "RowCountMatch \"wordpress_api.bronze-statistics_pages\" = 1.0",
			"Result": "PASS",
			"EvaluatedMetrics": {
				"Dataset.wordpress_api.bronze-statistics_pages.RowCountMatch": 1
			}
		},
		{
			"Name": "Rule_4",
			"Description": "IsPrimaryKey \"page_id\"",
			"Result": "PASS",
			"EvaluatedMetrics": {
				"Column.page_id.Completeness": 1,
				"Column.page_id.Uniqueness": 1
			}
		},

[REDACTED Rules 5 to 19 for space - Ed]

		{
			"Name": "Rule_20",
			"Description": "ColumnValues \"date_day\" between 0 and 32",
			"Result": "PASS",
			"EvaluatedMetrics": {
				"Column.date_day.Maximum": 31,
				"Column.date_day.Minimum": 1
			}
		}
	]
}

Finally, there’s a snapshot chart showing the results trend of the last ten runs:

2024 08 23 DQSnapshot

Although not downloadable, this can still be screen-grabbed and used to certify the data’s quality to stakeholders. Additionally, AWS has documented a visualisation solution using Lambda, S3 and Athena.

Additional Data Quality Ruleset

With the silver-statistics_pages ruleset testing complete, I added a second dataset check before I moved on. This ruleset is applied to silver-posts.

The checks are very similar to silver-statistics_pages in terms of rules and criteria. So in the interests of space I’ve committed it to my GitHub repo.

Now, let’s add my Glue Data Quality checks into my WordPress pipeline.

Ruleset Orchestration

In this section, I integrate my Glue Data Quality veracity checks into my existing WordPress Data Pipeline Step Function workflow.

Step Function Integration

As a quick reminder, here’s how the Step Function workflow currently looks:

2024 08 09 stepfunctions graph

This workflow controls the ingestion, validation, crawling and ETL processes associated with my WordPress API data. I’ll insert the quality checks between the Silver ETL job and the Silver crawler.

AWS Step Functions runs Glue Data Quality checks using the StartDataQualityRulesetEvaluationRun task. This task uses an AWS SDK integration, calling the StartDataQualityRulesetEvaluationRun API with the following parameters:

  • Data source (AWS Glue table) associated with the run.
  • IAM role to run the checks with.
  • Ruleset(s) to run.

Optional parameters are also available. In the case of my silver-statistics_pages ruleset, the API parameters are as follows:

JSON
{
  "DataSource": {
    "GlueTable": {
      "DatabaseName": "wordpress_api",
      "TableName": "silver-statistics_pages"
    }
  },
  "Role": "Glue-S3ReadOnly",
  "RulesetNames": [
    "silver-statistics_pages"
  ]
}

Because the TableName parameter is different for the silver-posts checks, each check needs a separate action. However, I can use a Parallel state because both actions can run simultaneously. This will take full advantage of AWS’s systems, yielding faster execution times for my workflow.

Here is how my Step Function workflow looks with these changes:

stepfunctions graph

This workflow is executed by an EventBridge Schedule running daily at 07:00.

Step Function Testing

Testing time! My workflow needs new IAM permissions to perform its new tasks. These are:

  • glue:StartDataQualityRulesetEvaluationRun

This lets the workflow start the silver-statistics_pages and silver-posts Data Quality jobs.

  • iam:PassRole

A Glue Data Quality job must assume an IAM role to access AWS resources successfully. Without iam:PassRole the workflow can’t do this and the check fails.

  • glue:GetTable

The workflow must access the Glue Data Catalog while running, requiring glue:GetTable on the desired region’s Data Catalog ARN to get the required metadata.

With these updates, the workflow executes successfully:

2024 08 28 SFExec

During the parallel state, both Data Quality jobs successfully start and finish within milliseconds of each other instead of running sequentially:

2024 08 28 SFResults

Cost Analysis

In this section, I examine my costs for the updated Step Function workflow.

This Cost Explorer chart runs from 16 August to the end of August. It is grouped by API Operation and excludes some APIs that aren’t part of this workload.

2024 09 01 Costs

Some notes:

  • I was experimenting with Glue Data Quality from 19 August to 22 August. This period generates the highest Glue Jobrun costs – $0.23 on the 20th and $0.27 on the 22nd.
  • The silver-statistics_pages ruleset was added to the Step Function workflow on the 26th. The silver-posts ruleset was then added on the 27th.
  • The CrawlerRun daily costs are usually $0.04, with some experiments generating higher costs.

My main costs are from Glue’s Jobrun and CrawlerRun operations, which was expected. Each ruleset costs around $0.09 a day to run, while each crawler continues to cost $0.02 a day. Beyond that I’m paying for some S3 PutObject calls, and everything else is within the free tier.

Separately, AWS has tested Data Quality rulesets of varying complexity. Their accrued costs ranged from $0.18 for the least complex to $0.54 for the most complex. So on par with mine!

Summary

In this post, I used AWS Glue Data Quality checks and rulesets to apply bespoke veracity checks to my WordPress datasets.

I think AWS Glue Data Quality is a very effective veracity tool. The simple syntax, quick execution and deep AWS integration offer a good solution to a core Data Engineering issue. It’s great that datasets can be compared with other datasets in the Glue Data Catalog, and the baked-in reporting and visuals make Glue’s findings immediately accessible to both technical engineers and non-technical stakeholders. I look forward to seeing what future Glue Data Quality releases will offer!

If this post has been useful then the button below has links for contact, socials, projects and sessions:

SharkLinkButton 1

Thanks for reading ~~^~~